. We will change the hall sensor together with you. Often the electronic ignition lights up and the hall sensor is on, such a thing.
Replacing the Hall sensor VAZ classic, NIVA
Ditonton 61 rb 5 tahun yang lalu
If you want more detailed videos, as well as videos of other car repair work, ask and send.
VAZ 2107 CARBURETOR. REPLACING THE HALL SENSOR
Ditonton 40 rb 3 tahun yang lalu
I RECOMMEND TO CARRY WITH YOU AN EMERGENCY IGNITION AZ-1 AND A SPARE SWITCH.
Replacing the Hall sensor VAZ 2109
Ditonton 115 rb 5 tahun yang lalu
Replacing the Hall sensor of a VAZ 2109 This video shows how to replace the Hall sensor with your own hands. First we shoot.
How to check the Hall sensor in road conditions
Ditonton 322 rb Tahun Yang lalu
No spark, engine won't start. Checking the Hall sensor on a VAZ and other cars with an electronic ignition system.
How to check the Hall sensor
Ditonton 27 rb 10 bulan yang lalu
Hall sensor replacement
Ditonton 38 Bulan Yang lalu
Guys, hello everyone, review of the machine, so I grabbed the check, I’m now going to make a hall sensor, so I set it up as an example.
the engine suddenly stalls or jerks (part 1)
Ditonton 286 rb 4 tahun yang lalu
We will talk about carburetor cars. Malfunctions of the distributor and its inhabitants - cover, slider, Hall sensor, .
Determining the operation of the Hall sensor in road conditions. The easiest way
Ditonton 1.2 rb 11 bulan yang lalu
As friends, I have long wanted to make a video on how to check the operation of the hall sensor in road conditions, that is, whether it is broken or not.
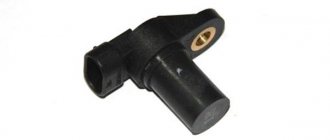
The Hall sensor is one of the most important elements of the contactless ignition system for gasoline engines. The slightest malfunction of this part leads to serious problems in the operation of the motor. Therefore, in order to avoid diagnostic errors, it is important to know how to check the Hall sensor and, if necessary, to be able to replace it.
We divided this material into two parts: theoretical (purpose, design and principle of operation of the Hall sensor) and practical - signs of malfunction, verification methods and replacement methods.
At the end of the article, watch the video instructions on how to replace the Hall Sensor yourself.
And before checking the Hall sensor for malfunctions, let's understand its purpose and operating principle.
What is a Hall sensor and how does it work
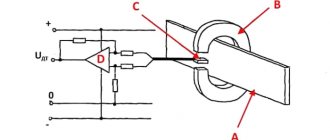
The Hall sensor (also known as a camshaft position sensor) is one of the main elements of the distributor. It is located next to the distributor shaft, on which a magnetically conductive plate, similar to a crown, is attached. There are as many slots in the plate as there are cylinders in the engine. There is also a permanent magnet inside the sensor.
The principle of operation of the Hall sensor is as follows: when the shaft rotates, metal blades alternately pass through a slot in the sensor. As a result, a pulse voltage is generated, which enters the ignition coil through the switch and, converted into high voltage, is supplied to the spark plugs.
The Hall sensor has three terminals:
- one connects to the “mass”,
- the second is approached by a plus with a voltage of about 6 V,
- The converted pulse signal goes from the third terminal to the switch.
The principle of operation of the sensor and its features
In its operation, the sensor uses the physical Hall effect, discovered in the 19th century. However, they began to use it only in the 70-80s of the last century, when automakers began to switch from contact ignition systems to electronic ones.
The principle of operation of the sensor is quite simple. As the motor shaft rotates, metal blades pass through slots in the motor housing. It gives an electrical impulse to the switch, as a result of which the latter unlocks the transistor and supplies voltage to the ignition coil. It, in turn, converts the low-voltage signal into a high-voltage one and supplies it to the spark plug.
Structurally, the sensor has three contacts:
- for connection to “ground” (car body);
- to connect voltage with a “+” sign and a value of about 6 V;
- to supply a pulse signal from it to the switch.
The advantages of using a Hall sensor in electronic ignition systems are two main factors - the absence of a contact group (which constantly burns out), as well as a higher voltage on the spark plug (30 kV versus 15 kV).
Since Hall sensors are also used in braking and anti-lock braking systems and tachometer operation, the device performs the following additional functions for the car:
- increases engine performance;
- speeds up the functioning of all machine systems.
Signs of a Hall sensor malfunction
Hall sensor malfunctions manifest themselves in different ways. Even an experienced technician will not always immediately identify the cause of engine problems.
Here are some of the most common symptoms:
- The engine starts poorly or does not start at all.
- At idle, the engine runs rough and jerky.
- The car may jerk when driving at high speeds.
- The power unit stalls while driving.
If one of these signs appears, you must first check the serviceability of the Hall sensor.
Also, do not exclude other malfunctions of the ignition system found in cars.
Distinctive features in case of DC malfunction
Malfunctions in the operation of the sensor have various manifestations. Determining them by external signs without opening them is not always possible. Below are some of the most common symptoms of a Hall sensor malfunction:
- the engine does not start or starts poorly;
- unstable operation at idle;
- when driving at high speeds, the car “jerks”;
- The running engine stalls for no apparent reason.
If one or more of the above symptoms appears, the Hall sensor should be checked for defects.
Hall sensor Audi Volkswagen
How to check the Hall sensor
A simple way to check the camshaft position (Hall) sensor is shown in the following video.
There are several ways to check the health of the Hall sensor. Each motorist can choose the most suitable option for himself:
- Take a working sensor from a neighbor or at a car disassembly for testing and install it instead of the “native” one. If the engine problems disappear, then you will have to buy a new part.
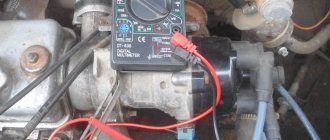
- Using a tester, you can measure the voltage at the sensor output. In a working device, the voltage will vary from 0.4 V to 11 V.
- You can create a simulation of a Hall sensor. To do this, remove the three-pin block from the distributor. Then turn on the ignition and connect outputs 3 and 6 of the switch with a piece of wire. The appearance of a spark indicates that the sensor has failed.
If the test reveals that the Hall sensor is faulty, then it must be replaced with a new one.
Monitoring the operation of the throttle
There are 3 wires going to the throttle from the controller:
- “zero” – black;
- power supply 5 V – red;
- the control signal supplied from the throttle stick to the controller (the voltage varies in the range of 0–4.2 V, depending on the angle of rotation of the stick) is green.
To check the functionality of the Hall sensors in the accelerator handle, you need to measure the voltage on the red wire with a voltmeter. You need to connect the “+” terminal of the device to it, and the negative terminal to the black wire. If there is no voltage of 5 V in the circuit under test, the cause of the problem does not lie in the throttle grip. The controller may be faulty, or it is not receiving power, or there is a break in the wiring running from the controller to the accelerator handle.
If the voltmeter shows voltage is supplied to the accelerator handle, but when it is turned smoothly, there is no voltage on the green wire, the cause of the problem lies in a malfunction of at least one of the Hall sensors or the wires suitable for it. Defective elements must be replaced.
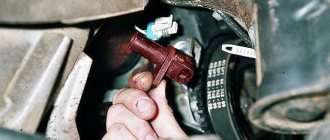
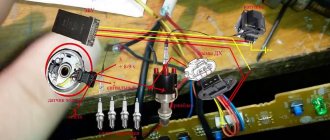
Hall sensor replacement
Replacing the Hall sensor will not be particularly difficult. Even a novice car enthusiast can handle this work with his own hands.
The video below shows in some detail the process of replacing the sensor in the distributor of a UAZ car.
Typically, replacing a Hall sensor consists of several steps:
- First of all, the distributor is removed from the car.
- Next, remove the distributor cover and align the timing mechanism mark with the crankshaft mark.
- Having remembered the position of the distributor, you need to unscrew the fasteners with a wrench.
- If there are latches and stoppers, they should also be removed.
- The shaft is pulled out of the distributor.
- All that remains is to disconnect the terminals of the Hall sensor and unscrew it.
- By pulling back the regulator, the faulty part is carefully removed through the gap formed.
- The new Hall sensor is installed in the reverse order.
Checking the functionality of the Hall sensor not only allows you to accurately determine the cause of engine failure. Thanks to simple techniques, the motorist will save his time on repairs and also eliminate unnecessary waste of money.
Reasons for failure of diesel generators
Below are the most common factors for Hall sensor failure:
- Presence of contamination. A common cause of breakdown is simple dirt. When it appears, the controller will signal this - the car begins to act up.
- The spark is gone. It is necessary to check the wiring and terminals for the presence and quality of contact. Oxidation of at least one of the three terminals can lead to a circuit break. In addition, a simple bend or break in the wire may occur - this may be caused by the displacement of the DC pad by the vacuum ignition corrector. To avoid this, the wiring must be secured so that when displaced it bends into a loop.
- Wiring failure. If the high-voltage wiring in the car is heavily worn out, if it runs close to the sensor wires, there is a possibility of a high-voltage breakdown. This often happens when the air humidity is high or when you accidentally drive into a deep puddle.
Video on how to replace a Hall sensor with your own hands
The simple operation of replacing the Hall sensor in the ignition distributor is not described in the manual.
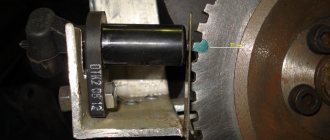
First you need to remove the distributor. Remove the cover (two latches). To facilitate subsequent installation, carefully look and remember well the position of the slider: where exactly it is directed (can be marked on the valve cover), as well as in what position the + scale is located. -. Next, unscrew one nut (key 13), remove the clamp and take out the distributor.
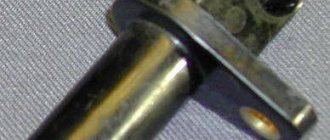
Using light blows of a small hammer through a thin (3 mm) cylindrical metal object, knock out the pin that secures the oil deflector clutch 22. The pin is a steel strip bent into a tube - it is visible in the section on the right. A long M3 screw can be used as a tool. I used a nail of the same diameter, biting off the point and filing it off. Actually, we could have limited ourselves to this one paragraph :-).
Remove the oil deflector coupling and the washer between it and the body, and remove the shaft from the distributor body.
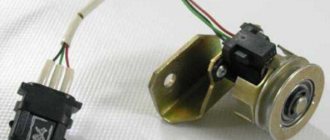
Unscrew the Hall sensor 41 (two brass screws), its connector (two steel screws) and the vacuum regulator 26 (two steel screws). There is no need to remove the rod of the vacuum regulator 27: just pull the regulator away from the distributor body and remove the Hall sensor, the connector and the bundle of three wires connecting them into the resulting gap.
Next, assemble everything in the reverse order, starting with installing a new Hall sensor. The oil deflector pin must be driven in on the side of the shaft where the countersink is made around the hole.
Reinstall the distributor in the position that was marked before disassembly. Be sure to adjust the ignition timing using the strobe light.
One of the spark plugs is faulty
If, when checking a spark plug, a spark does not appear between the electrodes, then the first thing to do is check the spark plug itself. It is possible that this was the cause of this problem. Take a working spark plug (it’s better to always carry a spare one with you) and crank it a little with the starter. Observe the performance of the candle. If a spark appears, great; if not, you should look for the cause further. Also, you can see the problems that cause the spark to disappear here: https://atlib.ru/blog/164-net-iskry
Replacing the hall sensor for a VAZ 21213 carburetor
Reasoning of a car owner named Esteban: Styling, rich equipment
Category: Maintenance
Vehicle characteristics: The vehicle dimensions are as follows: body length - 3503, width - 1100, height - 1721 mm. The wheelbase is 2269 mm. Ground clearance 152 mm. The car is equipped with a hybrid power unit. The 2-cylinder engine is equipped with a system that provides engine power output. There are 4 valves per cylinder. The diameter of one cylinder is 72 mm, the piston stroke is 78 mm. The engine crankshaft accelerates to 5000 rpm. Maximum torque is maintained up to 4000 rpm.
Posted by admin: at the request of Anatoly
Original name: Korvaaminen hall-anturi, VAZ 21213 carb
Release date: 05.12.2022
Laughter in the topic: A coach and an assistant are forming a national team of boxers to go on a foreign tour: - So, we’ll take this one, Kuznetsov too, Sidorov to hell... At this time, a call from the boss from the boxing federation: - Petrovich, I hope my son is going? You follow there... The coach and assistant grab their heads: - Well, that's it, fuck it. He’ll fail in the first round. “And most importantly, if the sponsor finds out who we’ve pinned his advertisement on, that’s it, we won’t get a penny anymore.” No one will have time to see this advertisement at any fight. But it needs to be visible. - So, let’s go to the sponsor, explain, negotiate... Soon the selected boxers come to the training camp and receive a new uniform. There is a sponsor's emblem, everything is going on... The boss's son appears. He takes the uniform and says: “Why do I have a uniform without an emblem?” Everyone has an emblem. Coach: - You have an emblem, but you don’t see it. The main thing is that the audience will see it. - Where is it? - On the soles.
Video instructions: replacing the hall sensor on a VAZ 21213 carburetor
Troubleshooting
Troubleshooting in the ignition system of the VAZ “Six” should be carried out using the method of elimination, checking element by element sequentially. This is worth dwelling on in more detail.
Battery check
Since when starting a car, the power source is the battery, it is by checking this device that diagnostics should begin. Malfunctions with the battery appear when you try to start the engine. At this moment, the indicator lights on the instrument panel go out. The reason could be either poor contact on the terminals themselves, or simply a weak battery charge. Therefore, the condition of the terminals should be checked and, if you need to clean them, tighten the fastening. To prevent future oxidation, it is recommended to cover the contacts with a graphite coating. If the battery is discharged, it is charged using an appropriate device.
Spark plug wires
The next elements that require mandatory checking in case of problems with sparking are explosive wires. Upon external inspection, the cables should not show any damage (cracks, breaks, etc.). To assess whether a spark passes through the wire or not, you will need to remove the tip from the spark plug and place it near a ground (5–8 mm), for example, near the engine block, and crank the starter for a few seconds.
At this time, a powerful spark should jump. The absence of one will indicate the need to check the high-voltage coil. Since it is impossible to determine by ear which of the cylinders does not spark, the test should be performed one by one with all wires.
Video: diagnostics of explosive wires with a multimeter
Spark plug
Spark plugs, although infrequently, still fail. If a malfunction occurs, it is with one element, and not with all of them at once. If a spark is present on the spark plug wires, then to check the spark plugs themselves, they are unscrewed from the cylinder head of the “six” and an explosive cable is put on. The metal body of the spark plug touches the masses and turns the starter. If the spark plug element is working, then a spark will jump between the electrodes. However, it may also be absent from a working spark plug when the electrodes are filled with fuel.
two-circuit ignition for Niva 21213. part 1, assembly. — Lada 4×4 3D, 1.7 l., 1994 on DRIVE2
Hello everyone. Let's talk about ignition. for stable operation of a carb engine is one of its components. There are several options. contact and non-contact. And so we have. contactless ignition Niva 21213 STOCK. works through a distributor with one hall sensor (distributor), 1 ignition coil and 1 electronic switch. This whole system has replaced contact ignition. BSZ has a number of advantages and a number of disadvantages. I was satisfied with the work of the BSZ stock, but I wanted something better (on the distributor cover the contacts of the distributor burned out 2 times due to water getting in, or the parts are like that now) in general, after scouring the forums and the Internet, I came to convert the BSZ stock into a BSZ with 2 hall sensors without an ignition distributor (distributor cover, the distributor itself remains) you will need the following1. 2 hall sensors 240р2. 2 switches 500r3. 2 bundles of wires BSZ 2107-niva 21213 280r4. plan washer (made by a turner according to the drawing) 500r5. I removed the old trailer for BSZ from the old engine
6. 2 screws with 4 mm washers. (same as on the stock hall sensor) found in the garage, cut the length to fit
I didn’t take a picture of the distributor, but everyone saw it)))
drawing for the faceplate. made by a turner. there are 2 details here
We take the distributor and completely disassemble it.
I won’t write how to disassemble the distributor. It’s not difficult, and there’s information on the Internet
We take 2 new hall sensors and fit them onto a new washer so that both fit and do not interfere with each other. I cut the plastic with pliers and everything fell into place.
Next we need a bearing with a pressed washer for the hall sensor. this washer needs to be removed. Wash the bearing to remove old grease, blow and dry. fill with new grease and assemble onto a new washer for 2 sensors. There is no need to flare, the washer stood up under the pressure.
Already sorted it out. there is a bearing, a drain washer for 1 hall sensor and a washer for 2 hall sensors. I removed the drain washer using a grinder, because... it is rolled at the factory. Using a grinder, carefully cut off the rolling and knock out the bearing through the head at 22
I had to sharpen the new washer with a grinder so that everything would fit and stand on the trable. I didn’t take any photos because... I constantly assembled and disassembled the filling of the distributor to try on parts.
Next you need a rod with curtains. we are finalizing
drain with 4 curtains. we need 2. so 2 opposing ones need to be sawed off
that's all with the filling. Now we need a cover. we make it from an old broken lid. I found a trash can in the corner (okay, I didn’t have time to throw it out, it came in handy)
we cut off the horns))) I sharpened it with a grinder. then I'll putty and paint it
I brought the wires from the sensors almost to their standard places, the finished version!
Peace to all, when the ignition coil arrives with the next parts from Japan for both cars, installation will be done! For starters, I’ll say that the coil is from a Japanese Mazda. I don’t want to assemble on Russian reels, because... There are very few quality parts, but there is an opportunity here.
Page 2
Hello everyone. Let's talk about ignition. for stable operation of a carb engine is one of its components. There are several options. contact and non-contact. And so we have. contactless ignition Niva 21213 STOCK. works through a distributor with one hall sensor (distributor), 1 ignition coil and 1 electronic switch. This whole system has replaced contact ignition. BSZ has a number of advantages and a number of disadvantages. I was satisfied with the work of the BSZ stock, but I wanted something better (on the distributor cover the contacts of the distributor burned out 2 times due to water getting in, or the parts are like that now) in general, after scouring the forums and the Internet, I came to convert the BSZ stock into a BSZ with 2 hall sensors without an ignition distributor (distributor cover, the distributor itself remains) you will need the following1. 2 hall sensors 240р2. 2 switches 500r3. 2 bundles of wires BSZ 2107-niva 21213 280r4. plan washer (made by a turner according to the drawing) 500r5. I removed the old trailer for BSZ from the old engine
6. 2 screws with 4 mm washers. (same as on the stock hall sensor) found in the garage, cut the length to fit
I didn’t take a picture of the distributor, but everyone saw it)))
drawing for the faceplate. made by a turner. there are 2 details here
We take the distributor and completely disassemble it.
I won’t write how to disassemble the distributor. It’s not difficult, and there’s information on the Internet
We take 2 new hall sensors and fit them onto a new washer so that both fit and do not interfere with each other. I cut the plastic with pliers and everything fell into place.
Next we need a bearing with a pressed washer for the hall sensor. this washer needs to be removed. Wash the bearing to remove old grease, blow and dry. fill with new grease and assemble onto a new washer for 2 sensors. There is no need to flare, the washer stood up under the pressure.
Already sorted it out. there is a bearing, a drain washer for 1 hall sensor and a washer for 2 hall sensors. I removed the drain washer using a grinder, because... it is rolled at the factory. Using a grinder, carefully cut off the rolling and knock out the bearing through the head at 22
I had to sharpen the new washer with a grinder so that everything would fit and stand on the trable. I didn’t take any photos because... I constantly assembled and disassembled the filling of the distributor to try on parts.
Next you need a rod with curtains. we are finalizing
drain with 4 curtains. we need 2. so 2 opposing ones need to be sawed off
that's all with the filling. Now we need a cover. we make it from an old broken lid. I found a trash can in the corner (okay, I didn’t have time to throw it out, it came in handy)
we cut off the horns))) I sharpened it with a grinder. then I'll putty and paint it
I brought the wires from the sensors almost to their standard places, the finished version!
Peace to all, when the ignition coil arrives with the next parts from Japan for both cars, installation will be done! For starters, I’ll say that the coil is from a Japanese Mazda. I don’t want to assemble on Russian reels, because... There are very few quality parts, but there is an opportunity here.
The Hall sensor is one of the main parts of the contactless ignition system. That is why it is of serious interest to a large number of car owners. This is understandable, because if this device malfunctions, the engine simply will not start. Let's look at why it is needed and find out how to check it on a VAZ.
Non-contact ignition system device
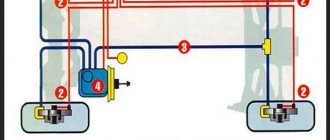
Contact ignitions are obsolete, but are still used in older cars. On rear-wheel drive VAZ models, contactless was first installed on 2107. The BSZ device for carburetor engines consists of:
Electronic and contactless ignition systems are the same device. It got its name due to the absence of a contact group in the system design. The ignition switch also has a contact group, which is a common cause of engine failure.
To install the BSZ with your own hands, you will need the following tools:
This video covers all the nuances.
First of all, it is important to make sure that the problem is in the lock. Therefore, the spark plugs, distributor and ignition coil are inspected. Often these parts of the internal combustion engine become the reason for failures of correct operation. If breakdowns in them are excluded, then the ignition switch (IZ) should be replaced. Removal order:
If you strictly follow the instructions and wiring diagram, no problems should arise. This is facilitated by the simplicity of the design. Moreover, the part can even be repaired if the damage is not critical.
Purpose of the sensor
This sensor is a device that is mounted as close as possible to the distributor and is connected to the engine camshaft. The Hall sensor replaced the contact ignition system, which had a primitive design that made it difficult to start the engine in bad weather conditions, as well as in the event of burnt contacts. The modern device consists of a shaft on which a plate in the form of a small crown is mounted. This crown has a certain number of teeth, which corresponds to the number of engine cylinders. A magnet is also permanently installed inside the sensor.
Now the following happens. When the engine starts, the camshaft begins to rotate, which causes the shaft on the sensor to rotate. At the same time, the metal blades begin to constantly intersect the free space inside the device. As a result, a pulse voltage is formed, which is directed through a group of wires to the ignition coil. Inside the coil it is converted into high-voltage and returns to the distributor for distribution among the cylinders.
Which ignition is better: contactless or contact?
The carburetor circuit also includes: a drive lever from the accelerator pump, a diaphragm, an adjusting screw and an air duct from the starter, a shut-off valve (solenoid), an air damper, a needle valve, a fuel supply fitting, an economizer for power modes, a carburetor heating unit, fittings for crankcase ventilation, for supplying vacuum for the vacuum regulator in the ignition, and other elements.
Niva 2121 has the following sequence of passage of fuel elements through the carburetor chamber. First, fuel moves from the fuel tank to the float chamber in a controlled amount. The float rises or falls as the fuel moves.
Further, the fuel path lies through the nozzle into the atomizer, located in the narrow part of the diffuser, with simultaneous air entering the carburetor through the outer pipe. The throttle valves then deliver varying amounts of fuel into the engine cylinder through an intake manifold cast from aluminum alloys. The manifold is attached to the engine with studs through gaskets that have heat-resistant properties.
How to check the Hall sensor?
The Hall sensor is checked to identify its malfunction. The following signs of malfunction may serve as a reason for checking:
- Engine instability. It is expressed in frequent changes in speed, as well as engine vibration, which usually occurs when it tries to stall. In addition, it is quite possible that while driving the car jerks and does not develop full power.
- Startup problems. If the engine starts immediately or does not start at all, the sensor needs to be checked.
- Any unpredictable behavior of the internal combustion engine, for example, its sudden stop, can also be due to a faulty Hall sensor.
If anything from this list happens in your case, then you need to check the sensor immediately. To monitor its performance, you can use the following methods, which have long been used by experienced car enthusiasts:
- The first method is the most popular and, perhaps, the most accurate. To do this, you can borrow a known-good sensor from your neighbor in the garage or a friend, install it on the car and check the operation of the engine. If the problems listed above immediately disappear, then you need to purchase a new one.
- If you are unable to find a working device, you can use another method that simulates the operation of the sensor. To do this, pull out its plug from the distributor side and turn on the ignition. Close outputs 3 and 6. If you observe slight sparking, the sensor needs to be replaced.
- The next method is used by more competent craftsmen. In this case, you will need a very ordinary voltmeter. Using its probes, you need to measure the output voltage of the sensor, which should correspond to a range of values from 0.4 to 11 Volts.
These are all the ways in which you can test the Hall sensor. It is possible that there are other methods. Immediately after the check, if a malfunction is detected, the sensor must be replaced, then engine operation will immediately return to normal.
We carry out the adjustment ourselves
Also interesting: Chevrolet Niva instrument cluster tuning
Then there are two possible developments: early and late ignition. Let's consider solutions for both cases:
Niva 21213 can be subject to adjustment of the starting system by the gap at the edges of the valves, if the carburetor is removed, or by the crankshaft speed directly on the car. In the first case, the gap at the location of the lower edge (in the direction of air movement) from the throttle valve is set to a width of 1.1 mm.
It is adjusted with a screw that has a 0.7 cm hexagon on the head and a slot from the shank. This operation is carried out with the cam lever turned counterclockwise from the starting system control (all the way). In the same position, the gap at the lower edge of the air damper is set to 3 mm using a screw in the cover from the diaphragm mechanism in the starting system (you need to loosen the lock nut).
Malfunctions and solutions
As a rule, most malfunctions occur due to the fault of spark plugs and high-voltage wires. However, other reasons cannot be ruled out. In non-contact systems, you cannot disconnect the terminal from the battery to check the operation of the generator. Otherwise, the switch may fail. A malfunction of the ignition coil can be determined by measuring the resistance of its windings. Replace with a suitable one. A coil from a contact system will not work, because its parameters are different. The commutator can be checked by examining its pulses to the coil. In this case, all conditions are necessary to ensure its operation. For example, the health of the Hall sensor. The easiest way to check spark plugs is to replace them with ones that are known to work with the same gap and preferably of the same type. Burnt distributor contacts and jammed carbon contribute to deterioration of spark formation.
Therefore, it is necessary to carry out a visual inspection at least once a year. Some engine malfunctions are not necessarily caused by ignition problems.
In addition, it is worth paying attention to the correct setting of the lead angle. Some experts do not believe the strobe data and rely on engine operation in different modes. If piston pin sounds are heard, this indicates that the advance angle needs to be reduced.
Checking the contact distributor
The need to check the distributor-breaker arises if problems arise with sparking, but during the diagnostics of the ignition system elements the problem could not be identified.
Cover and rotor
First of all, we inspect the cover and rotor of the device. The check consists of the following steps:
- We dismantle the distributor cover and inspect it inside and out. There should be no cracks, chips, or burnt contacts on it. If damage is found, the part must be replaced.
contact Group
The main malfunctions of the ignition distributor contact group are burnt contacts and incorrect clearance between them. In case of burning, the contacts are cleaned with fine sandpaper. If they are severely damaged, it is better to replace them. As for the gap itself, to check it it is necessary to remove the cover of the distributor-breaker and turn the engine crankshaft so that the cam on the distributor shaft opens the contacts as much as possible. We check the gap with a feeler gauge and if it differs from the norm, then we adjust the contacts by unscrewing the corresponding screws and moving the contact plate.
Capacitor
If a capacitor is installed on the distributor of your “six”, then sometimes the part can fail as a result of a breakdown. The malfunction appears as follows:
- problems starting the engine;
- sudden engine stop while driving.
You can check an element in the following ways:
- Control lamp. Disconnect the wiring coming from the coil and the capacitor wire from the distributor according to the figure. We connect a light bulb to the open circuit and turn on the ignition. If the lamp lights up, it means that the part being tested is broken and requires replacement. If not, then it's OK.