Tools:
- Straight box spanner 13 mm
- Curved box spanner 24 mm
- Hex key 12 mm
- Driver for 3/4 socket bit
- Knob attachment 24 mm
- Large flat screwdriver
- Syringe for filling transmission units with oil
- Waste oil container
- Small hammer
- Torque wrench
Parts and consumables:
- Transfer case shaft seal
- Transmission oil
- Sealant
- Litol-24 lubricant
Note:
We carry out the work on an inspection ditch or overpass.
1. We replace the shaft seals of the front and rear axle drives by disconnecting the cardan shaft flanges from the shaft flanges, as described here. We change the transfer case drive shaft oil seal only after removing the intermediate shaft, as described here. The operations for replacing all three oil seals are the same - we will show them using the example of a rear axle drive shaft oil seal.
2. Drain the transfer case oil as described here.
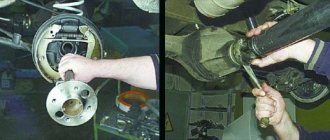
3. We insert two bolts into the holes in the flange and screw the nuts onto them.
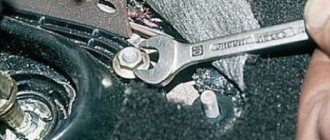
4. Using a 24mm socket, unscrew the flange mounting nut, holding it from turning with a screwdriver or a mounting spatula inserted between the bolts.
Warning:
Self-locking nuts must not be reused; replace them with new ones!
5. We remove the washer.
6. Remove the flange.
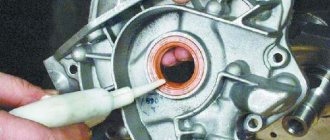
7. We pry off the oil seal with a screwdriver.
8. We remove it from the transfer case cover socket.
9. Apply sealant to the seating surface of the housing in the crankcase under the oil seal. Apply Litol-24 lubricant to the working surface of the new oil seal.
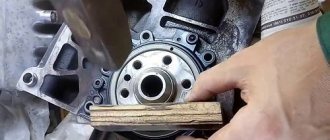
10. We press in the oil seal with a piece of pipe or a tool head of a suitable size.
Helpful advice:
You can use an old oil seal as a mandrel.
Warning:
The transfer case shaft seals have the same mounting dimensions, but have oppositely directed oil drainage notches. When installing, follow the direction of shaft rotation indicated on the oil seal.
11. We install the dismantled parts in the reverse order. Apply sealant (threaded) to the threads of the flange nut and tighten the nut with the prescribed torque H*m(kgf*m)96–117.6 (9.8–12.0), using a torque wrench.
We check the oil level in the box as described here and, if necessary, top up.
The article is missing:
- Photo of the instrument
- Photos of parts and consumables
- High-quality photos of repairs
Source: Chevrolet niva device, operation, maintenance and repair. Publishing house "Behind the Wheel".
Reg.: 12/06/2004 Threads / Messages: 628 / 51730
Reg.: 12/06/2004 Threads / Messages: 4031 / 23190 From: Moscow Age: 65 Car: 21214M, 2013
When replacing, the oil seal must be placed on sealant. I've written about this many times, try searching for ABRO.
Before you shoot anything, find out what the sound is and where it comes from. I doubt it's a bearing. Maybe some shield is resonating, maybe it’s touching something.
Alexey aka ALER.
Reg.: 12/06/2004 Threads / Messages: 628 / 51730
Reg.: 12/06/2004 Threads / Messages: 4031 / 23190 From: Moscow Age: 65 Car: 21214M, 2013
Alexey aka ALER.
Reg.: 12/06/2004 Threads / Messages: 628 / 51730
Thank you. Today I installed oil seal 2121-2302052 on the rear axle flange. I hope this is true? Otherwise, the first time I put 2101-2402052 there from the classics and it drained my oil in a terrible way. By the way, is it really possible to change the oil seals in the front and rear axles on a lift without a torque wrench? One service center told me that the shank nuts are tightened very cleverly. And what if they are not tightened correctly, then you can safely change the gearboxes
Transfer case device
The Chevrolet Niva transfer case redistributes engine torque between the drive axles and, if necessary, changes the gear ratio and locks the center differential. The parts of this assembly require significant force. Therefore, RK gears and bearings operate in an oil environment.
To prevent oil leakage from the transfer case, oil seals are installed at the joints of the housing and rotating drive shafts. They consist of two parts: a metal body and a rubber cuff, tightened by a spring. The latter ensures sealing of the connection due to the tight fit of the rubber to the shaft.
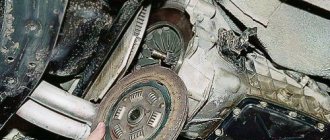
Symptoms of a problem
The CV joint is designed for operation in fairly harsh conditions. Therefore, only proven devices are installed at the car manufacturing plant. Their service life is comparable to the service life of the entire car. But nothing is impossible for Russian roads. The outer CV joint experiences the greatest load. All vibrations associated with uneven road surfaces, sudden braking, and impacts are transmitted to it.
Video - replacing the CV joint boot in Logan, Sandero, Largus and all the nuances:
First of all, you should monitor the integrity of the anthers. Leaks on them are a serious threat to performance.
The aggressive nature of driving with the wheels turned to full is very dangerous for CV joints. This style is taught in extreme driving courses.
Video - replacing CV joint boots:
Failure of CV joints can be determined by play and sound. When under heavy load, faulty outer CV joints produce a squeaking sound similar to the sound of worn-out brake pads. Also, during a sharp start, a characteristic click may be heard on the turned wheels.
The most classic option, when it comes time to replace the CV joint, is the appearance of a characteristic crunch on one side of the car. Such a crunch when turning the steering wheel can only be produced by a constant velocity joint. It is more difficult to determine which CV joint sounds, internal or external.
Video - how to check which CV joint has started knocking:
If extraneous noise appears during straight-line movement, the inner CV joint is most likely worn out. The following procedures may help to make an accurate determination.
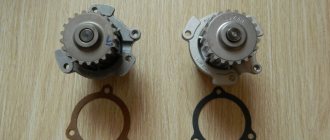
Article, size and manufacturers of reinforced cuffs
Initially, oil seals with an outer diameter of 68 and an inner diameter of 35.8 mm were installed in the transfer case. two types:
- 2121-2302052 — one oil seal. A similar part is installed on the drive gear of the front axle;
- 2101-2402052-01 — two oil seals in the Republic of Kazakhstan. The same part is located on the drive gear side of the rear axle.
The installation of different seals is explained by the different directions of rotation of the drive shafts.
Useful! Nowadays oil seals with article number 2123-1802120-12 are installed in the RC and axles of the Niva Chevrolet. They are designed for shaft rotation both clockwise and counterclockwise.
Spare parts from the Balakovo plant (Rosteco) are popular. According to reviews from Chevrolet Niva owners, they are characterized by high wear resistance at an affordable price.
KINDS
The CV joint was invented quite a long time ago; according to the most common version, it was invented back in the twenties of the last century by Alfred Rzepp. Therefore, it is not surprising that since then many varieties of this part have appeared:
- cracker - installed exclusively on trucks;
- tripod - usually used as an internal CV joint;
- twin hinge – used quite rarely due to its complex design;
- ball, or CV joint, is the most common type, which is most often used on the axles of passenger cars.
It was this invention that became revolutionary for the design of passenger cars with front-wheel drive.
CV joint device
Here you can see a photo of a ball CV joint, thanks to which it will become clearer what this part is like in the assembled state. If we talk about its components, then, in fact, there are not so many of them:
- Housing with outer ring.
- Separator.
- Inner ring.
- 6 balls.
- Shaft.
- Stop ring.
- The anthers are external and internal, they are held in place by clamps.
If you put these elements together, they actually look like some kind of grenade.
All these parts are assembled into an external CV joint and an internal CV joint. The internal one transmits rotational movements to the external mechanism, which results in a change in the angle of the axle shaft relative to the axis.
When and how do you need to change the seals of the VAZ 2123 transfer case?
Reference! Parts must be replaced if transmission oil leaks occur at the interface between the drive shafts and the transmission housing.
If this is not done, the transmission will leak. Without lubrication, transfer case parts will quickly fail.
Step-by-step instructions for replacing the oil seal of the Niva Chevrolet
To work, you need to have free access to the bottom of the car. Therefore, replacement of the oil seals will be carried out on an inspection ditch, overpass or lift.
You will need the following tool:
- hexagon 12;
- open-end or socket wrench 24;
- waste container;
- flat screwdriver;
- hammer;
- mandrel;
- syringe for filling transmission oil;
- new self-locking nuts for fastening the flanges.
The algorithm for replacing the Niva Chevrolet transfer case oil seal is as follows:
- drain the oil from the transfer case into the prepared container;
- unscrew the bolts securing the cardan, the drive shaft oil seal of which is to be replaced;
- engage the gear, lock the differential and put the car on the handbrake;
- Unscrew the nut securing the propeller shaft drive flange.
- remove the washer;
- pull the flange off the shaft;
- use a screwdriver to remove the old oil seal;
- clean the seat and apply sealant;
- lubricate the rubber seal of the new oil seal with oil;
- using a mandrel and a hammer, press the part into place;
- install the flange and washer, tighten them with a self-locking nut;
- secure the cardan.
Important! The self-locking design does not allow for reuse of parts. Therefore, the flange nuts must be replaced with new ones.
After completing the work, it is necessary to fill the transfer case with fresh transmission oil.
Replacing the oil seal on the drive gear drive, main steps
- it is necessary to unscrew the bolts holding the flange, remove the cardan shaft from the gearbox
- disconnect the CV joint housing from the drive.
- you need to connect a dynamometer and determine at what moment the rotation begins. To do this, rotate the flange mount until the gears begin to move.
- bolts are screwed into adjacent holes
- Between the bolts there is a pry bar, with the help of which the flange is kept from turning.
- After this, you can remove the flange along with the washer using a universal puller.
- The oil seal from the bridge gear is replaced with a new original spare part. The sealing ring must be lubricated with grease or lithol.
- After this, it is necessary to press the ring using a pipe of a suitable diameter.
- The flange fits onto the spline connection.
- The cardan shaft is installed in place.
Transfer case oil seal Niva Chevrolet dimensions
Tools:
- Straight box spanner 13 mm
- Curved box spanner 24 mm
- Hex key 12 mm
- Driver for 3/4 socket bit
- Knob attachment 24 mm
- Large flat screwdriver
- Syringe for filling transmission units with oil
- Waste oil container
- Small hammer
- Torque wrench
Parts and consumables:
- Transfer case shaft seal
- Transmission oil
- Sealant
- Litol-24 lubricant
We carry out the work on an inspection ditch or overpass.
1. We replace the shaft seals of the front and rear axle drives by disconnecting the cardan shaft flanges from the shaft flanges, as described here. We change the transfer case drive shaft oil seal only after removing the intermediate shaft, as described here. The operations for replacing all three oil seals are the same - we will show them using the example of a rear axle drive shaft oil seal.
2. Drain the transfer case oil as described here.
3. We insert two bolts into the holes in the flange and screw the nuts onto them.
4. Using a 24mm socket, unscrew the flange mounting nut, holding it from turning with a screwdriver or a mounting spatula inserted between the bolts.
Warning:
Self-locking nuts must not be reused; replace them with new ones!
5. We remove the washer.
6. Remove the flange.
7. We pry off the oil seal with a screwdriver.
8. We remove it from the transfer case cover socket.
9. Apply sealant to the seating surface of the housing in the crankcase under the oil seal. Apply Litol-24 lubricant to the working surface of the new oil seal.
10. We press in the oil seal with a piece of pipe or a tool head of a suitable size.
Helpful advice:
You can use an old oil seal as a mandrel.
Warning:
The transfer case shaft seals have the same mounting dimensions, but have oppositely directed oil drainage notches. When installing, follow the direction of shaft rotation indicated on the oil seal.
11. We install the dismantled parts in the reverse order. Apply sealant (threaded) to the threads of the flange nut and tighten the nut with the prescribed torque H*m(kgf*m)96–117.6 (9.8–12.0), using a torque wrench.
Advice on how to remove drives without dismantling the Niva front gearbox
- To dismantle the drives, it is necessary to unscrew the fastenings of the gearbox (in this case, some kind of stop is placed under it).
- Then the steering knuckles are released. To do this, simply unscrew the shock absorber mount from the lower arm and the lower ball joint.
- To relieve the load, jack up the lower suspension arm.
- Unscrew the hub nut and remove the centering ring. The nut is too tight, so we use a wrench extension (for example, a metal pipe).
- We move the steering knuckle to the side. The drive can then move freely.
- To ensure free movement of the drive during removal, the gearbox must be moved back slightly.
- We remove the drive, being careful not to damage the anthers. If the boot is torn, it must be replaced.
- The procedure for removing the right and left CV joint drives is similar.
Before dismantling, it is necessary to mechanically remove dirt from the inside of the steering knuckles and from the bottom of the car above the work area. The best option is to wash the bottom with a high-pressure apparatus one day before carrying out work.
Driving at high speeds with broken universal joint crosspieces does not go without consequences. The rear axle gearbox on the classic and Niva is designed in such a way that when the car moves forward, the shank seems to be unscrewed from the engagement of the main pair. The drive gear of the main pair (also known as the shank) rotates on two bearings: front and rear. The distance between them is elastically fixed by the pretension created by the spacer sleeve when the shank nut is tightened. The vibration of the cardan, transmitted to the rear axle gearbox, gradually unscrews the shank nut. Radial play appears in the shank - especially on the front bearing, because When moving forward, the shank is unscrewed from the joint of the main pair and the front bearing is freed for play. Radial play wobbles the unfixed spacer sleeve and oil flinger washer, gnawing out metal fragments that fall into the tapered bearing. After the fragments cut “patterns” on the rollers and bearing race, noise begins, which continues even after the shank nut is tightened or the spacer is replaced. In theory, in such cases, repair of the rear axle gearbox is required. Repair with complete disassembly, troubleshooting and assembly. The last stage is not performed by anyone in a city of millions at a reasonable price. Everyone just replaces the gearbox with a new one and moves on.
Replacing the front shank bearing.
I decided to go a different route. Replace the front tapered shank bearing without disassembling the gearbox. I calculated the distance between the shank and the front bearing race, which was exactly 13 mm. It is necessary to select a puller into this distance, the clamping tab of which can squeeze through. We searched for a long time at the service station, but found a puller with a suitable jaw width size - 13 mm. Only the puller was external, but we managed to twist the legs for internal removal. We started working with this tool.
The flanges were uncoupled. We tightened the nut, took out the bearing, bushing and washer.
Now all that’s left to do is pull out the outer race of the front shank bearing.
Applicability
| Brand | Model | Name according to auto catalog | Drawing |
| VAZ | VAZ-2123 | Stuffing box | Transmission / Transfer case |
| VAZ | VAZ-2123 | Stuffing box | Transmission / Transfer case |
| VAZ | VAZ-2123 | Stuffing box | Transmission / Rear axle |
| Chevrolet | Chevrolet Niva 1.7 | Transfer case drive shaft oil seal | Transmission / Transfer case |
| Chevrolet | Chevrolet Niva 1.7 | Transfer case drive shaft oil seal | Transmission / Transfer case |
| Chevrolet | Chevrolet Niva 1.7 | Transfer case drive shaft oil seal | Transmission/Axles |
| Chevrolet | Chevrolet Niva 1.7 | Transfer case drive shaft oil seal | Applications / Seals |
| VAZ | LADA 4×4 M | Rear axle gear oil seal | Transmission / Rear axle |
The parts data presented on this page is for informational purposes only.
Download price lists
To download price lists, you must log in. If this is your first time on the site, please fill out the registration form.
The main types of such hinges
"Trakta" (cam-disc)
The CV joint consists of 2 liners, 2 knuckles and a disc. The inserts have cylindrical necks. There are grooves inside. The necks are covered with fists, the discs fit into the grooves. The working angle of movement does not exceed 450.
"Weiss" (four plus one)
This means the presence of 4 main and one guiding (centering) ball.
This hinge is installed on the GAZ-66 and other off-road vehicles. Its main drawback is the maximum angle of rotation of the wheel is only 320. The service life of such balls is low, since the load during movement falls on only 2 balls (the other pair is used when reversing).
Six - ball CV joint by Alfred Rzepp
In this mechanism, rotational motion is transmitted by all balls. The design consists of a dividing lever, a separator, 6 balls, a housing that includes a spherical cup with a driven shaft, and an inner race that includes a spherical cam with a drive shaft. Rzepp CV joints have several modifications.
The classic constant velocity joint can transmit significant forces with a working angle of up to 370. It has a high efficiency and high load capacity.
Three-spike - tripod
This constant velocity joint is sometimes called a “tripod”. Available in two versions - hard and universal. A rigid CV joint implies no movement along the longitudinal axis, the angle is up to 430, they are used as external CV joints. The universal one has a smaller angle; they can be used as internal hinges.
Auto catalog
- VAZ
- UAZ
- GAS
- AZLK
- IZH
- ZAZ
- ZIL
- LuAZ
- RAF
- BYD
- Chevrolet
- Daewoo
- Geely
- Great Wall
- Hyundai
- Lifan
- Tata
Price list
- Special offers
- KAMAZ spare parts
- Spare parts KAMAZ-5490
- Spare parts MAZ, YaMZ
- ZIL spare parts
- Spare parts ZMZ, for GAZ vehicles
- Spare parts for Volzhanki cars
- Spare parts for Gazelists
- Spare parts for trucks Lawns
- Spare parts for GAZ-71 caterpillar
- Spare parts UAZ, UMZ
- Spare parts KrAZ, BelAZ
- Spare parts URAL
- Spare parts BUSES
- AMAZ spare parts
- IKARUS spare parts
- KAVZ spare parts
- LAZ spare parts
- LIAZ spare parts
- NEFAZ spare parts
- PAZ spare parts
- Other buses
- Tractors, computer equipment, attachments
- Tractors and walk-behind tractors
- Municipal vehicles
- Attachments and trailed equipment
- Spare parts for TRACTORS and SPECIAL EQUIPMENT
- JCB - spare parts for special equipment
- Truck crane (KS-3577, KS-4517, etc.)
- AMZ (A-01, A-41, D-440, D-442, D-447, D-461, D-467)
- Amkodor (TO-18, TO-28, TO-30, etc.)
- ATZ (T-4A, TT-4M)
- VgTZ (DT-75)
- VMTZ (D-120, D-144, D-130, D-145T)
- VTZ (T-25, T30A-80, VTZ-2048)
- LTZ (T-40, LTZ-55, LTZ-60)
- MKSM, UNC, DETVAN
- MTZ - spare parts for tractors
- OTZ (TDT-55)
- PTZ (K-700/701/702/703/704)
- KhTZ (T-150, MT-LB)
- ChTZ (T-130, T-170, B-10, B-12, B-170, T-10M, DET-250)
- YuMZ - spare parts for tractors
- Other special equipment and tractors
- RVD - high pressure hoses and sleeves
- MMZ spare parts and engines