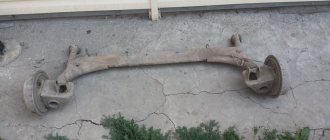
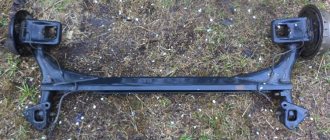
The car suspension connects the body with the road. And it consists of many interconnected mechanisms that provide the machine with a smooth ride . Timely replacement of the silent blocks of the Renault Logan rear beam is extremely important.
But the manufacturer does not recommend replacing the rear silent blocks separately, only together with the beam.
Replacing Logan rear silent blocks: preliminary information
The main task of silent blocks is to articulate the rear beam with the car body. In this case, an important condition is the damping of shock loads.
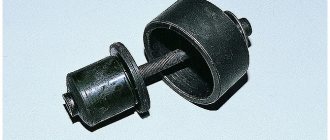
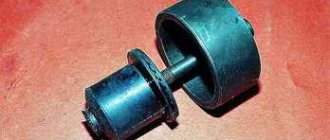
Structurally, the silent block of the rear beam of the Renault Logan is simple. It consists of two bushings and a rubber layer. The outer sleeve is plastic. The inner one is metal. The rubber is poured between the bushings not in a continuous layer, but in a certain way with areas of reinforcement and voids. This is done so that the silent block can be more easily twisted relative to the bushings during the working stroke of the beam and will not tear. At the same time, it must be rigid enough to withstand loads.
The silent block of a Renault Logan car is exposed to the following factors:
- torsional loads arising during working movements of the rear beam;
- shock loads from road unevenness, directed perpendicular to the axis of the bushings;
- environmental impact.
These processes are natural and are taken into account during design. If the car is operated in gentle conditions, then silent blocks can operate for more than 100 thousand kilometers before the first malfunctions appear. However, there are several factors that accelerate the destruction process:
- systematic driving on bad roads with large differences in unevenness;
- operation in winter on roads treated with sand-salt compounds;
- Incorrect installation of silent blocks.
Eliminating or minimizing these factors will allow silent blocks to work out their intended life without any problems.
Front lever silent blocks. Renault Logan Blog, announcements, videos
Photo Replacing the silent blocks of the front levers - logbook Renault Logan ripe cherry | Video
This video instruction for replacing the silent block of the front lever is suitable not only for Renault Logan cars, but also Sandero, Lada. Before removing the Logan lever, you need to unscrew the ball from the steering knuckle (head on.
Renault Logan ripe cherry › Logbook › Replacing the silent blocks of the front arms. Previously List of spare parts and articles for Renault Logan for maintenance Next Renault Logan ball joint.
Renault Logan, 1.4, Authentique, 2006. After undergoing maintenance (60 thousand km), the recommendations said: front arm silent blocks (slight play). Pos.
Of course, you can find a lot in markets or from resellers, but the guarantees in this case are questionable. Questions about the work of the forum. Each Logan owner will be able to choose something based on their preferences and financial capabilities. FRONT SUSPENSION ARM MET.
Renault Kangoo Forum club Renault Kangoo. Operating questions, owner reviews, repair tips. Answer: the silent blocks of the front lever did not cause any significant steering movement, but there were knocking noises on bumps. I pulled the suspension with many friends, and no one could understand exactly why it was knocking until I pulled out the ball joint and moved the stabilizer, then it was immediately obvious. But this is a lyric, I’m just wondering if I can continue like this for now or take everything apart and brew again. Answer: silent blocks of the front lever. Especially when braking, the load on the rear lugs is large, and if the holes are broken, it will continue to break until the lever rests on the body...
Find more posts by demivale. If anyone is changing the levers, look at this moment too and please write how it is for you. Answer: front lever silent blocks Another question about tightening the silent blocks. Another question - I first screwed on the stabilizer, attaching nuts to the lever, and then parked the car and tightened the silent blocks. If you first tighten the silent blocks while the car is standing, the bolt will theoretically move outward of the car, and then we tighten the stabilizer.
Answer: silent blocks of the front lever If you tighten it while loaded, otherwise the loads will be different when the lever is operating... Ah, the spruce, ah, the Christmas tree, ah, the evil wolves.
I've been letting you slip through my fingers all along, but if I catch someone for something, that will be the end of them! Now I’ll figure it out properly and punish anyone! Find more messages from Gromov Sergey. Answer: front arm silent blocks. Another question about tightening silent blocks. Answer: the silent blocks of the front lever are logically clear that if you drive the car empty alone, it means simply tightening it with the driver.
Therefore, the question is whose theory is more correct. The second question is really only relevant if the ear holes are larger than the diameter of the bolts and especially if they are oval. Just shortly thereafter, I began to often go for suspension diagnostics because of knocking noises, but the services found reasons for everything except the silent blocks. In any case, on a lifted suspension, the silent parts have more travel, so most likely the likelihood of separation is greater.
As for under what load should the silent be tightened? As an example, here is a quote from another forum: Here is the full text of the response from the official representative of AvtoVAZ:.
QUESTION TOPIC: Operational questions. Please tell me how to properly tighten rubber-metal connections in Samara; on a fully loaded car, or empty. Repair books indicate both options. According to common sense and the operating principle of silent blocks, the more correct option is with a load, but it is less common in the literature and is never used. What is written in the factory documentation and your opinion? According to factory technology, all silent blocks are tightened with the required tightening torque only on a loaded suspension and not only on Samara, but also on “classics”, etc.
Otherwise, when the car is placed on the floor and under load, all the silent blocks will rotate. Devulcanization will occur and the connections will take a very short time. Repair your cars correctly and demand it for a hundred. I also see that in the YouTube channel “Do-It-Yourself Renault Repair” they recommend Delphi silents for Logan. So in the future you can press in something yourself that has been relatively tested by others: sasik, delphi, trv.
Although I’ll be honest, I have a mixed opinion about Sasik, it was that Sasik bought two steering rods, so one was screwed into the rack, and the second had an undercut thread and their anthers crack faster compared to the Lemferder, on the same rods.
When is it necessary to replace the silent blocks of the Logan rear beam?
Let's consider the main malfunctions of the silent blocks of the rear beam and the signs by which they can be diagnosed.
- Single cracks or small tears without delamination of bushings. This malfunction is the embryonic stage of destruction and often goes unnoticed. Manifestations are usually weak or absent at all. There may be some increased kickback or increased noise when driving over bumps. Sometimes the rear beam sags slightly on one side if the rubber layer is pressed through.
- Detachment of the rubber layer from the bushing body. This malfunction is already more noticeable, and if you pay close attention to the car, it is quite easy to identify it. A characteristic dull knock appears when driving over uneven roads. The vehicle may become less stable when driving at high speeds. There is a feeling of so-called wobbling of the rear of the car. Uneven tire tread wear on one wheel or several at once is possible. The car may visually appear slightly skewed.
- Complete delamination and extrusion of the rubber layer. Advanced stage of wear of silent blocks. As a rule, it does not come to this, since at the previous stage the ride already becomes uncomfortable. However, there are also such cases. Here a clear metallic clang already appears, which is accompanied by shock loads on the rear axle. The car doesn't handle the road well. Its distortion or subsidence is noticeable.
- Destruction of beam fasteners or lugs. Also a limiting state that leads to an accident. Here the beam is torn off and the car completely loses transportability on its own wheels.
Malfunctions of silent blocks make themselves known in advance. Therefore, the driver has some time to choose the time and place of repair.
Removal
1. Loosen the wheel bolts. We lift the car on a lift or use a jack to lift the rear part of the car and place it on reliable supports (to do this, we first install wheel chocks under the front wheels).
Note: If the vehicle is being lifted on a lift, it is not necessary to remove the rear wheel.
2. Unscrew the wheel bolts and remove the rear wheel.
3. Using a metal brush, clean all threaded connections that will be unscrewed below; if necessary, apply a penetrating liquid (such as WD-40) to them.
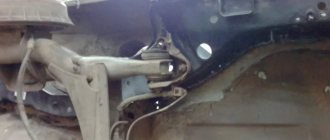
4. Using a jack or hydraulic strut, jack up the trailing arm of the rear suspension beam to relieve the load on the lower mount of the rear shock absorber.
5. Using a 18mm socket wrench, unscrew the lower bolt securing the shock absorber to the trailing arm of the rear suspension beam.
6. Remove the lower shock absorber mounting bolt and disconnect it from the trailing arm of the beam. Then remove the jack or hydraulic strut.
7. Then, to get to the upper mounting of the shock absorber strut, you need to move into the luggage compartment of the car.
8. Open the luggage compartment lid.
9. Remove the side trim of the luggage compartment from the required side, in our case – on the right.
Category: Make a car yourself
Vehicle characteristics: The dimensions of the car are as follows: length - 3512, width - 1100, height - 1182 mm. The wheelbase is 2714 mm. Ground clearance 132 mm. The car is equipped with a hybrid power unit. The 2-cylinder engine is equipped with a system that provides engine power output.
Posted by admin: at the request of Azamat
Watch the VIDEO about replacing the rear shock absorber bushing on a Renault Logan.
Assessment of a car owner named Hermann: No car has more rear space than the S-max. Comfortable fit. Large trunk. Rich equipment.
Release date: April 15, 2022
Laughter on topic: When my headphones break, I start hearing some voices around me.
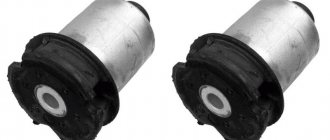
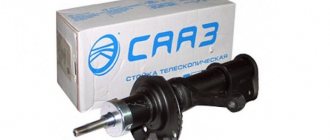
Types of silent blocks and their application
Silent blocks are made of rubber and rubber-metal. Rubber silent blocks include the lower mount of the rear suspension shock absorber. Other types of silent blocks are made from a composition of rubber and metal parts.
The use of these parts is typical for all cars; they have a direct purpose for the suspensions of any car. Renault Logan is no exception, and its suspension is also equipped with rubber-to-metal connections for the front arms and rear beam. Silent blocks are installed at the mounting points of the front subframe, which significantly improves the quality of the car's behavior on the road.
My account
It looks like this: The car is raised on a lift and the rear wheels are removed. The entire rear beam is cleaned of dirt and dust, the handbrake cables, the power regulator and the brake pipe are dismantled. All braking and traction forces when the car is moving are perceived by the Renault Logan suspension arms, connected through silent blocks to the body.
In addition, silent blocks absorb all road irregularities. That is, the worse the roads and the more aggressively you drive, the faster the silent blocks become unusable.
Let us immediately note that the manufacturer recommends replacing the Logan lower arm along with the silent blocks assembly. But if you want to save money, then everything is in your hands. To press out the silent block you will need a vice and a pair of mandrels of a suitable size.
All the details of the replacement can be seen in this video. We replace the rear silent blocks of Renault Logan in the same way as with the front levers in case of ruptures or peeling of the hinge rubber.
Diagnostics
All the details of the replacement can be seen in this video. We replace the rear silent blocks of Renault Logan in the same way as with the front levers in case of ruptures or peeling of the hinge rubber. To do this, we will need to hang out the rear of the car.
We remove the wheel from the side of the silent block being dismantled; if there is ABS, we remove the wiring harness from the beam and remove the parking brake cable from the eye of the beam bracket. We disconnect the lower shock absorber mount from the beam arm and unscrew the nut of the bolt securing the arm to the bracket and the three bolts securing the bracket to the body.
Selection of spare parts
To make the right choice of a durable part for Renault Logan, you must be guided by the quality of workmanship and the reputation of the manufacturer. There are many manufacturers that produce rubber-to-metal compounds for Renault cars of all types, one of them is the lemforder company. Lemforder spare parts are installed directly at the Renault plant during the manufacture of the car.
Also, to find the necessary part, it is better to use the original article, which will correspond to the above-mentioned company. The article number can be seen on the side of the part; if this number has been damaged, it can be found in the electronic catalog of Renault spare parts, and you can also find out how much these spare parts cost. Thanks to the article, you can search and purchase absolutely any part of your Renault Logan.
What tools are needed for replacement
To carry out the work of replacing the silent blocks of the levers, as well as the rear beam on a Renault Logan, you need to have a special set of tools, as well as a puller for repressing the necessary parts.
- A car lift, since in this case it is impossible to get by with a jack.
- Puller for performing work on replacing the above-mentioned parts.
- A set of spanners ranging in size from 10 to 32 millimeters.
- A set of socket heads equipped with a ratchet and a long wrench.
- Grease, as well as a set of rags for cleaning the cavities of the installation.
- A hammer weighing 1 kilogram or a small sledgehammer.
In addition to the tool, in order to independently repair and replace the Renault Logan suspension, you will need to invite your friend as an assistant, since an additional pair of hands will not be superfluous in this process.
What to do
What to do if the Renault Logan stove does not work. A little about the air conditioning system of the Renault Logan car - watch the video
First of all, you need to purchase high-quality silent blocks, as well as the necessary tools to complete this task.
Important! Both silent blocks should be replaced, even if the wear of one of them is insignificant. The output on these parts should be the same. Replacement of worn-out items can be done in different ways
In one case, mechanics remove the rear wheels, in another you can do without it, it all depends on the qualifications of the person performing this operation. It is best to consider how silent blocks are replaced on Renault Megane 2 sequentially, step by step. That's what we'll talk about
Replacing worn-out products can be done in different ways. In one case, mechanics remove the rear wheels, in another you can do without it, it all depends on the qualifications of the person performing this operation. It is best to consider how silent blocks are replaced on Renault Megane 2 sequentially, step by step. That's what we'll talk about.
Let's start with the front part of the Logan suspension
In order to replace rubber-metal parts on a Renault Logan with your own hands, you need to dismantle the suspension arms. To do this correctly and not damage the car’s structure, read the following instructions.
- Place your Renault Logan on a lift and then remove the wheels.
- Using a set of socket heads and spanners, unscrew the bolt securing the ball joint to the Logan steering knuckle.
- The lever is held in place by two bolts on the subframe. For convenient and correct dismantling of the lever, you need to unscrew these elements, thereby the lever will be in your hands.
- To replace a Renault Logan part, you need to install a puller in special grooves and dismantle the used elements.
- Thoroughly clean the installation cavity and apply a thin layer of lubricant, then install new parts.
When replacing new rubber-metal elements of Renault Logan, it is necessary to take into account the distance between the lever mounting brackets, otherwise it will be impossible to install the serviced part. To do this, it is better to take measurements in advance, and you will know how much tolerance to leave for the gap.
- If all dimensions are correctly observed, you can install the entire structure. Attention! After installing the lever on the Logan, do not attach it to the ball joint, position it in the same plane with the beam, then tighten the two bolts, only then can you assemble the entire suspension.
FORCE 949T1
The model belongs to the hydraulic puller type, the set of which includes 49 items. With its help, you can easily disassemble the bushing and replace it (with the exception of parts without holes). Compared to the above puller options, FORCE 949T1 is lighter and easier to use.
Characteristics:
- The maximum load on the cylinder is 18.2 t.
- The comfortable and durable spindle has dimensions: Ø 16 mm, Ø 14 mm, Ø 12 mm, Ø 10 mm.
- Deep mandrels - 22 pieces (18 internal ones of 110 mm each and 26 external ones of 68 mm each).
- Short mandrels - 22 pieces (18 internal 40 mm and 26 external 68 mm).
- Bolts - 4 pieces (diameter 16, 14, 12, 10 mm).
- Type - hydraulic universal puller.
Pros:
- Convenient collars.
- Sturdy case with metal clasps.
- Strong ratchets.
- Long heads.
- The handles are made of high-quality material that is not corroded by technical liquids.
Minuses:
- All parts of the puller are sensitive to moisture and quickly rust when exposed to it.
- High price.
Servicing the rear beam
To service the rear beam with your own hands and replace the silent blocks on it, you need to dismantle the entire structure. Of course, if you have a special tool, this procedure can be performed without dismantling the structure.
- Place the car on a lift, then remove the rear wheels.
- Loosen the shock absorber mounting bolts and remove the springs.
- After you have removed the spring, you need to tighten the bolts securing the lower part of the shock absorbers to the beam.
This way, the rear structure will remain hanging on the shock absorbers, and it will be convenient for us to make repairs.
- Unscrew the two bolts from the front of the rear beam, and then install the support post under its central part.
- Install the tool in special places and dismantle the old part.
- Thoroughly clean the surface of the installation cavity, then press in the new part using a mini press.
- Install the rear beam mounts into place, but do not tighten the bolts.
- Unscrew the shock absorber mounting bolts, then install the rear beam in line with the bottom of the car, only then tighten the beam mounting bolts.
This mandatory procedure is necessary to prevent premature failure of new parts.
- Install the rear springs and secure the shock absorbers in place.
Crimping process
The main goal is to ensure that the distance is equal to 7 mm when pressing from the cut of the “cup” of the lever to the outer plane of the silent block flange! And from the plane of the lever to the outer plane of the silent block flange is already 14 mm. There is no need to do less!
Finished unit after crimping
To carry out all actions, you will need two gas or Swedish keys. A screw with washers (puller) and a set of mandrels are also used.
Mandrel with additional insert
All equipment shown above was taken from the repair kit for the VAZ-2109. A lubricant is usually applied to the screw thread: cyatim, litol, etc.
First, clamp the lever in a vice. Then we assemble the structure as shown.
The lever is ready for crimping
The details go in this order:
- Bottom nut;
- Bottom washer;
- Mandrel with liner;
- Upper washer (it presses on the silent block);
- Second nut.
Once again, make sure that the inner sleeve remains free. The two nuts on the screw must be tightened, checking the result with a caliper.
About the types of silent blocks and their applicability
These parts exist in the form of rubber and rubber-metal products. The first type can be seen as the lower mounting elements of the rear chassis shock absorbers, and the second type can be seen in other structural suspension components.
Silent blocks have become indispensable components in the suspension of any modern car. The Renault Logan model does not fall out of this list. Its chassis elements are mostly fixed to body and other components using these rubber-metal products.
How to choose spare parts?
In order to accurately select silent blocks for front levers and more, two aspects should be taken into account:
- quality indicators of the product;
- the reputation of the manufacturer and reviews of its products.
Among the most well-known and trusted manufacturers based on the production of rubber-metal products for chassis and capable of reaching the level of the original product in terms of quality is the well-known brand “Lemforder”. The range of spare parts of this company involves the use of some products by the Renault plant as original elements.
To correctly search for the required analogue, it is recommended to use the data of article numbers belonging to a specific manufacturing company. This code is mainly contained on the part itself. If for various reasons it is damaged and reading it is not possible, you should refer to the original Renault catalog, which displays the spare part numbers for the unit you are interested in. You can also get information about the approximate cost of the required spare parts. Articles allow you to find and purchase any parts not only in the suspension, but in any other component of the car. So the original silent blocks of the front levers have their own article number.
Articles
Renault produces silent blocks both individually and assembled with levers. The part is designated as follows: 6040002245 (60 40 002 245). Analogues:
- 26304 (FEBI)
- 60 92 6304 (SWAG)
- TD729W (DELPHI)
- C8617 (LYNXauto)
- 30292 (ASAM)
- 4500001 (FORMPART)
- 53210 or 33124 (MAPCO)
- FZ90454 (FORTUNE LINE)
- L25819 (MONROE)
- 38DC1002 (AS METAL)
- V46-0268 (VAICO)
- MGZ-508014 or 72-1956 (MAXGEAR)
- 5103924 (NK)
- F8-7977 (OPTIMAL)
- D300165 (DENCKERMANN)
- 4340201409 or EMS8502 (JP GROUP)
- DC11001 or B56112 (RIW)
- 57-00732 (TALOSA)
- 8500 25819 (TRISCAN)
- 77-00862-SX (STELLOX)
- 31242 01 (LEMFORDER)
- RESB3746 (MOOG)
- JBU751 (TRW)
It seems that the last three are praised. But there is nothing better than the original. And the cheapest analogue is produced by SWAG.
What tools to prepare?
To ensure an effective process for replacing silent blocks in the front arms and in the rear beam structure, you should acquire the following tool kit:
- a car lift that allows you to carry out work with convenience;
- puller of a suitable type;
- a set of keys, the standard size of which varies from “10” to “32”;
- socket heads, in the “company” of which we involve an elongated wrench and a ratchet;
- sufficient amount of rags and appropriate lubricant;
- hammers of different sizes (depending on the situation).
It would be useful to involve an assistant, since some operations require their convenient implementation, acting in pairs.
Let's start with the front suspension
In order for the replacement of the silent blocks of the front levers to be successful, there is no alternative to dismantling the front levers and then removing them.
The order of manipulations.
- Loosen the wheel rims and hang the car on a lift.
- We remove both wheels from the Renault Logan.
- Using suitable wrenches, unscrew the bolt that holds the ball pin of the lever support of the same name in the steering knuckle.
- The lever is fixed to the subframe of the Renault Logan using two bolts. Unscrew them and take the part out.
- To remove used elements, we use a puller, ensuring its correct position in relation to the lever (special grooves).
- We clean the lever cage, where we subsequently add lubricant.
- We install new products into our mounting clips.
When replacing the silent blocks of the front arms, we take into account the distance formed between the brackets for fixing the part being serviced. If this indicator is neglected, then subsequent installation of the lever in place will be impossible. To be on the safe side, it is recommended to carry out the required measurements in advance, which will allow you to determine the amount of tolerance to ensure the gap. 8. After making sure that the dimensions are correct, we mount the unit in place.
Attention! When installing the lever, you should not immediately attach it to the ball joint, but should limit it to its location in the same plane as the beam. Next, tighten the two bolts, after which we complete the assembly of the suspension unit.
Replacement of the front control arm silent blocks is complete.
A successful “operation” presupposes that the person performing it has little experience in this work.
Making a puller
As already written above, it is not recommended to remove this part from the car without a puller. When removing, you can hit the paw (lever) and damage it. Moreover, the worst thing here is microcracks that can come out at the most inopportune moment. This will lead to an accident. Hammering a new silent block into place damages the mounted part. Soon after the replacement, your car's suspension will begin to knock again.
It is also possible that the wheel alignment angles may be disrupted (this is only possible on models with four-link suspension). In this case, you will not only get an extraordinary replacement of the joints, but also the need to purchase new wheels.
A purchased tool, in this case, is not always the best choice. They are not always reliable. Also, you should buy them, but why spend money on something that you can easily make yourself from practically waste material. Another reason why people try to make such a device on their own is the need to change the hinge, but there is no puller at hand.
First you need to understand how the puller works. In the simplest version, by tightening the nut, the silent block is squeezed out of the lever eye. There are also hydraulic devices. They work on the same principle, but are driven in different ways. It is almost impossible to assemble a hydraulic puller in a garage. Therefore, we will make a screw version of the device.
To work you will need the following:
- Bolt. It is selected empirically;
- Cylinder. It should be slightly wider than the hole in which the silent block is placed;
- Several washers. One should reliably cover the cylinder hole. Sometimes it is simply welded onto one of its ends.
- The rest should be smaller than the diameter of the silent block;
- Suitable size nut.
Assembling the device is quite simple; insert the bolt into the cylinder. On the reverse side it is assumed that a nut will be installed. All that remains is to put this miracle of garage assembly into practice. The puller works like this:
- Remove the silent block axis. For greater convenience, it is better to remove the lever from the machine. But, on some models you can do the work directly on the car. We clamp the removed paw in a vice;
- To press out the hinge, you need to install a cylinder on one side. The bolt is inserted into the hole. Please note that its length should allow you to place several washers on the other side and screw on the nut;
- Place the washers and begin to tighten the nut on the resulting puller. Gradually, it will squeeze the silent block out of the mounting hole.
As you can see, making such a device for removing hinges is not too difficult.
How to service the rear beam?
Replacing the silent blocks of the rear beam involves dismantling this assembly. If you happen to have a special tool, then this procedure can actually be performed without removing the beam, which is rare.
Let's get started.
So, replacing the silent blocks of the rear beam is not a complicated procedure, but it is a responsible one. Let's do it step by step.
- We hang the car using a lift and then remove the wheels of the stern axle.
- We loosen the fasteners of the rear shock absorbers on the Renault Logan and subsequently remove the springs.
- After removing the springs, we screw the bolts into the fastening points of the lower shock absorber brackets on the beam.
- This ensures a “suspended” position of the entire structure, allowing further actions to be carried out conveniently.
- We install a supporting element under the central sector of the beam and unscrew the bolts at the front points of its attachment.
- Using a tool, we remove each worn-out rear beam silent block from its mounting sockets.
- We clean the cavities and press new products until they are completely seated (a mini-press will do).
- We return the beam fixing elements to their places, but do not tighten them.
- We unscrew the shock absorber fasteners, set the beam level with the bottom, and then tighten the attachment points to the Renault Logan body. This is a necessary measure to ensure the correct location of a device such as the silent block of the rear beam in the socket of the beam placed under the load and to prevent premature wear of the new rubber-metal elements.
- We install the springs and secure the shock absorbers.
Replacement of the rear beam silent blocks has been completed.
Step-by-step instruction
1. Lift and remove the wheel.
2. Unscrew the ball joint bolt from the steering knuckle. Tighten the nut by turning it to sixteen heads and hold the head of the bolt with a sixteen wrench.
After unscrewing, if the bolt cannot be removed manually, we use a punch to size it.
3. Now we need to remove the ball pin from the fist. To do this, take a flathead screwdriver and lightly insert it into the wedge where the mounting bolt was located. This action “wake up the finger.” Next, take the tube, insert it into the lever and push the tube down until your finger pops out. If your finger doesn't come out, you can use a hammer to help a little while tension is applied to the tube. Use a hammer to tap the lever in the direction of your finger movement.
4. If you have a Logan with a stabilizer, you need to unscrew the anti-roll bar. You should hold the top of the arm under the T40 Torx and unscrew the number thirteen nut from the bottom of the arm.
5. Move the protective cover to the side to gain access to the lever mounting bolts. Threaded clamp. Unscrew it manually.
6. Unscrew the nut and bolt shown below. They provide traction. The nut on the lever is an eighteen key, the upper bolt is a thirteen key.
After unscrewing, remove the rod.
7. Unscrew the two bolts securing the lever and remove the lever.
Please note that the front arm bolt is longer than the rear arm bolt. Longer due to the fact that a rod is also attached to it.
8. Check the condition of the ball joint and measure the hole in the stabilizer arm. The hole should not be larger than 16 mm, wear of no more than 1 mm is allowed. If you have a normal hole and a live ball, then it makes sense to change the silent blocks. If any of the above is wrong with you, it is cheaper and more profitable to replace the lever as an assembly.
If you follow the manufacturer's recommendations, it is generally recommended to always replace the lever assembly.
9. Before squeezing out the silent blocks, measure their extension as shown in the photo below. New ones should be planted in approximately the same way, 1-2 mm is allowed.
We select the spindle so that it rests around the silent block against the lever. We select the head based on the size of the silent block. We clamp this body in a vice and tighten the silent block in the chuck. If the silent block does not come out completely, we help with a hammer.
We carry out this procedure with two silent blocks.
10. Lubricate the outside of the silent blocks with a small amount of oil. Next, we select the size of the head so that one head presses on the silent block clamp and fits into the other. We fix it in a vice and check the size, press it.
The distance from the beginning of the silent block to the edge of the lever is approximately 7 mm. If your silent block doesn't work well enough, that's okay. On original new arms they often do not fit evenly.
11. Let's do the reverse assembly. Among the assembly nuances, it is worth noting that the bolts of the silent blocks of the lever must be tightened from the hole when the wheel is loaded.
Also pay attention to the ball axle. Make sure there is no tension in the threads. If the bolt is damaged, it only needs to be replaced with the original bolt. I think there is no need to explain what will happen if the ball stud bursts. Ball bolt tightening torque 60 Nm
There are no more installation nuances, everything is in reverse order. If you have any questions, please ask them below in the comments.