For normal operation of the electronic ignition system and other devices of the VAZ 2114 with an injection engine, the voltage in the on-board network must be in the range of 13.6-14.7 volts. At the initial moment, the power source is the battery voltage (12.6 V), and when the engine is running, the generator becomes the main one. It provides power to the vehicle's equipment and charges the battery.
The charging circuit for cars with carburetor and injection engines is the same. For injection engines, only harnesses have been added for connecting to the ignition module, switch and injection system controller.
autovazremont › Blog › The battery light does not light up, the VAZ-2107 is not charging. What to do?
Recently, returning from work, the following situation arose with me - when I turned on the ignition, the battery charge indicator lamp stopped lighting, the charging itself disappeared, and the voltmeter needle showed only the battery charge level.
Therefore, having somehow reached home, I decided to find out the reason and, after rummaging on the Internet, got to work.
First, a little theory: when the engine is running, a dead battery is charged with a constant voltage of 13.6-14.2 V from the car’s on-board network through the generator. Due to the different speeds of the engine crankshaft, in order to maintain the specified voltage, a voltage regulator (PP, “pill”, “chocolate”) is included in the generator excitation circuit, which, when the voltage in the network increases above the rated one, reduces the current going to the generator excitation winding. The magnetization of the rotor poles decreases, which leads to a decrease in its output voltage. Therefore, the reasons that the generator does not charge the battery are associated with the elements of the “excitation circuit” or the “generator-battery battery” output voltage circuit, including the generator itself. When the ignition is turned on, the lock (14) also turns on the ignition relay (13 ). In this case, +12V from the battery (1) passes through the relay contacts and fuse No. 10 of the mounting block, then is supplied to the on-board network and to the output of the battery charge indicator lamp (11) and the charging sensor in the instrument panel (12). After this, they go through the diode, the mounting block (10) (plugs Ш5-Ш10), are fed to plug “61” of the generator and go to the terminal of the built-in PP (7) and through the brush and contact ring to the excitation winding (8) - the starting excitation of the generator (4). As the engine speed increases, and with it the generator rotor, the phase voltage increases, and through a block of additional diodes (3) it increases the voltage on the excitation winding and on the output diode of the battery charging indicator lamp. When the output phase voltage reaches +12V at both terminals of the battery lamp, the voltage is equalized, and due to the absence of a voltage difference, it goes out (as when starting a car). In this case, the generator produces a voltage greater than 12V, which charges the battery through output “30”.
Thus, in order to eliminate the problem, we need to sequentially check all elements of the system, starting with the elements of the “excitation circuit” and ending with the “generator-battery” circuit. We arm ourselves with a multimeter, an indicator screwdriver or a light bulb with a wire, and begin:
Insufficient contact
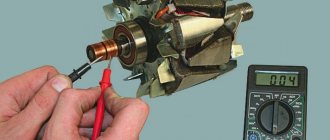
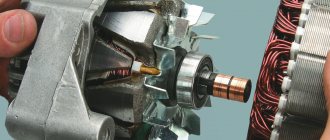
Please note that if the brushes and rings on the rotor become oily or dirty, contact may be lost for a short time or permanently. It is possible that the springs in the brush holder have deteriorated. With their help, the brushes are pressed against the rings on the rotor. Consequently, the total resistance of the excitation winding increases, or the electrical circuit is completely broken. In this case, the generator gives a weak charge or stops working altogether. To get rid of this problem, sometimes you can simply wipe the brushes with a lint-free cloth. It is advisable to moisten it in solvent or gasoline. Of course, if the brushes are very worn, they need to be replaced. In the event that oxidation of the rings has occurred, it is necessary to clean them using glass sandpaper.
What to do if there is no charger?
If the VAZ 2107 is not charging, then the voltage at the battery terminals, both with the high beam headlights on and off, does not increase when the engine is running and corresponds to the voltage of the battery. Most often, the tension even decreases. This indicates a lack of power on the generator excitation winding. The reason for this may be a malfunction of the regulator or loss of power to it. In this case, the first thing we do is use a test lamp to check the power on the wire connected to the voltage regulator or terminal 15 of the generator, depending on the connection diagram used.
On vehicles manufactured after 1996, it is necessary to connect the wire from terminal 15 of the generator to ground with the ignition on. In this case, the charging indicator lamp should light up. If there is power, and on cars produced after 96. If the control lamp is on, then remove the voltage regulator from the generator and check its serviceability. How to do this is described in the article Checking the voltage regulator.
In the event of a power failure, it is necessary to check, on vehicles produced before 1996, the integrity of fuse No. 9 in the mounting block. If it is in good condition, check the serviceability of the wire from the mounting block to the voltage regulator, the reliability of its connections and the presence of power at pin 3 of block 11 of the mounting block. If there is no power at terminal 3, check the integrity of the conductive paths in the mounting block. On cars produced after 1996, if the warning lamp does not light up, you need to check its serviceability and ring the circuit from it to terminal 15 of the generator according to the diagram given. If the voltage regulator and excitation circuit are working properly, it is necessary to remove and repair the generator.
What generator voltage is considered normal?
To check the generator voltage, you need to start the engine and turn off the entire load. In this case, the multimeter should show 14.3 -15.5 Volts (see video at the end of the article). A deviation of 0.1 Volt in one direction or the other is allowed.
After this, it is necessary to connect consumers one by one and check the generator voltage.
Ideally, it should “drop” by about 0.2 Volts when you turn on each new load. In this case, the total U should not fall below the level of 12.8 Volts. Otherwise, the battery will be discharged.
Generator maintenance for preventive purposes
VAZ 2112 malfunction in the generator
First, let's look at how the generator is serviced:
- First of all, this means cleaning the external surfaces.
- Generator maintenance also involves checking the attachment of the device to the engine.
- In a thorough check of the reliability of attachments with a generator and voltage regulator.
- It is also necessary to check the generator drive belt, because if the tension is weak, the device will not function normally. It is recommended to carry out this same check every 10 thousand kilometers.
- It is also necessary to check the condition of the generator belt, which should not have any cracks or delaminations.
VAZ 2112 generator malfunction
The condition of the bearings is checked (see Replacing generator bearings on a VAZ 2112 on your own) of this device. This check involves removing the belt and rotating the rotor by hand. If jamming or play is detected during the process, as well as clicks or noise, the bearings will have to be replaced.
A few words about electrolyte
One of the main indicators by which you can judge the health of a battery is the electrolyte level. The voltage of the power supply depends on it under different operating modes.
In the process of discharging the battery, acid is consumed, the share of which in the total volume of liquid is a third (35-36%).
The result is a decrease in the density of the liquid. When the battery is charged, the reverse process occurs.
In such a situation, water is consumed, and acid, on the contrary, is formed. As a result, the density of the electrolyte increases.
In the normal state, when the battery voltage is 12.7 V, the density is 1.27 g/cc. Moreover, all parameters directly depend on each other.
Repair of generator on VAZ 2104
In fact, repairing a car generator is not the most difficult task.
It is important to properly remove and disassemble the device, and replacing burnt out or worn parts is done intuitively. That’s why car enthusiasts say that repair work on the G-222 is quite feasible even for a driver who has never disassembled generators
Removing the generator from the car
To work, you will need to prepare a minimum set of tools in advance:
- open-end wrench 10;
- open-end wrench 17;
- open-end wrench 19.
After the car has cooled down, you can begin dismantling work. The procedure is relatively simple and does not require specific knowledge in the field of electrical equipment:
- Remove the wheel from the right front side of the vehicle.
- Make sure the car is securely on the jack.
- Climb up on the right side and find the generator housing.
- Loosen the lower mounting nut, but do not unscrew it yet.
- Loosen the nut on the stud from the top side, also without unscrewing it yet.
- After this, you can slide the generator housing onto the engine - this way the belt is loosened and can be removed from the pulley without damage.
- Disconnect the wire coming from the generator terminal.
- Disconnect the wiring from the winding.
- Remove the wire from the brushes.
- Unscrew the lower and upper nuts.
- Pull the generator towards you and remove it from the engine bracket.
Video: dismantling instructions
The device can be very dirty, so it is recommended to wipe the case before disassembling it. After all, during disassembly, dust can get on internal parts and lead to a short circuit.
How to disassemble a generator
The next stage of work requires changing tools:
- open-end wrench 19;
- socket wrench 19;
- ratchet (you can add an extension);
- head at 8;
- head at 10;
- small hammer.
Before disassembling the generator housing, you must also prepare containers in which you will put small parts (nuts, washers, screws). You can even sign from which mechanism certain parts were removed, so that later it will be easier to put the generator back together:
- The first step is to unscrew the four nuts on the back cover.
- Next, remove the pulley; to do this, you will need to unscrew the nut securing it.
- Afterwards the body can be divided into two parts. One part comes out easily from the other. As a result, the generator breaks up into a stator with a winding and a rotor.
- Remove the pulley from the rotor - it usually comes out easily. If you have any difficulties, you can tap it with a hammer.
- Remove the rotor and bearings from the housing.
- Disassemble the stator into parts, being careful not to touch the winding.
Video: instructions for disassembling the device
How to repair a generator
After disassembling the device, you will need to carefully inspect every part. The part needs to be replaced if:
- it is covered with a coating of burning and soot;
- heavy wear is visible;
- there are cracks and nicks on the surface;
- There is a deformation in appearance.
Accordingly, in order to carry out a full repair, it is necessary to replace the failed generator mechanisms with new ones. It is now quite difficult to find suitable elements on the VAZ 2104, so it is worth immediately assessing the feasibility of repair work. Maybe it’s easier to buy an original generator than to waste time searching for the necessary spare parts?
In most cases, it is advisable to replace rather than repair the generator.
If you have chosen to repair the device, you will need to make sure that all components are identical to the standard elements. Even a slight difference between a part and the original one can lead to incorrect operation of the generator and even to its breakdown.
Replace the mechanisms while assembling the device in the reverse order.
Short circuit between turns
Occurs when the outer insulation of the wire with which the winding is wound is destroyed. Please note that in the presence of an interturn short circuit, excessive heating of the winding occurs. In this case, the current consumed by the excitation winding increases many times. For accurate diagnostics, it is necessary to completely disassemble the generator, and then use a multimeter to measure the coil resistance. If it differs from the reference one, we can conclude that there is a short circuit between the turns of the winding.
Generator breakdowns and their elimination
If it turns out that all the equipment is installed correctly, then you should start checking the electrical circuit of the generator. The first thing that needs to be inspected in this case is the contacts. If they are loose, they should be tightened; if they are oxidized, they should be cleaned. Such a seemingly “minor nuisance” may well be the reason that the generator charges the battery very poorly (or even does not charge at all).
After checking the contacts, you need to check the tension of the drive belt. If it is very weakened, then it is likely that it will slip and there will be extremely poor transmission of rotation to the generator shaft. After tightening the belt, battery charging should be restored with the engine running.
The next point to check the functionality of the generator is its graphite brushes. They, like any other graphite brushes on any other device, wear out over time. You can simply check their condition visually - if there is little left of the brushes and they do not make good contact with the rotor, then they should be replaced with new ones. After this, the generator should start working again.
Generator voltage under load
To ensure the functionality of the power supply, it is recommended to perform a load test.
To begin with, remember that there are three types of voltage:
- Nominal - indicated in the operating instructions. It is 12 Volts. This figure is far from the actual U value.
- Actual . Here we are talking about the voltage parameter after installing, connecting and starting to use the car battery. On average, this parameter is 12.6-13.2 V (this was mentioned above).
- Under load . Here the voltage parameter supplied by the generator can change.
The presence of a load allows you to verify the health of the battery and generator.
A seemingly serviceable battery with an output of 12 V can drop significantly after switching on the consumers. During the testing process, an additional device is used - a load fork, which allows for an increased load on the battery.
Let's give an example.
If your battery capacity is 60 mAh, the load value should be 120 A. The connection duration is 3-5 seconds.
We can say that the power supply is working properly if the voltage does not drop below 9 Volts. If the parameter drops to 5-6 V, this indicates a complete discharge of the battery. After testing under load, the voltage should return to 12.2-12.4 V.
If a strong drawdown is detected, it is necessary to check the battery, and then repeat the experiment with the plug again. If there is no drawdown, we can talk about the health of the battery.
To check the generator, you can do the following: start the car, turn on as many consumers as possible, and then take a measurement. The voltage should be 13.5-14 V.
If it is lower, this indicates a failure of the generator. The lower critical limit is 13.0 V.
If the voltage of the car's generator is very low, do not rush to draw conclusions - make sure that the contacts on the battery are not oxidized. If so, rub them with sandpaper.
Possible causes of malfunctions
Brush wear
If the generator does not charge the battery, then the first thing that comes to mind on cars with sufficient mileage is wear of the brushes. There are few purely mechanical components in generators that affect its performance - and the brushes, constantly rubbing against the commutator, are worn out.
As the contact wears out, the contact deteriorates, and the current in the rotor winding drops accordingly. At first, the generator gives little charge at low speeds, “waking up” after re-gasping, then it fails completely. The brushes themselves can be either a separate unit or interlocked with a relay regulator.
When removing the brush assembly from the generator, you can easily feel how far it can be extended so that the elasticity of the springs ceases to be felt - this will be the remaining working length of the longest brush
Please note that more often the brushes wear unevenly: on the side of the cover, where dirt and brush wear products accumulate, the brush wears out faster. This is also noticeable by the presence of a groove on one of the rings
The groove itself is not so bad if it is worn evenly. Here it is wavy, with sharp changes in diameter - a direct indication of replacing the slip rings or rotor assembly. On foreign generators there is a monoblock design, when the diode bridge, the relay-regulator, and the brush assembly are one whole. Replacing such a monoblock is not a cheap matter, and it is stupid to do it when only the brushes are worn out. Therefore, they are soldered, selecting suitable ones from domestic generators or power tools.
Stator problems
Similar problems can arise in stator windings. In particular, if there is an interturn short circuit, the battery will not charge. Of course, the generator can work, but in emergency mode. Firstly, its power will drop significantly. Secondly, the batteries will not be charged. Thirdly, excessive heating of the generator housing occurs. The winding may also short-circuit to the housing. Excessive heating, humming, loss of power - all those signs that are inherent in rotor winding failures. The check is carried out in the same way as in the case of a rotor winding. To carry out repairs, it is necessary to replace all faulty coils. It even happens that in generators the positive terminal is closed to the housing. Consequently, a short circuit also occurs between the terminals of the battery. This poses the risk of a fire. Of course, the generator does not charge in this case.
How does the battery charge in a VAZ 2107?
To understand how the process of charging the “seven” battery occurs, you need to know the principle of operation of the generator and understand the connection diagram of these devices.
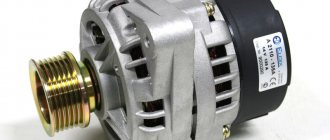
Design, drive and characteristics of the VAZ 2107 generator
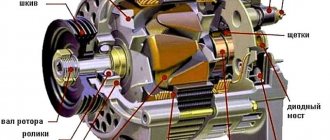
A car generator set serves to provide electricity to the vehicle’s on-board network, as well as to recharge the battery when the power unit is running. Structurally, it consists of the following main elements:
- housings with windings (stator);
- armatures (rotor);
- current conversion module (rectifier);
- stabilizer (voltage regulator).
The generator serves to provide electricity to the vehicle's on-board network.
The unit is driven by a belt from the crankshaft pulley.
Throughout its history, the “Seven” was equipped with two types of generating sets: 372.3701 and 9412.3701. They have the same design and operating principle, except that in unit 9412.3701 the fan blades are located inside the housing, and the rectifier module is located outside.
Table: main technical characteristics of VAZ 2107 generator sets
| 372.3701 | 9412.3701 | |
| Rated voltage, V | 14 | 14 |
| Current at rated voltage and armature speed 5000 rpm, A | 55 | 80 |
| Maximum power, W | 770 | 1120 |
| Weight, kg | 4,5 | 4,9 |
The performance of these devices differs greatly in terms of the amount of current produced and power output. Generator 9412.3701 is more productive. It is used in injection “sevens”, where the on-board network is supplemented by an electronic engine control system.
How does the VAZ 2107 generator set and the generator circuit work?
Without delving into the theory of electrical engineering, the generator functions as follows. When the key is turned in the ignition switch, the current from the battery through the relay and charge warning lamp is supplied to the exciting stator winding. At the same time, the crankshaft begins to rotate the rotor. During rotation of the armature, an electromagnetic field is formed in the phase windings, which induces an alternating current. Since all electrical devices on the on-board network are designed for direct current, the design of the installation includes a semiconductor rectifier module. The amount of voltage produced by the generator varies depending on the crankshaft speed. To stabilize it, a special regulator is used, smoothing out surges and dips and supplying the machine’s on-board network with a voltage as close as possible to the nominal one.
The electric current generated by the generator is supplied to the battery terminals to charge it.
Thus, when the engine is running, the generator converts the torque of the crankshaft into a direct current of 55 or 80 A (depending on the type of device) and a voltage of 13.9–14.5 V, necessary for operating electrical devices and charging the battery. Current is supplied to the positive terminal of the battery through terminal “30” and a separate wire, and the “ground” of the installation is connected to the negative terminal of the battery.
How to choose a replacement generator
When purchasing a new generator with a warranty, this item will be unnecessary. But most often it will be cheaper and more practical to purchase a used part from disassembly. When purchasing a generator secondhand, there is a risk of receiving a faulty part.
When purchasing, you need to check the generator using the following algorithm:
- Visual inspection . Dents, cracks on the body, broken seats and broken fasteners are a reason to bargain or refuse to purchase.
- Pulley rotation. The shaft should not jam and rotate silently; radial and axial play is unacceptable.
- Inspection of the plate. It is better to choose a generator that is completely identical to the standard one in voltage and speed.
- Inspection of slip rings and brushes. If there are deep grooves from brushes on the copper tracks of the rotor, then the generator has served for a long time.
- Checking the functionality of the generator. You will need a battery and a 3-volt control lamp. We connect the minus of the battery to the body of the part, the plus to the excitation terminal, marked with the number “30”. We connect one wire of the light bulb to ground, the second to the “+” terminal of the generator. We sharply turn the generator pulley by hand. If it is working properly, the three-volt light bulb will flash brightly.
- Checking the generator for breakdown of the windings. The technology is described above.
Why does the VAZ-2110 generator not charge the battery?
The standard equipment of the VAZ-2110 car includes a battery with a capacity of 55 Ah. It holds a charge quite well and may not require refilling for many months. The thing is that all voltage losses are compensated by the operation of the generator
If the latter fails for some reason, it is very important to promptly detect the malfunction and eliminate it. Otherwise, the generator will not charge the VAZ-2110 battery and poses a serious threat to the entire power supply system of the vehicle
The main reasons why the generator does not charge the battery
To identify problems, it is necessary to diagnose both the entire on-board network, which may draw too much energy, and the generator itself. If you have tuned your car, equipping it with additional electrical equipment, you will need to check its energy consumption level and serviceability.
Car diagnostics to identify problems with battery charging
First, we need to check the correct operation of the battery charge indicator located on the dashboard. It is quite possible that it is simply showing incorrect data, confusing you, and no serious repairs will be required. The next important step is to check the functionality of the fuse. It is better to immediately replace it with a known-good device and try to start the engine. If the charge indicator goes off immediately, the problem has been detected and successfully resolved.
Battery still won't charge? Let's try to detect a current leak, if any. For this purpose, we check the car when it is cold, when all its systems are completely turned off. A small voltage release in such a situation is considered normal, since in almost any machine a weak contact can be detected in some parts of the circuit and a local short circuit can be identified. If the leak is so large that the generator is not able to charge the battery, the alarm should be sounded.
If there is no strong current output, we carry out exactly the same test, but with the connection of the equipment installed during the tuning process. In this case, this will be the cause of the leak. The easiest way to solve the problem is to remove all third-party devices.
We identify generator malfunctions
The above-mentioned checks make it possible to quickly identify malfunctions of elements of the on-board power supply network, short circuits and other problems. But if the problem is not in the system itself, diagnostics of the generator will be required. In the vast majority of cases, it reveals one of the following problems:
- generator winding break. It is detected using a voltmeter to measure the voltage at the output. To eliminate a break in the outer winding, it is enough to solder, but an internal break requires a complete replacement of the coil;
- short circuit between turns, detected using an ohmmeter. The generator often cannot charge the battery due to increased resistance of the coils;
- insufficient contact between the rotor rings and brushes. The main causes of this problem are contamination of parts or weakening of springs. In the first case, you can simply clean the surfaces of the brushes or rings, but in the second, you will need to replace worn components;
- a short circuit to the housing, which can be eliminated either by high-quality insulation of the generator or by replacing the failed winding;
- short circuit to the stator housing or positive terminal. “Cureable” by installing new parts;
- stretching of the generator belt, its severe abrasion or wear. In this case, the equipment not only does not work correctly, but also gets very hot, so you can quickly detect the problem;
- short circuit in the phase winding.
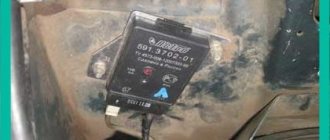
Another fairly common problem is the failure of the generator voltage regulator. This device is installed in order to normalize the current generated by the unit and supplied to the on-board network, maintaining it within strictly defined limits. Operating a car with a broken regulator is strictly prohibited, as there is a very high risk of failure of all electrical equipment
Therefore, it is very important to detect the problem in a timely manner and eliminate it.
Winding destruction
It is not very pleasant if the excitation winding is suddenly destroyed. If such a malfunction is present, the generator will not work completely, since there is no magnetic field. The fact is that the operating principle of any generator is based on the presence of a moving magnetic field. This malfunction can be identified very simply. Firstly, if you touch the generator housing during operation, it will turn out to be too hot. Secondly, a light with a battery drawn on it will definitely light up on the dashboard. It indicates that the battery is not charging. You can also use the multimeter in resistance measurement mode. To do this, you need to measure the resistance value between the rings. But these are not all the reasons why the generator does not charge well.
Table of energy consumption by different equipment.
Charging the battery is necessary in cases where it takes on part of the load of the energy supply system. How much energy does the equipment in the car need?
| Side lights and vehicle lighting | ~40 watt |
| Headlights and fog lights on both sides | ~250 watt |
| Stove fan at maximum power | ~200 watt |
| Cooling fan runs briefly | ~250 watt |
| Heated rear window | ~150 watt |
| Fuel pump and engine management | ~80 watts |
| Radio (medium sound level) | ~100 watt |
Table 1. Electricity consumption in the car by additional equipment.
By simple calculations we get a total consumption of 1070 watts, which when converted to amperes will be approximately 90A. For many car generators, such a load, and they are the first to take it upon themselves, is at the limit of the equipment’s capabilities. When a certain threshold is reached, the system will transfer part of the load to the battery. Therefore, it is necessary to carefully calculate the characteristics of the generator and battery.
Reason #2. Battery is very discharged
A fairly common reason for low on-board voltage is the current battery charge level. If it is low, then the on-board network voltage may also be slightly underestimated. This happens because the discharged battery, after starting the engine, begins to charge intensively, consuming a large current. That is, it is a serious load on the generator.
WHY IS THE VAZ 2109 BATTERY NOT CHARGING?
The generator and battery on the VAZ 2109 are sources of electrical energy. The battery helps start the engine and also supplies electrical energy consumers when the engine is not running. The main voltage initiator in a car is the generator. It powers all devices while the engine is running and at the same time charges the battery.
Therefore, in most cases, if the VAZ 2109 battery is not charging, it means the operation of the generator-battery tandem is broken. You need to look for the cause of the discharge either in the design of the generator itself, or on the path from it to the battery. Sometimes the reason is also poor contact or excessive wear of the battery itself. This problem needs to be corrected urgently, since the battery can only operate the car for a few hours (depending on the capacity). It is necessary to identify the fault in the power source link and eliminate it.
Important points
The voltage (U) and capacity of the car battery are the main parameters that need to be paid attention to when choosing and checking a power source.
The main purpose of the battery is to start the engine during the period when the car's generator has not yet been connected to work, and the battery is the only power source.
To eliminate operational problems, the car owner should know the following points:
- What does the battery life depend on?
- What should the voltage be (in normal mode, after starting the engine and under load);
- What causes the decrease in capacity during the cold season and other issues.
Let's consider these questions in detail.
The lamp does not light
Let us now consider the reasons why the VAZ 2110 battery charging light does not light up:
Multi tester
- If your car has a warning lamp for checking the operation of the generator, then before starting the engine, immediately when you turn on the ignition, the lamp should be on
- If it doesn’t light up, but the rest of the devices work, then perhaps it’s just burned out
- We also do not rule out a break in the generator excitation drive or another malfunction.
- If the rest of the devices on the panel do not work, this means it’s time to check the fuses of the VAZ
- If a light bulb burns out, then the generator is excited through an additional resistance, so the integrity of the light bulb will not in any way affect the operation of the entire charging circuit
- To check the functionality of the electric generator, as well as the charge of the battery, we need a multi tester (as in the photo above)
- Pointer testers require correct polarity when connecting them, and are sensitive to falls and shocks
- First, let's determine the faulty location, let's figure out whether the generator itself or the control light with the wire is faulty
- A quick determination requires disconnecting the thin wire from the electric generator that comes from the warning light, and connecting it to the ground (ground) of the car, then turn on the ignition
- If the VAZ 2110 battery light comes on, then the generator itself is faulty
- Possible malfunctions include a break in the generator winding, a breakdown of the voltage regulator relay, worn brushes or armature slip rings, etc.
- In the event that the charge control light does not light, it is necessary to check the serviceability of both the light bulb and its wires.
- To perform such a check, you do not need to remove the dashboard and pull the lamp out in order to carefully examine the integrity of its filament
- It will be enough to connect the probe of a multimeter, turned on in voltmeter mode, to the car body, and the second to the disconnected wire
- By the way, instead of a multimeter, you can use a test light with a power of about 1 Watt
- In a working circuit, our device will show the battery voltage, and the control light will glow at half-glow
- This means that the charge control light has burned out.
- If the voltmeter readings are strikingly different from the voltage on the battery, then there may be a break in the circuit running from the control light to the generator
- When the charge control light does not go out when the engine is running, you need to check the serviceability of the generator
- The same must be done if the light bulb burns at half-glow
- To check the serviceability of the generator, in any case, we will need to check the voltage at the battery terminals with the engine running
- When checking the battery voltage reading with the generator running, it will be within the normal range -13.5 - 14.5 Volts
- The check should be carried out at medium engine speeds and with the headlights on high beam.
- In addition, the burning of the charge control lamp, while the engine is running, in the glow zone may be due to current leakage through one of several additional diodes in the rectifier bridge
- Or due to a malfunction of the diode located in the instrument panel
- The generator operates normally and does not require repairs.
- Now we have figured out why the VAZ 2110 battery light is on or goes off; identifying faults will not be difficult for you, and correctly identifying the cause is the key to successful repairs. Additionally, I suggest using video materials on the issue of interest.
Problems with the generator
How to check the crankshaft sensor of a VAZ 2115 injector 8 valves
The battery does not charge from the generator due to a number of reasons. In order to quickly identify these problems, you need to know their characteristics.
Belt problems
If the generator does not charge, then the problem may lie in the integrity of the belt. Even an inexperienced car owner will detect serious damage. It is more difficult to determine its weakening. Indeed, in this case, the generators either provide charging or not.
To identify problems with the belt, look at the indicators and lights. They glow almost constantly. To eliminate this, tighten the belts or completely replace them.
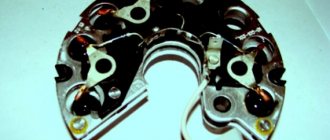
Faulty diodes, regulators, brushes
The generator does not charge the battery if faulty diodes are included. Such elements are identified using multimeters or testers. It is possible to replace one diode or the entire bridge. Incorrectly functioning elements cause the battery to be poorly charged or recharged.
When the power supply is overcharged, the diodes, which are operating normally, heat up. Voltage surges result from the use of an ineffective regulator. It is replaced immediately.
Poor charge occurs because the brushes that make up the generator wear out. If the replacement is not made, the generator does not charge the power source.
Polarity reversal
If the battery of a laptop or vehicle is completely discharged, perform a polarity reversal. If done correctly, the power supply will charge. Polarity reversal can be performed if changes in the poles can be observed. Otherwise, the charging unit should not be connected.
When determining pole reversals, you should focus on the capacity of the cans that are included in lead-acid batteries, but not other sources. For recharging, use only those chargers that are equipped with protective elements.
Polarity reversal is not performed if:
- The electrolytic composition has become cloudy and the charged car battery is quickly discharged.
- The lead plates were destroyed.
- KZ banks, which is included in the composition.
- Low composition density.
Overload
Why does the battery receive a charge, but the voltage does not increase? The main reason is generator overload. This is caused by the connection of standard and non-standard electrical equipment, various gadgets and installations. In this case, the generator operates at the limit.
Such difficulties arise for new car enthusiasts. After all, they use a variety of units and devices, acoustic systems, and lighting equipment for tuning. Sometimes car batteries are upgraded by increasing the power level of the power sources. Therefore, the output voltage does not “cover” all costs.
Other reasons
Why won't the generator charge? This occurs due to rapid wear of the rotor, which does not perform rotational movements and gets stuck in the stator. The rotor stop frequency varies. The only way to cope with this problem is to dismantle the old installation and install a new unit that works normally.
A breakdown in the circuit is an equally common problem due to which the car battery does not take charge from the electric generator. It is problematic to independently identify why the generator stopped functioning. Car mechanics and workshop workers are involved in this event.
The generator does not produce rated voltage
When determining why the battery is not charging, specialists constantly disassemble the generator. These steps allow you to identify the following faults:
The damaged pulley is replaced. To identify such a defect, this element is periodically inspected. Abrasion of current collecting brushes. During active use of vehicles and car batteries, current collection brushes are periodically replaced. When selecting elements, they are guided by the manufacturers’ recommendations. Wear of slip rings. Copper components lose integrity and properties. This results in a reduction in the rated voltage. As a result, the generator does not produce a charge. Violation of the integrity of the diode bridge. Damaged diodes are soldered or pressed in
It is very important to carry out all processes correctly. Soldering irons and other tools are used for these purposes.
The car battery does not charge for various reasons. If the problems are related to current leakage, then elimination of them must be started immediately. After all, a malfunction of the electrical system leads to short circuits, fires, etc. You need to check not only the car battery, but also the generator. After all, it is not difficult to disable it. For example, such consequences result from the installation of non-standard equipment, untested units and installations.
Troubleshooting
A lot depends on the operation of the VAZ 2110 generator. If it malfunctions, what can start the battery? And when it stops providing the required voltage, you have to urgently figure out what the reason is. But just by external signs you can determine that the generator is creating problems:
- The charging light starts flashing at low speeds;
- there may be a burning smell in the cabin;
- there are mechanical damages.
If a visual inspection does not bring results, you must:
- remove the plastic cover from the generator;
- check all electrical connections;
- Unscrew the diode bridge, as well as the voltage regulator relay with brushes.
Diodes are checked with a special tester. When they operate normally, the current will only flow in one direction. If the current flows in two directions or the diodes do not pass it at all, then the reason has been found.
The cause of poor performance may be the belt. If it is worn out, it can be seen immediately. If the generator winding “flies”, it is better to entrust the solution to this problem to a specialist.
Common battery problems:
- short circuit of battery electrodes/plates;
- mechanical or chemical damage to the battery plates;
- violation of the tightness of battery cans - cracks in the battery case as a result of impacts or improper installation;
- chemical oxidation of the battery terminals. The main causes of these malfunctions are:
- gross violations of operating rules;
- expiration of the product's service life;
- various manufacturing defects.
It is very useful for a motorist to know the main causes of generator malfunctions , how to eliminate them, as well as preventive measures to prevent breakdowns.
All generators are divided into alternating and direct current generators. Modern passenger vehicles are equipped with alternating current generators with a built-in diode bridge (rectifier). The latter is necessary to convert current into direct current, on which the vehicle's electrical consumers operate. The rectifier, as a rule, is located in the cover or housing of the generator and is integral with the latter.
All electrical appliances of the car are designed for a strictly defined operating voltage range. As a rule, operating voltages are in the range of 13.8–14.7 V. Due to the fact that the generator is “tied” with a belt to the engine crankshaft, it will work differently . It is for smoothing and regulating the output current that the relay-voltage regulator is designed, playing the role of a stabilizer and preventing both surges and dips in the operating voltage. Modern generators are equipped with built-in integrated voltage regulators, colloquially referred to as “chocolate” or “tablet”.
It is already clear that any generator is a rather complex unit, extremely important for any car.