Traffic rules prohibit with faulty low beam headlights or without side lights in the dark or when there is insufficient visibility on the road .
The rear lights have a Renault Logan combined bulb (with 2 filaments).
In it, the side lights are connected to the brake signal. Its failure is fraught with big troubles. Turn signals can be given by hand, but the trouble is that not all drivers are able to recognize them. Therefore, it is better to be ready to change any of the car’s lighting elements at any time of the day, right on the road. We will describe how to change the lamps in a car yourself .
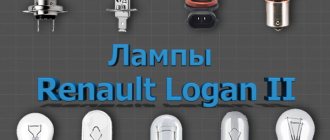
Lamps used
| Lamp | Type | Power | |
| Front optics | Low/high beam lamp | H4 | 60/55 |
| Front turn signal | PY21W | 21 | |
| Dimensions | W5W | 5 | |
| PTF | H11 | 55 | |
| Side turn signal lamp | with white diffuser | WY5W | 5 |
| with orange diffuser | W5W | 5 | |
| Lamp (rear block headlight) | brake light lamp | P21/5W | 21/5 |
| PTF | P21W | 21 | |
| reverse light | P21W | 21 | |
| turn signal | PY21W | 21 | |
| Additional brake signal | P21W | 21 | |
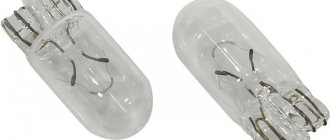
| Room lighting | W5W | 5 | |
| Interior and trunk lamps | trunk light | W5W | 5 |
| lampshade | W5W | 5 | |
| individual lighting | W5W | 5 | |
| glove compartment lamp | W5W | 5 | |
| cigarette lighter illumination | W1,2W | 1,2 | |
| climate control unit illumination | W1,2W | 1,2 | |
We check, select and change the battery for Renault Logan
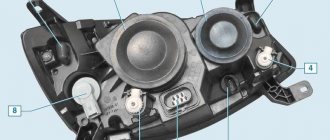
Replacing light bulbs in the front headlight of Renault Logan 1
In the left Renault Logan headlight unit, it is more convenient to change the lighting elements by first removing the battery (but you don’t have to do this). To change the turn signal lamp, you must first squeeze out the lock of the wire block, then disconnect it from the socket.
We press the lock of the wire block, then disconnect it from the socket.
The socket rotates clockwise in the left headlight , and counterclockwise in the right . After this, the socket is removed along with the light bulb. To remove it, you will need to press it and scroll counterclockwise . Replacement requires PY21W .
Turn the socket clockwise (for the right headlight - counterclockwise) and remove it from the socket.
Also, after disconnecting the wire block from the turn signal socket, you can get to the side lights . The entire socket rotates clockwise in the left headlight of Renault Logan 1 and counterclockwise in the right one . After this, you can remove the socket from the headlight housing along with the side light bulb. W5W is used for updating .
Turn the side light socket clockwise (for the right headlight - counterclockwise) and remove the socket with the lamp from the headlight housing.
Replacing low (high) beam lamps
The process of repairing headlights in the left and right headlights of Renault Logan 1st generation is similar. The battery gets in the way and does not need to be removed.
Remove the plastic cover (for clarity, the headlight mounting bolts are unscrewed and it is pushed forward). Disconnect the wire block from the head light source.
First, the plastic cover is removed ; to do this, the mounting bolts are unscrewed . The wire block is disconnected from the low beam bulb , after which the sealing rubber cover is removed .
Remove the rubber sealing cover (shown on the removed headlight for clarity). We remove it from engagement with the reflector hook.
The spring clamp is squeezed out , after which it must be removed from the engagement with the reflector. then lowered and the headlight bulb can be removed from the headlamp housing.
Lower the latch and remove the head light source from the headlamp housing.
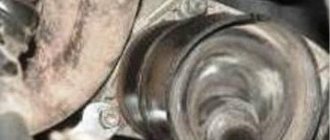
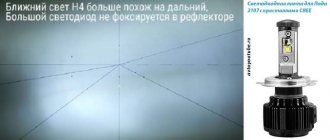
It is halogen , so you cannot touch the glass flask with your fingers in a new product, because The slightest traces of fat and sweat will cause it to overheat and quickly fail. You can clean the glass with an alcohol solution on a clean cloth. You can completely exchange it for a product marked H4 . Everything is assembled in reverse order.
Adjusting Renault Logan headlights - good light
On a note!
The low and high beam lamps installed in the car are halogen. This suggests that it is strictly not recommended to touch their flasks before installation and operation .
You will have a reasonable question: Why?! And we will answer you! Grease stains that your fingers leave on everything they touch, and in our case on a halogen lamp, have a very adverse effect on the service life of this very lamp. Everyone knows that such lighting devices have a very high temperature during operation, so if you accidentally touch your light bulb with your hands, you can rest assured that at the site of this contact, black soot will appear, which will subsequently dim and turn black even more, heating up the light bulb itself. flask, which can subsequently lead to its swelling and destruction.
Therefore, installation work should be carried out with gloves, and if this is not possible, then make sure that it is clean before installing the lamp.
Now you yourself know that in such a matter as replacing a light bulb, there is nothing complicated and the entire process from the beginning to the completion of all work was within 15-20 minutes, which allows you to carry it out simply in the parking lot near your home.
Changing the light source in the PTF Renault Logan
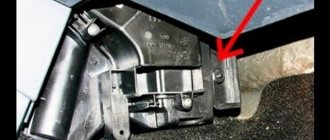
Unscrew the three screws and remove the front bumper mudguard.
a mudguard on the front bumper of Renault Logan 1 . It should be removed near the damaged lamp. The latch on the wire block and it is disconnected. The flask is turned counterclockwise and removed . H11 is installed in the reverse order .
We press out the plastic clamp of the wire block and disconnect it from the light source. Turn it counterclockwise and remove the lamp.
How to remove the rear or front bumper on a Renault Sandero
If visual defects appear on one of the bumpers, the presentability of the Renault Sandero decreases. In order to return the car to a new look, this part should be replaced. To do this, it is necessary to remove the rear bumper, and if the front bumper is damaged, then work must be done on it. The procedure is simple and does not take much time. Removing the rear or front bumper is necessary if installing another radiator grille. Its position in this version is low. It may become clogged with dirt and dust. This results in damage to the grille. And then the front bumper must be replaced. In this article we will try to sort out all the nuances, including finding out how to remove the bumper.
First, study videos or photographs on this topic for a better understanding of how to remove the bumper. In this way, you can avoid unnecessary questions that may arise during dismantling. This will also make it possible to find out what fasteners are used and where they are located, which will speed up the procedure. The main ones should be video reviews, where everything is described in detail.
Required Tools
To install a new part, only a couple of tools are used. Dismantling is carried out with a set of screwdrivers. All work is carried out in-house, which saves money. To remove the rear bumper, you need to unscrew the screws and fasteners. The use of a lift or jack is not necessary in this case.
Changing the light sources of the rear headlight unit
Unscrew the two plastic nuts securing the rear light inside the trunk.
We remove the flashlight without disconnecting the wire block from it. To change the side light in the rear lights , inside the trunk of Renault Logan 1 you need to unscrew the two nuts securing the light, they are plastic. remove the foam gasket from it , then 2 plastic latches are pressed out , after which the holder with all the lighting fixtures is removed.
Remove the foam gasket from the lantern. We press the two plastic latches and remove the holder from the flashlight body.
To remove the turn signal bulb from the holder, press it and turn it counterclockwise . P21W is installed in the reverse order . The fog light and reverse signals are also being replaced . Combined P21/5W ( dimensions plus brakes ). On each holder near the cartridges the power of the lighting device is indicated.
By pressing the combined side light and brake signal lamp and turning it counterclockwise, remove it from the holder socket. The power of the light source is indicated on the holder next to each cartridge.
Replacing steering rods and boots for Renault Logan
Side light circuit
It's very easy to replace the side light bulb yourself.
In order to save fuel and reduce the load on the generator, daytime running lights are now often included in this circuit, which makes it quite complicated.
You might be interested to know whether it is possible to use LED lamps in a car? Read more in this article
The standard wiring option is quite simple and consists of the following elements:
- circuit breakers;
- front and rear position lamps;
- central or key switch;
- Let's take a closer look at the first two elements.
Circuit breakers
Sometimes blown fuses are the reason why the side lights do not light up on one side or another.
There are usually two fuses in the circuit, for the left and right sides separately. Since the light bulbs consume little power (4-5 W each), the fuse rating is small, only 5-7.5 A.
Where are the side light fuses located?
In the same place as the others, in a single block. On most modern cars, this block is located under the instrument panel next to the steering column, or, more often, on the lower left, under a plastic trim.
In the latter case, it is enough to remove the cover protecting the unit, mounted on latches. On the back of the cover, as a rule, there is a sticker with information about which circuit this or that fuse protects, indicating its rating.
The biggest inconvenience in this case may be insufficient knowledge of the English language - it is in this language that inscriptions are usually made, even on Korean and Japanese cars.
Lamps
Externally, the headlight bulb is marked W5W, but today LED sidelight bulbs are increasingly used.
Their advantage over incandescent lamps is their greater durability, and the price of both largely depends on the manufacturer. The most famous products are Philips, Osram, Tesla.
What are the new generation 4Drive LED lamps? Find out now!
Watch the video about LED bulbs for side lights:
Moreover, as the “Behind the Wheel” test showed, expensive products do not always justify their price.
Also, quite often, the front dimensions are equipped with light bulbs with a metal base, but this, one might say, is a thing of the past.
For rear position lights, the most common lamp is with two spirals - 21 and 5 (or 4) W.
The 21 W coil lights up when you press the brake, i.e. In this case, the light bulb serves as a brake light, while the lower power spiral works as a side light.
Just as with any other lamps, purchasing a more expensive product does not guarantee any exceptional durability.
The reliability and safety of Renault Logan is beyond doubt, as is the operation of all its systems. Decent lighting equipment is available for maintenance, and after carefully reading the recommendations, you can easily replace head lighting equipment yourself, including side lamps.
Replacing lamps in the additional brake light Logan 1
Inside the trunk, through the hole in the rear parcel shelf, turn the cartridge counterclockwise and remove the cartridge.
an additional brake signal on the rear shelf of the cabin . To get to it, you will need to lift the trunk lid and unscrew the cartridge counterclockwise . The bulb itself from the cartridge after pressing and turning again counterclockwise . The new P21W is installed in the reverse order.
Changing the room lighting source
Use a screwdriver to press out the plastic clamp of the flashlight and remove the flashlight from the hole in the rear bumper.
In the rear bumper of the 1st generation Renault Logan there is a special hole in which the license plate lamps are located. To get to them, you need to use a flat screwdriver to press out the plastic clip and remove the flashlight. disconnect the electrical wiring block from it . The diffuser is removed by pressing its clamps . After this, the lighting element can be removed and replaced with a new one marked W5W . The entire structure is assembled in reverse order.
Having released the clamp of the wire block, disconnect the wire block from the lamp. We press the latches with our hands and remove the diffuser. We take out the light source from the lantern.
Possible malfunctions of the light switch and their elimination
In Renault Logan, the light switch becomes unusable from time to time. This usually occurs due to wiring problems. They may stop turning on all the lights at the same time, and, for example, only the side lights.
To fix this problem, you need to disconnect the negative from the battery, and then remove the cover from the steering wheel and unscrew the switch. Disconnect the terminal by pressing the clamp on both sides. Inspect the part to determine which wire has broken. Most often, this happens with black and red. To repair the regulator, you will need to replace both of these wires.
We recommend: Modification of Renault Duster. Chip tuning
Replacing interior lighting bulbs Renault Logan 1
We remove the lamp diffuser, overcoming the resistance of the four clamps.
We take out the lighting lamp from the ceiling and insert a new W5W. To remove the lampshade: by pressing the plastic lock, remove the lampshade from the ceiling upholstery. The “negative” terminal is removed from the battery . By pressing the 4 latches , the diffuser is removed from the lampshade. The lighting bulb is removed from the lampshade and replaced with a new W5W . The individual backlight bulb also changes .
We press the latch and, having disconnected the block of wires, remove the interior lamp.
During body repair of a Renault Logan or with new upholstery, after removing the diffuser, remove the lampshade by simply pressing the plastic clip and disconnecting the electrical wiring block.
Changing the power steering fluid in Renault Logan
Trunk lighting
The Renault Logan trunk light on the rear parcel shelf . First, remove the negative terminal from the battery, then lift the trunk lid . The lampshade opens; you need to pry it up with a screwdriver and remove it from the hole in the shelf.
Use a screwdriver to pry up the lampshade and remove it from the hole in the rear shelf. Squeeze the plastic clip and remove the lamp diffuser.
The diffuser is removed from it by squeezing the plastic lock. Now you can remove the damaged lamp from the lampshade and insert a new W5W . Everything is reassembled and put in place in reverse order. The lampshade is also replaced if necessary.
Remove the light source from the lampshade. To replace the lampshade, remove it from the hole in the rear parcel shelf. By pressing the latch of the wire block, disconnect the wire block from the lampshade.
Renault Logan alternator belt replacement
Choosing a manufacturer
Phillips lighting fixtures are factory installed in Renault. Elements in a standard installation show a long service life - up to 40,000 km. After replacement, a similar part will last up to 10,000 km.
Among the companies specializing in the production of H4 type car lights are:
- Philips;
- Narva;
- Osram;
- Bosch;
- Koito;
- LynxAuto;
- Tesla;
- Lighthouse;
- Dialuch.
Halogen optics from these manufacturers are characterized by high quality and good lighting properties. For Renault Logan lamps, a power of 55/60 W is provided. A separate package may include a technical mark +30/50%. This marking indicates an increase in luminous flux by a certain percentage.
When installing halogens marked +30/50%, it is necessary to adjust each headlight. This will ensure optimal light output without dazzling oncoming drivers.