The battery plays an important role in a car. When you turn the ignition key, it sends current to the starter. It helps the engine start. If it is discharged, you will not be able to start the car.
Therefore, to avoid problems with starting, this is especially important in winter, it is necessary to periodically monitor the battery capacity. Because With the onset of winter, many car owners are faced with this. This is due to the fact that negative temperatures have a bad effect on the electrolyte. at how to check the charge of a car battery at home below.
How to check the battery yourself
So, how can you check the health of your car battery?
Of all these methods, the most accessible to the average person is to use a tester to check the car battery and visually inspect it, and perhaps look inside (if the battery is serviceable) in order to see the color and electrolyte level. And to fully check the car battery for performance at home, you also need a densimeter and a load fork. Only in this way will the picture of the battery condition be as clear as possible.
Therefore, if there are no such devices, then the minimum actions that are available to everyone are to use a multimeter, a ruler and use regular consumers.
To test a battery without special equipment, you need to know its power (say, 60 Ampere/hour) and load it halfway with consumers. For example, by connecting several light bulbs in parallel. If after 5 minutes of operation they begin to glow dimly, it means the battery is not working as it should.
As you can see, such a home test is too primitive, so you can’t do without instructions on how to find out the real condition of a car battery. We will have to consider in detail the principles and all available testing methods, right down to measuring the density of the electrolyte and testing with a load simulating the operation of the starter.
Examination
Now directly about how to check your battery yourself with a load fork, reading the necessary data on the condition of the battery.
Not everyone knows the nuances of such a procedure. It is generally accepted that this is very difficult. But if you figure out how to use a load fork and follow the instructions, it turns out that you don’t need much to test your battery.
This operation is performed with or without a load.
Testing without load
First, let’s learn how to properly and independently test your car battery with a load fork without using a load.
Before testing the battery, you need to disconnect it from the charger or remove the car terminals. A minimum of 7 hours must have passed since the last trip.
Therefore, the most optimal time will be the morning, when the car has been parked overnight. Be sure to check the electrolyte level and add water if necessary.
The load forks are mobile, so it is not necessary to remove the battery from the car to check. It is optimal when the battery temperature is about 20 degrees or more. If it's cold outside, it's better to remove the battery, take it indoors, wait for it to warm up, and then start testing.
The diagnostics itself without load is performed according to the following scheme:
- connect the positive wire with the plug terminal to the battery positive;
- a metal pin or negative wire is connected to the negative of the battery (5-6 sec.);
- look at the readings indicated on the voltmeter.
If the device shows 12.6-12.9 V, this corresponds to 100% charge. When the range is 12.1-12.3 and 12.3-12.6 V, this is 50 and 75% charge respectively. At readings of about 11.5-11.8 V, the plug shows a full discharge.
Load testing
Having completed the first stage of verification, you can gradually move on to the next step. Namely, testing under load.
You can check the battery using an NV under load only if the battery is fully charged.
Now in more detail about how to properly test your car battery with a load fork under load conditions. The load should be connected based on the recommendations from the manual. Then the plug itself is switched.
Be careful, because when there is a load, a large current will flow through the negative terminal, which can cause a spark.
When testing under load, the main data is obtained at 5 seconds of testing. After this, the device turns off. You cannot keep the plug on for more than 5 seconds.
As for the results, they could be like this:
- when the voltage is above 10.2 V, everything is fine with the battery, the charge is full;
- if the device shows 9.6 V, the charge is approximately 75%, which is also good;
- a value of about 9.0 V is allowed, that is, 50% charge;
- 8.4 V is only 25%;
- if less than 7.8 V, a complete discharge is observed.
Upon completion of the load test, another test without load is carried out. Normally, the device should show 12.4-12.7 V. If the parameters have dropped, there are problems in one or several battery banks. It is necessary to check the electrolyte level, its condition, the tightness of the case, the presence of problems with contacts, etc. That is, a complete diagnosis is carried out. If the problem is in the battery itself, you will probably have to buy a new one.
Internal battery failures
Reasons for discharging the VAZ 2110 battery
The main problem that spoils the battery from the inside is the coating of the plates with reaction salts of acid and lead. They prevent the movement of charged particles from one electrode to another. At the same time, the resistance increases, which leads to a decrease in the overall battery capacity. The early stages of such a process are reversible, but if the reaction has significantly damaged the plates, then restoring the operation of the unit is impossible.
Device for measuring electrolyte density
Sometimes particles may fall off the plates, leading to a short circuit. If this happened not so long ago, then washing the inside with distilled water will help. To avoid swelling of the case from severe long-term frosts, you should not leave the battery in the car. The electrolyte expanded due to this process will destroy the structure of the battery, which after such “stress” cannot be restored.
Common types and types of load forks
In specialized stores and markets you can find a large number of load forks, which differ in design, measurement range and level of measured current.
In addition, such measuring instruments are classified according to the type of battery being tested - for alkaline and acidic power sources.
The main feature is the difference in load (most often from 1 to 12 Amperes).
There are also plugs that allow you to test individual battery banks, if the product design allows this possibility.
The most popular types of load forks include:
- NV-B is a device that allows you to measure voltage in the range from 0 to 3 Volts. The maximum current load is 100 Amps. The device is used to test acid-type batteries (voltage 2 V) and alkaline batteries (1.2 Volts).
- E 107 UHL4 - type of load plug for testing 12-volt car batteries. The measurement limit in this device is from 0 to 20 Volts. Current load limit is 100 Amperes.
- BH-01 is a device that allows you to measure voltage in the range from 0 to 15 V. The operating temperature is from 1 to 35 degrees Celsius. The test should be repeated after 15 seconds.
- HB-01 is a device characterized by an accuracy of 2.5%, as well as a measurement range from 0 to 15 Volts. Load size - 100 or 200 Amperes. Temperature range from 30 degrees below zero to 60 degrees above zero.
- NV-03 is the most popular product among car owners, the distinctive feature of which is the presence of an electronic voltmeter with an LCD indicator. The kit comes with two loads that can be connected to the plug separately. The maximum current load is 200 A, the voltage is from 0 to 16 Volts, and the capacity of the tested batteries is from 15 to 240 A*h. The product is used to test batteries for a standard voltage of 12 Volts. If one load is connected, the current limit will be 100 Amperes. In this case, you can test batteries with a capacity of 15-100 Ah. If you install two loads, the maximum current increases to 200 Amperes. In this case, it is possible to check the battery for 100-240 Ah.
- HB-04 is a more powerful device that allows you to test 12 and 24 Volt batteries. In addition, using the device, you can test individual elements of a 2 V battery. Measurement accuracy is 0.5%, voltage range is 0-32 V. In addition, the product operates in a wide temperature range - from -20 to +60 degrees Celsius .
Where to charge?
Many people do not give due importance to this aspect of the car battery charging process. And in vain, because under no circumstances should you charge the battery in a poorly ventilated area, especially if we are talking about an apartment. The fact is that during the charging process the battery emits sulfur dioxide, arsenic hydrogen (arsine), antimonous hydrogen (stibine), hydrogen chloride and other toxic substances. Their high concentration is harmful to humans, causing headaches, coughs and other symptoms of deterioration of health. Moreover, everything that the battery emits ends up on furniture, clothes, and carpets. Consequently, these poisons will have their negative impact on humans for a long time.
Do you think this is nonsense? In order to prove the opposite, we conducted a visual experiment, may Green Peace forgive us. Next to the battery, which is being charged in an unventilated room, we placed a small indoor tree. Lively, green and very pretty. After just a few hours, its leaves began to dry out and turn yellow, and after another two hours, only the trunk and branches remained of the tree. All the leaves have fallen. Draw your own conclusions.
However, that's not all. The hydrogen released by the battery combines with the oxygen contained in the air to become explosive. Sometimes all it takes is a small spark, a lit match or a cigarette. Therefore, the safest place to charge a car battery is outside or in a well-ventilated room, preferably with a draft.
In conclusion, we would like to wish that the battery in your car never runs out.
March 19, 2013. Artem Kiselev, especially for InfoCar.ua
Source: InfoCar.ua
Original taken from
lukilukii
in Car Battery. Charging correctly
A. LAVRENOV, Irkutsk
When a battery (or rechargeable battery) is charged, the charging current is set according to the readings of the ammeter. What does it show?
Electrochemical processes in a battery occur on the surface of its plates, which are in the electrolyte. To increase the battery capacity, the plates are made porous. In the thickness of the plate, in its pores, mixing of the electrolyte occurs much more slowly than on its surface and in the adjacent electrolyte layer.
It has been noticed that the higher the charging current, the more intense undesirable processes occur in the thickness of the plates, i.e., battery aging. Therefore, the charging current is limited, finding a compromise between charging speed and the rate of battery aging from high current. It is generally accepted to charge lead-acid starter batteries with a current equal in amperes to one-tenth of the ampere-hour capacity. And the operating instructions for these batteries [1] recommend, for example, for a 6ST55 battery the charging current is even less - 2.75 A, i.e. 0.05 capacity.
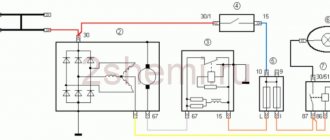
For many years, chargers have been manufactured according to the same structural diagram: mains transformer—full-wave rectifier (sometimes bridge)—rheostat—ammeter. Let's add a measuring resistor with a resistance of 0.1 Ohm to the charging circuit of the device, and instead of one ammeter we will connect three in series - a magnetoelectric (TL-4 avometer), an electromagnetic E421 and a M890F multimeter (see diagram in Fig. 1). We will set the avometer and multimeter to measure direct current.
Let's connect the battery to the charger and use the magnetoelectric ammeter PA1 to set the charging current with rheostat R1 to 1.9 A. Some may find it strange, but the electromagnetic ammeter PA2 will show 2.7 A, and the electronic ammeter will show 1.87 A. All devices tested and gave the same readings when measuring direct current.
The slight difference in the readings of ammeters PA1 and RAZ is explained only by the natural error of the instruments, but the reason for the significant difference in the readings of ammeter PA2 is that the current in the circuit is very different from constant. It is known that the ammeter of the electromagnetic system measures the effective value of alternating current, and the magnetoelectric and electronic ones measure the average. It is the average value of the charging current that determines the electrical charge transferred to the battery.
Let's apply the voltage dropped across the measuring resistor R2 to the Y input of the oscilloscope (sweep speed - 2 ms/div, sensitivity - 0.2 V/div) and take a series of oscillograms at current values of 1, 2 and 3 A, set using an ammeter TL-4.
The oscillograms (Fig. 2, a, b and c, respectively) strongly resemble in shape the voltage at the output of a half-wave rectifier, although each “half-sine wave” is somewhat distorted: its top is flattened at the top and inclined to the right. The charging current occurs at the moment when the voltage at the output of the rectifier exceeds the EMF of the battery being charged, while the electrochemical processes are nonlinear. Connecting a smoothing capacitor C1 with a capacity of 4700 μF to the output of the rectifier practically did not change the shape of the charging current. And here’s the most interesting thing: these “half-sine waves” on the oscillogram in Fig. 2b, for example, have a height at the maximum point of two divisions of the oscilloscope scale, and this corresponds to 4 A. Do you remember what the ammeters showed?
Let's now experiment with an SCR charger. Such devices are attractive because, due to the absence of a bulky, powerful rheostat, they are small in size and have significantly higher efficiency and reliability. For the experiment, I chose the device described in [2]. The voltage of the secondary winding is 27 V rms, the ammeter is left alone - TL-4, the measuring resistor with a resistance of 0.1 Ohm is the same.
Oscillogram in Fig. 3a corresponds to the ammeter reading of 1 A; the current amplitude reaches 3.2 divisions of the oscilloscope scale - 6.4 A. Oscillograms Fig. 3, b and 3, c - with ammeter readings also 2 and 3 A. Curves 2, c and 3, c are close to each other in amplitude, since the same transformer was used, the rheostat was in a position where the resistance was almost minimal, and the trinistor is open almost the entire half-cycle.
Signs and causes of battery failure
An experienced driver will quickly guess about problems with the power source. To do this, he only needs a few signs, including:
- Sluggish engine cranking, indicating a low charge level. His efforts are not enough to ignite the fuel mixture.
- The battery drains quickly. Usually this problem is detected in the cold season, when a seemingly full battery goes out after a couple of cranks.
- Energy consumers are unstable.
All these factors should not be ignored, since the final failure of the battery can occur at the most unexpected moment. To avoid consequences, it is necessary to diagnose the unit.
There are several reasons for the battery to malfunction. Among the main ones the following are considered:
- The absent-mindedness of the owner, when electrical appliances are left on when leaving the car, which leads to the rapid landing of the container.
- Low quality of equipment maintenance.
- Increasing service life beyond established standards.
- Technical problems in the electrical wiring system, which can result in oxidation and destruction of contact connections.
- Incorrect connection of consumers leads to increased electricity consumption and reduced battery life.
- The generator does not work well, disrupting the battery recharging cycle while driving.
The root causes of battery failure can be diagnosed and prevented. It is important that this be done by properly qualified specialists and using high-quality and reliable tools.
Alternative methods
A proven method for restoring battery performance without using a special device is “lighting” from another battery.
It is important that they have the same current values. Otherwise, the fuses or part of the vehicle's electrical wiring will fail.
This can be done using the following algorithm.
- Direct connection to the battery of another car, observing the polarity, as when using a charger.
- After starting the engine, you must wait 3-5 minutes and only after that you can disconnect the terminals. First from the “donor”, and then from the battery of your car.
- The trip lasts 20-30 minutes. The best charging will occur when upshifts or downshifts are activated. The recommended crankshaft speed is from 2900 to 3200.
This method will be effective if the battery charge level is not lower than critical. Otherwise, starting the engine and on-board systems will be impossible.
It is also not recommended to use homemade chargers made from household charging blocks from a laptop or mobile phone. It is almost impossible to control the main current and voltage values during the charging process. This can lead to negative consequences. It is best to purchase a cheap but reliable factory charger model.
The battery is the most important thing in any car. It is this element that provides the starting current to the starter. It is thanks to the battery that the engine starts quickly and without problems. But this doesn't always happen. To avoid difficulty starting, you need to periodically check its charge level. There are several ways to do this.
How to check the charge of a car battery at home? You will find out the answer to this question further in our article.
Using a Multimeter to Test
This device is in demand not only among motorists. It is used in any area related to electrical measurements, including using it to check the performance of the battery. The versatility of such a tool is explained by the fact that it combines a voltmeter, an ohmmeter, and an ammeter. The compact device does not take up much space in the car and is always ready to take the necessary measurements. The battery reserve lasts for a long time, if you remember to turn it off during a break in work.
When choosing an assistant to repair car electrical wiring at home, you need to take into account the following characteristics:
- DC voltage is measured in the range from 0 to 200 mV, 2 V, 20 V, 200 V, 1 thousand V, and alternating voltage is measured from 0 to 200 V, 750 V.
- Resistance testing parameters range from 0 to 200 ohms.
- The DC current run-up in most models is 2, 20, 200 mA.
Battery voltage measurement
This is the most important parameter of the battery’s suitability for operation. Many drivers test this indicator first. This is done with the engine running. If the device scale displays values from 13.5 to 14 V, then everything is in order with this characteristic. Increased numbers will indicate a low charge level and more energy being supplied from the generator to maintain operating mode. This case often occurs in winter, when a faulty battery runs out of power.
There is no need to worry about short-term exceeding the standard data. In a technically sound car, the level stabilizes within 10 minutes. If during the specified period the indicators have not been restored, you need to pay attention to the serviceability of the voltage regulator or the condition of its contacts. If they become oxidized, they need to be cleaned. If there is a decrease in potential below 13 volts, you should think about replacing the battery, as this is an indicator of a faulty element.
If you take measurements with the car not running, you should pay attention to the following nuances:
- A voltage lower than 12 volts will not allow the engine to start, especially in cold weather with thickened oil. The crankshaft will not turn due to insufficient force in such a situation. A normal level is considered to be no weaker than 13 V.
- All measurements should be taken before the start of the movement, and not immediately after its completion.
- A larger charge will keep the battery operating for a longer period. At a lower level, it will sit down faster. Therefore, a new battery or one in close to this condition remains operational longer.
Battery charge and capacity
To check a car battery using this method, you need to analyze the data from a multimeter. Measurements should be taken 5 hours after recharging or disconnecting the battery from the machine. The data in this case will be more accurate. They do not depend on the ambient temperature.
Considering such measurements, the following patterns should be noted:
- A potential difference of 12.8 V indicates a fully charged battery. A large excess hints at serious malfunctions.
- The 75% balance is indicated by the figure 12.6 V.
- The marking 12.2 is taken as half.
- 12 volts will indicate a quarter of the resource.
- Anything less than the last value indicates a minimum reserve.
Information about capacity is no less important than charge. You can test it in the following way:
- The battery must be fully ready for use.
- Apply load to the battery. You can connect several lighting fixtures in series.
- A weak glow at a voltage of 12.4 volts guarantees problems with starting the engine in winter.
- Reducing the data below 12 V requires replacing the battery.
Such a check of the car battery provides an opportunity to avoid problems during start and movement, as well as prolong the operation of the product.
In addition, you can test the capacity by checking the control charge:
- The battery must be completely full.
- Turn it on at deep load according to the passport.
- Connect the device to the circuit.
- Measure the time it takes for the current to decrease by half.
- If it matches what the manufacturer stated, then the battery is working.
Leakage current measurement
For any car, even a completely new one, this is an inevitable phenomenon. This is explained by the minimal electricity consumption of some consumers even when the engine is turned off. In reference books you can find numbers from 10 to 80 mA depending on the device. If this data is greater, then we can talk about a malfunction of the machine. The ideal value is 60 mA. The lack of daily recharging due to interruptions in operation has a more negative impact on the condition of the equipment.
Before you begin obtaining information, you need to prepare the vehicle for testing:
- Disconnect the interior lighting, radio and other consumers.
- Remove the keys from the ignition.
- Check the information received. Exceeding values of more than 60 mA gives rise to a search for the circuit that receives the maximum power consumption. This can be done by elimination, removing fuse blocks one by one.
This preliminary procedure will provide more accurate information about both the condition of the battery and the power supply circuits.
The procedure for checking leaks is as follows:
- Set the measuring range to 10 A or 20 A.
- Disconnect the minus battery.
- Connect the probe of the device to this place.
- Connect the second one to the removed wire.
- The result will be shown by an indicator board or arrow.
Checking the battery charge when measuring electrolyte density
This method of checking is quite useful before the onset of winter. A decrease in ambient temperature reduces the density of the electrolyte. Thus the charge also drops. Low density increases the risk that the car engine will not be able to start.
To check the charge of a car battery, you need a special device - a hydrometer. The sequence of actions is as follows:
- 6 caps of battery cans are unscrewed.
- The hydrometer is placed inside the jar. And you need to wait until it is completely filled with electrolyte.
- It is pulled out and over time the float will indicate the current readings.
If the car battery is in good condition, then during the cycle from full discharge to full charge, the range of changes in electrolyte density will be from 0.15-0.16 g/cm3.
Using a car at low negative temperatures with a discharged battery will lead to freezing and disintegration of the lead plates.
In the table you can see at what sub-zero temperature, depending on the density of the electrolyte, ice appears in the battery.
| g/cm3 | 1,10 | 1,11 | 1,12 | 1,13 | 1,14 | 1,15 | 1,16 | 1,17 | 1,18 | 1,19 | 1,20 | 1,21 | 1,22 | 1,23 | 1,24 | 1,25 | 1,28 |
| °C | -8 | -9 | -10 | -12 | -14 | -16 | -18 | -20 | -22 | -25 | -28 | -34 | -40 | -45 | -50 | -54 | -74 |
As you have already noticed, even a fully charged car battery will freeze at a temperature of -74 degrees, and with a capacity of 40% it will freeze at -25 degrees. And with a low charge, up to 10%, it will not be possible to start the engine even in mild frost.
Electrolyte condition
You can understand how stable the serviceability of the power source is by looking at the state of the electrolyte. It should also be checked in cases where voltage and current readings cannot be measured.
To check, you will need a Phillips screwdriver - you will need to unscrew the caps on the jars in which the electrolyte is poured.
Some batteries have a charge indicator that helps determine the condition of the electrolyte - level, density, charge - and give a general idea of the health of the battery in this regard.
In other cases, you can simply check the electrolyte level with a flashlight; you just need to direct the beam into each of the cans. A signal that the battery will soon lose serviceability is exposed plates.
The liquid must always be above the critical level, since otherwise it will lead to the destruction of the grating filler, which, in turn, can cause a short circuit.
If the electrolyte is at an acceptable level, the next step is to measure its density. For this you will need a hydrometer. If the battery is 100% charged, the density will be ≥ 1.27 g/cm³.
The type of electrolyte also matters. A brown tint may be a sign of destruction of the plates. In this situation, you must carefully use a bulb to remove all the liquid that you can, and then replace it with the same volume of new electrolyte.
How to determine the charging of a car battery with and without a table
Experienced drivers are well aware that the battery voltage value is an excellent indicator indicating the degree of its charge. Voltage is one of the most important characteristics that is easy to measure. Having information at what voltage level the battery needs to be recharged, and when the charge needs to be fully replenished, it is much easier to ensure its timely and proper care.
To help motorists, a special table has been developed that makes it possible to almost accurately determine the level of charge of a car battery based on its voltage. But if it is not at hand, what to do? Let's look at different ways to check the battery charge.
Checking the remaining battery capacity
If you notice some deterioration in parameters, you can check the remaining battery capacity. Such measurements can be made with the Lancol Micro-200 device. It calculates an estimate of battery wear and displays the main indicators on the screen. In the photo below:
Lancol Micro-200 battery performance tester
- SOH - battery performance as a percentage of maximum capacity.
- SOC - battery charge.
- R is the internal resistance of the battery.
You can calculate the residual capacity yourself using the formulas.
The internal resistance of the battery indicated in the passport
Let's say there is a battery with a cold cranking current of 420 amperes, a capacity of 60 ampere/hour and an internal resistance of 4.2 mOhm (0.0042 Ohm). Resistance data can be found in the battery data sheet.
First you need to calculate the actual resistance. Before starting, we measure the voltage on the battery, for example it was 12.69 volts. We take a 50 W light bulb from a headlight and connect it to the battery via an ammeter. The current was 3.65 amperes. The voltage when the light bulb is connected is 12.5 V.
We substitute the values into the formula: R (actual) = (12.69 (for example, without load) – 12.5 (under load))/3.65 A (bulb current). We get R (actual) = 0.052 Ohm.
Since the resistance also depends on the external temperature. At 25 degrees it is 100%, and at minus 20, for example, 40% of the norm. It is necessary to calculate the reference resistance: Ret = 0.0042*100 = 0.042 Ohm.
From here we get C residual = 60*0.042/0.052 = 48.46 A/h. Now let's calculate as a percentage: 48.46/60*100%= 80%. The remaining battery capacity is 80 percent, which is still not bad.
How to charge?
Chargers for car batteries today are presented in huge quantities - from cheap Chinese ones to fully automatic, high-quality, but expensive ones from famous manufacturers. To choose the “right” charger, it is better to consult with a specialist, but it is still worthwhile to navigate the basic selection criteria. Moreover, there are not so many of them.
The first thing you need to pay attention to is the charging circuit, since some devices operate with a constant current value, while others operate with a constant voltage value. In practice, this means that a constant current charger will fully charge the battery, but may overheat the electrolyte, which will shorten the battery life. A constant voltage charger, in turn, eliminates the risk of electrolyte overheating, but will not charge the battery completely, since the current will drop at the end of the charging cycle. But don’t rush to get upset. There are also so-called chargers with a combined charge cycle, which first charge the battery at a constant current, and then the voltage stabilizes and the current drops. The entire process occurs automatically and does not require any attention. Naturally, such chargers are the most expensive.
Note! When choosing the power of the charger, you need to take into account the fact that the maximum recommended battery charging current corresponds to 10% of its capacity. For example, with a capacity of 65 Ah, it is equal to 6.5 A.
The next selection criterion is pulse or transformer memory. Transformer is considered very reliable, but is unlikely to please with its dimensions and weight. Pulse ones are more compact and lighter, while reliability very much depends on the manufacturer.
Well, the third criterion for choosing a charger is the power supply method. There are two options here. The first, classic, in which the charger itself is connected to the network, and the current is transmitted to the battery through “crocodiles”. The second is more sophisticated, but not always applicable, since much depends on the characteristics of a particular car. We are talking about so-called charging and starting devices that charge the battery through the cigarette lighter. The main thing is that the cigarette lighter is powered directly from the battery and not through a generator. Moreover, the charging and starting devices themselves are divided into several more categories - those that operate from a 220V network, those that can operate from the cigarette lighter of another car, and also those that have their own batteries, that is, an autonomous power source.
The feasibility of checking the battery amperage with a tester
Many motorists also ask whether it is possible to check the battery current. It is safe to say that the voltage and capacity level of the battery are more than enough to correctly assess the performance of the battery and the possibility of its safe operation in the near future.
It is important to remember that it is not practical to check the current indicator on the battery; moreover, with such tests there is a real danger of an accidental short circuit.
Discharged battery voltage
A battery whose terminal voltage is less than 11.6 volts is considered completely inoperative (discharged). In such a situation, the operation of an automobile energy source is impossible: the electrical equipment of the car will cease to function. That is, the battery needs to be charged.
A full discharge seriously affects the condition of lead batteries, which are especially sensitive to this problem. For such a battery to lose more than half of its capacity, just one deep discharge is enough. Batteries that contain antimony are more resistant to strong discharge. The same can be said about gel and AGM products. It is recommended to prevent the battery from being completely discharged, which will negatively affect its service life.
The winter period is worth mentioning separately. At this time, due to the slowdown of chemical reactions, the activity of the electrolyte decreases, which is fraught with its freezing. To prevent such an incident, it is recommended to maintain the voltage of a charged car battery and not allow it to drop below 12.5 V.
Reinstalling the battery
After cleaning the case, terminals and tray, reinstall the battery.
- Carefully place it on the tray.
- Attach to tray using clamping mechanism.
- Connect the terminals. This time, start with the positive terminal and connect the negative or ground terminal last.
- After connecting the terminals, spread a thin layer of Vaseline around the top of the terminals and terminal posts. This prevents corrosion from accumulating around the terminals.
Under load
To find out the battery voltage, you need to purchase a special device. However, it only allows you to find out the readiness of the battery for further operation and the state of charge of the battery. This product is not suitable for determining energy content. For this reason, there is no way to determine the battery life through this product.
The device has the following equipment, which includes:
- housing with a built-in device, a multimeter;
- spirals that provide resistance;
- cables that have “crocodiles” at the ends for easy connection to the battery;
- switch.
There are 2 types of such products: digital, which show the parameter on the display, and analog, which shows the value using an arrow. The first type is better because it produces a more accurate value compared to the second. Most load forks operate at positive temperatures from 1˚С to 35˚С. But there are products that can work well even at -25˚С, but the cost of such a device will be many times higher than conventional devices. The product can generate current from 100A to 200A.
A battery test using a load fork can be performed within 10 seconds, although according to harmonized standards the test can be performed for 20 seconds.
Lead-acid batteries
The most common application for lead-acid batteries is starter batteries in vehicles. They are used to start the engine, as well as support the generator under heavy load on the vehicle's on-board network. In normal operation, lead-acid batteries do not experience deep discharge. The battery is charged after starting by the current generated by the generator. In addition, it is recommended to periodically charge the starter battery using a charger. What reactions occur?
Ongoing processes
The electrochemical reaction inside a lead-acid battery involves the positive and negative electrode materials, as well as the electrolyte. The active mass of the positive electrode is lead dioxide (PbO2). In the case of a negative electrode, it is lead (Pb) powder. When charging a lead-acid battery, the following reactions occur at the electrodes.
The general process in an electrochemical system is described by the equation.
During the charging process, water is consumed from the electrolyte and its density gradually increases. The electrolyte density of a fully charged battery is about 1.27 g/cm 3 . Below you can see a table of the battery charge level.
| Electrolyte density, g/cm. cube (+15 degrees Celsius) | Voltage, V (no load) | Voltage, V (with load 100 A) | Battery charge level, % | Electrolyte freezing temperature, gr. Celsius |
| 1,11 | 11,7 | 8,4 | -7 | |
| 1,12 | 11,76 | 8,54 | 6 | -8 |
| 1,13 | 11,82 | 8,68 | 12,56 | -9 |
| 1,14 | 11,88 | 8,84 | 19 | -11 |
| 1,15 | 11,94 | 9 | 25 | -13 |
| 1,16 | 12 | 9,14 | 31 | -14 |
| 1,17 | 12,06 | 9,3 | 37,5 | -16 |
| 1,18 | 12,12 | 9,46 | 44 | -18 |
| 1,19 | 12,18 | 9,6 | 50 | -24 |
| 1,2 | 12,24 | 9,74 | 56 | -27 |
| 1,21 | 12,3 | 9,9 | 62,5 | -32 |
| 1,22 | 12,36 | 10,06 | 69 | -37 |
| 1,23 | 12,42 | 10,2 | 75 | -42 |
| 1,24 | 12,48 | 10,34 | 81 | -46 |
| 1,25 | 12,54 | 10,5 | 87,5 | -50 |
| 1,26 | 12,6 | 10,66 | 94 | -55 |
| 1,27 | 12,66 | 10,8 | 100 | -60 |
| Electrolyte density, g/cm. cube (+15 degrees Celsius) | Voltage, V (no load) | Voltage, V (with load 100 A) | Battery charge level, % | Electrolyte freezing temperature, gr. Celsius |
The main problem in the process of charging a lead-acid battery is the incomplete dissolution of lead sulfate (PbSO4). This substance clogs the pores of the active mass, resulting in a decrease in the area of interaction between the electrolyte and the electrode material. Because of this, a gradual loss of capacity occurs.
As the battery is used, more and more lead sulfate remains on the plates after charging. The process is called sulfation. It is responsible for the failure of most lead-acid batteries in vehicles.
Charge modes
Apart from boost charging, there are two main charging schemes for lead-acid batteries. At constant voltage and constant current. Today on sale you can find many chargers (chargers) that have the ability to use these modes, as well as their combinations.
The most common is the charging scheme at a constant voltage. The idea here is that a constant voltage is supplied to the battery terminals. Charging is ensured by equalizing the voltages at the charger terminals. The completeness of the charge in this case depends on the voltage supplied to only the battery terminals. That is, if you charge the battery for the same time at a voltage of 14.4, 15 and 16 volts, then the most complete charge is achieved at 16 V.
Another common scheme is direct current charging. This process includes several stages, each of which maintains a constant current strength.
This charging scheme requires constant monitoring and adjustment of the supplied current. The stages are divided according to the voltage level at the battery terminals.
Typically the process looks like this.
- At the first stage, the current strength is set at 10% of the rated capacity of the battery. After this, charging is carried out to a constant voltage of 14.4 volts.
- The second stage begins with a voltage of 14.4 volts. This value is the level at which the decomposition of water from the electrolyte into oxygen and hydrogen begins. For batteries produced using Ca-Ca technology, this voltage value is higher. To minimize the release of gases, the current strength is reduced by half. That is, if at the first stage it was 5 amperes, then here you need to reduce it to 2.5 A.
- The third stage starts with a voltage of 15 volts. The current strength is reduced by two times compared to the second stage. Then, at certain intervals (1─2 hours), the voltage at the terminals is checked. As soon as it stops changing, the process can be considered over. At the last stage there will be active release of gases. For this reason, the battery should be located in a well-ventilated area, and there should be no sparks or open flames nearby.
The method of accelerating battery charging was mentioned above. A similar mode is available in many chargers. It differs only in that the battery is supplied with a current increased to 30% (compared to the standard value of 0.1*C). This is used in cases where the battery needs to quickly give the charge that is necessary to start the engine. Increased current during charging negatively affects the condition of the electrodes and active mass. Therefore, it is better not to use this mode unless necessary.
Alkaline batteries
Alkaline batteries are used as traction batteries. They can be found in various warehouse equipment, railway transport, power tools and other applications where they operate in cycling mode.
Ongoing processes
The most common electrochemical alkaline battery systems are nickel-cadmium and nickel-metal hydride. Let's consider the charging process using their example. Both types of batteries have a positive electrode with an active mass of nickel hydroxide (NiOOH). It contains graphite and barium oxide. Barium oxide extends the service life of the battery, and graphite increases the electrical conductivity of the active mass.
The active mass on the negative electrode in nickel-cadmium batteries is a mixture of cadmium (Cd) and iron (Fe) powders. In nickel-metal hydride batteries, the active mass on the negative electrode is a mixture of iron powders and its oxides. Nickel sulfate (NiSO4) and iron sulfide (FeS) are added to it.
Below are the reactions that occur in an alkaline battery when charging.
2Ni(OH)2 + 2KOH + Fe(OH)2 -> 2Ni(OOH) + 2KOH + Fe
2Ni(OH)2 + 2KOH + Cd(OH)2 -> 2Ni(OOH) + 2KOH + Cd
During the discharge process, the active mass on the positive electrode is oxidized and 2Ni(OH)2 is converted into nickel hydroxide. At the same time, reduction occurs in the active mass of the negative electrode, resulting in the formation of iron and cadmium.
Charge modes
If we consider the charge of a standard Ni-Cd battery cell, then the recommended current is 10-20% of the rated capacity. Charging time can last up to 16 hours. The permissible temperature range for charging alkaline batteries is from 0 to 50 Celsius. The most efficient charging process occurs in the temperature range from 10 to 40 degrees Celsius.
In practice, the design of alkaline batteries allows them to be charged with a current of at least 30% of the rated capacity. The charging process in this case takes several hours. There is one important point when charging alkaline batteries. This is especially true for nickel-cadmium batteries. They have a problem called the “memory effect”. Therefore, these batteries must be discharged before charging. Many chargers designed to work with alkaline batteries have similar functionality.
Therefore, the process of charging an alkaline battery most often begins with its discharge. In this case, the voltage at the terminals of the element should not be allowed to drop below 1 volt. After the discharge, the charging process starts.
There are much more different charging schemes for alkaline batteries than for lead-acid batteries. Some of them are shown in the image below.
During the charging process, the voltage at the terminals of the alkaline battery gradually increases to 1.6-1.75 volts. At the final stage, the voltage can rise to 1.8 volts. In the case of sealed alkaline batteries, it happens that the end of the charge is determined by the transferred ampere-hours. To charge the battery completely, sometimes an amount of energy corresponding to 150 percent of the nominal capacity is consumed. A fully charged alkaline battery has an open circuit voltage of 1.45 volts. Return to content
Lithium
The charging process will be considered using the example of lithium-ion batteries. Recently, they have become widespread as power sources for household appliances, consumer electronics, power tools, electric vehicles, electric bicycles, scooters, etc. Compared to the lead-acid and alkaline batteries described above, lithium-ion models have a higher energy intensity.
Ongoing processes
The lithium electrochemical system currently uses a variety of chemistries and new ones are being developed periodically. We will look at the reactions that occur during charging in most common commercial Li-Ion batteries.
The negative electrode is made of a material containing carbon. Due to its nature and the composition of the electrolyte, the process of intercalation of lithium ions into carbon occurs. The carbon matrix has a layered structure, which can be ordered or partially ordered. This already depends on the specific carbon-containing material.
The materials used to make the positive electrode may differ for different varieties of lithium batteries. Most often, lithiated oxides of cobalt or nickel are used for these purposes. Lithium manganese spinels are also used.
When charging a lithium-ion battery, the following reactions occur at the electrodes.
C + xLi + + xe — -> CLix
During the intercalation process, lithium ions from the electrolyte are introduced between the carbon layers. In this case, the volume of the carbon matrix changes slightly. These qualities determined the choice of carbon as the anode material. In addition to carbon-containing material, the negative electrode may contain additives such as tin, silver and their alloys. Some models contain composite materials.
Charge modes
The charging process for lithium-ion batteries is combined and takes place in two stages. At the first stage, charging is carried out with a current, the value of which ranges from 20 to 100% of the nominal capacity of the battery. This stage continues until the battery voltage reaches 4.1 volts. After this, the second stage begins, during which the charge is carried out at a constant voltage. In terms of time, the entire charging lasts about 3 hours (at the maximum permissible current), of which one hour is allocated for the first stage. You can read more about the charging process for lithium batteries in this article.
The end of the charge is detected at the moment when the voltage has reached its maximum (4.1─4.2 V), and the current has decreased to 3% of its value at the beginning of the process. In some cases, a third stage is possible, which is storage. This stage is a periodic recharging to compensate for the capacity lost due to self-discharge.
If you increase the charge current above 0.2─1*C, this does not lead to a decrease in process time. In this case, the first stage is simply reduced and the second stage is increased.
There are chargers that provide only the first stage of charging. With this option, the battery charge level is about 70-80%. Return to content
Life time
Typically, the battery life with proper care is 4-5 years. If maintenance is carried out in a timely manner, it will serve faithfully for these years. But sometimes, with proper maintenance, it can work for 6–7 years.
This period can be influenced by many factors:
- Workmanship. As you know, expensive brands still work longer even with less care.
- Temperature operating conditions. Both low and high temperatures have a negative impact on battery life. Summer high temperatures under the hood further provoke sulfation.
- Generator operation. Proper operation of the voltage relay will extend its service life.
- Terms of Use. Short trips are detrimental to the battery.
- Regular maintenance.
Batteries work better in cold weather if they are in good condition and fully charged.
Preparatory work and precautions
Many car enthusiasts ask the following question: “Is it necessary to remove the battery for charging, or can you leave it in the car?” In principle, both options are applicable. The choice of charging method depends on the conditions of the room where it will take place, as well as on how long you plan to charge the battery.
If you remove the battery and disconnect it from the car’s on-board power supply, you must be prepared for the fact that the settings of the connected electronics, for example, air conditioning, climate control, and sound system, may be lost. This also erases data from the engine control unit memory system (diagnostic results and other information). Therefore, this method is used extremely rarely, only when it is necessary to properly charge a completely dead battery. This process typically takes a long time (10 to 30 hours), so it is usually done at home. After all, few people are willing to sit in the garage for so long, and leaving a working charger unattended is unsafe.
It is important to know! If you plan to charge your car battery at home, try to place it in a place where there are no people, for example, on a balcony. This way you will protect your loved ones from the harmful effects of released toxic substances (hydrogen chloride, sulfur dioxide, etc.). The first signs of poisoning are headache, metallic taste in the mouth, and cough. But if you make sure that the air from the balcony does not get inside the room, but goes outside, you can avoid these consequences.
If you charge the battery in a car , then you need to do this in a dry place (preferably in a heated garage). If the car was parked in the cold, you need to wait several hours until the battery warms up at room temperature. Charging the battery should be done with the engine off, and you should also turn off the ignition and other electrical systems of the car or put them into sleep mode, if possible. This method is usually used when you need to recharge the battery to start the engine.
Regardless of where you charge, you need to comply with several general requirements. There should be no open fire near the location of the battery, since hydrogen released along with gases mixed with oxygen can cause an explosion from a spark. The wires from the starter-charger must be positioned in such a way that nothing pinches them and there is no possibility of accidental contact.
The following steps will help you understand the reason:
Check that the charger is connected to the power supply correctly and that the polarity of the device and battery terminals is correct.
Checking the memory
To check the voltage produced by charging, connect it to the battery and turn it on. Then, connect a voltmeter in parallel (a multimeter in DC measurement mode). You should get stable (not jumping) readings of 13-14.5 Volts. Readings that fluctuate or differ from the norm are considered a faulty memory. If the charger readings are adjustable, then adjust them to the normal value.
To check the current strength of the charger, connect an ammeter (multimeter in ammeter mode) in series with the charging circuit. One probe is connected to the charging terminal, the second to the battery terminal, the battery is connected to the charger through an ammeter. The readings obtained are compared with the readings of the ammeter of the device. A discrepancy between the readings of the charger and the tester means a breakdown of the charger.
We are looking for a memory failure
To make sure that the memory is faulty, check it this way:
- Disconnect the device from the power supply.
- Disassemble the housing using a screwdriver.
- Visually inspect all parts, blackened ones need to be replaced
- The soldered contact can be simply soldered back with a soldering iron.
The cables are checked by simply “ringing”, connecting the tester with one probe to the plug of the device, the second to the end of the wire inside the device body. Infinite resistance means a break. The second wire and the wires going from the charging to the battery are connected in the same way.
fuse is checked visually; if it is blown, it will be noticeable. Replace the blown fuse.
The transformer is checked when the charger is connected to the network and running. Readings are taken from the charging terminals; they should be 13-14.4 Volts.
The diode bridge is tested by connecting the tester in the desired output mode. Absence of readings or incorrect readings is a sign of bridge failure. The monolithic bridge is being replaced entirely. Otherwise, you can ring each diode. The tester is switched to resistance mode and the probes are applied to the diode outputs. Swap the probes. A diode allows current to pass in one direction, so one measurement will show no resistance and the second will show infinite resistance. If the readings are different, the diode should be re-soldered. This is done with all diodes in the bridge.
It is not worth replacing the fuse with a wire “Bug”. This threatens to break other components and is dangerous for your life. Disassemble the device only without power, the plug is removed from the socket. Tested when switched on, only in assembled form. Don't forget about the danger of electric shock.
Battery check
When the battery is charging, the ammeter needle does not drop, you have already checked the device, all that remains is to check the battery itself.
Use a tester to check the voltage at the battery terminals. It is better to use a load fork, then the voltage under load is immediately detected. A working and fully charged battery should show 12.6 -13.2 volts. Under load for 3-5 seconds, the voltage should not fall below 9 volts.
A voltage below 12.6 indicates a low battery charge, but a low voltage under load means that the battery is “dying” or requires increasing the density of the electrolyte.
Try charging a battery that is not in service again with a higher current to the required voltage; if this does not work, you need to buy a new one. A severely discharged battery requires a higher charging current, perhaps a more powerful charger will solve the problem.
When being serviced, you should check the electrolyte level inside each jar and its density.
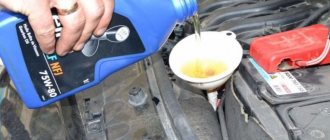
The low level is increased by adding distilled water. By adding tap water, you reduce the density of the electrolyte. The salts contained in such water decompose the acid. By adding acid, you will ruin the battery plates, because you will greatly increase the density of the acid and corrode them.
When the battery is discharged, the acid density drops. When recharging, the process proceeds in the opposite direction. For a working battery, the density in the charged state is 1.27 g/cm3. Check the battery is in a charged state.
The density is checked with a hydrometer.
Work with electrolyte wearing rubber gloves and safety glasses. If acid gets into your eyes, rinse it immediately with water.
How to care for your battery
To avoid unnecessary troubles, you should regularly check the battery and give it the necessary care. To do this, the battery and its terminals must be kept clean and discharged/charged during long periods of inactivity. In severe frosts, it is better to take the battery from under the hood to a warmer place.
Some manufacturers recommend charging the battery once every 1-2 weeks, arguing that sometimes the consumption exceeds the self-charging of the battery. Thus, checking the battery is a completely feasible task and necessary for the proper operation of the car.
How to clean a car battery
Cleaning the battery case
You can use a simple procedure to clean the battery case. To do this, you need to prepare a mixture of 8 ounces of warm water and one tablespoon of baking soda. This neutralizes the acid and helps remove dirt from the battery case and terminals.
Wear safety glasses and rubber gloves and, using a soft brush, apply the solution to the top of the battery and the sides of the case. If your battery uses compartment caps (serviceable batteries), do not allow the mixture to seep under the caps and mix with the electrolyte inside.
Wipe with the solution and a clean rag. Continue applying the cleaning solution until you see no signs of buildup.
Cleaning the Battery Terminals
As with the battery, remove dirt and corrosion from the terminals using baking soda and a water solution.
To make your task easier, pour the mixture into a Styrofoam or similar disposable cup and submerge the battery terminal in it for a minute or two. Next, use a battery compartment cleaning tool to finish removing corrosion from the terminals. Repeat the procedure until you see that both cables are free of corrosion.
Cleaning the battery compartment
Check the condition of the battery compartment. Make sure there are no screws, cracks, pieces of dirt or signs of corrosion. If necessary, use the same solution to remove dirt and corrosion from the pan.
An alternative to connecting an ammeter in a car (clamp clamp)
As a conclusion, we will briefly consider how you can do without building in an ammeter (since it is not so easy to do) and measure the currents of interest to us. To measure leakage currents, a conventional multimeter is sufficient. For other measurements you will need a current clamp. Of course, their cost will make few people happy, but believe me, a good quality ammeter with a shunt for a car will cost no less.
To measure leakage currents, you need to turn the multimeter into ammeter mode with a limit of up to 10 A, not forgetting to move the positive probe into the corresponding connector on the device. The ammeter is connected to the gap between the battery and one of the terminals disconnected from it. The device readings are the leakage currents. Attention! Carry out the described procedure only with the engine and electrical consumers turned off. It is absolutely forbidden to start the engine or turn on a powerful load (headlights, external acoustics, stove) while the ammeter is in the circuit.
Well, to measure the cold cranking current (starter inrush current), battery charge and discharge, and energy consumption of devices, it is enough to buy current clamps. They are very easy to work with. Using pliers you need to cordon off the wire through which the currents of interest flow. For example, to measure the starting current, the clamp is installed on the positive wire going to the starter. The remaining parameters can be measured by installing the device in places where the current shunt is installed using the methods described in the article.
How to make your own battery fork
Motorists make many attributes from improvised materials in the garage. Since you can make a load fork yourself, we will consider its most popular option.
The load is a coil from a burnt-out heating device of a couple of kilowatts. This will be a nichrome wire with high resistance. Using the formula U=I*R, we calculate that in practice the spiral will give R=0.12 Ohm. A dozen parallel-connected heater wires will give the required parameters of 1.2 Ohms.
Switch the multimeter to Ohmmeter mode and measure the required length of wire, not forgetting about a margin of a couple of centimeters. We twist everything into a tight bundle and put ceramic insulation on top. For the body we use a U-shaped building profile. We solder the connecting insulated copper stranded wire to the crocodile.
The load output probe should be copper with a diameter of 5–6 mm. We select a digital voltmeter with a button. We put it on the sealant and put a window under it. It is advisable to insulate the handle.
How to make a device with your own hands
When the necessary equipment is not available, you can make the device yourself by watching the video. It is necessary to take a voltmeter from ready-made instruments, and the remaining parts are constructed from improvised means. Difficulties will arise when calculating and creating internal resistance, which requires current.
A suitable material is nichrome wire, used to create heating coils in electric stoves. Nichrome elements can be replaced with a metal strip from other heating devices.
For a voltage of 12 V, the current indicator should be within 80-120 Amperes, and the resistance should be 0.1-0.15 Ohms. A device for measuring such resistance is difficult to find. For this reason, the length of one element is selected and the current that it passes is measured. After this, several similar parts are combined.
A homemade device is made sequentially:
- Select a nichrome wire or heating strip and measure the current up to 15 A with a multimeter. The element should pass 10-12 A.
- 10 such parts are connected, receiving a load of 100-120 A. The wire must be twisted securely.
- The resulting element is placed in a suitable housing and fixed in it. If the box is small, then the wire is bent several times so that the turns do not touch each other. The parallel connection must be reliable, which is ensured by insulating cylinders that are installed on the bends.
- The ends of the twist are soldered to the output contacts, and from the outside to the connecting wires.
- Connect a voltmeter.
- Clamps are attached to the ends of the connecting cable, which are then connected to the battery.
When the device is ready, you can take measurements at home.
Why does a discharged, undercharged battery not boil?
Everyone knows that a normal battery placed on charge does not boil.
And why? Because the current supplied from the charger to the battery is initially spent on the electrochemical reaction of sulfate decomposition. When a battery discharges, lead sulfate forms on the positive and negative plates as a natural result of the discharge process. Such sulfate, when charged, turns into active substances without any difficulty. The fault term “plate sulfation” is used when discharged (i.e. coated with a layer of lead sulfate) plates do not charge when normally charged.
Lead sulfate, formed under normal discharge conditions, consists of small crystals evenly distributed in a porous and highly conductive active mass. With a subsequent charge, such sulfate again easily turns into lead dioxide and lead.
With unacceptably deep discharges, the active mass of the plates almost completely turns into sulfate, and in some cases the sulfate goes from a fine-crystalline state to a coarse-crystalline state.
Moreover, if there are surface-active organic substances in the battery, then adsorption of these substances occurs on the lead sulfate crystals of the negative plates, as a result of which the rate of dissolution of the crystals decreases.
In this case, the internal electrical resistance of the active mass increases sharply. The sulfate completely covers the particles of the conductive active mass, and the passage of current through the plates stops. In addition, the potential at which gas evolution begins during charging changes.
The transition of the adsorbed sulfate formed in the plates into lead dioxide and lead becomes impossible under these conditions, and the battery loses part of its capacity, and with very deep sulfation, almost all of its capacity, as we wrote about in the previous article.
The reasons for the formation of large lead sulfate crystals may be:
- systematic, excessively deep discharge of batteries;
- regular undercharging;
- leaving batteries in a half-discharged or discharged state for a long time;
- low electrolyte level.
When the battery is almost fully charged and there is little soluble sulfate left on the plates, then some of the current supplied to the terminals turns out to be excessive.
Where does the excess current go?
That's right, the process of electrolysis begins in the battery, i.e. decomposition of water into hydrogen and oxygen. Therefore, the battery begins to “boil”.
For this reason, an uncharged battery does not boil during charging, but an already charged battery “boils.” This is a sign that the battery has been charged and has stopped accepting a charge.
Interesting measurements
If there are leaks of electrolyte on the car battery, then the following interesting experiment will demonstrate the current leakage. It is necessary to put the multimeter in voltage measurement mode: place one probe against the car terminal, and the other against the surface of the electrolyte spot. The performance of the device will surprise you.
Electrolyte stains, as well as other liquids, are removed from the surface of the battery with an alkaline 6% soda solution (about a tablespoon per glass of water). Use a rag soaked in this solution. Avoid flooding the entire battery case, terminals, and car wires with water.
Ultimately, using an ordinary multimeter, you can study a large number of characteristics of a standard battery and more. That is why even the simplest such device is an extremely important thing in the household.
Moreover, such simple home diagnostics will allow you to avoid many unpleasant situations, and will also help you carry out timely maintenance and repair of your car.
Don’t rush to change components ahead of time
Try the methods given in our article to restore functionality and diagnose the cause of the malfunction. A battery, especially a new one, rarely fails suddenly. Much more common are software problems or failures in the operation of the power supply or its connectors. Check all the options, and only then decide to buy a new device.
Hello everyone, today I want to tell you why the battery on a Lada Kalina car does not charge. If the red battery indicator lights up, then this is already a reason to sound the alarm, since most likely the car is running only on the battery and is not receiving a charge.
Now a little joke: “Do you know why the battery can’t go down? Yes, because he can only sit down.” So, let’s go.
The first reason is the battery itself; if it is old enough, it may no longer take a charge, this is due to sulfation of the plates. You can borrow a working battery from someone and install it to check for sure, and then you can buy a new one. By the way, I noticed such a strange thing, for some reason the batteries that come from the factory with the car last much longer, I don’t know why. The second reason is oxidation of the wires and poor contact on the battery terminals; if they are oxidized, then you need to clean and tighten the contacts. Next, we check the minus of the body and engine and all other connections. Also, the wires that go to the generator also need to be checked. If necessary, tighten and clean. After all, sometimes it happens that due to poor mass the battery is not recharged. There was a case when everything was changed, both the battery and the generator, it was on a VAZ 2114 car, and in the end it turned out to be a ground wire going to the engine. The replacement did not help, I had to run an additional wire from the engine to the body.
The third reason for a poor battery charge lies, of course, in the alternator belt. If it doesn’t reach enough or something gets on it, say oil, then it will slip. The belt must be dry and taut. Well, if necessary, you need to replace it with a new one. In my case, the generator does not have a tensioner, so the only solution is replacement.
The fourth reason is the generator, but there is no need to rush and immediately run for a new generator for your Lada Kalina, perhaps your voltage regulator has failed or the brushes have worn out, if this is the case, then you need to replace it.
It is also possible that your diode bridge has failed and also needs to be replaced. There are also copper rings in the generator, they are also erasable. Well, then the rotor wears out and the circuit breaks, and in this case, you will probably have to buy a new generator. I looked at the most common reasons for the lack of battery charge on a Lada Kalina car, if you had other reasons, then write in the comments. Well, that's all for now everyone.
Completion of charging, installation of the battery on the car
After charging is complete, disconnect the charging wires, screw on the caps on the jars and wipe the battery with soda solution again. When charging, droplets of electrolyte evaporate from the jars and settle on the body. If you do not remove the electrolyte from the surface, current may leak through the case and the battery will quickly discharge. This problem is very common, since 80% of car enthusiasts simply do not know this. The electrolyte on the body is not particularly visible; it lies in a thin film, but this is enough for the current to pass through the body of the device.
Lighting a cigarette from a charged battery
The most popular way to “reanimate” a battery. When connecting batteries to each other, remember the diagram:
- We connect the wire for lighting one end to the positive on the operating unit;
- with the other end we also connect it to the positive on the non-working battery;
- with the second wire we do the opposite (first we connect the wire to the negative of the failed battery, and then we connect to the negative of the charged battery).
How long does it take to charge the battery?
There is no exact definition of the time required for a full charge, as there are several factors that influence this. Therefore, the charging time can be from a couple of hours to several days.
There are 4 main factors affecting battery charging time.
- Battery discharge percentage. A completely discharged battery will take much longer to charge than one that is 50% discharged.
- Degree of battery wear. Over time, the battery plates crumble and its capacity decreases. Let’s take as an example a worn-out battery with a capacity of 60A*hour. But its capacity in fact will not be equal to 60A*hour, but will be less, for example, 50-45A*hour. Consequently, a worn-out battery will charge faster than a similar, but new one.
- Charging current and voltage . The lower the current, the slower charging occurs.
- Charge acceptance rate. For example, a cold battery charges less well. This is due to the fact that the rate of chemical reaction (electrolysis) depends on temperature. Therefore, before charging, it must be warmed up at room temperature if it is brought in from the street in winter.
If an automatic charger is used for charging, it will automatically determine when the battery is charged, turn off and indicate full charge with some kind of indication. When charging, as the battery charges, the difference between the battery's emf and the charging voltage decreases, resulting in a decrease in current. When the current reaches approximately 0.5A, the charger stops charging.
If the charge is not carried out automatically, then you need to wait until the current drops to its minimum value (approximately 1-0.5A) and remains at this level for about three hours without changing. After this, you can turn off the charger and measure the density of the electrolyte.
You can understand that the battery is fully charged by two signs. This results in the electrolyte achieving a density of 1.27 g/cm3 and a voltage at the battery terminals of 12.7V. Density and voltage measurements should be made after the charger is turned off and some time has passed after charging. It is necessary for the electrolyte to settle and stop releasing gas bubbles.