Digital technologies have long penetrated not only into every home, but also into every car. The VAZ 2110 on-board computer (BC) has been a very common thing for almost any driver for more than a decade (the first BCs were installed back in the 90s on carburetor engines). You won’t be able to access social networks or play games with it, but that doesn’t make it any less useful or interesting, hiding about the same number of possibilities and various functions as a modern smart phone or tablet PC.
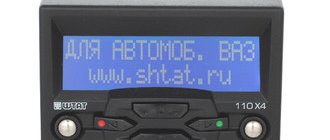
On-board computer VAZ 2110
Like any other digital technology, the on-board computer on the VAZ 2112 has a lot of specific characteristics that differ from one model to another. And in the same way, you have to sort out the existing offers on the market for yourself, selecting the functions and technical data you need, and also taking into account the pricing policy of a particular product and manufacturer. Do you want to know why the BC in a modern car is considered as indispensable as a mobile phone in your pocket?
What is the on-board computer of the VAZ 2110
Without using dry terms copied from the operating instructions, we can simply say that the on-board computer on the VAZ 2112 (2110) is the main communication interface (means of communication and interaction) between the car and the driver. With the help of an “on-board” friend, you can find out a lot of useful information about your iron horse. It will help you calculate the remaining fuel, warn you about possible overspeeding and unexpected malfunctions in the main injector systems and more.
Structurally, it is a black box. It can be installed in the car dashboard, directly on the dashboard and, in some cases, even on the windshield. There is a small numeric LCD display at the front, and a port at the rear for power supply and communication with the vehicle's main information systems.
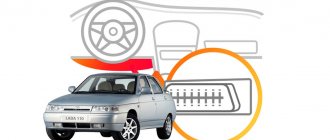
Installation of on-board computer VAZ 2110
Do not confuse the electronic control unit (ECU) and the on-board computer. If the on-board computer does not work on a VAZ 2110, that’s half the problem; the car can drive safely, although the motorist will feel extremely uncomfortable, not having any information about the operation of the main systems of his car. The ECU can be considered the “brain” of the car, setting the program for the operation of the electric motor actuators. Without an ECU for a VAZ-2110 of the injector type, you definitely won’t get anywhere.
However, a good VAZ 2110 on-board computer is directly connected to the ECU, being able to exchange basic information with it and report possible problems with the engine to the user. Thanks to such a successful symbiosis, you will no longer have to rack your brains about why the “Check Engine” light on the dashboard came on.
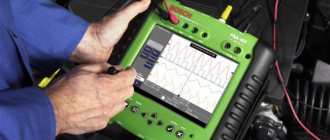
Diagnostics using additional tools
To diagnose cars, including the VAZ 2110, various equipment is used, which is connected to a special connector. Thanks to this equipment, which is not particularly complicated or expensive, you can get a complete picture of the condition of the car.
The service station uses a personal computer to which data from phase sensors is transmitted via a special cable.
Adapter for car diagnostics
Bluetooth devices have appeared on the market that allow diagnostics using a smartphone, tablet or laptop.
They work according to the scheme. The device is connected to the connector, the ignition is turned on and the diagnostic process begins. The data comes from phase sensors to the ECU. From it to a mobile device on which specialized software must first be installed.
This makes it possible not only to obtain more data, but also to present it in a more visual form. This method allows a driver, even with little experience in operating a car (in our case, a VAZ 2110), to obtain all the data about his car.
But most drivers prefer to carry out diagnostics at a service station. So that you are aware of the data that the on-board computer produces through RAM from the phase sensors, we will present the transcripts of common errors.
Decoding combinations
If problems arise with electrical equipment, they must be corrected immediately. Error code 1602 will indicate that not everything is in order in this matter.
Sometimes error 1602 can simply be reset and does not appear in the future. Socialists call such data “good.”
Error 1602 sometimes appears if:
- the battery was disconnected for some time;
- there was a voltage surge when starting the engine, for example, in cold weather.
But if error code 1602 appears all the time, you need to check the entire network. Perhaps there is a break. If error code 1602 constantly appears, you can try cleaning the battery terminals. Check if they are securely fastened. Didn't help, error 1602 still appears? Check the circuit. You need to start from the positive terminal of the battery. Start with the electrical fuse and fuse link.
Check the ground of the ECU, TPS. Sometimes it happens that the cause of error code 1602 is an alarm that can block the controller circuit and affect the readings of the phase sensors. In such a situation, you need to file a claim with the company that installed the alarm.
Error 0102 indicates a low signal level, which is reported from the mass air flow phase sensor.
Code 0102 will be stored in RAM memory in the following situations:
- low air consumption, which depends on the speed of rotation of the crankshaft;
- how open the throttle is;
- Several cycles have passed since the problem appeared.
If the error appears periodically, then you need to:
- check the condition of the air barrier;
- fastening the wiring block to the ECU;
- check IAC;
- clean the throttle pipe.
Another error that may occur is 0300. 0300 appears in cases where the RAM detects frequent misfires.
If error code 0300 is displayed constantly, then you need to check the following components:
- spark plug;
- nozzles;
- ignition system;
- increased or decreased compression levels may be the cause of code 0300;
- Also, code 0300 may appear in case of wiring failure.
You cannot ignore the appearance of error 0300. In the future, this may lead to deterioration in the performance of other nodes.
It is not difficult to master car diagnostics, in particular the VAZ 2110. It will extend the service life due to timely detection of faults detected by phase sensors.
All fuel-injected VAZ 2110, 2111 and 2112 cars have a function such as self-diagnosis of the instrument cluster and even detection of certain errors with codes displayed on the display.
To start this function, you need to hold down the daily mileage reset button and turn on the car's ignition. So that you don’t have to think for a long time about what and how to do, I advise you to watch the detailed video review that I recorded for this topic. The video was made using the example of a VAZ 2112.
As for decoding errors, I will try to make a text description of them below to make it more clear and accessible to everyone.
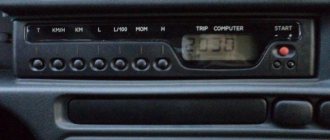
What does the VAZ 2110 on-board computer show?
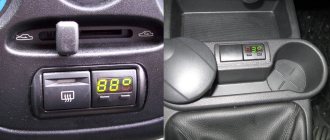
The VAZ 2110 on-board computer exists in several versions. The most basic option is a small seven-segment liquid crystal display consisting of just two numeric lines. It occupies a very modest position under the speedometer on the dashboard. Displays a minimum of information for the driver, if not almost nothing. Since such a VAZ 2110 on-board computer can hardly be considered a full-fledged one, motorists often replace it with more serious models installed instead of a plug next to the ACS unit.
An on-board computer on a VAZ 2110 is not a definite luxury today. A full-fledged electronic device capable of performing a huge number of useful information and diagnostic functions in your car will cost you no more than 500-900 rubles for the simplest option. More “sophisticated” copies can cost from 1,500 to 12,000 rubles.
Installation of on-board computer VAZ 2110
Let's turn to the information that the on-board standard computer of the VAZ 2110 can give us. Conveniently, using push-button navigation, you can switch a number of modes, allowing you to keep your finger on the “pulse” of our iron horse. Here is a short list of the main features that the on-board computer on the VAZ 2110 is capable of:
- displaying the current time and setting an alarm;
- reports the temperature outside the car;
- counts kilometers traveled;
- determines the time of movement;
- will tell you what the average fuel consumption is per 100 km;
- You can also find out instantaneous fuel consumption;
- preliminary calculation of the amount of fuel in the car in kilometers;
- average movement speed;
- fuel consumption in liters.
This is by no means an exhaustive list of the capabilities that the on-board computer on the VAZ 2110 is capable of. There are countless different models, the potential of which may well be expanded and updated with improvements in the firmware supplied with them. For example, the standard on-board computer of the VAZ 2110 (the same MK-10, AMK-2110 with firmware 211000) by default has specific shortcomings that do not allow receiving information through the diagnostic interface of the electronic control unit (ECU), but all this is perfectly “treated” with updated firmware .
Installing the Multitronics X10 trip computer
When purchasing this item on Avito, of course, there will be nothing else in the kit except the BC.
Actually, the ambient temperature sensor and the wire to the diagnostic block had to be farmed myself). There were no problems with this) 1. Take out the standard clock and disconnect it from the connector. We release the connector and it flies far and for a long time into this abyss of wires)). Next, roll up your sleeves, lower your hand into the resulting hole and feel for the standard BC block.
3. Now it is necessary to make a temperature sensor, because a used MK will not have one, the percentage is 100%) The sensor itself was the LM335Z chip.
Microcircuit in TO-92 package. It has 3 pins, the leftmost pin, if you look from the side of the marking where the edge is cut off, we don’t need it, personally I just broke it off) Barbarian, yes))
Next, take a 2-core wire and a soldering iron and begin the soldering process. I was a little lucky, and in my case, the BC included a 2-wire wire with a connector for the computer.
Solder the black wire to the rightmost leg of the sensor, the wire with a strip (red or white, depending on what you have) to the middle leg. Then we take a beautiful green heat shrink and isolate the sensor from the aggressive environment.
Then, after everything done above, we connect the sensor with a wire under the beard, then I thought about where to pull it. Selected the engine compartment. The exit to the engine compartment was made through the clutch cable seal. Next, I brought the sensor along the ties to the tow hook and fixed it there with a very beautiful yellow tie)
4. Take the trip computer, insert the pads into it and begin to figure it out according to the previously downloaded instructions from the official website)
Personally, I found the management of the bookmaker to be a little difficult, although I have now completely understood its functionality and am happy with everything).
The BC itself will determine your ECU. Plus, you will also need to make adjustments to the temperature sensor in order to achieve accurate temperature readings overboard. You can then begin on-screen programming and setting maintenance counters.
In general, I am very pleased with the work of BC. I saw what I wanted to see. I was a little upset, but more about that in the next blog.
Good luck to everyone) If you have any questions about the On-Board Computer, I will be happy to answer them.
Source
Types of bookmakers
On-board devices are divided into several types. Injection or carburetor devices are suitable for the VAZ 2110, depending on the type of power system for the car. Additionally, devices are divided into stationary, installed only in specially designated places, or universal, of any size, which can be placed in any convenient place.
The main differences between a BC injector and a carburetor
The main differences between the bk, depending on the type of power supply, are the on-board capabilities for the VAZ 2110. The carburetor type is the simplest. The main reason is that carburetors are largely controlled mechanically, and electronics play a secondary role. Therefore, its standard set of functions is extremely small. You can find out about:
- time of day or set an alarm;
- current and average fuel consumption, as well as power reserve;
- average speed and driving mode;
- engine or outside air temperature;
- diagnostic information that allows you to find out about an engine operation error and decode it.
Disadvantages of the BC injector
Some VAZ 2110 models are equipped with a standard on-board computer. This model has a certain number of disadvantages and limitations. For example, the model interacts poorly with the electronic control unit (ECU) and does not allow receiving data through a special diagnostic connector. However, only motorists with on-board computers in the state face this problem. In addition, this can be treated with a standard flashing of factory settings.
If the BC is installed separately on the VAZ 2110, then it can be easily customized for yourself. If connected correctly, the device will not cause problems. If there are still difficulties, for example, the Check light comes on, but the diagnostics shows that such an error code does not exist.
This means that the contacts of the on-board computer may come loose or the electronic system may fail. You need to restart the bookmaker or turn it off for a few minutes. Next, we reconnect and configure the device according to the operating instructions.
- some models of on-board aircraft do not allow reading errors;
- incorrect connection of the computer to the VAZ 2110 can cause errors in the ignition system;
- shows incorrect fuel consumption values due to a faulty mass air flow sensor.
How to set up your calendar and clock
We have reached the most difficult chapter. Let's get straight to action:
- Turn on the “Clock” or “Calendar” option (button 1 or buttons 1 and 5) ;
Clock and Calendar options - Press key 4;
- Use buttons 5 and 6 to set the hour or date;
- Press key 4;
- Use buttons 5 and 6 to set the minutes or month;
- Press key 4 again.
For a quick adjustment, follow step 1 and step 2. If you then press button 1, the clock will round up from 1:57 p.m. to 2:00 p.m. Or in other words: it was 14:05, but it will become 14:00.
Rules for driving a car with an injector
A car equipped with an injector is less susceptible to ambient temperatures. However, in severe frost, the injection Lada also experiences difficulty starting. Here it is worth using the on-board computer with the function of heating spark plugs. Every time the temperature drops below a certain value and the car is turned off, a special heating of the tips is carried out to ensure a stable engine start.
Also, the VAZ engine sometimes overheats, which can cause valve burnout and costly overhauls. However, this is possible if the cooling system is faulty. If necessary, you can activate the Tropic function for the on-board computer of the VAZ 2110. When the temperature reaches more than the value set by the owner, the forced cooling fan turns on.
Installation of BC for injector
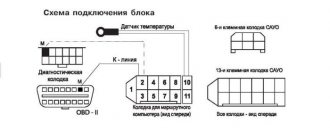
- You need to find a standard connector for connection. Remove the trim from the VAZ 2110 at the bottom of the torpedoes, as a rule, it is located there.
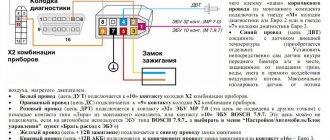
- Next, you should find the K-line wire and connect it to the car's ECU. The location of the wire is indicated on the on-board computer connection diagram (see photo).
- You can connect an air temperature sensor (it is better to install it in the rear bumper or near the steering tips), fuel consumption or car speed to separate connectors. The pinout of the block is shown above.
If necessary, you can install an on-board computer in addition to the standard one. This will save space on the panel. For example, a Sigma or Staff computer is installed on a VAZ 2112 instead of the standard plug for the SAUO unit and there is no need to wire the contacts. It is necessary to connect three contacts - 12 volt, K-line and ground.
User manual
Additionally, it is worth setting up the computer for the VAZ 2110 after all devices have been installed.
The device, as a rule, has a special cross. These buttons help you configure the device. For example, to connect a fuel level sensor, you need to drain the tank, turn on the device, and press the diagnostic button. The device will carry out the analysis, and then a numerical designation will appear on the display. This amount of gasoline should be poured. The computer will then move on to another phase of analysis. Once completed, you can fill the tank full. The full set of settings is indicated in the operating manual for a specific device and you can make a choice in favor of the desired functions.
ADJUSTING THE COMPUTER FUNCTION
Clock correction
Press button 4 in the “Current time” mode. At the sixth signal of the exact time, press button 1, this resets the seconds and rounds the clock. Setting the current time (calendar) Press button 4 in the “Current time” (“calendar”) mode. Use buttons 5, 6 to set the desired hour (day). Press button 4. Use buttons 5, 6 to set the desired value for minutes (month). Press button 4 to complete the time (calendar) setting. Setting an alarm Press button 4 in Alarm mode. Use buttons 5, 6 to set the desired hour value. Press button 4. Use buttons 5, 6 to set the desired minute value. Press button 4 to complete the alarm setting. In the “Current time” mode, the alarm symbol will light up (the alarm is on).
* If the counter of any of the accumulated parameters (“Travel time”, “Travel time with stops”, “Total consumption”, “Trip mileage”) overflows, all accumulated ones, as well as calculated ones (“Average fuel consumption”, “Forecast”) are reset mileage on remaining fuel", "Average speed") parameters, with the appearance of a two-tone sound signal.
Turning off the alarm
Press button 4 in Alarm mode. Press button 1 to turn off the alarm. “—.—” will appear in the digital digits, and in the “Current time” mode the alarm symbol will not light up (the alarm is turned off).
Adjusting the brightness of the indicator backlight
When the side lights are on, the illumination level is adjusted using the instrument scale illumination regulator. When the side lights are turned off, the backlight level is adjusted by software: - press button 4 in the “Traveling time with stops” mode. All single segments (pictograms) will be displayed on the indicator, which is a sign of the backlight level adjustment mode, and the digital digits will display a number corresponding to the backlight level as a percentage of the maximum value; — use buttons 5, 6 to set the required level of backlight brightness; press button 4 to end the brightness adjustment mode.
Calibrating the fuel level sensor
To carry out the correction, it is necessary to drain all gasoline from the tank. Press and hold button 4 for more than 2 s in the “Fuel level” mode. A flashing number “0” will appear on the indicator. Press and hold button 3 for 1 s until a confirmation beep appears. After this, a flashing number “3” will appear on the indicator. Fill the gas tank with 3 liters of gasoline using a measuring container, wait the time necessary for the fuel level sensor to calm down, press and hold button 3 for 1 s until a confirmation sound appears. Continue this procedure until the maximum value is 39 l, after which the computer automatically exits the mode. Installing an overspeed alarm Press button 4 in the “Medium speed” mode. Use buttons 5, 6 to set the required speed threshold. Press button 4 to exit the overspeed alarm setting.
The car of the 21st century is equipped with a huge number of microcircuits, electronics and sensors. VAZ 2110 owners rarely encounter breakdowns of electronic components for the simple reason that there are very few of them in this model. But if something goes wrong, the driver needs time to find the fault in the components and organs of the car. But if the VAZ 2110 had a standard on-board computer, vehicle diagnostics would be carried out much faster. But if you have free time and a little capital, the “ten” can be upgraded and an on-board computer installed. Initially, it seems that installing such equipment into a car will be problematic, but in reality, installation, diagnostics, and connection will not take even an hour.
Functional purpose of the device
The development of the technical component of vehicles has led to an abundance of electronic and mechanical devices that control the operation of the car. Each of them reflects one or another indicator, which a person does not always have time to analyze. This is where the VAZ on-board computer will help, taking control of what is happening. In addition to monitoring the operation of vehicle systems, it will promptly inform the owner about a failure.
Another advantage is that the standard on-board computer analyzes the technical condition of the car within the specified parameters. In practice, this means that the driver can ask a question regarding the presence of components or assemblies whose performance exceeds the technical norm. Preventative analysis reduces the likelihood of downtime due to technical failure. The VAZ trip computer differs in the available options depending on the configuration:
- Carburetor is a budget option that does not have sufficiently wide functionality. Installation does not take much time, and operation is simple. It is difficult to find it on the market due to low demand among VAZ-2110 owners.
- Injection - there are various options on the market that take into account the needs of drivers. Among the main advantages is the ability to conduct in-depth diagnostics. For example, if the car does not start because the injector has failed, the system will notify you in advance. The cost of the on-board computer depends on the configuration.
- Universal - installation is carried out on a VAZ-2111, 10 or 12 without taking into account technical specifications. Installation is carried out behind the rear view mirror or windshield.
- Adapted - selected taking into account the make and model of the vehicle. Installation is carried out in a strictly designated place, which the instructions will help you find.
Installation recommendations
The efficiency of the device is determined at the stage of selection and subsequent installation. An on-board computer (BC) is selected for the VAZ-2112, which collects and analyzes incoming information. Regardless of the model, it is equipped with a Check Engine light. When it is triggered, the bookmaker will independently determine that it is not working.
Experienced drivers do not advise overpaying for sensors of humidity and outdoor temperature levels, a chronometer, and an alarm clock. These indicators are easy to obtain using a standard VAZ-2110 thermometer. Once the driver has made his choice, installation can begin. First, you should study the passport supplied with the device, which will tell you how to connect the on-board computer.
When operating a vehicle, only 1 BC is required. The presence of a second computer in most cases provokes failures in the operation of both systems. Connection to the VAZ-2112 is carried out via a 9-pin block. It is located behind the BC and has a trapezoidal shape.
A diagram of the vehicle and the on-board computer itself will help you connect the contacts correctly. To connect to the VAZ-2110 in the standard BC, contacts No. 10 and No. 11 are not used. They are intended for temperature, humidity and pressure sensors. The installation of the BC is completed by connecting the K-line. Mistakes cannot be made, otherwise the indicators obtained from the VAZ-2112 will be inaccurate.
The connecting line runs in the diagnostic block provided for it. When checking valves and other preventive inspections at a service station, it is into the block that the technician looks into the block to connect the equipment. When laying the cable, you should make sure that there are no bends and that it is close to moving elements. For example, when operating a vehicle, the K-line can be damaged by the gas pedal.
Self-diagnosis mode: the concept of error codes and their use
As we said above, correct configuration of the BC will prevent possible malfunctions and problems. Information is transmitted to the computer from the control unit, which determines possible breakdowns and malfunctions of certain components. This is quite important, since untimely “treatment” of a particular problem can lead to the inoperability of the vehicle as a whole. All information about possible breakdowns is presented to the driver in encrypted form, in particular in a code.
The procedure for starting the self-diagnosis mode may vary depending on the BC model:
- If your “ten” is equipped with a basic BC, which is located under the speedometer on the control panel, to start the diagnostics you need to hold down the mileage reset button and turn the key to Z3. If everything is done correctly, the needles of all instruments, from the tachometer to the fuel level in the tank, will begin to move quickly. After this, you need to press the reset button twice and you will receive comprehensive information about the breakdowns.
- If the “ten” has a luxury configuration, in which the BC is located next to the automatic heater control system unit, then the self-diagnosis starts according to a different scheme. You need to click on the clock in time display mode. When error information appears, the BC only needs to be connected to the diagnostic interface.
Sorry, there are no surveys available at this time.