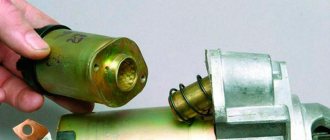
Slip rings
Replacing the slip rings of the VAZ 2110 generator is necessary if there are various types of defects on their surface. Because of them, the rings cannot efficiently perform their most important function - tightly connecting the parts to each other so that contact occurs between them. Very often, individual parts of the generator break. If you change it completely, you will have to spend a considerable amount of money. Therefore, you can repair it by replacing broken parts. On a VAZ 2110, replacing the slip rings of the generator is a simple procedure and you can handle it yourself.
Steel rings and their advantages
Replacing slip rings on a VAZ 2110 generator
There is no point in installing copper rings, as they wear out very quickly. Therefore, it is better to opt for steel rings, which have a number of advantages:
- They hardly wear out, so the brushes remain in almost perfect condition for a long time.
- They are easy to install.
Note: by the way, for more reliable fixation, they are first lubricated with a flux solution, and then washed with soda.
- Once installed, they are securely fixed, remaining motionless in all situations.
How to replace slip rings on an old-style generator rotor.
Generator repair
engine ZMZ-409 UAZ Bukhanka 2009 mileage 140 thousand km, for only 220 rubles (bearing 50 rubles and cont.
We fill new contact rings carefully so that they do not become distorted, otherwise during operation of the generator the brushes will fall apart or they will wear out quickly. It is better to stuff through a wooden container.
Having installed new rings, we secure the wires going to the excitation coil. It’s better, of course, to solder them, it will be more reliable.
Don't forget to install a new protective washer.
This is where we finish with the armature and move on to the stator.
Replacing the rotor with rings
Replacement on the VAZ 2110 generator
Sometimes it is not possible to replace the rings separately. The rotor also has to be replaced. This situation occurs when the rings reliably “stick” to the rotor. But you can try to restore the rings by placing them in a sulfuric acid solution. They cannot be kept in solution for a long time, as whole particles may disintegrate. To replace the rotor and rings, you must:
- Place markings on the covers of the generator (to make it easier to assemble them later, otherwise you can confuse their location).
- Remove the plastic casing. This is easier to do after the three latches securing it are bent away.
Note: you need to bend them very carefully, as they are quite delicate. Moving too quickly can cause them to break.
- Remove the two screws that secure the electronic voltage regulator.
- After this, you will have access to the generator relay. It must be removed, otherwise it will interfere with the work process.
- Remove all fastenings of the unit and condenser.
- Then unhook the three winding tips coming from the stator.
- Remove the block and capacitor. If you need to replace the capacitor, you need to unscrew the nut that secures it. Then remove the washer along with the bushing. Now it’s the turn of the wires that attach the capacitor to the contact bolt. After this, you can remove and replace the capacitor itself.
- Unscrew the generator coupling bolts. There are four of them in total. There are usually flat washers and spring washers underneath the screw heads. They are very small, but perform an important function. You can’t lose them, otherwise you’ll have to buy new ones, but finding them on sale is not easy.
- Remove the generator cover from the side where the slip rings are located. In this case, you can help slightly with a screwdriver, as if pulling the lid towards you.
VAZ 2110 in the generator slip rings
- Remove the nut securing the generator pulley. Remove the washer and pulley.
Note: the rotor must be stationary. To prevent it from spinning, it should be clamped as much as possible, and a small piece of plywood should be placed under it.
- Disconnect the thrust washer.
- Remove the generator rotor.
- It has a spacer ring that needs to be removed.
- At this stage, you need to carefully inspect the slip rings. It is possible that they will also have to be replaced. If they are worn out or there are scratches on their surface, then replacement cannot be avoided (by the way, it is not necessary to install new rings - they can be thoroughly sanded).
- A multimeter should measure the resistance of the rotor winding.
Note: if this tool shows that there is a break in the rotor winding, then it urgently needs to be changed. You can also try to rewind it, eliminating the break. But this process is quite complicated.
- You should also check if there is a short circuit between the winding and the rotor housing. To do this, you need to use a 220 V lamp. One of its wires must be connected to the body, and the other must be connected in turn to each of the slip rings. Moreover, if there are no short circuits, the lamp will not light.
- Insert the new rotor into place.
- Assemble everything in the opposite order.
Disassembling the generating device
It is noteworthy that generators come in two types: old and new. The differences between them are in the diameter of the shaft. A 15 mm shaft is installed on old generators, 17 mm on new ones. This means that different bearings should be selected for replacement. The 302nd is suitable for a 15mm shaft, and the 303rd for a 17mm shaft. As for the rear bearing, it goes with all generators and is marked as 202.
So, disassembling the generator begins:
- First, remove the plastic cover;
- then the diode bridge is dismantled;
- remove the tablet (regulator with brushes);
- To unscrew the pulley nut, you will have to clamp the generator in a vice, and then use a 24mm socket.
Advice. The gene must be clamped in a vice very carefully so as not to damage its parts. To avoid damage, the pulley is clamped using rubber gaskets.
- the relative position of the covers of the generating device is marked;
- then the tightening screws are unscrewed.
Note. The fastening screws are tightened very tightly. They are made of soft metal, so the usual methods of turning out oxidized bolts will not work. Here you will need an impact screwdriver or a shaped one, but with a large tip. Fasteners must be pre-treated with WD-40 or brake fluid and wait a little.
It is also recommended to treat the joints of the covers with the device body with WD-40.
- take a mounting spatula or an ordinary, but flat screwdriver, and halve the gene.
What causes rings to wear off?
Alternator rings for VAZ 2110
The following generator parts can cause slip ring failure.
Stator
- On its inside there should be no traces from the rotor that would appear during its operation. Otherwise you will have to change it.
Note: You also need to check the bearings, as this problem often appears when they are broken. Sometimes even the generator cover can also get broken. This problem urgently needs to be fixed by replacing the damaged part with a new one.
- After this, you should check whether there is a break in the stator winding. It needs to be checked in the same way as the rotor.
Generator VAZ 2110
Of course, if you are sure that the stator is completely intact, then you should not carry out such manipulation. But if there is even the slightest suspicion that it is malfunctioning, then it is better to check it. A faulty stator can lead to rotor failure again.
Bearing
- See if the generator bearing located on the rotor rotates correctly. It should rotate freely on the slip ring side without jamming.
- If it dangles too much or, on the contrary, is very tightly clamped, then it needs to be compressed.
Lid
- The generator cover on the slip ring side may have damage, cracks or other defects.
- In this case, it needs to be replaced, otherwise it will have a bad effect on the contact rings, leading to their abrasion.
Alternator slip rings (alternator slip rings).
As every car enthusiast knows, the electrical equipment of any vehicle includes such an important part as a generator. This device is used to convert mechanical energy that comes from the engine into electrical energy. The generator is paired with a voltage regulator, and together they make up the generator set.
As a rule, modern cars are equipped with alternating current generators. Based on the requirements for any generator, the most suitable generators are AC devices.
In this article we are not going to talk about the generator as a whole, but will touch only on a small part of it - slip rings , without which the operation of the entire generator is impossible. We will try to tell you what slip rings are, as well as how they can be easily and quickly replaced in case of wear or some kind of malfunction.
1. What are generator slip rings?
Slip rings are characterized as a peculiar type of electrical contacts, which are a conductive ring with brushes that fit tightly to it. Thanks to these brushes, the electricity generated in a rotating electrical machine is supplied from one part of the circuit to another part using a sliding contact.
As a rule, slip rings are used in cases where electrical energy cannot be transmitted directly using special wires, for example, at the moment of supply to a rotating shaft.
Today, slip rings are widely used in mechanical engineering, in electric motors, and even in robotics, in order to transmit information and control signals. Compared to the commutator unit, slip rings, which are used in electric motors, are much more popular among users, since they wear out much less during operation.
Like all other tools in a car, depending on the chosen technological solution, slip rings can be divided into two types: concentric and longitudinal rings. Typically, the material from which slip rings are made is hard metal. In some cases, slip rings can also be coated with a wear-resistant and environmentally resistant coating, which can be gold-plated or silver. Today, there are also cases where liquid metal slip rings were put into operation, which are mercury current collectors that provide the transmission of high currents and have low resistance.
2. Replacing the slip rings of the generator No matter how high-quality and durable the generator is, sooner or later, over time, some of its elements still become unusable. Of course, you can purchase a new generator, but in practice, repairing the generator yourself is quite easy and does not require any special skills or specialized tools, and it will also save you a considerable amount of money. Failure of slip rings can cause major malfunctions of the rotor itself, and then of the entire generator, so you should be very careful to ensure that the slip rings are in normal working condition. As practice shows, the most common malfunction of the generator rotor is wear of the slip rings. Based on the fact that it is not always possible, or simply impossible, to find new rings for all rotors, you almost always have to replace even a completely working rotor with a new one. What can cause wear on the rotor rings? There are a huge number of different factors. The most common is the introduction of copper particles into the brush material and further work “copper on copper”. You can also quite often observe this situation: when you replace the brushes and a new rotor, at the very first revolution of the rotor you hear a sharp creak. Further, if you make several turns and then remove the brushes, you will see one or several places where copper is embedded, and a torn strip will be clearly visible on the ring. In this case, if you leave everything as is, you risk rapid wear of the rotor. Your first aid in this case will be grinding in and impregnating the brushes with oil . As practice shows, a brush soaked in oil will last you much longer; moreover, in such a situation, the contact ring is subject to less wear. There are many instructions in which, for unknown reasons, they strongly recommend wiping all oily slip rings and brushes with gasoline, justifying all this by the fact that the oil on the brush worsens the contact. In practice, as we have already said, everything is exactly the opposite: neither the current nor the voltage on dry and oiled brushes changes. A special experiment was carried out on this matter, which proved the correctness of the above statement. It was carried out according to this system: while working directly on the load with dry brushes and measuring all possible parameters, a few drops of oil were applied to the rings and the instruments were monitored. One could have expected anything from this experiment, including hydroplaning of the brush, but nothing of the kind happened, so we came to the conclusion that an oiled brush does absolutely no harm. If there is any malfunction or wear of the slip rings, you need to promptly replace them with new, functional ones. But before you make a replacement, you need to decide on the choice of ring. As practice shows, not all rings can boast of proper quality and reliability. As a rule, experts do not recommend using copper rings, as they are quite unreliable. By their nature, they can work until the last minute, or they can wear out in a very short period of operation. It is better to choose steel rings, because, as is known, the coefficient of friction of graphite on steel is much lower than on copper, and based on this, steel rings practically do not wear out; the same can be said about brushes, which in this case are subject to wear much less than on copper rings. If we take into account the electrical indicators, we can say that there is no particular difference between steel and copper slip rings; the resistance of a graphite brush is disproportionately greater than the resistance of steel. If you simply haven’t found suitable rings, don’t rush to get upset and buy a new rotor, which will cost you a considerable amount of money. Try to make a "knight's move" and replace the voltage regulator. You just need to place a few washers under it in such a way that the brushes move from the thinned part of the rings to the whole one. Of course, this is not the best way out of the situation, but the generator can still operate in this condition. If you are a motorist who is not looking for easy ways in life, the most suitable solution for you would be to buy new slip rings that will not require a lot of money from you. Whatever one may say, if you have already removed the old rings, and damaged them while removing them, there is no other choice. As every knowledgeable auto mechanic knows, you will need to remove the rear alternator bearing before attempting to replace the slip rings. In the case when the diameter of the shaft is quite small, when removing the rear bearing, experts under no circumstances recommend using a puller for this, which, as a rule, can damage the shaft. Therefore, you should not take risks, but it is better to use this method, already tested in practice, with which you will not have to purchase a puller, and the shaft will survive. So, look at the instructions given below and at the same time get to work. First, using a large open-end wrench, remove the generator bearing. Next, we clamp the rotor in a vertical position and hook the outer ring of the bearing directly with the lower horn of the key. You can also, of course, pry the bearing cover in a circle with a screwdriver, but when performing this operation you need to make sure that the bearing itself does not warp at the time of removal. Once you have managed to remove the bearing, proceed to remove the plastic cross-shaped plug using a straight screwdriver. Next, you need to straighten the two contacts that you will see under the casing and release the leads of the rotor winding. The tools for performing these operations will be a screwdriver and pliers. Finally, we get down to breaking off the contacts and after that we remove the old shank. Once the bearing is removed, you can begin replacing the slip rings. First, you need to carefully release the rotor winding terminals from the ring clamps and equally carefully remove the rings. After this, we carefully remove any remaining glue. As a rule, at this stage everyone understands why you should not use a puller when removing a bearing. So, after this operation, we press the new slip rings onto the shaft. As a rule, most specialists put new slip rings on the rotor using a hammer (there are also cases when you need to use a file). In the event that the rings suddenly turn out to be a little shorter than the original factory ones, you can use a plastic sleeve, which will need to be placed on the shaft. It is very important here to avoid any distortion, as otherwise the brushes can deteriorate very quickly. Next you need to solder the winding leads to the ring tracks. After this, it is necessary to carefully and carefully apply the sealant in order to protect the soldering from oxidation. Then we put the protective cover in place and, using the old bearing as a mandrel, carefully press the new bearing into place. In the same way, we press the shaft into the new bearing. Next - it's a matter of small things. It is necessary to clean the stator winding terminal terminals. After this, all that remains is to screw the terminals to the diode bridge and lubricate them with lithol to protect them from oxidation. In everyday life, there is also the option of soldering new slip rings onto old ones. If you choose this technology, you first need to remember that before soldering the rings, you need to tin them using an active flux, for example, with “soldering acid” (zinc chloride) and rinse them thoroughly with soda. As a rule, the remains of copper rings are tinned with rosin. After this, you need to heat the new contact rings with a soldering iron until the solder melts, and as a result you will see how they smoothly and freely fit onto the remains of the old rings and, after cooling, are soldered quite firmly. After that, you just have to take care of their groove and then grind the rings. It is better to base the machine on the rear bearing fixed in the steady rest - this way you will get the maximum guarantee of the smallest displacement of the rings relative to the rotor axis, which will eliminate the possibility of the brush coming off the ring and breaking the chain at high speeds. Once you have installed the slip rings, you can begin assembling the generator. In this case, it is necessary to carefully ensure that the rotor can rotate freely and easily, and also to ensure that it does not touch the housing or stator. We tighten the pulley and... voila! You can laugh that your generator is already assembled. But all your efforts don’t end there. After you have installed the alternator back on the car, you need to measure the voltage level in the alternator when the car engine is turned on. If he has reached the norm, then congratulations! You did everything right and the rings are in their place. As a rule, after replacing the slip rings in the generator, the viability of the latter will last for at least several years. Ideally, you can immediately modify the generator in order to increase the voltage in the car network.
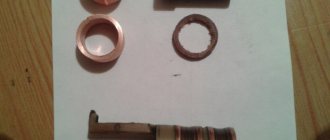
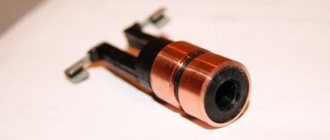
PHOTO (examples) of slip (slip) rings on the generator rotor:
You can order from our partner for foreign cars
For domestic ones - for VAZ on the Avtomagnit website
Manifolds for BOSCH generators
Table of markings of slip (slip) rings on the generator rotor:
| No. CARGO | To the generator | ø internal hole, | ø external (copper rings), mm | Width (height), mm | Application |
| mm | |||||
| 237323 | Ford | 5 | 14 | 10 | Ford Connect |
| 239930 | B.O. | 5 | 14 | 43 | |
| 239718 | ND | 6 | 15 | 46 | |
| 233937 | Ford | 6 | 16 | 38 | |
| 235160 | VAZ | 6,5 | 13,9 | 48 | VAZ-2110 |
| 138441 | HI | 7 | 17 | 45 | |
| 232295 | VALEO | 7 | 15 | 43 | |
| 135172 | B.O. | 7 | 16 | 52 | |
| 232854 | Iskra | 7 | 16 | 52 | SKODA FABIA |
| 135298 | VALEO | 8 | 24 | 18 | |
| 232401 | Delko | 8 | 15 | 20 | CHEVROLET96540542 |
| 136682 | Delko | 9 | 16 | 21 | |
| 135179 | VALEO | 9 | 15 | 28 | |
| 138421 | VALEO | 9 | 15 | 28 | |
| 135173 | ND | 9 | 15 | 23 | |
| 131819 | ND | 9 | 15 | 24 | |
| 131817 | L.U. | 9 | 25 | 11 | |
| 230090 | VALEO | 9 | 15 | 48 | |
| 130843 | Delko | 12 | 23 | 25 | |
| 135140 | MI | 12 | 23 | 30 | |
| 133409 | MI | 13 | 23 | 28 | |
| 133924 | Delko | 13 | 26 | 23 | hexagon inside |
| 231400 | Motorola | 13 | 27 | 32 | |
| 233938 | Ford | 13 | 27 | 37 | |
| 131219 | Motorola | 14 | 26 | 14 | |
| 136305 | Ford | 14 | 27 | 37 | |
| 135536 | NIKKO | 14 | 23 | 30 | |
| 135054 | HI | 14 | 28 | 29 | |
| 138439 | HI | 14 | 23 | 30 | steel |
| 233235 | HI | 14 | 27 | 29 | |
| 137571 | HI | 14 | 28 | 33 | |
| 131054 | CAV | 15 | 31 | 24 | |
| 138413 | MI | 15 | 33 | 31 | steel |
| 130842 | VALEO | 15 | 30 | 21 | |
| 131815 | VALEO | 15 | 30 | 28 | |
| 133055 | VALEO | 15 | 27 | 32 | |
| 133349 | VAZ | 16 | 33 | 22 | |
| 133401 | B.O. | 17 | 33 | 22 | VAZ |
| 132642 | L.U. | 17 | 27 | 24 | Nissan |
| 133402 | B.O. | 17 | 28 | 23 | |
| 235764 | B.O. | 17 | 28 | 22 | |
| 138440 | HI | 17 | 32 | 28 | |
| 137313 | MI | 17 | 33 | 29 | |
| 137315 | HI | 17 | 33 | 29 | |
| 133410 | HI | 17 | 35 | 28 | |
| 130841 | Ducellier | 17 | 36 | 23 | through hole |
| 131814 | VALEO | 17 | 31 | 28 | |
| 131818 | VALEO | 17 | 32 | 23 | 2 rings |
| 233498 | VALEO | 17 | 30 | 31 | |
| 134492 | VALEO | 17 | 30 | 28 | |
| 137574 | VALEO | 17 | 30 | 38 | |
| 233936 | Delko | 17 | 30 | 33 | hexagon inside |
| 131816 | DCL | 17 | 30 | 28 | |
| 138438 | ND | 17 | 32 | 25 | steel |
| 135315 | ND | 17 | 33 | 31 | steel |
| 233118 | Delko | 17 | 27 | 32 | |
| 132295 | Delko | 17 | 30 | 28 | |
| 133351 | Valeo | 17 | 34 | 23 | |
| 233281 | Delko | 18 | 30 | 33 | |
| 233191 | Ford | 18 | 32 | 33 | |
| 231368 | Mando | 18 | 34 | 31 | |
| 230490 | MI | 18 | 34 | 28 | |
| 231567 | MI | 18 | 34 | 31 | steel |
| 130561 | Delko | 18 | 30 | 28 | |
| 233220 | Motorola | 19 | 40 | 22 | 2 rings |
| 133925 | Motorola | 19 | 40 | 22 | 2 rings |
| 136000 | B.O. | 20 | 33 | 22 | |
| 233787 | MI | 26 | 42 | 29 | steel |
| 133408 | ND | 33 | 25 | 18 | steel |
Generator stator
The stator windings can only be examined by disconnecting or unsoldering the leads from the diode bridge. The resistance between the terminals of the windings should be approximately 0.2 Ohm. And between the terminal of any winding and 0 (common terminal) there is about 0.3 Ohm. If the stator windings or diode bridge are shorted, the generator makes a loud noise during operation.
Also carefully inspect the condition of the internal parts of the stator and the outer part of the rotor. They should not touch each other during operation. As they say, “shoes.” During such operation, the generator makes increased noise, which indicates wear of the bearings or bushings.
Video, testing on a homemade stand:
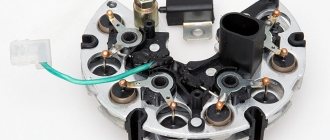
Diode bridge
A diode bridge consists of two plates, one of which is positive and the other negative. Diodes are checked with a multimeter in ohmmeter mode.
Connect one probe to the “+” terminal of the diode bridge, and alternately connect the second to terminals F1 F2 F3 and 0. To make it clearer: we connect one probe to the positive plate, and with the other we alternately touch the terminals of those diodes that are pressed into this plate.
Then swap the probes and do the same. In one case the tester should show conductivity (some kind of resistance), but in the other it should not. So we checked the diodes on the positive plate.
To check the diodes on the negative plate, connect one probe to the negative plate, and the second to the leads of the diodes alternately. In exactly the same way, then we swap the probes and repeat the procedure. In one case there will be conductivity, in the other there will not be.
Repair and replacement of the stator of the VAZ 2110 generator.
The generator stator has three windings. These windings are connected together on one side and to a diode bridge on the other. They are wound on a plate-type metal core.
First of all, we visually inspect the stator windings for damage. Damage can be different, for example, chipped insulation, burnt windings, visible breakage of windings. If such causes are identified, it is advisable to replace the stator.
But if everything seems to be in order, we proceed to check it with a multimeter.
You need to set the device mode switch to a sound signal and connect the probes to the windings one by one and take measurements.
Since the ends of the windings are connected to one point, all three outer wires must ring each other. Above in the photo, I indicated the alternate connection of the device in different colors.
If, when checking one of the windings, no sound signal is heard, it means there is a break somewhere and the stator needs to be replaced. You can, of course, rewind the winding, but more experience is needed here, so it is better to replace the entire stator.
In the same way, we check whether the windings are shorting to the stator housing. Replacing valve stem seals for VAZ 2110 | car enthusiasts. To do this, we connect one probe to each winding terminal in turn, and the other probe to the stator housing.
We can finish this with the stator and move on.
Replacing slip rings without changing the rotor
Generator rotor rings VAZ 2110
In any case, their replacement is carried out by removing the rotor. But it doesn’t always need to be changed either. Replacing rings goes like this:
- Use a screwdriver to pry off the plastic casing that “hides” the contact output of the rotor winding. After this, it should be removed.
Note: you need to pry it carefully, in a circle, until a slightly noticeable gap appears.
- Under it you will see two contacts.
- Using pliers and a screwdriver, release the latches. After this, release the leads of the rotor winding.
- Disconnect the shank with rings. You can carry out this process in any convenient way. The easiest way is to pinch the shank and twist it. The contacts will be broken and it can be removed without any problems.
- Contacts may remain in the grooves. They should be picked out. You can use a regular nail for this.
- New rings should be put on the rotor shank.
Note: in this case, distortion must not be allowed to appear. Everything should be strictly in the center. Otherwise, there will be beating, resulting in damage to the brushes.
Alternator rotor slip rings for VAZ 2110
You can replace the generator rings with your own hands, as it is not difficult to do even at home. The price of new rings ranges from 200-1000 rubles. And at a car service you will need to pay two or even three times more. After all, no one will undertake this seemingly simple repair for less than 1000 rubles. Of course, before you start repairing it yourself, it’s worth reviewing photos and videos on this topic. Instructions wouldn't hurt either.
Removing and disassembling the generator
Disconnect the wire terminal from the negative terminal of the battery. Remove the generator belt (see “Checking the condition and replacing the generator drive belt”).
By pressing the lock of the generator pre-excitation wire block. . disconnect the block from the voltage regulator connector.
Using the “13” socket, unscrew the nut securing the wire lugs to terminal “B+”. . and remove them from output.
Using a 17mm socket, unscrew the bolt of the lower mounting of the generator and remove it. Remove the nut from the generator bracket.
Using a 13mm socket, unscrew the nut of the bolt for the upper mounting of the generator.
. and remove the generator. We disassemble generator 5132. 3771 to replace the voltage regulator, rectifier unit, rotor, stator and bearings.
Using the “8” socket, unscrew the three nuts securing the casing.
. and remove the casing.
Remove three metal washers from the casing mounting studs.
Using a slotted screwdriver, unscrew the two screws securing the voltage regulator terminals.
Using the “8” socket, unscrew the two nuts securing the voltage regulator.
. and remove the regulator.
We use a marker to mark the relative positions of the generator covers.
Using a 7-point socket, unscrew the four bolts holding the covers together.
Remove the back cover with the stator assembly. If the stator does not come out of the front cover, pry it off with a screwdriver from different sides relative to the front cover.
We put a high “24” head on the pulley fastening nut and through its hole insert a “8” hexagon into the hole of the rotor shaft. We unscrew the pulley fastening nut, holding the tool head with a pipe wrench or in a vice. Remove the spring washer
. and a spacer washer.
Push the rotor shaft out of the front cover.
. and remove the cover to replace the front bearing.
. Using a slotted screwdriver, unscrew the four screws securing the bearing pressure plate.
Remove the pressure plate.
Use your hands to push the bearing out of its seat.
. and remove it. If it is not possible to push out the bearing, we knock it out using a mandrel or tool head of a suitable diameter. To replace the rear bearing...