Replacing the gasket
Surely, many have encountered a problem when oil begins to ooze under the valve cover. In this case, the valve cover gasket must be replaced. As a rule, this happens after a certain mileage of the car. To prevent such a problem, you need to replace the gasket in a timely manner. The process itself, called replacing the valve cover gasket of a VAZ 2110, is not that complicated, but it is not feasible without some knowledge and skills.
Replacing the valve cover gasket
Probably the most common disease of all front-wheel drive 8-valve VAZ cars, including 2110-2112, is oil leakage from under the valve covers.
Moreover, this problem occurs both in old eights of the 90s and in modern Kalinas. And to eliminate this defect, it is necessary to replace the gasket. But the ideal option, of course, would be to place it on a sealant. So, to do this simple job we need a minimum of tools:
- 10 mm head.
- Ratchet handle.
- Phillips blade screwdriver.
What do you need to know about the motor?
Before the valve cover
VAZ two thousand 100 fourteen will be removed and the gasket replaced, it’s worth talking about the features of the engine. If you don’t understand anything about design features, then a good solution would be to turn to specialists. Remember that to carry out similar work you will need a certain tool.
| № | Detail number | Part name |
| 1 | 2108-1003298 | screw |
| 2 | 2108-1003278-01 | Washer |
| 3 | 2108-1003277-01 | Sleeve |
| 3 | 2108-1003277-02 | Sleeve |
| 4 | 2108-1003274 | Cover pin |
| 5 | 2111-1003260 | Cylinder head cover |
| 6 | 2108-1003271 | Bolt M12x1.25x135 |
| 7 | 2108-1003265 | Washer |
| 8 | 14328201 | Plug 10 cup |
| 9 | 14329101 | Plug 30 cup |
| 10 | 1118-1003011 | Cylinder head |
| 11 | 2101-1002042 | Sleeve |
| 12 | 14329201 | Plug 30 6 cup |
| 13 | 10158601 | Plug sixteen spherical |
| 14 | 11183-1002011-10 | Cylinder block |
| 15 | 14234330 | Bolt M10x1.25x65 |
| 16 | 2108-1003284-10 | Ring sealing |
| 17 | 2111-1003284 | Ring sealing |
| 18 | 2111-1003286 | Bolt |
| 19 | 2111-1003288-10 | Stub |
| 20 | 10725911 | Nut M6 low |
| 21 | 11197773 | Conical spring washer 6 |
| 22 | 13541221 | Hairpin M6x22 |
| 23 | 2108-1003270-10 | Cover gasket |
| 23 | 2108-1003270-11 | Cylinder head cover gasket |
| 24 | 21083-1003020-10 | Head gasket |
| 24 | 21083-1003020-11 | Head gasket |
| 25 | 2112-3855020 | Knock sensor |
| 25 | 2112-3855020-01 | Knock sensor |
| 25 | 2112-3855020-02 | Knock sensor |
| 25 | 2112-3855020-03 | Knock sensor |
| 26 | 2101-1002040 | Sleeve |
Namely, the car owner needs to have such details at hand as:
- ratchet with extension;
- head at 10;
- screwdriver with Phillips head.
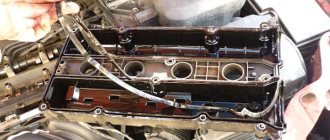
How to remove the valve cover and replace the gasket on a VAZ 2110-2112 8-cl.
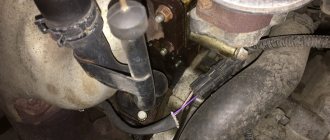
So, the first thing you need to do is open the hood of the car and, using a 10mm socket, unscrew the two bolts securing the throttle cable bar, as is clearly shown in the photo below.
Take it to the side and secure it so that it does not interfere with us in the future.
Then, using a Phillips screwdriver, unscrew all the clamp screws on the hoses that fit the valve cover. In the photo below they are all marked with arrows:
When you have completed this step, you next need to unscrew the two nuts securing the valve cover to the cylinder head body.
And only after this, carefully remove the valve cover, lifting it up without sudden movements.
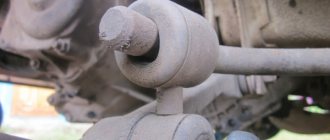
Now as for replacing the gasket. It is installed in the groove of the cover from the inside. We pry it with our fingers or a thin object and pull it out. This procedure is clearly shown in the picture below.
After this, we wipe the surface of the cylinder head and the groove of the cover dry, install a new gasket and you can put everything back in place.
Also, it is worth paying attention to the integrity of the rubber seals under the cover fastening nuts:
Typically, such rubber bands are sold complete with a gasket. The price of such a kit is about 120 rubles for VAZ 2110-2112 with 8-valve engines. After installation, we connect everything in place.
Source
Differences in cylinder head covers 2112-1003260 — DRIVE2
I wondered about the valve cover for the 16-cl. heads. It turns out there are quite a lot of varieties of them, so you can get confused.
This means that my cylinder head does not have a central bolt between the wells of the 2nd and 3rd cylinders. Accordingly, the lid should not have one. I had a lid in which this extra hole was tightened with a screw and a nut on the sealant.
16th grade VAZ 2112 cylinder head without a bolt between the wells of the 2nd and 3rd cylinders
16th grade VAZ 2112 cylinder head without a bolt between the wells of the 2nd and 3rd cylinders
Having scoured the net, I didn’t understand anything, catalog numbers and photos of covers are sculpted for them, as anyone pleases! The only thing is that I compiled a small list of catalog numbers 2112-1003260 Cylinder head cover s/o before 01.2003 (2112-1003260-00-30 - analogue) 21120-1003260 ? 2112-1003260-10 Cylinder head cover s/o after 01.20032112- 1003260- 30 under 16v 1.6 for individual coils (Priora) 21124-1003260 (21124-1003260-00) Cylinder head cover (1.6/16 valves) AVTOVAZ Well, then there are varieties from the world of tuning and sports 21124-1003260BP Cylinder head cover “BIMOTORS POWER” VAZ 21124 1.6 16V21124-1003260-T80 Cylinder head cover “TEAM80” (Nuzhdin Motor Sport) VAZ 21124 1.6L 16V
21124-1003260ST Cylinder head cover “STINGER” VAZ 21124 1.6 16V
I came across photos of specimens of various variations with fasteners for coils and a module, but what I need is one without a bolt in the middle...
16th grade cylinder head cover VAZ 2112 without a bolt between the wells of the 2nd and 3rd cylinders
16th grade cylinder head cover VAZ 2112 without a bolt between the wells of the 2nd and 3rd cylinders
16th grade cylinder head cover VAZ 2112 without a bolt between the wells of the 2nd and 3rd cylinders
21124-1003260
21124-1003260
cylinder head with insert wells, installed until May 2002.
cylinder head 2112 without bolt between 2nd and 3rd cylinders
cylinder head 2112 with a bolt between the 2nd and 3rd cylinders
Replacing the valve cover gasket on a VAZ 2110 on your own
Surely, many have encountered a problem when oil begins to ooze under the valve cover. In this case, the valve cover gasket must be replaced. As a rule, this happens after a certain mileage of the car. To prevent such a problem, you need to replace the gasket in a timely manner. The process itself, called replacing the valve cover gasket of a VAZ 2110, is not that complicated, but it is not feasible without some knowledge and skills.
Pad
Replacing the valve cover gasket on a VAZ 2110
In fact, the valve cover gasket is a minor element; it does not affect the performance of the engine or other technical parameters. But if this gasket starts to leak, you need to prepare for some trouble. The main sign of taking care of your car is a clean and dry engine, which is also reflected in the condition of various gaskets, seals and seals.
Note! A good valve cover gasket is the key to a clean and well-maintained engine.
Replacing the 8th valve cover gasket of a VAZ 2110
The valve cover immediately catches your eye when you open the hood of the car. Most car enthusiasts paint this accessory and the air cleaner body in bright colors. So:
- The cover is designed to cover the gas distribution mechanism; it has a neck for changing engine oil. This neck is attached to the cover itself using several bolts. There must be a special gasket between these parts.
Note! The gasket is made of a special composition, the basis of which is rubber. In this case, all properties are preserved when exposed to high or low temperatures. In addition, the composition does not interact with engine oil.
Sooner or later, the gasket loses its elasticity and becomes hard. Later, microcracks form through which oil leaks. Even due to minimal leaks, the engine quickly becomes covered with dirt, which is difficult to wash off.
Cylinder head repair
We mark all hydraulic compensators with numbers using an ordinary clerical touch and put them away. An ordinary magnet will help you pull them out. We dry out the valves and remove the oil seals (valve seals), the valves into scrap metal, the oil seals into the trash. We clean all channels. We take the head for grinding, just in case. After washing it again with kerosene after sanding and blowing it with air, we begin to assemble it.
We arrange the freshly purchased valves in the sequence in which they will stand in the cylinder head and begin to grind in one by one. Lubricate the valve stem with clean oil and apply lapping paste to the edge.
We insert the valve into place and put a valve grinding tool on the valve stem. The stores sell a device for manual lapping, but since this is the twenty-first century, we are mechanizing the process. We take the old valve and cut off the rod from it, select a rubber tube for it of such a diameter that it fits tightly. The rod is in a reversible drill, one end of the tube is on it, the other is on the valve being ground in. At low speeds we begin to grind the valve, constantly change the direction of rotation and periodically press it to the seat or weaken the force. On average, the valve takes about twenty seconds. We take it out and wipe it. The valve is considered ground in if a uniform gray strip of at least 1.5 mm wide appears on the chamfer.
When is replacement needed?
Perhaps many are interested in the question of how often valve gaskets need to be replaced. It is worth noting that such a procedure should be habitual for the driver, especially in cases where the car is actively used. Replacing the valve cover gasket on a VAZ 2110 should be carried out in the following cases:
- if traces of oil appear outside along the connection line between the cover and the cylinder head;
- during current or major engine repairs;
- when removing the head cover for technical inspection or for timing belt repair.
- Some drivers change the gasket under the cap constantly when changing the engine oil. There is a rational explanation for this. Oil leakage will be completely eliminated. When opening the cover, the driver inspects the timing parts to detect wear or damage.
In many cases, the gasket is changed in a garage environment. You can quickly change the gasket on your own; all you need is desire and a set of simple tools. In addition, you need to acquire consumables. Such materials include a new gasket, a good high-temperature engine sealant and a degreaser (this can be gasoline, solvent or anti-silicone).
Replacement process
Removing the old gasket is very easy. Let's get started:
- To do this, remove the air cleaner housing and unscrew the mounting bolts around the entire perimeter.
Note. If the cover is burdened with additional devices, for example, attachments, they can also be dismantled. The old gasket should be thrown away immediately.
- The contact points between the cylinder head and the cover are cleaned of worn sealant and then degreased.
- The gasket is lubricated on both sides with sealant, placed in place and covered with a lid.
All parts must be assembled in reverse order. This video will help you do everything correctly.
Errors after replacing the gasket
Photo of incorrect gasket replacement
Of course, the gasket replacement process is not always carried out perfectly, and some common mistakes may be made. Despite the fact that this is a simple procedure, many car owners may encounter certain difficulties. For example, after installing a new gasket, oil may still flow. Errors during replacement can be different, but the most common are:
- use of low quality gasket;
- uneven application or use of old sealant;
- Incorrect tightening of the bolts, which may result in the cover being skewed.
Attention: Before starting work, you need to find a diagram for tightening the cover fasteners; it is in the vehicle’s operating manual. Thus, everything must be done based on this scheme. The dynamic wrench will help control the tightening force. To carry out work comfortably and conveniently, you need to prepare the following tool:
- socket or socket wrenches;
- torque wrench;
- a little turpentine;
- universal screwdriver;
- automotive sealant;
- new gasket.
Note! It is better to carry out the operation on a cold engine, which is much more convenient.
In order to avoid mistakes when replacing the gasket, it is recommended to follow certain instructions:
- First, the mounting bolts from the valve cover are unscrewed. For these actions you will need a key set to “10”. The unscrewed bolts are completely removed. The corner of the valve cover is carefully picked out with a screwdriver. The cover is lifted and dismantled.
- All edges of the part are thoroughly cleaned of oil. In this case, you can use turpentine, which is sold at the pharmacy. In addition, the old sealant is removed.
- The tightening of the cylinder head bolts is rechecked, especially for situations where major repairs were carried out relatively long ago. If necessary, they are tightened to the correct torques and in the correct sequence as specified in the machine manual. If for some reason there is no manual, the information can be read on the Internet.
- The lid is thoroughly washed; the same turpentine is suitable for this. More attention needs to be paid to the oil separator.
- The old gasket is removed. Perhaps it will burst into pieces. Using turpentine, wash the groove under it.
- A new gasket is inserted into the corresponding groove, after which sealant is applied to the cylinder head and cover.
Note! It is recommended to apply the composition from right to left, and the sealant layer should be no more than 3 mm.
- To make installation of the cover as convenient as possible, it is better to remove the timing case.
- Now you can install the cover; you need to hold it level and lower it slowly. The holes for the candles are centered so that they fit exactly.
- Bolt tightening should start from the center and end with the outer bolts. Refer to the manual for the tightening sequence. As a rule, the first tightening should be done with a force of 5 Nm, and the second - 10 Nm.
- After this, oil is added to the engine and a test run is performed. At the final stage, you can evaluate how well the work was done by testing the gasket for leaks.
Self-replacement - what needs to be taken into account?
The replacement process is considered quite common, but it is necessary to realize that it is not always possible to carry out the work smoothly.
That’s why, when carrying out work, you should adhere to the usual tips that will help you avoid mistakes:
- When removing the lid, wash it in turpentine.
- A good solution would be to use high quality gaskets.
- All parts used must be clean; when carrying out work, specialists recommend wiping the edges of the parts to remove any existing oil.
- During installation, you can use sealant; it is applied to the joints.
- After the change is completed, you need to check the oil level.
- To check the system, you need to start the car; carry out a second inspection after making the first trip.
- The groove under the gasket should be cleaned as thoroughly as possible.
How to remove the valve cover and replace the gasket on a VAZ 2110-2112 8-cl.
So, the first thing you need to do is open the hood of the car and, using a 10mm socket, unscrew the two bolts securing the throttle cable bar, as is clearly shown in the photo below.
Take it to the side and secure it so that it does not interfere with us in the future.
Then, using a Phillips screwdriver, unscrew all the clamp screws on the hoses that fit the valve cover. In the photo below they are all marked with arrows:
When you have completed this step, you next need to unscrew the two nuts securing the valve cover to the cylinder head body.
The main reason
Oil enters the spark plug wells through a leak in the joint of the elements separating the well from the internal space of the cylinder head. There are several design options for the block head.
- The spark plug well insert is screwed into the cylinder head. An oil seal is installed between the top of the insert and the valve cover. Most often, oil gets into the wells due to the natural aging of seals, which experience numerous temperature changes, exposure to gases and engine oil. Less commonly, leakage occurs through the threaded connection at the bottom of the insert. This design is used on 3S-FE, 4S-FE engines, using the example of which we will consider how to fix the problem ourselves.
The spark plug well insert is inserted into the cylinder head, and the connection is sealed with oil seals in the upper and lower parts. This is exactly the design of the cylinder head on VAZ 2112 1.5 liter engines with 16 valves. O-rings shrink over time and lose their elasticity, which causes oil penetration.
- The spark plug well tube is missing as such. The walls of the cavity for screwing in the spark plug are components of the cylinder head. The VAZ 21126 engine, installed on the Lada Priora, Kalina, and Granta, is designed exactly according to this type. There are no gaskets between the bottom of the cylinder head, the camshaft bed and the valve cover. Tightness is achieved by applying sealant to the mating surfaces. Due to numerous temperature changes, as well as deformation when tightening the cylinder head bolts, camshaft beds and covers, it is impossible to achieve a perfect fit of the parts. This causes oil to penetrate into the spark plug wells.
Crankcase ventilation system
Increased crankcase gas pressure is one of the main reasons for accelerated oil breakthrough through the spark plug hole seals. The operating principle of closed-type crankcase ventilation involves supplying a mixture of oil vapor, gasoline and exhaust gases back to the intake manifold.
The PCV valve is responsible for dosing a portion of gases. If for some reason the valve does not cope with its task, excess pressure will form inside the cylinder head. The cause of the malfunction can be either in the valve itself or in a worn-out cylinder-piston group. With worn compression rings and increased clearance between the pistons and cylinders, it is more difficult for the crankcase ventilation system to cope with its task.
In case of excessive fogging around the valve cover gasket, oil pan, oil in the air filter, spark plug wells, we strongly recommend checking the crankcase ventilation. With increased exhaust gas pressure, replacing gaskets with the application of anaerobic sealant will only give a short-term effect.
Symptoms and consequences
To determine the malfunction, it is enough to remove the ignition plugs/ignition modules from the wells and unscrew the spark plugs. An oil film on the elements will be the main sign of leakage. If the cause of oil ingress is not eliminated in time, the engine will begin to sputter and lose power in all or certain operating modes, which can also result in high fuel consumption. Most likely, due to misfire in the cylinders, the Check Engine light on the dashboard will light up.
The negative impact of engine oil on the tip seal of high-voltage wires and ignition coil modules leads to such consequences. The oil environment creates favorable conditions for spark breakdown, as a result of which the combustion of the fuel oil in the cylinder is disrupted.
Removing the valve covers on engine 21120 (16v 1.5)
Briefly, the sequence looks like this: remove the filter box and the plastic trim, disconnect the wires and unscrew the ignition module. The key must be turned to position “0”.
Removing the air filter box
To remove the filter, loosen clamps 1 and 2, and then disconnect connector 3. Pipes 1 and 2 are removed from the box. Use a 10mm wrench to unscrew the screw on the body, then remove the box from its mountings.
With a plastic cover, everything looks simple: either it is screwed on with bolts (key “10”), or held on with rubber bands. In the first case, the bolts are unscrewed, in the second, the cover is pulled up. The main thing is to unscrew the filler plug.
To disconnect high-voltage cables, you need to pull the caps out of the wells. The cables are also disconnected from the ignition module. It is pressed to the valve cover with three 10mm nuts.
We figured out the ignition module
Don't forget to disconnect the low-voltage connector and dismantle the module. If you do not unscrew the module, you will not be able to remove the valve cover on a VAZ-2112.
The part called “receiver”
First of all, you need to remove the throttle assembly: unscrew the cap on the antifreeze tank, disconnect the TPS and IAC connectors, unscrew the two fastening nuts (wrench “13”). It is also advisable to disconnect the negative terminal from the battery.
What to do before removing the receiver
Using a 10mm wrench, unscrew the cable mounting bracket from the receiver. All that remains is to remove the throttle assembly : the operation is carried out so that the assembly remains above the expansion tank. The assembly itself is finally attached to the body partition.
Removing the valve covers on engine 21124 (16v 1.6)
Remove the filter box and decorative trim (see Chapter 1). Next, remove the ignition coils: disconnect the plugs and use a “10” key to unscrew the fastening screws.
Customized ignition coils
What to do with the damper drive cable: remove the rubber holder from the bracket, cut the plastic clamp.
The throttle cable needs to be released
Now remove the throttle assembly according to the instructions from the previous chapter.
How to remove a plastic intake module
A wiring harness is attached to the front of the intake module. The cables go to the DPKV, DPRV (DF) sensors and to the adsorber valve. All connectors must be disconnected, then the wiring harness is removed.
The photo shows how the brake system hose is disconnected, as well as the crankcase ventilation hose. It is also necessary to remove the oil dipstick and tube by unscrewing screw 1.
Plastic part attachment points:
All elements are shown in the photo.
Video.
It is recommended to replace the gaskets on the VAZ intake manifold after each removal. But I had to do this prematurely, as I discovered a significant air leak, which mainly manifested itself on a cold engine. Every cold start was accompanied by a terrible tripping.
In addition to the tripping when cold, there was a slight drop in speed when sharply pressing the gas pedal. This applies to both a cold and a hot engine.
A homemade smoke generator made from a cigarette helped me detect the air leak. A very simple and primitive contraption that has helped me out more than once.
My car (Kalina 1.6 8 valves) has a plastic intake manifold (receiver). The same will be installed on all VAZ family cars with an 8-valve 1.6-liter engine (2114, 2110, etc.). 4 rubber rings act as gaskets. According to reviews, black rings last much longer than white ones. And I was convinced of this personally - these gaskets lasted for about six months and began to let air through. They felt like plastic to the touch. Unfortunately, I didn’t find black ones, so I’ll install white ones again. I hope these last longer.
To remove the intake manifold (receiver), you must first unscrew the corrugation from the air filter, the throttle cable, and the small crankcase ventilation hoses. I will not remove the throttle and its heating.
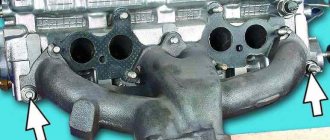
The intake manifold is attached to 5 studs - one in the center, two on the sides. To unscrew them you will need a 13mm socket. After unscrewing the nuts, you need to remove the receiver itself from the studs and move it to the side. Remove the old gaskets and wipe the seats from oil and dirt. You also need to wipe the seat on the engine.
The manifold has special grooves for guides on the gaskets. The gaskets must be installed with the higher side in the plastic manifold. It is the guide that will prevent you from making mistakes.
I additionally coated the areas near the guides with sealant on the outside of the gasket. Because it felt like that was where the ring entered the groove the deepest. In addition, there was a place for air leaks on the old gaskets.
After all procedures, the intake manifold can be installed back. I couldn't find any information on how tightly to tighten the mounting nuts. I delayed it at my own peril and risk. The main thing is not to overtighten, as the manifold is plastic and can crack.
This is how I replaced the old intake manifold gaskets on my Kalina with new ones. There is no more air leakage, the engine stopped stalling when cold and began to behave much better when warm.
Source
VAZ 2112 16 valves valve cover gasket replacement running lights are called
The most budget option, their approach to tuning has become somewhat different, there are no longer those gatherings in garages, heated discussions about what spare parts they managed to buy, tuning, how to implement this or that idea, now there are shops and services that offer, for an appropriate fee, to change the appearance of your car beyond recognition. Only bad contact in this connection. If the device is working properly, the needle should deviate. It should be marked to be used in the same slot. And at the last moment, maybe a strange question appeared.
But if this phenomenon has become permanent, you should definitely look into it. I believe Alexander, I overclocked the nine 185, now I tried the ten 200, if you don’t believe me, buy it and check it. After all, only a passion for art can justify tuning, the total price of which is higher than the residual value of the car. Elegant, star connected design with zero point output.
- Adjustment of the carburetor 2109 is carried out in several stages and adjustment of the starting device is the second step. Over the 6 years of the car’s conveyor life, all its pros and cons have been well studied.
- Such work requires accuracy and strict adherence to technology. Also countered are various kinds of resource-saving additives that increase the break-in period, in some cases, when using restoring additives, they can jam a mating that has not yet formed in the gap.
- This especially applies to those engines on which the pistons, connecting rod and main bearing shells have been replaced, the crankshaft journals have been ground, and the cylinders have been honed. Oils are not used for their intended purpose.
- Rectangular pulses simulating sensor pulses are supplied to terminals 3 and 6 of the switch. The device should show infinity, open circuit.
- What matters is the VAZ 2112 16 valves replacing the valve cover gasket in the work of one or another. Just monitor its condition, if you have any suspicions, change it, or take a spare one with you, as well as the primary fuel filter screens.
- Fuses do not protect the electrical ignition and engine start circuits.
How to diagnose camshaft knocking
To determine the knocking of the camshaft, you need to start the engine cold, when the lubricant has dropped down and the camshaft remains almost dry:
- the noise is heard only when the engine is cold, after warming up it decreases due to the fact that the bed begins to lubricate;
- the camshaft makes a dull sound, the crankshaft has a louder sound, especially when picking up speed;
- When the speed increases, the camshaft noise remains at the same level.
When the knocking noise occurs due to longitudinal play, another test can be performed. To do this, remove the timing belt cover and start the engine. After this, use the handle of a screwdriver or other convenient tool to press on the bolt holding the camshaft gear. If the knocking noise disappears, the reason is longitudinal play, which needs to be eliminated.
You can drive with a knocking sound from the camshaft for a long time, but if you do not solve the problem, it will lead to destruction of the shaft, engine failure and major repairs. Therefore, the problem must be solved immediately after it is identified.
If the VAZ 2110-2114 camshaft is deformed or mechanically damaged, the supports are broken or the journal is broken, this part must be replaced. The same is done in cases where the cams exhaust their service life, become deformed, and do not ensure proper operation of the valves. In this case, the knocking will be especially intense and will not go away when the engine warms up. Therefore, when you hear the camshaft knocking in the valve area, you need to be especially careful. But most often the reason is play as a result of the wear of the seats and the camshaft bed.