January 10, 2020 Lada.Online 72 602 7
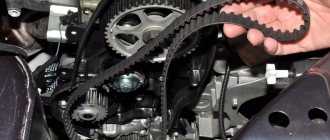
A towbar (tow hitch or trailer hitch) is designed to couple a vehicle to a trailer when towing and transporting large cargo. Installation of this accessory on modern LADA cars has a number of features. The process of installing and connecting a towbar on a Lada Vesta is described in the AVTOVAZ technological instructions.
Why do you need a valve cover gasket?
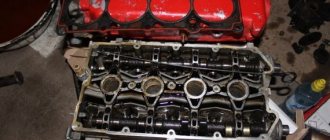
The driver sees this detail when he opens the engine compartment. In his field of vision is the gas distribution mechanism cover, which is located in the cylinder head. The part ensures the sealing of this part, it prevents oil from penetrating into prohibited compartments. This element is fixed with nuts and bolts, so it is quite easy to remove. The valve cover gasket is made of rubber, which does not change its characteristics even with prolonged use.
Naturally, each material has its own shelf life, therefore, when exposed to negative factors, it is deformed, but does not change significantly. Car enthusiasts regularly monitor the condition of this element, since the valve cover gasket is replaced almost immediately when a leak occurs.
The part is located under the neck; the engine mixture flows through it. The cylinder head cover is used to cover the timing belt. A rubber gasket is installed between these parts and the mechanism head. Temperature changes do not affect the material used. In addition, it does not come into contact with oil, so the service life is determined individually and largely depends on the vehicle.
Lada Vesta LPG › Logbook › Tow bar BOSAL + Smart-Connect ARTWAY
Ngày tốt lànhFinally, I got around to installing a towbar. I chose a towbar with a Bosal towbar without electrics (order number 1234A) and an Electrical Coordination Unit for the Smart-Connect Artway-Pro towbar (catalog number SC-PRO-100) Why?1. The Bosal 1234A trailer hitch has a more competent fastening compared to analogues. For example, the photo shows that it is attached instead of the rear amplifier - 4 bolts at the end of the side members, and one at the bottom.
Competitors (for example Leader) have 4 bolts on the bottom and that’s it.
2. Smart-Connect Artway-Pro SC-PRO-100. The choice is stupid because of the price. The parameters were also quite satisfactory: Tracking the connection of the tow hitch. Switching the fog light. Regulation of work with single-filament and diode lighting. Works in most cars with modern electronics. Automatically disables standard parking sensors when connecting a trailer. Sound indication if there is a malfunction in the trailer lamp circuit.
No more is needed. I paid 1,750 rubles for the happiness of owning a Chinese gadget.
Purely theoretically it was possible without it. The equipment is basic, there is no additional electrical unit. But I decided to install a smart one and relieve the standard wiring. During installation, the power, at my request, was taken directly from the battery. I installed it at the official Lada dealer in Kaluga - Aves paid 4,000 rubles for installation, the time was 3 hours.
And the question that worries many is whether installing a towbar is a change in the design - NO, subject to the conditions: It must be removable or conditionally removable. It must be designed for this vehicle. And it was installed by the service center. In short, his passport (aka installation instructions) went to the towbar - there we write down our car, VIN, and at the dealer we put a stamp that they put (now I carry this piece of paper with me along with the passport for the gas cylinder). Well, we make a note in the service book - that’s it. It's enough )
When is it necessary to replace the valve cover gasket?
When closed, there is no oil in this part, since the space is filled with air. While the car is moving, the camshaft rotates, its elements are abundantly lubricated, and at high speeds particles of the product fall on different parts. If engine fluid splashes onto the walls, it enters the crankcase. Then even a small hole in the part will lead to leakage.
The cylinder head cover gasket must be removed if:
- oil leaks from the engine compartment are visible on the device or adjacent areas;
- a gasket crack was discovered during the repair of other parts;
- a major overhaul is carried out and the power element is reassembled.
Inexperienced craftsmen damage the gasket under the valve cover with a screwdriver. The sealant will not help here, because after two weeks the liquid will appear in this place.
Wear of the material due to natural causes is rare, but this also requires replacing the valve cover gasket. In the absence of mechanical action, the elasticity of the rubber is lost. Over time, it becomes hard, cracks appear on it, through which liquid penetrates. Replacing the valve cover gasket is not an urgent job, but you shouldn’t put off repairs for long. Over time, the engine will develop a coating of oil and dirt that is difficult to remove.
If the gasket remains in this condition for a long time, then the driver does not notice other defects in the car, which also appear through leaks. A splashed engine will not allow you to detect leaks in the timing belt, so operating a car in this condition is considered dangerous.
Lada Vesta › Logbook › connect the Lada Vesta tow bar socket
Without a matching unit it’s as easy as shelling pears, you just need to know the colors of the wires of the rear lights of the car to which you need to connect the corresponding wires from the towbar socket. And so in the car of my year and configuration (I assume the others have a similar color scheme, but not a fact)), Clear blue - dimensions Orange - turn signals Red - feet Didn't connect the rear PTF, didn't bother, they say purple. For ground there is a standard nut on the body on the left side of the lamp under the trunk trim. There is also a standard hole for entering wires from the tow bar and wiring, i.e. the most convenient place for connection. What pitfalls await with this installation option, i.e. without a matching block. Turn signals with incandescent lamps do not work, i.e. they will only work with LED lamps, but they do not shine well (the light is dim), and in clear sunny weather they are practically invisible. Vesta is equipped with the so-called Skanshina, which reacts to changes in resistance in the network of various electrical consumers. And if the resistance increases, for example, when additional consumers are connected, Skanshina blocks this channel, i.e., turns off the current supply so that the wires do not melt from heating under additional load. LED light bulbs, by their nature, have virtually no additional resistance in the network, it is minimal and Skanshina does not see them. It turns out that we either install LED bulbs in the standard trailer lights or a matching unit, no options. I also heard that in Vesta in the Lux configuration, installing a towbar electrics without a coordination unit is not an option at all. There is some kind of additional block burning there, which costs as much as ten thousand rubles. Now with the coordination block.
No question, the diagram is simple, anyone can figure it out. But where to connect the + power supply of the matching unit. Pull it to the battery, as in the diagram, through the entire car? I don’t have a free power plus, for example a 12 V socket, in the trunk. I haven't found a convenient answer yet. If you have any thoughts please write. Good luck to all.))
I’m not an electrician)), if something is wrong, forgive me and correct me, fellow professionals. And tell me, is there a free power + in the wiring in the trunk and what color is it?
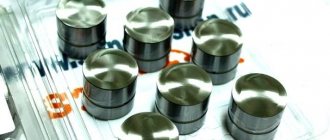
Types of parts
Before changing the valve cover gasket, it is worth considering that there are several options for parts, but they all perform the same functions and differ only slightly. The shape of the part follows the plane of the surface. It fills the main irregularities and compensates for deviations that appear between different parts.
The cylinder head cover gasket has different design types:
- non-breaking - available in the form of a ring;
- complete - in addition to the main element there are seals for existing holes;
- composite - made of a gasket and several inserts for sealing.
Also, before replacing the valve fluid gasket, it is worth studying the materials:
- Rubber. This type is more popular than the others and is created from several types of material. It becomes softer when warming and hardens when cold.
- Paronitis. The parts are made from rubber, but minerals are added, which are molded and vulcanized. Non-asbestos paronite is supplemented with steel wire to give reliability to the product. Such parts partially act as sealants and do not change shape from external factors.
- Cardboard. They are made from paper that is protected from water, oil and gasoline. Such gaskets are rarely used because they are considered unreliable and are found on domestic cars.
- Rubber with cork. Here a light filler or cork is added in granular form. This increases the degree of sealing and compensates for vibration when the machine moves.
Before changing the valve cover gasket, it is recommended to determine the material of the new part. Craftsmen at service stations install rubber products, sometimes products interspersed with paronite or cork.
How to remove and install the front and rear bumpers on a Lada Largus
AvtoVAZ bought in 2008 from the automobile manufacturer Renault the right to assemble and distribute cars built on the basis of the R90, F90 and B0. A deal was also made on the possibility of using engines (1.4 and 1.6 liters). This is how the Lada Largus car was born. This is a joint project of several companies at once. In fact, the model is an exact copy of the Renault Logan, except for some changes in appearance and a different logo.
In general, the appearance of the Lada can be said in a few words - simply and without unnecessary details. Rectangular shapes, clean lines, small overhangs and wide side moldings. From the side the body is straight with a large glass part. The rear doors are hinged. They are equipped with comfortable position locks when opening (from fully open to perpendicular to the car).
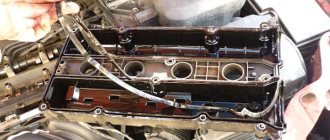
Preparing to replace the valve cover gasket
There are no requirements for choosing a location; a garage or an area on the street is suitable. There is no need to drain the fluids before opening the cylinder head cover. To disassemble the structure, use pliers, a head with a knob that fits the bolts, a screwdriver and a rag.
The car is left in a suitable area, and then wait until all the parts have cooled down. If you don't have time for this, replace the valve cover gasket while wearing gloves. From consumables, new material, degreaser, sealant, and rings for bolts are prepared in advance. You should study the car specification in advance, because sealing the gasket is carried out mainly on VAZ models.
Some drivers tighten the bolts on the valve cover before purchasing a new part. In some places the seal sags and the fastenings become loose. The tightening procedure is simple: use a screwdriver to go over the main elements one by one.
Why do you remove the bumper?
This action is prompted by a not so wide range of reasons. If there is a need for dismantling, then for this purpose it is not at all necessary to go to a service center. An ordinary Lada Largus driver is quite capable of handling this procedure on his own and, in addition, saving a considerable financial resource.
So, let's take a closer look at cases when it is necessary to dismantle an element.
Breaking
This can happen in an accident or during careless parking. The latter case in most cases assumes the integrity of the body element itself, and its paintwork is damaged. Need for painting
This event involves removal, which will ensure better quality of painting work compared to a similar procedure without dismantling the element. Body modernization. Some owners seek to update the exterior of their “horse” and are inclined to replace the standard product with a tuning element. Plus there is a cover on the rear bumper. The need to install additional tools. Such accessories can be parking sensors, a camera, etc. When installing linings.
How to change the valve cover gasket yourself?
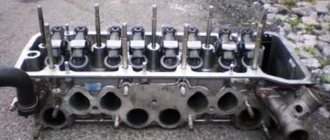
Look at what parts prevent dismantling. A lot depends on the car model; usually, before replacing the valve cover gasket, remove the filter, pipe, electrical harnesses, air vent and throttle cable.
Before replacing the valve cover gasket, use a rag to go over any areas where oil has already entered. Then follow the instructions:
- Turn off the gas, remove the wires and pipes. Remove the filter if it is close.
- Loosen the bolts and then remove the nuts that secure the cover. The procedure here is the same as at the moment of tightening.
- Grasp the end of the neck with your hands and turn the part over so that the lubricant does not leak out.
- Remove the damaged gasket and clean off any remaining residue with a rag.
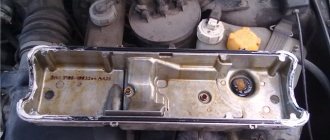
- Wipe the cover flange until no oil remains on it.
- If a sealant is needed, treat the surface of the parts with a degreaser. When it is not available, take carburetor fluid or gasoline.
- Flush the crankcase gas valve if it is located in this part. It is also purged with air.
- Place the gasket on the edge of the cylinder head, and when tightening the fasteners, use the diagram shown.
Check the car for leaks; if the repair does not help, tighten the bolts more tightly. In extreme cases, use a high-temperature sealant.
Connection
The connection is made through a special electrical module - a matching unit (smart connector).
Turn off the ignition, disconnect the earth wire terminal from the battery.
Connect the electrical module type Smart Connect KA.SC.7.1, supplied with the trailer hitch kit, in accordance with the instructions supplied with the module.
The matching block can be made independently based on conventional 4-pin relays:
Almost all the necessary contacts for connection can be found in the rear light area (see Lada Vesta electrical diagrams), or use a multimeter). Additionally, you just have to run the wire from the battery through the fuse along the left side (photo author).
Basic mistakes
Before changing the valve cover gasket, it is necessary to clean all contact surfaces, otherwise the procedure will be useless. After a month, the consumable will crack and will have to be replaced again.
Despite the fact that the repair seems quite simple, drivers without experience face the following difficulties:
- Warping of the lid. Occurs when the fasteners are unevenly tightened or the part is mechanically deformed.
- Uneven distribution of sealant. This happens if you take a low-quality composition. Some products look half-dried when opened.
Most car models do not require sealant, so the product is not overused. In this case, a torque wrench is used for tight fixation. It presses all the parts tightly against each other, so auxiliary substances are no longer needed.
Since there is minimal risk of damage to car components during this repair, it is worth trying to perform the procedure yourself. If after this the problem is not solved, then contact a service station, they will carry out a comprehensive diagnosis and indicate where exactly the problem arose.
Body repair of Lada Largus in St. Petersburg
Lada body repair in SKR is a high-quality and inexpensive repair. At the Body Repair Station, Lada cars are constantly dealt with. We have extensive experience working with this brand, which allows us to easily carry out all repair work on the body and more. Lada body repair is not particularly difficult for us. We are used to working with spare parts for this car. And we will tell the car owner which Lada body parts are best to purchase. And if you want to achieve the highest quality results in repairing Lada cars, leave all the hassle of selecting spare parts to us. Our craftsmen personally inspect spare parts and select the most accurate stamping possible. This allows you to achieve a good final result in the repair. If you are interested in the cost and timing of Lada body repairs, call tel.
The owner of a Lada Largus car came to our car service center to assess the cost of damage. Our master examined the car and assessed the external damage to the body, naming the price. The client was satisfied with the price, and he left the car in our car service center.
Lada Largus has features that do not allow internal damage to be assessed. The bumper with radiator grille tightly covers the entire internal structure. But based on the nature of the impact and external damage, we assumed that the bumper reinforcement remained intact. When removing the bumper, it turned out that the amplifier was damaged, the bumper was a plastic element and after the impact it simply snapped back into place. The amplifier on Largus is not a separate element, but part of the structure, it became clear that the cost of repairs would change. We invited the client to a car service center in order to show the internal damage and agree on further actions. They quoted the full amount of repairs, taking into account all hidden damage, and the client agreed to continue the repairs.
Body repair of Largus consisted of the following work:
- Hood repair and painting
- Replacing and painting the front right fender
- Replacing the right headlight
- Front bumper - replacement and painting
- Front bumper reinforcement - replacement and painting
Repairing the Largus bumper did not make sense, since the price of a new bumper is much lower. There is an option to buy a bumper directly in color, but such elements may have an error in tone and will stand out against the background of the factory-painted body.
The renovation of Largus was carried out efficiently. All elements were painted to exactly match the tone of the body. Further operation of the Lada Largus is possible immediately after completion of the work.
Largus spare parts are not expensive, for this reason it is sometimes more profitable to replace even something that can be repaired. We easily found all the necessary elements and delivered them to the car service center. The client did not have to waste time on the process of purchasing spare parts.
The Lada repair was completed on time, all work is guaranteed. Service of Lada Largus is also possible in our car service center, about which the client was informed.
You can find out how much any repair costs by calling or sending your question through the form on our website:
You can estimate the cost of the work by sending us a photo by email.
In SKR there is an opportunity to purchase spare parts for your car. All spare parts are ordered to our customers at purchase prices. The price for any repair in our car service does not exceed the price for a similar repair in any other car service. There are a lot of car repair shops offering Lada car repair services in a city like St. Petersburg. But high-quality repairs, combined with a wide range of repair services, are practically non-existent.
SKR is a high quality Lada repair in any area of car repair!
Contacts:
The SKR body repair station is located in St. Petersburg, on the street. Novorossiyskaya, 53 Lit.B, on the border of the Vyborg and Kalinin districts. The nearest metro station is Ploshchad Muzhestva.
Address: St. Petersburg, st. Novorossiyskaya, 53 Lit.B
Telephone
Email:
Every third owner of Lada Largus was faced with the need to dismantle the front bumper. Not every car enthusiast is able to do this, because he is not an expert in this field or simply does not have the necessary knowledge.
Video about removing the front bumper on a Lada Largus and installing a radiator mesh:
Clutch disc with friction surface (1.45 minute video)
Therefore, for proper operation of the clutch, it is fundamentally important that the clutch disc contains so-called friction material. The material is applied on both sides of the disc. If the coating is partially or completely erased, the car will not even be able to move. From this, we can conclude that when starting off, it is extremely important to monitor the moment when the clutch pedal is released. If you accidentally erase the friction layer of the working surface, burn out the clutch, you will no longer be able to go anywhere without replacing the clutch discs.
Push coupling
The second important element, without which the clutch cannot work properly, is the push clutch. Its outer part is bolted to the flywheel, continuously transmitting torque to the gearbox and then to the wheels. A so-called diaphragm spring is attached to the coupling ( 2.50 of the video). With its help, the two clutch discs are routed and the engine and gearbox are disconnected.
Front bumper - removal and installation of Lada Largus Lada Largus
There may not be many reasons for a driver to remove the bumper on his car. It is not at all necessary to contact a service center for this, where you will have to pay a considerable amount for repairs. Everything can be done with your own hands. Why the driver may need to remove the bumper:
- Breakdown – this happens as a result of a traffic accident or improper parking. It happens that the part itself is intact, but the back panel requires repair.
- Painting – requires dismantling for better painting of the body.
- Body improvements - installation of a new bumper, etc.
- Installation of additional accessories, for example, parking sensors, etc.
- Installation of overlays, etc.
Dismantling process
So, let's look at the step-by-step process of dismantling the front bumper:
- Before you start this simple task, you need to prepare. It is best to place the car on a lift, but at worst, you can use a pit.
- Now let's move on to the dismantling process itself. Remove the lower plastic protective mudguard. To do this, unscrew the fasteners that are located in front. The back and middle parts are attached to plugs that can be removed using a special tool or screwdriver.
- Now, you need to unscrew the front fender liners from the bumper.
- Next, you should find the wire connector that is responsible for the fog lights and disconnect it. It is located in the left arch of the body mudguard.
- We unscrew the screws that secure the bumper to the subframe from below.
- You should also unscrew the screws securing the bumper to the fender on both sides.
- Next, unscrew the upper mounts of the buffer to the radiator frame.
- We lower the edges of the bumper where it was attached to the wing and, pulling it forward, remove the buffer.
- If necessary, remove the wiring harnesses from the grooves that are laid along the bumper.
- We unscrew the fog lights and dismantle them.
- Having released the fasteners, remove the radiator grille.
- We also pull out the lower bumper grille.
- Installation is carried out in reverse order.
Now the front bumper has been removed from the car, and the necessary manipulations can be carried out.
The reasons for dismantling can be very different, but the main one remains physical damage. Many people have come across this concept. So, let's look at the cases in which you will have to remove the front bumper on Largus:
- Road accident. The most common reason why a part needs to be dismantled. In 75% of cases this happens due to the fault of the Largus driver. A simple failure to maintain distance can lead to deformation and damage not only to the bumper, but also to the elements underneath it.
- Colliding with an obstacle (even though the Largus has quite high ground clearance), which resulted in deformation of the lower part of the radiator frame. To eliminate damage to the body element, you will have to dismantle the bumper.
- Replacing the radiator grille will also require removing the buffer. This is so because the frame is an integral part of the security element.
- A banal but worthwhile reason is tuning. To upgrade or install a body kit, you will have to remove the bumper.
- Touch-up paint or other reasons will also be a reason to remove the front bumper.
- In some cases, the bumper will have to be removed if the radiator needs to be replaced.
- Installing DRLs (daytime running lights) in the bumper.
All these and other reasons may be a reason to remove the bumper on Largus.
Expert commentary
Veniamin Viktorovich, car dealer
Specialist Trokot “Trokot curtains are superior to film tinting in a number of ways. If you lower the windows, fresh air will come in, but the barrier to the sun's rays will remain in place.
Also, when the window is lowered, insects, dust and dirt do not fly in. When going out into nature, leave the car and leave the windows closed, there will be no mosquitoes inside, and there will be no heat.
The removable tint on the door is a functional and essential accessory, in my opinion. But this is a personal opinion, I don’t impose this point of view on anyone.”