Home » Repair
08/23/2019 Category: Repair
Yesterday one of our regular customers came to us with a recently purchased second-generation Kalina to replace the timing belt, roller and pump, plus all the fluids, but more on that in another article. This engine was also installed on the Grant, so this article will be relevant for it as well. The speedometer shows 60,000 and I believe that for this engine this is the optimal replacement interval, even though all reference books say about 75,000.
Let’s make a reservation right away that when the timing belt breaks on this car, the valves bend. It is recommended to check the condition of the belt every 15,000 kilometers.
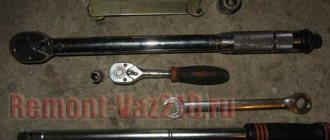
To work, we will need a set of keys and sockets, as well as a 5-point hex and a key for the tension roller. The entire procedure takes approximately one and a half hours.
The engine is similar to the eighth.
First, remove the protection, drain the antifreeze, and for convenience you can remove the right front wheel. Next, loosen the locknut of the generator belt tensioning mechanism. Using a 10mm socket, unscrew the tensioner pin and remove the belt.
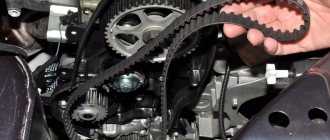
We unscrew the four bolts with a 5mm hexagon and remove the upper protective cover of the timing belt.
Set top dead center (TDC). We turn the crankshaft by the pulley mounting bolt clockwise until the mark on the camshaft sprocket and the timing belt protective casing coincide.
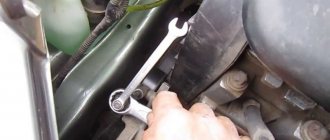
Unscrew the crankshaft pulley bolt. We block the wheels with stops, tighten the handbrake, engage fifth gear and, with a slight movement of the wrench and a one and a half meter pipe extension, unscrew this bolt.
Next, use the same 5mm hexagon to unscrew the bolts securing the lower timing case cover and remove it.
Remove the protective washer.
The marks on the crankshaft sprockets should be aligned with the oil pump casting.
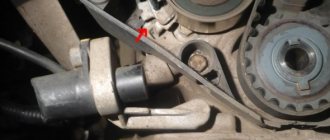
Praise be to the designers of AvtoVAZ, finally rollers with a tension indicator appeared on the engines, now you don’t need to tighten them by eye and check the tension by twisting the belt, not even thirty years have passed since the invention of such a design. We unscrew the tension roller bolt and dismantle the latter; we also remove the old timing belt. The photo shows that the belt has stretched out because the tension marks have diverged; when checking the condition of the timing belt, if you see this, you will just need to tighten it.
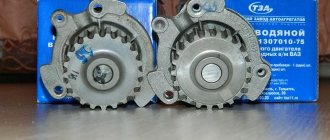
To replace the pump, we need to remove the camshaft sprocket, and also unscrew several bolts of the inner casing and remove it.
Three bolts out and the pump replaced. The green arrow indicates the hole for the tension roller bolt.
Having replaced the water pump, we proceed to install a new timing belt.
We put the casing and camshaft sprocket in place. We check that all the marks match, as discussed above. We install the tension roller, but do not tighten the bolt. We put on a new belt, observing the direction of rotation, first on the crankshaft sprocket, camshaft, tension roller and pump, the latter can be swapped. We tighten the timing belt. Use a special key to turn the roller counterclockwise, as indicated on its body...
...until the marks on it coincide and tighten the bolt.
We turn the crankshaft two turns and again check the alignment of the marks and the belt tension.
We install all the parts in the reverse order of removal, fill in antifreeze and start it. It couldn't be simpler. Good luck on the roads. Neither nail nor rod
What is a timing belt for?
The timing belt on a Lada Granta car is necessary to synchronize the operation of the camshaft and crankshaft. In the instructions for cars 16 and 8 cl, the replacement period is regulated. However, nevertheless, most car enthusiasts know little about it and may not even know its location, not worrying about how to change it correctly. It is easy to find; you just need to lift the hood of the car. In the most visible place there is a timing belt covering many pulleys. By opening the instructions that come with the vehicle, you can also easily find the section that describes this unit. The timing belt interacts not only with the crankshaft and the camshaft, but also with several other systems. Such a load significantly reduces the life of the belt, which makes it possible for it to break.
Explanatory video on where to look for tags
The gas distribution mechanism is one of the most important systems of an internal combustion engine. The timing belt controls the engine valves, ensuring the normal functioning of intake and exhaust. During intake, the fuel-air mixture enters the combustion chambers as a result of the opening of the intake valve. The next phase opens the exhaust valve, and the gas distribution mechanism removes exhaust gases from the combustion chamber. The VAZ 2190 uses a standard gas distribution unit, differing only in the number of engine valves.
Replacing the timing belt
Make sure the engine flywheel has been correctly installed and secured (see above). Then, using a “17” or “19” wrench (ICE 11183), unscrew the screw holding the generator drive pulley. The pulley itself and the protective washer are then removed.
The pulley should not interfere
Now you need to weaken the clamping force in the tension roller:
- 11186/21116 – using a “15” round wrench, unscrew the fastening bolt 2-3 turns. The roller will “release” the belt automatically;
Automation will work to weaken
- 11183 – use a 17 key to loosen the fastening nut. Then the roller itself is rotated clockwise.
All that remains is to replace it: a new part is installed in place of the old timing belt, and that’s it. Installation of the remaining parts is carried out in the reverse order.
Basic replacement operation
To increase downforce, the outer roller assembly is rotated counterclockwise. For engines 11186/21116, an additional requirement must be met: the two rectangular marks must coincide.
Mandatory requirement for motors 11186/21116
Upon completion of installation, the marks AB and CD should also match. The drawing for them is given above.
Tightening torques
To perform installation correctly, you need a wrench with a force regulator. The value on it is set depending on the type of part:
- Tension roller mounting screw (11186/21116) – 17-27 N*m;
- Roller fastening nut (11183) – 30–36 N*m;
- Generator pulley fastening – 105–110 N*m.
First, the tension is adjusted on the roller, and then the fastening nut or bolt is tightened.
Installation of all shafts according to marks
First check that the gear is in neutral. There is a rubber cover on the crankcase body closer to the clutch assembly. It needs to be removed.
Inspection window and rubber plug
The point is to achieve alignment of the marks on the flywheel and in the scale slot. When this is done, fix the flywheel with a screwdriver.
Flywheel fixed
Of course, it is easier to perform such an operation with two people. Know that the desired position of the shaft corresponds to the alignment of marks AB and CD (see figure).
Timing drive in 8-valve engines
The crankshaft itself must be rotated to the right using a 17 or 19 key (motor 11183). The meaning of this is illustrated in the photo.
The generator drive pulley must be turned.
The generator belt must be removed.
The generator belt blocks access to the timing drive parts. You will have to loosen the fastening and remove this belt.
Generator mounting, 13 bolts
Use a 13mm wrench to loosen the lower mounting bolt.
Then unscrew the upper fastening nut and remove the bolt. The generator casing is pressed against the engine and the structure is secured with wire. The belt can now be removed. Installation of the alternator belt is carried out in the following sequence: 1
.
Secure the generator; 2
. Throw the belt over the pulleys, as shown in the photo;
Installation of the alternator belt, first step
3
. Having engaged 5th gear, roll the car back.
Please be aware that reusing the alternator belt is a last resort. It would be better to buy a new part.
Replacing the timing belt on 16-valve Lada Granta internal combustion engines
Let's take a closer look at replacing the timing belt on such units.
- You should start by de-energizing the on-board network - by removing the terminals from the battery.
- Next, the belt itself is dismantled - when the crankshaft and camshafts are in the TDC position. To do this, after fixing the flywheel with a screwdriver, the belt is loosened by turning the tension roller and removed from the pulley.
- The belt is replaced simultaneously with the replacement of both rollers.
- During installation, the new belt must be pulled on both sides, placing the back on the tension rollers and the front on the support rollers.
- Next, the belt is put on the pulleys of both camshafts.
- Tensioning the belt must be done while simultaneously turning the tension roller (counterclockwise). The cutout of the first outer sleeve should coincide with the protrusion of the second inner sleeve.
- After tightening the mounting bolt and turning the crankshaft two turns (clockwise), it is important to check the alignment of the marks on the shafts.
A more detailed procedure for installing a belt on a 16-valve unit can be viewed in the video.
Many people are familiar with another way to replace a timing belt drive - when virtually no tools are required. However, this method can only be used when there is no need to replace the rollers.
We recommend: Why is the exclamation mark on in the car and how to fix it?
The essence of this simple process is that, using a regular knife, half of the worn belt is cut off and then completely removed. Next, when installing a new timing belt on the crankshaft pulleys, the second half of the worn belt drive is gradually removed.
Which kit to buy
In addition to the toothed belt, a tension roller and a coolant pump are purchased. The main supplier of rubber products is the RTI plant in Balakovo. Products from GATES, BOSCH, DAYCO, CONTITECH have proven themselves well. If the pump in the engine cooling system is replaced, antifreeze will be needed to top it up.
Yesterday one of our regular customers came to us with a recently purchased second-generation Kalina to replace the timing belt, roller and pump, plus all the fluids, but more on that in another article. This engine was also installed on the Grant, so this article will be relevant for it as well. The speedometer shows 60,000 and I believe that for this engine this is the optimal replacement interval, even though all reference books say about 75,000.
Let’s make a reservation right away that when the timing belt breaks on this car, the valves bend. It is recommended to check the condition of the belt every 15,000 kilometers.
To work, we will need a set of keys and sockets, as well as a 5-point hex and a key for the tension roller. The entire procedure takes approximately one and a half hours.
The engine is similar to the eighth.
First, remove the protection, drain the antifreeze, and for convenience you can remove the right front wheel. Next, loosen the locknut of the generator belt tensioning mechanism. Using a 10mm socket, unscrew the tensioner pin and remove the belt.
We unscrew the four bolts with a 5mm hexagon and remove the upper protective cover of the timing belt.
Set top dead center (TDC). We turn the crankshaft by the pulley mounting bolt clockwise until the mark on the camshaft sprocket and the timing belt protective casing coincide.
Unscrew the crankshaft pulley bolt. We block the wheels with stops, tighten the handbrake, engage fifth gear and, with a slight movement of the wrench and a one and a half meter pipe extension, unscrew this bolt.
Remove the protective washer.
The marks on the crankshaft sprockets should be aligned with the oil pump casting.
Praise be to the designers of AvtoVAZ, finally rollers with a tension indicator appeared on the engines, now you don’t need to tighten them by eye and check the tension by twisting the belt, not even thirty years have passed since the invention of such a design. We unscrew the tension roller bolt and dismantle the latter; we also remove the old timing belt. The photo shows that the belt has stretched out because the tension marks have diverged; when checking the condition of the timing belt, if you see this, you will just need to tighten it.
To replace the pump, we need to remove the camshaft sprocket, and also unscrew several bolts of the inner casing and remove it.
Three bolts out and the pump replaced. The green arrow indicates the hole for the tension roller bolt.
Having replaced the water pump, we proceed to install a new timing belt.
We put the casing and camshaft sprocket in place. We check that all the marks match, as discussed above. We install the tension roller, but do not tighten the bolt. We put on a new belt, observing the direction of rotation, first on the crankshaft sprocket, camshaft, tension roller and pump, the latter can be swapped. We tighten the timing belt. Use a special key to turn the roller counterclockwise, as indicated on its body...
...until the marks on it coincide and tighten the bolt.
We turn the crankshaft two turns and again check the alignment of the marks and the belt tension.
We install all the parts in the reverse order of removal, fill in antifreeze and start it. It couldn't be simpler. Good luck on the roads. No nail, no rod!
Replacing the timing belt of Lada Granta 8 valves is required once every 75 thousand kilometers. If you ignore the scheduled replacement of the belt, tension roller and sometimes the pump (coolant pump), you may end up with serious repairs to the Lada Granta engine. After all, a broken timing belt almost always leads to damage to valves, valve seats and even pistons. Therefore, the timing drive must be treated very carefully. Every 15 thousand it is necessary to inspect the belt for breaks, cracks, peeling or oiling.
The advice applies to VAZ, 11186 and 21116 engines. All of them are 8-valve and are installed in Grant cars. Let's consider replacement steps.
First, remember a simple rule: the 11183 engine cannot bend its valves, so you can rotate the crankshaft and camshaft pulley separately. For motors 11186 and 21116 this would be unacceptable!
How to determine that a break may soon occur
Urgent replacement of the timing belt for a Granta car of 8 and 16 cl. may be necessary if the following phenomena occur:
- Decrease in vehicle power. A poorly tensioned or worn drive can make the engine difficult to start and reduce power output.
- Incomprehensible noises from the timing belt on the Grant, emanating from the engine compartment. Clunking, ticking or strange rustling noises often indicate that the Granta timing belt is damaged and rubbing against the casing or other parts under the hood
- Visible damage. The part may have abrasions, cracks and “shaggy” areas that are visible to the naked eye.
If, upon careful inspection, it is discovered that the teeth on the Grant timing belt have been cut off or at least one of the other listed problems, it is necessary to urgently replace the part with a new one, which is quite possible to do yourself.
Let's sum it up
Now you know which pump is best to choose. Try to timely diagnose and replace the coolant pump on your LADA Granta. Use only high-quality products, which will allow the components of the unit to serve for a long time and properly. Don’t be lazy to compare different products from among the offers, because this is a reasonable action in terms of selecting the optimal option.
The Lada Granta pump is an essential component of the car’s cooling system. The pump is responsible for the circulation of coolant and, as a result, for the functional state of the Granta cooling system. The water pump operates in the temperature range (-40ºС) - (+40ºС) with air humidity up to 90 percent. The water pump operates by rotating the timing belt. Every Lada Granta 8-valve with a 1.6-liter engine is equipped with a pump-type water pump.
We change the belt ourselves
Replacing the timing belt after a specified period on 16 and 8 cl Lada Granta engines is a simple process and even a novice car enthusiast can do it with his own hands. The main thing is to carefully follow all the instructions and not miss anything.
Required Tools
- keys for 10 and 17;
- mounting spatula;
- roller tension wrench;
- jack;
- set of TORX (sprockets) and heads;
- forceps.
Roller tensioner
Stages of work
- First, remove the negative terminal of the battery.
- Remove the generator belt drive.
- We fix the car using stops; decide for yourself which ones are best suited for this.
- When we lift the car with a jack, remove the right front wheel.
- Remove the gas distribution mechanism cover.
- The piston of the 1st cylinder should be set at the highest point.
- We loosen the belt tension using a tension roller or bolt.
- Loosen the tension roller nut.
Tension rollers
- Unscrew the bolt securing the generator pulley. If difficulties arise, you need to open the plug in the crankcase. Using a mounting spatula, it is necessary to fix the flywheel teeth; this will keep the crankshaft from turning arbitrarily.
- Remove the generator drive pulley.
- Remove the bottom cover by first unscrewing the three bolts.
- We remove the timing belt drive from the camshaft and crankshaft pulley.
- If necessary, remove the timing belt tension roller.
- We carefully examine it, and if we find that its condition is unsatisfactory, we change it.
- We also inspect and, if necessary, replace the belt.
- Assembly of all other components proceeds in the reverse order.
The next important stage is the correct tension of the timing belt drive of the Lada Granta with 16 cl and 8 cl units.
- First of all, you need to warm up the engine, the coolant temperature should be 20-25° - this is a certain norm. This temperature must be exactly so that the roller marks coincide. If you warm it up to 80-90°, the mark will shift by 5-6 millimeters. Important! Use rollers that are recommended for a Lada Granta 8 or 16 cl, otherwise the results may be different, even the belt may break.
- Next, you need to align the marks of the camshaft pulley and the marks located on the rear cover.
- We fix the pulleys with the device described earlier.
Fixing pulleys
- We align the marks on the crankshaft pulley and on the oil pump cover.
- We turn the crankshaft with a wrench in the shortest angular direction.
- We tighten the bolt securing the auto tensioner.
- We put the belt drive on the support roller, pulleys and auto-tensioner.
- We install a special key for tensioning the belt in the grooves of the auto-tensioner support plate.
Belt tensioner
- Turn it counterclockwise until the first and second marks coincide.
- Tighten the bolt securing the tensioner. The tightening torque should be approximately 2.4/3.5 kgf. m.
- Remove the crankshaft lock and turn it a couple of turns.
- If the first and second marks do not match, you will have to re-tension.
Attention! The tension roller should not move or deviate, no matter how much in one direction or another, this will be proof that it is in good condition and working correctly. This means that its breakage is excluded.
Checking condition and tension
As already noted, so that a belt break does not lead to serious problems, it is necessary to periodically check its condition and tension.
Checking the condition of the belt is quite simple and you can do it yourself.
To do this, you need to unscrew and remove the protective drive covers, jack up the front right wheel, engage a higher gear and spin the wheel.
The engaged gear will ensure rotation of the crankshaft and timing drive through the gearbox.
When rotating, you must carefully inspect the belt. If any defects or signs of wear are noticed on it - torn teeth, peeling of rubber from threads, cracks, significant abrasions, then the belt must be changed regardless of the mileage.
Additionally, when checking the condition of the drive, its tension should also be assessed.
Although the Grant uses a roller with automatic tension, you cannot rely on the fact that it works normally and it is better to check the tension, especially since it is very simple to do.
The belt must be taken with two fingers in the middle of the area opposite the tension roller, that is, on the span between the shaft pulleys and turned clockwise.
Moreover, if even with significant force it is impossible to twist it at an angle greater than 90 degrees, then the belt is tensioned normally. If it twists at a larger angle, then it is necessary to adjust its tension.
Imported analogues
Various components are suitable for replacing belts “2108-1006040-10”:
- GATES – 5521 or 5521XS;
- BOSCH – 1 987 949 095;
- DAYCO – 94089;
- CONTITECH – CT527;
- Finwhale - 2108-1006040.
The timing belt “21116-1006040” can be replaced with another part:
- GATES – 5670XS;
- CONTITECH – CT1164;
- QUARTZ (Germany) – QZ-5670XS.
Usually the choice is made in favor of GATES products. The letters "XS" in its catalog mean "reinforced". Grantovods have already told us in detail about the timing of replacing the timing belt, its choice, and signs of wear in the material: when to change the timing belt on Grant: recommendations from the plant and grantovods.
Original timing belt and fake
Attention! Components from GATES (England) are most often counterfeited! From the photo you can understand what the main difference is. Beware of fakes.
Conclusion
Despite the simplicity of the algorithm for replacing the timing mechanism on an eight-valve engine, it is still better to contact a service station for professional installation. The timing belt is not a mechanism that you can skimp on the quality of tuning.
Subject to the manufacturer's recommendations and moderate driving style, the timing service life is more than 80,000 km.
Frequent breakdowns that occur are due to the fault of the owners of the technical equipment, as a result of violation of the rules for using the machine.
Replacing the timing belt on 8-valve internal combustion engines Lada Granta
There is nothing complicated in the process of replacing the belt on Grant cars equipped with 8-valve units; you can even do it yourself.
- After removing the terminals from the battery, remove the alternator belt.
- Next, remove the front upper cover of the timing mechanism itself - for subsequent installation of the piston of the first cylinder in the TDC state.
- To replace a worn belt, you need to loosen the tension roller nut.
- Next, you need to unscrew the main bolt at the generator drive pulley and remove it. This can be done with a regular key.
- Afterwards, by removing the three mounting bolts, you need to dismantle the lower timing cover.
- The belt itself is removed together with the tension roller. You should start removing the belt drive from the camshaft pulley.
- At the time of installation, carried out in reverse order, it is necessary to ensure the correct belt tension.
Parts from the VAZ catalog
Let’s immediately look at the list of VAZ components and special tools:
- Tensioner roller for internal combustion engine 11183 – 2108-1006120, nut for it – 00001-0021647-21;
- Timing belt (11183) – 2108-1006040-10;
- Automatic tension roller – 21116-1006226;
- Timing belt (11186/21116) – 21116-1006040;
- Key for automatic roller – 67.7812.9573-01;
- Key for roller VAZ-11183 – 67.7834.9525.
The tension roller of the "2108" family has two slots on one side. These slots should look “up”, that is, away from the engine.
Tensioner roller for motor 11183
The slots were made for special tools. It is designated by the numbers “67.7834.9525” (see list). And for automatic rollers, the key is designated differently - “67.7812.9573”. What it looks like is shown below.
The automatic roller can also be adjusted
It remains to list how the mounting bolts, washers, etc. are designated:
- Three bolts for the VAZ-11183 cover – 00001-0009024-11, washers – 00001-0026406-01;
- Timing drive cover (11183) – 21080-1006146-10;
- Bolts for VAZ-21116 covers – 2108-1003286-00, spring washers – 00001-0011977-73;
- Top cover – 21116-1006226-00, bottom cover – 21116-1006218-00.
We hope no questions arise here.
Reviews
And you can decide which timing belt for the Grant is right for you based on reviews from the owners of this car.
Oleg: after running into a Boshev counterfeit, I prefer products from a domestic manufacturer. This is the second time I have bought a BRT belt. It runs the required 75 thousand without any problems. I recently changed the tension roller. I installed the Vologda one, let's see how it performs
Vitaly: I prefer not to skimp on spare parts, so I only install from the German manufacturer Gates. You can feel calm with it even on a long trip.
Slava: the most reliable and proven option is the manufacturer Contitech. Although it is more expensive than Bosch, the quality is many times better. My friend (his Kalina) and I bought it at the same time. He took something cheaper, made in Russia. The salespeople talked me into talking about Contitech. I'm very pleased, because my friend threw his away a long time ago, and I still drive it. Although it looks like new, I’m thinking of changing it, it’s already done more than 130 thousand. I'll take the same one.
Review of Manufacturer Prices
Technical parameters of the roller:
- hole diameter for nut - 10 mm;
- width - 27 mm;
- height - 55 mm.
| Manufacturer | Price, rub.) | Resource (thousand km) |
| 1118-104102013 original Lada Granta | From 520 | 25 – 30 |
| GATES T42042 | From 450 | —/— |
| GATES T43228 | —/— | —/— |
| GATES T43147 | —/— | —/— |
| LYNXauto PB-1027 | From 480 | —/— |
| LYNXauto PB-1029 | —/— | —/— |
*prices are current as of October 26, 2018.
Cost of purchasing components separately:
- video: 450 – 500 rub.;
- belt: from 300 rub.;
- bracket: 430 RUR;
- axle: 85 RUR;
- tensioner: 380 – 400 rub.;
- studs, bushings: 300;
- bracket - adapter for generator: 2200 rub.
Total: 3800 - 4000 rubles.
Survey
Determine the best timing kit, belt or pulley
We will do it by voting. Leave feedback in the comments, in which you can indicate:
- Which timing belt and rollers did you choose and why?
- How often do you change the rollers and timing belt?
Where can I buy?
These and other original parts are presented at low prices in our online store:
We previously told you when to change the timing belt and rollers according to the manufacturer's regulations, as well as how to do it yourself.