The low beam of the VAZ 2110 does not light up: reasons
Greetings, masters!
Such a problem: the low beam on the VAZ 2110 does not work! Moreover, it is the near one, but the distant one works. I changed the glass and cleaned the headlights, after which the low beam disappeared!! What could have happened and where to look for him now?! Thank you in advance! Check the fuse first, it could have blown, then check the relay, is it working or not? Does it click? If everything is normal, measure the voltage on the lamps, and then on the fuse itself! Disassemble the block and inspect everything carefully!
I measured the voltage - zero everywhere. I opened the unit, looked superficially, everything seemed to be normal. Where else to dig, where could the low beam have disappeared??
Check the button. In general, it’s not clear. Did you measure the voltage on the lamps, on the fuse, and did the plus come into the block or not?
Low beam not on? This is a fairly common phenomenon on Lada family cars. There can be many reasons for this, as practice shows, and, as my personal experience says, almost all of them are banal and extremely understandable. I will give a few of them, for sure there is nothing serious in your case, you just need to carefully examine everything again.
I also encountered a similar problem when taking headlights apart for polishing. After some time, the low beam disappeared. I don’t know if this has anything to do with their disassembly or not, but the breakdown was fixed fairly quickly.
Adjustment
Once a year, the low beam on the VAZ 2110 should be adjusted. This procedure is necessary in order to increase the lighting efficiency and also to prevent dazzling oncoming drivers.
Below we will take a closer look at how to adjust the low beam headlights:
- You need to find a flat area with a wall that will serve as a screen.
- The car should be placed at a distance of five meters from the screen. A passenger must sit in front. You can also put a load weighing 75 kilograms in the car.
- On the screen you need to draw a horizontal line at 600 mm, as well as a second line 75 mm below the first.
- Then you need to draw three vertical lines - the two outer lines should correspond to the centers of the headlights, and the middle one should be located in the middle between them.
- The headlight hydraulic adjustment handle should be moved to the position corresponding to the minimum load.
- One of the headlights must be covered with cardboard or a sheet of plywood.
- Then the light beam is adjusted according to the diagram. Adjustment is carried out with screws with plastic heads, which are located on the back side of the headlights. They rotate the optical element around the horizontal and vertical axis.
- Next, you need to adjust the second headlight in the same way.
The lamps could burn out
Halogen lamps are designed in such a way that different filaments are responsible for the low and high beam. That is why drivers are often faced with a situation where there is high beam, but no low beam. The reason may be precisely the lamps that simply burned out.
How to fix the problem? Nothing complicated, no electrical knowledge required. It is enough to open the hood, pull out the contact group, release the clamps, unscrew the old lamp and install a new one in its place.
Other reasons
Lamps are one of the simple and common reasons for the lack of low beam, but they are far from the only one. I strongly recommend that you also check:
Carefully inspect the entire wire, as well as the terminals for connection to the fuse and relay. If necessary, tighten the nuts and clean the contacts. Also, don’t forget about the button, the wire going to it could have fallen off, or simply come off. In domestic cars, it is the button that needs to be checked first - this is one of the weakest points!
Many car owners are faced with a situation where the low beams are not on. In this case, the distant one turns on normally, and its serviceability is beyond doubt. According to statistics, every third driver is familiar with such a breakdown firsthand. In this case, the first thought that appears in the head is the failure of the optics itself. In reality, the reason may be completely different.
The defect is well known to owners of VAZ cars, who sometimes encounter the problem even after purchasing a new vehicle. In this case, most often the headlight on the right side of the car does not light up. In turn, the head light source on the left suffers from a similar problem to a lesser extent.
But it would be dishonest to say that the breakdown is typical only for domestic cars. Foreign cars of various manufacturers are also susceptible to this “disease”. The difference is that each part has its own safety margin and resource.
What to do if the low beam does not light up? The car owner has two solutions - contact qualified specialists to fix the problem, or do the work yourself. When choosing the second option, you must have the necessary tools and knowledge of the car’s design, as well as the features of the electrical circuit. If the high beam lights up normally, but there are problems with the low beam, there may be several reasons:
Regardless of the problem, you can easily fix it yourself. At the same time, knowing the reasons why the headlight does not light is useful for every car owner. There are situations in life when a fault occurs on the road, and the service station is several tens of kilometers away. Below we will look at how you can quickly solve the problem and which options are the most promising.
Lamp burned out
If the low beam does not light up, the first thing the car owner will assume is that the filament is damaged. This is possible, because structurally the car headlight contains two spirals, each of which performs its own task. If one thread burns out, the second one continues to work normally. This is a feature of halogen lamps that provides additional reliability and safety.
To replace the lamp, proceed as follows:
When performing work, consider a number of rules:
Fuse blown
In a situation where the headlight does not light, you should make sure that the fuse through which the circuit of interest is powered is working. If it burns out, the low beam may also not work. To resolve the problem, do the following:
If a blown fuse is a frequent problem, replacing it alone will not solve the problem. The cause of the malfunction is most likely in the power wiring. To determine the location of the damage, use a multimeter, with which you need to ring the main parts and accurately diagnose the location of the damage. If you cannot determine the malfunction, contact a specialist at a service station. There is no point in delaying the problem for two reasons:
Problems with power cables
If the cause of the malfunction lies in the wires, check the entire chain through which voltage is supplied to the fuse box, relay and directly to the vehicle's head light source. The reason that the headlight does not light may be oxidation or weakening of the contact group on one of the pads. As a result, the current increases in problem areas of the circuit, and this leads to overheating. To restore normal contact, stretch the wire fastenings to the blocks, having previously processed the contact connections, using a needle file or sandpaper.
Be sure to check the button that activates the low beam. We cannot ignore the possibility of oxidation or poor-quality wiring of contacts directly in the switch itself. Moreover, if the low beam is not on, you should start diagnosing and searching for the cause of the problem with this button. After that, you can move on to checking other circuits.
Other reasons
Now let's look at alternative versions of why the headlight, or more precisely, the low beam, does not light up. If the above checks did not produce results and the problem could not be repaired, it is worth remembering the latest events. Perhaps in the near future, some alterations were made to the design of the machine or repair work was carried out. It is possible that during such activities the power circuit was damaged.
If the low beam on one or two car headlights does not light up, this is a reason to start looking for the cause of the malfunction and fixing the problem. If the recommendations discussed above did not help restore functionality, you should contact specialists at a service station. Otherwise, you will waste time, and you may not be able to find out the cause of the breakdown.
The methods discussed above will be effective if the high beam does not work, and the second spiral, responsible for the low beam, copes with its responsibilities. The reasons for this problem are usually similar. Added to the list is the possibility of failure of the switch installed near the steering wheel. By the way, due to the incorrect operation of this unit, the low beam may not work either. If you find that the headlight does not light due to this lever, replace the faulty part.
Video: What to do if the low beam headlights in a VAZ 2106 do not work
If the video doesn't show, refresh the page or click here
Video: The left low beam headlight on a VAZ 2110 does not light up, a simple reason
If the video doesn't show, refresh the page or click here
Video: Low beam headlight does not light up. Replacing a light bulb on a VAZ 2110, 2111, 2112
If the video doesn't show, refresh the page or click here
Replacing lamps
Choice
The process of replacing lamps on a VAZ 2110 is extremely simple. However, before you begin this operation, you must purchase new lighting elements.
This vehicle is factory equipped with H7 standard halogen bulbs. Today there is a large selection of lamps on sale, not only halogen, but also other types - xenon and LED.
Their features, advantages and disadvantages have been discussed many times on car enthusiast forums, so below we provide only a comparative table with the main characteristics of these lamps:
| LED | Xenon | Halogen | |
| Brightness | Up to 2000 lm | Up to 3300 | Until 1550 |
| Durability | 50,000 hours | 3000 hours | 1500 hours |
| Colorful temperature | 4300-8500 K | 4300-8500 K | 3300 K |
| Lamp price | From 10 USD | From 30-40 USD | From 20-30 USD |
Note! The most optimal color temperature of the light flux is in the range of 4300 – 5000 K.
It must be said that in addition to the data from the table, when choosing, you should also take into account the penetrating ability of the light flux. Halogen lamps are the leaders in this parameter - they illuminate the road much better in rain, fog or snow.
In addition, installing xenon or LEDs in the fog lights of the VAZ 2110 will require electrical intervention, in particular the installation of additional equipment (ignition units). Therefore, it will not be possible to perform their high-quality and safe installation with your own hands.
Note! Experts recommend changing light bulbs in pairs so that both headlights shine equally. In addition, their service life is approximately the same, so if one of them burns out, the second one will soon fail.
Each car owner must choose for himself which light for the VAZ 2110 will be better based on his own financial capabilities, weather conditions of the car, etc.
How to replace the lamp
Instructions for replacing light bulbs look like this:
- First of all, you need to open the hood and disconnect the terminal from the battery.
- Then you need to remove the plug located closer to the wing.
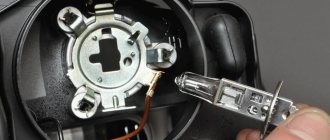
- Next, you need to unfasten the spring clip, which presses the light bulb to the headlight housing.
- After this, you should carefully disconnect the block from the contacts and remove the light bulb itself, since nothing else interferes with it.
- Now you need to insert new light bulbs in the same position in which the old ones were located, connect the block to the contacts and secure everything with a bracket.
- At the end of the work, you should install the plug in place.
Note! When replacing lamps, it is important not to touch the glass with your fingers. Otherwise, grease stains will remain on the surface, which will lead to overheating and failure of the lighting element.
The lamp replacement is now complete. As a rule, this operation takes several minutes even for beginners.
Advice! Many car owners are interested in how to improve headlights? The easiest way is to disassemble the headlights, wash them, replace the glass if necessary and adjust the light beams. As a rule, these simple procedures give good results.
How do lights work on a car?
Malfunctions that arise may be in the nature of a complete failure of the headlights or their periodic inoperability; there may be cases when your light will burn dimmer than usual and intermittently.
High beam is usually adjusted for night driving on the highway, in contrast to the fact that low beam is often used during the day, in combination with fog lights. The easiest way to troubleshoot a complete failure of the VAZ 2110 light. In this case, there is a specific breakdown or malfunction that you can simply methodically identify and eliminate. In the case of periodic failures, and at the time of elimination, when everything is working, this malfunction is much more difficult to determine, since it can hide anywhere. Before searching for the reason for the failure of the low beam or high beam headlights, you should understand the mechanism of operation and the principle of operation, which is as follows:
Power from the battery is supplied to the ignition switch - then power goes to the side light switch - from which it goes to the light switch located on the steering column - then control goes from it to the corresponding relay in the fuse box, the steering switch turns on a certain relay, supplying voltage to his contacts.
Thus, if the lighting fails, you need to understand and find out in which part of the circuit the circuit break or voltage loss occurred. Or determine that the malfunction lies in the failure of the lighting lamps. On this car, the low and high beam are divided into two lamps in each headlight.
Let's consider the case when the right high beam does not work. Do not forget that the light is turned on by a relay, and in the event of a failure of the low or high beam of one headlight and at the same time the functionality of the other, this means that the light switching circuit before the relay is functioning normally and the cause should be looked for after the relay, starting with the fuses. Almost all circuits are protected by fuses, even installed additional accessories - navigator, video recorder, radar detector, receive power from the cigarette lighter, which is protected by a fuse
Fuse F13 is responsible for the far right fuse; we take it out and check for functionality; if by visual inspection it is not clear whether it works or not, replace it with a known-good fuse of the same power. When replacing it, two options are possible: the light will not light up or the fuse will blow. In case of short circuit. We need to look for its cause. Next, open the headlight and replace the high beam bulb. All this can be made a little easier if you have a test light at your disposal, which you can use to check whether voltage is supplied to the headlight itself, since removing the light bulb requires a little skill.
If you determine that when you turn on the high beam, the voltage approaches the headlight, then you can safely remove its pot from the back of the headlight and replace the bulb. There is one more malfunction, this is a break and loss of “mass” on the paw, take this point into account and do not rush to immediately spend money buying a new light bulb. Perhaps this wire is simply disconnected and when power comes to the lamp, there is no ground power.
Source
Conclusion
The low beam headlights on a VAZ 2110 may stop shining for various reasons, however, in any case, the fault can always be found and fixed by yourself. At the same time, we should not forget about adjusting the direction of the light beams, on which the effectiveness of the head lighting largely depends.
You can get additional useful information on this topic from the video in this article.
When the headlights on any car simply do not work, this is an ordinary case. The cause could be the light switch, fuses, or other common things. The “ten” has a feature, without knowing which you can check everything you can to the point of stupor, but still not find the fault.
Usually everything looks like this: the headlights or side lights of the “ten” do not work, and randomly, for example, the left side headlight does not work, the side lights on the right front and left rear do not work. The fuses are intact and many owners of the “ten” are very surprised. It's no wonder if you don't know one secret.
This secret is located in the fuse box, which on the VAZ-2110 even looks like a black box. Once you open it, you will see fuses and relays, with one relay being larger than all the others. It is called a lamp monitoring relay and ensures that the lamps in the headlights and side lights are intact. When a light bulb burns out in the indicated places, the relay sends a signal to the display unit of the on-board control system, the pictogram lights up in it and a typical decimal “ding-ding” is heard.
Inside this relay there are four spirals - these are resistors and the point is that one of these spirals can burn out. This happens, of course, for a reason, but as a result of a short circuit, but the main “trick” is that the resistors of this relay burn out faster than the fuses in the block! That is, absolutely all the fuses are intact, everything is great, but some light bulbs do not work. What is also confusing is that the failure occurs according to an illogical pattern (which may not work, described above), which is why many people think about a bad “ground” in some connection.
If you know about this feature of the “tens”, then identifying a burnt-out relay is a couple of trifles. It can be freely pulled out of the block and disassembled. To disassemble this relay, you need to carefully pry off the bottom cover with a screwdriver, from which the contacts come out, and remove it. Resistors will be visible immediately, and a burnt one even more so. Then it is better, of course, to buy a new relay, but it is not a fact that it will not burn out the first time you turn on the headlights - most likely there is a short circuit in the network.
Therefore, to diagnose a short circuit, it is better to make sure that the fuses are reliable.
, use a soldering iron to fuse a wire onto the burnt resistor to restore it and put the relay in place.
If the fuse does not blow, there is a chance that the relay has simply died due to, for example, old age. If the fuse also fails, you need to look for a short circuit
.
Content
The easiest way, without a doubt, is to entrust everything to the reliable hands of a trusted auto electrician, but it is not too difficult to cope with some problems on your own - if you have the smallest amount of free time and a primitive acquaintance with the basics of electrical circuits.
The low beam of the headlights does not light up, but the high beam is on - this phenomenon can be due to several reasons. And most of them are quite easy to fix. Moreover, this can happen to your car at a completely inopportune moment: on the highway, for example, when you need to switch to low beam so as not to blind oncoming drivers with headlights. Let's try to deal with all the flaws one by one, and consider: what might be the most common options for repairing and troubleshooting such an important segment as low-beam lighting.
Burnt fuse
Another fairly common reason for low beam headlights not working is a blown fuse. In order to eliminate this problem, it is enough to check all the fuses and replace the faulty element.
However, if burnout occurs with enviable frequency, then the problem lies in the breakdown of the wiring. In order to determine this, “ring” all elements of the electrical circuit or contact a service center.
Important! This problem should not be ignored, as in the event of a short circuit a fire may occur.
Lamp burned out
Naturally, if any light source does not turn on, the first thing that comes to mind is that the light bulb has burned out. The design of car lamps is such that the low beam may indeed be absent, but the high beam remains available. Halogen lamps have two filaments. It is quite possible for one of them to rupture - in this case, the light for which it is responsible will be absent.
To replace the bulb, the services of an auto electrician are not required. It is enough to open the hood with the ignition off, remove the protective box on both sides of the headlight, pull out the contact group, disconnect the spring clips, remove the burnt out bulb and install a new one. A little subtlety:
The flask should be wiped with alcohol before installation, otherwise it will burn instantly. It is also not recommended to handle the bulb with unprotected hands: there is always some greasy and damp secretions on them, which can damage the light bulb. The best way to do this (replace the lighting) is with a dry cloth or rag.
Replacing lamps
Choice
The process of replacing lamps on a VAZ 2110 is extremely simple. However, before you begin this operation, you must purchase new lighting elements.
This vehicle is factory equipped with H7 standard halogen bulbs. Today there is a large selection of lamps on sale, not only halogen, but also other types - xenon and LED.
The photo shows a H7 standard halogen lamp
Their features, advantages and disadvantages have been discussed many times on car enthusiast forums, so below we provide only a comparative table with the main characteristics of these lamps:
The most optimal color temperature of the light flux is in the range of 4300 – 5000 K.
It must be said that in addition to the data from the table, when choosing, you should also take into account the penetrating ability of the light flux. Halogen lamps are the leaders in this parameter - they illuminate the road much better in rain, fog or snow.
In addition, installing xenon or LEDs in the fog lights of the VAZ 2110 will require electrical intervention, in particular the installation of additional equipment (ignition units). Therefore, it will not be possible to perform their high-quality and safe installation with your own hands.
Experts recommend changing light bulbs in pairs so that both headlights shine equally.
In addition, their service life is approximately the same, so if one of them burns out, the second one will soon fail.
Each car owner must choose for himself which light for the VAZ 2110 will be better based on his own financial capabilities, weather conditions of the car, etc.
How to replace the lamp
Instructions for replacing light bulbs look like this:
- First of all, you need to open the hood and disconnect the terminal from the battery.
- Then you need to remove the plug located closer to the wing.
- Next, you need to unfasten the spring clip, which presses the light bulb to the headlight housing.
Disconnecting the block from the contacts
- After this, you should carefully disconnect the block from the contacts and remove the light bulb itself, since nothing else interferes with it.
- Now you need to insert new light bulbs in the same position in which the old ones were located, connect the block to the contacts and secure everything with a bracket.
- At the end of the work, you should install the plug in place.
When replacing lamps, it is important not to touch the glass with your fingers.
Otherwise, grease stains will remain on the surface, which will lead to overheating and failure of the lighting element.
The lamp replacement is now complete. As a rule, this operation takes several minutes even for beginners.
Many car owners are interested in how to improve headlights?
The easiest way is to disassemble the headlights, wash them, replace the glass if necessary and adjust the light beams.
As a rule, these simple procedures give good results.
Why doesn't the low beam headlight light up? Troubleshooting
Almost every car owner has encountered a problem when the headlight does not light up “halfway”, that is, the low beam does not work. In this case, a situation arises in which the high beam lights up as if nothing had happened. At least a third of motorists have encountered this, and almost all of them had the idea that the problem was in the “headlights”, that is, the problem was in the optics, although in reality this is not always the case.
This malfunction is very familiar to VAZ car owners, who from time to time encounter this problem, even when they buy a completely new car. Often this problem affects the right headlight of the car, while the headlights on the left side of the car are not affected as often as the right.
But it would be a mistake to say that this only applies to Russian cars and their manufacturers; cars from foreign manufacturers are susceptible to the same problem. The difference is that each optical element, depending on the manufacturer, has its own shelf life and durability.
So, what should a driver do when there is a problem with the low beam? Every motorist has two options - contact a service station with a specialized specialist to solve the problem, or, saving money and sometimes time, fix the problem yourself. If you decide to fix the problem yourself, then you need to have the necessary tools for this and, most importantly, knowledge of the car's structure, including knowledge of the principles of the electrical circuit. If your low beam does not work, but there are no problems with the high beam, then the reasons for this may be several problems:
You can fix this damage yourself. Moreover, knowing how to solve a breakdown related to headlights will be a help for every motorist, especially in a situation when the problem overtakes you on the road, and the nearest service station is several dozen, or even a hundred kilometers away. We will show you how to fix this problem yourself and present options for resolving it.
The low beam on the VAZ-2112 does not work: it does not light up and does not shine
If some devices on your VAZ 2110 or VAZ 2112 car have stopped working, fuses or relays may be to blame. At the very least, the first thing you need to do is check them, and then draw some conclusions regarding the malfunctions. Correct diagnosis of many electrical problems will allow you to accurately determine the cause of the inoperability of a particular unit. To find out what the fuses and relays of the VAZ 2110 - 2112 are responsible for and how to find the right one, read this article.
As in many other cars, in the VAZ-2112 and VAZ-2110, when the engine is turned off, the devices are powered directly from the battery. When the engine is running, voltage is supplied to the devices from the generator, which simultaneously charges the battery. If the current exceeds the permissible value or a short circuit occurs, the circuit fuse will blow. Powerful electrical appliances are connected via relays.
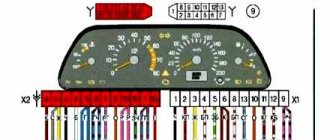
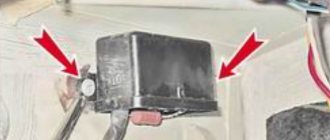
Fuse and relay box
The fuse and relay box is located on the left, lower part of the instrument panel. It is accessible by pressing the button and folding the lid down. To remove fuses, there are special non-conductive pliers in the upper left part of the mounting block.
1 - K5 - high beam relay. If the high beams in two headlights do not work, check this relay. If one of the high beam headlights does not work, check fuses F3 and F13, as well as the lamps and the high beam switch.
2 - K4 - low beam relay . If the low beam in both headlights does not work, check this relay. If only one low beam headlight does not work, check fuses F2 and F12, as well as the lamps themselves and the light switch.
3 - K1 - lamp health control relay.
4 - non-conductive tweezers for removing fuses.
5 - power window relay . If your power windows stop working, check this relay. It could also be in fuse F5, or in the window lift drive system itself. To get to the mechanism, you need to remove the door trim. Check the electric motor, the appearance of the gears and the absence of binding of the mechanism.
6 - K3 - turn signal and hazard warning relay . If your turn signals or hazard lights do not work, check this relay and fuse F16, as well as the turn signal lamps themselves and their switch.
7 - starter relay . If the car does not start and the starter does not turn, check this relay. It could also be a dead battery, as well as the starter mechanism itself.
8 - backup fuses.
9 - fog lamp relay . If the fog lights do not work, check this relay and fuses F4 and F14. Also check their connection diagram, the serviceability of the wiring and connectors, as well as the lamps in the headlights and the power button.
10 - K2 - windshield wiper and washer relay . If your windshield wipers or windshield washer are not working, check this relay. Also check the wiper motor, washer pump and washer fluid level in the washer reservoir.
11 - K7 - rear window heating relay . If the heating does not work and the rear window fogs up, check this relay and fuses F8 and F9. Also check the connection contacts to the terminal points of the heating elements (at the edges of the glass at the rear pillars). If everything is in order, but the heating does not work, the issue may be in the wiring (the wires are frayed or something else).
12 - K6 - add. relay, ignition relay . If your ignition does not turn on or is having problems with it, check this relay. This relay protects the ignition switch contacts from burning. Also check the ignition switch itself and the contact group.
13 - row of fuses F1-F1014 - row of fuses F11-F20
Only one headlight is off
So, you saw that one of the high beam (or low beam) headlights did not turn on, and you found out that the bulbs are working, and the voltage is supplied by the battery or generator. In this situation, checking the circuit begins with the fuse. So, if the problem occurs in:
- right headlight (low beam), then inspect F12;
- left – F2.
Both of these fuses have the same rating - 7.5 amperes. At the same time, for the right high beam, voltage is supplied through F3, and the left one feeds F13.
All the fuses mentioned above are located in the same block where relays K5 and K4 are located. If you don’t have any new ones in stock, install a temporary jumper. For this, a copper wire with a thickness of at least 0.3 millimeters is suitable - this cross-section will withstand a current of 10 amperes. As an alternative, aluminum foil rolled into a flagellum will also work. In any case, remember that this is a temporary measure, and replace the fuse with a new one as soon as possible.
Circuit breakers
Now let's see which fuses are responsible for what in the same mounting block. I will also give the main reasons for troubleshooting.
F1 (5 A) - license plate lighting lamps, dashboard lighting, side lights on the panel, trunk lamp, left side lights . If any of the listed lamps do not work, check this fuse, as well as the lamps themselves and their contacts. If everything is in order, check the headlight switch button.
F2 (7.5 A) - low beam in the left headlight . If both low beam headlights do not work, also check relay K4 and the lamps themselves. It could also be the light switch and its contacts.
Replacing fuses
If after replacing the bulbs the lighting still does not work, you should check the fuses. The mounting block is located on the left side of the steering wheel.
Fuse F2 is responsible for low beam lighting in the left headlight unit, and F12 in the right one. It must be said that a fuse malfunction cannot always be detected visually. Therefore, it is better to install new fuses.
Wiring
Let's go further along the chain. You need to find out if there is voltage at the headlight unit. To do this, you need to measure the voltage at the lamp plug. If there is voltage, but the lamp does not light, then:
If there is no voltage, then you need to look for where the break is!
Having problems with the wires
To eliminate this malfunction, you will have to check all the blocks through which the relay and fuse box are connected. It is possible that there is a poor-quality connection, as well as oxidation of the contacts, which leads to an increase in the current flowing in these places and their heating. To eliminate such malfunctions, it is enough to tighten all the pad fastenings, having first thoroughly cleaned all contacts using sandpaper or a needle file.
It would also be useful to check the button with which the headlights are turned on, since its contacts are also subject to oxidation and they may also have a poor-quality connection. Practical experience suggests that it is from this button that you should start troubleshooting, and only after making sure that it is fully operational, continue searching for the reason why the low beam does not work.