Instrument panel VAZ 2110 - description of lamps and indicators
Designations of indicator lamps on the instrument panel of VAZ 2110 - 15.
Many car enthusiasts are faced with this seemingly simple question. What do the indicator lights on the instrument panel mean?
And what do we know, they all light up together only when the ignition is turned on, and when one of them lights up while driving, it becomes a little uneasy.
I didn’t know this myself when I switched to the “two” after the “seven”; on the 2107, half of them didn’t light up at all, so I didn’t know what it was and what it was for. And a friend of mine, after buying a car in Novorossiysk, even bought a whole book on VAZ, due to ignorance of these light bulbs.
The symbols on the instrument panels on all VAZs are almost the same, just the location is different.
Let's start in order.
1 — Coolant temperature, in degrees Celsius.
2 — Tachometer, engine speed.
5 — Speedometer, vehicle speed in km/h.
6 - Fuel level in the tank. When there are 5-7 liters left, a yellow light comes on - a warning or an icon with a picture of a gas station.
7 - Actually, this is an image of a gas station, signaling the need to refuel.
8 - Indicator lamp for turning on the dimensions.
9 — The brake fluid level is low, it may be leaking somewhere.
10 - Turn on the high beam.
11 - Clock adjustment knob (hours/minutes - switches when pressed), sometimes this knob serves as the function of switching the total mileage/day mileage (on panels with a narrow display).
12 — The display showing the total mileage/daily mileage is narrow on some models.
13 - Hazard warning lamp - “hazard light”.
14 - Check Engine, often indicated by this icon - this means a malfunction in the engine, it is recommended to stop the engine.
15 — Display with a clock (can show the outside air temperature if there is a temperature sensor).
16 - Malfunction in the battery charging system: loose or broken generator belt, generator malfunction, open circuit and other problems.
17 - Parking brake indicator.
18 - Insufficient oil pressure in the engine, it is recommended to turn off the engine and find the cause.
19 — Air damper light (on carburetor engines)
I’ll also add about the lamps on the additional panel in the dashboard of the VAZ 2110 - 12.
— The light marked with an arrow indicates a malfunction of the parking lights or brake lights. — Below is a brake pad wear indicator, if it lights up, check the brake pads, maybe it’s time to change them. — Seat belt warning light — this is clear from the picture.
On the other side from above:
— Low engine oil level — Low washer fluid level — Increased coolant temperature
This is how the review turned out. If some light comes on and the signal beeps, do not panic. Usually it's little things.
Save this note to yourself on your social network by clicking on one of the buttons below.
Design and arrangement of lighting devices VAZ 2110 – 2112
The car uses two block headlights, in which reflectors for high and low beam lamps are installed in a single housing. For high and low beams, single-filament halogen lamps AKG12-55-2 (H1) with a power of 55 W are used. In the low beam sections, A12-5-2 (W5W) front side light lamps are additionally installed. Headlight units from different manufacturers may differ in the design of the low beam section. The vehicle must have headlights of the same design. The headlights are turned on by a switch installed on the instrument panel trim. The high and low beam headlight lamps only light up when the ignition is on. When the ignition is turned off, only the side light lamps can light in the headlights. The headlights are switched from high beam to low beam using the left steering column switch lever
Diagram for switching on headlights on a VAZ 2110, VAZ 2111, VAZ 2112: 1 – left headlight; 2 – right headlight; 3, 7 – to power supplies; 4 – mounting block of fuses and relays; 5 – headlight switch; 6 – external lighting switch; 8 – relay for turning on fog lights; 9 – to the mounting block (block Ш1, pin 6); 10, 11 – rear fog lamps; 12 – control lamp for fog lights; 13 – fog lamp switch; 14 – ignition switch; 15 – high beam indicator lamp; K4 – headlight low beam relay; K5 – headlight high beam relay
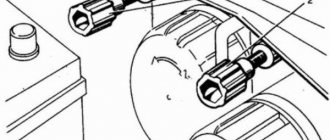
To adjust the direction of the low beam beam, there are two screws with plastic handles on the rear wall of each headlamp unit. The screws allow you to change the direction of the light beam in the horizontal and vertical planes. The headlights are equipped with a hydraulic luminous flux direction corrector, which allows you to change the vertical direction of the light beam from the passenger compartment in accordance with the vehicle load. Some cars are equipped with fog lights, which are mounted in the niches of the front bumper. The fog lamp switch is installed in the instrument panel trim on the left side. When the fog lights are turned on, the warning lamp located next to the switch lights up. The headlights can be equipped with lamps of the type AKG 12-55-2 (HI) or AKG 12-55-1 (NZ). The relay for turning on the fog lights is installed in the mounting block.
Diagram for switching on fog lights on a VAZ 2110, VAZ 2111, VAZ 2112: 1 – Fog lights; 2 – control lamp for turning on fog lights; 3 – relay for turning on fog lights; 4, 7 – to power supplies; 5 – mounting block of fuses and relays; 6 – external lighting switch; 8 – to the light switch; 9 – fog light switch
On a car not equipped with fog lights, their installations are covered with plastic plugs. The front direction indicators are mounted on the outer sides of the headlight units. They are equipped with lamps of type A12-21-4 (PY21W) with orange light bulbs. Turn signals are duplicated by side turn indicators (repeaters) mounted on the front fenders. The side turn signals have baseless lamps. Moreover, if the lantern’s diffuser is orange, then lamps of type A12-5-2 (W5W) are used, and if the diffuser is colorless, then with an orange bulb of type A12-5-3 (WY5W). The turn indicators are activated by the left steering column switch.
Scheme for switching on external lighting on a VAZ 2110, VAZ 2111, VAZ 2112 car: 1 – side light lamps in the headlights; 2, 6 – to power supplies; 3 – mounting block of fuses and relays; 4 – external lighting switch; 5 – ignition switch; 7 – indicator lamp for external lighting; 8 – side light lamps for rear lights; 7 – brake signal lamps; 9 – license plate lights; 10 – instrument lighting switch; 11 – to instrument lighting lamps; 13 – brake light switch; 14 – display unit of the on-board control system; K1 – lamp health monitoring relay
The VAZ 2110 with a sedan body and the VAZ 2112 with a hatchback body are equipped with combined rear lights, which consist of two parts. One part is the external light, installed in the rear fender niche and consists of two sections: the upper - the turn signal section with the A12-21-3 (P21W) lamp and the lower - the side and fog light sections. There are two lamps installed in the lower section: A12-21-3 (P21W) and A12-4-1 (T4W). The other part is the internal light, installed on the lid (or door) of the luggage compartment and also consists of two sections: a reversing light section with a colorless lens and a brake signal section with a red lens. Both sections are equipped with the same type of lamps - A12-21-3 (P21W).
Diagram for switching on direction indicators and hazard warning lights on a VAZ 2110, VAZ 2111, VAZ 2112: 1, 2 – direction indicator lamps in the headlight unit; 3, 6 – to power supplies; 4 – mounting block of fuses and relays; 5 – ignition switch; 7 – alarm switch; 8 – left side direction indicator; 9, 10 – direction indicator lamps for rear lights; 12 – left steering column switch; 13 – indicator lamps for direction indicators; KZ – relay-interrupter for turn signals and hazard warning lights
On a VAZ 2111 station wagon, the interior light also consists of two sections with A12-21-3 (P21W) lamps, but instead of the brake signal section there is a fog light section. The external lamp has three sections: the upper one - side light with lamp A12-10 (R10W); middle – brake signal; the lower one is the turn indicator. The two lower sections contain the same type of lamps A12-21-3 (P21W).
Scheme for turning on the sound signal on a VAZ 2110, VAZ 2111, VAZ 2112 car: 1 – sound signal; 2 – sound signal switch; 3 – mounting block of fuses and relays; 4 – cooling system fan wire block; 5 – to power supplies
A lighting lamp is installed on the ceiling of the cabin. It turns on automatically when you open any of the side doors using limit switches installed in the door openings, or forcibly when you press the lamp diffuser. An AC12-5-1 (C5W) type lamp is installed in the interior lighting lamp. The same lamps are used in license plate lamps, glove box and luggage compartment lamps. The license plate is illuminated by two lamps.
The license plate lamps and luggage compartment lamps light up when the side lights are turned on. The luggage compartment lamp can be turned off forcibly, for which there is a switch on the lamp itself. The glove box light comes on when the ignition is on and the glove box lid is open.
Illumination of buttons on the VAZ 2110 panel
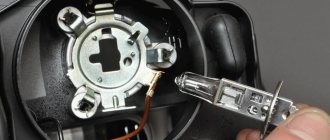
The first thing to do is remove the button itself. Let's analyze it. To do this, pull the body and the moving part in different directions. Great, now we see the incandescent lamp in the housing. Then it all depends on your dexterity: you can remove it from there at this stage (I didn’t succeed). If the efforts do not yield results, we analyze further. To do this, use a screwdriver or a knife to pry off the latches on one side and the other.
The switch mechanism was exposed before us. Our goal is the black bracket; we pry it with a screwdriver and the mechanism falls apart. This way we get the opportunity to freely remove the lamp, for example, with tweezers with electrical tape on its ends for better adhesion to the lamp. Or between pins 6 and 7 there is a small hole through which a needle can fit to press out the lamp
Now it all depends on your imagination and means. For example, you can buy a ready-made LED lamp of any color. I used my own design (my first experience in soldering SMD components =)). In the case of LEDs, please note that “+” is contact No. 6, and “-” is contact No. 7 (we look at the back of the case where the block with wires is inserted).
How to replace the headlight on a VAZ 2110 - 2112 - step-by-step instructions
In order to replace the headlight on a VAZ 2110 - 2112, do the following:
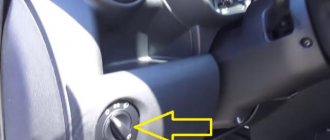
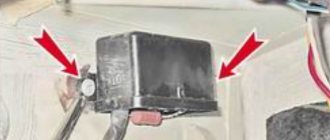
- At the very beginning of the operation, open the hood of the car and unscrew all the bolts or screws (different everywhere) that secure the radiator grille to the car; for clarity, the grille mounting bolts are indicated in the photo below by arrows:
- After the bolts have been unscrewed, remove the grille from the car and begin unscrewing the bolts securing the headlight unit itself; to do this, take the extension with a cap head in your hand and use it to unscrew the two top and one side bolts securing the headlight unit.
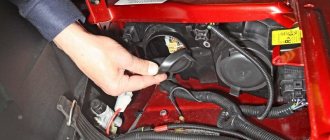
- Then, on the reverse side, find two blocks of wires that are connected to the headlight, one of these blocks is indicated by a red arrow in the photo, but the second one is not visible from the angle, since it is connected to the turn signal and therefore is not visible in the photo because of the body, so after you find both pads and disconnect them, you will have to remove the hydraulic corrector from the headlight (the corrector is indicated by a blue arrow), to do this, press the latch that holds the corrector and then turn it clockwise about 90 degrees, remove it from the hole in which it is located.
- Now again move to the outside of the headlight block and remove the cover from the block, in order to remove it, grab it with your hand as shown in the main figure below and then move it to the center by about 3-4 centimeters, and after it moves to center to the required distance, press your hand on its lower part and push it further until you completely remove it from the car as shown in the small photo below:
- Next, when the cover of the headlight block is removed, take the extension cord and put the cap on it and then unscrew the last nut that secures the headlight block itself (Indicated by an arrow in the small photo), and when this nut is unscrewed, pull it towards you and thereby completely remove the entire unit from the vehicle.
Wiring diagram for fog lights.
According to the factory connection diagram, the fog lights turn on after the headlights are turned on. In this case, you can leave the headlights on with the engine off, which will drain the battery. To prevent this situation, it is better to connect the relay control wire to the terminal from the ignition switch (red in the diagram). But if you want to leave the switch on together with the dimensions, then pin 30 of the relay is best connected to a wire receiving power through the ignition switch. It should be taken into account that the load on the ignition switch will increase.
We recommend watching:
- How to connect LEDs in a circuit
- Diagram of automobile LED lamps
- How to connect an LED to a 12V battery
The LED lamp has stopped lighting
Automatic headlight sensor
How to turn on low beam on a VAZ 2110
Lighting for the VAZ 2110 car. Headlight adjustment.
Design Features:
. Cars use side lights that combine running lights, low beams (single beam lights) and turn signals. In addition, the lights have parking lights. The long and long beam beams are activated by auxiliary relays K4 and K5 located in the mounting block. The control voltage to the relay coils is supplied by the headlight switch when the exterior lighting switch is fully pressed. When the flasher is on, the low beam comes on, and when it is on, the high beam
, all lamps (passage and movement) are illuminated.
turn on
as soon as possible by pulling the light switch lever toward you.
In this case, the voltage at terminal “30” of the switch is supplied directly from the power sources. In wiring harnesses B for connecting wires when installing low beam headlights with double hood. In this case, the wire with the gray/red stripe in connector B must be connected to the same color wire as the "56b" switch switch. Then, when the beam is on low beam
, the low beam lamp flashes in the two brake lights and, when the main beam is on, the intermediate light of the two lamps and the lamp light up.
Fog lights
. For VAZ 2110 cars, fog lights can be installed as an option on the front bumpers. The headlights are switched on by switch 27 (see Instrument panel) using an additional relay type 113.3747 installed in a block attached to the rear of the mounting block. The fog lights can only be turned on when the exterior lighting
26.
Turning on the headlights and low beam.
Accelerated driving training for novice drivers: registration for lessons.
Scandinavian light on vase 2110 Including medium light from the hands of the generator
HOW TO CONNECT YOU AUTOMATICALLY WITH MORE LIGHT
,CONTROL OF TREATMENT WORK I.
Outdoor Lighting
. The ambient light is turned on by the external light switch 26 (in positions “I” and “II”). The side lights and brake lights are powered through the lamp control relay K1. If any indicator is on, the relay is turned on by the corresponding LED in block 5 (see Instrument panel) of the on-board monitoring system.
Direction indicators
. The starboard or starboard turn signals are activated by a switch. In emergency mode, switch 42 turns on all direction indicators. Flashing of the lamps is ensured by the KZ relay switch in the mounting block.
Adjusting headlights VAZ 2110
Check and adjust the shine Equipped with vehicle headlights: with full fuel tank, tool box and spare tire.
1. Check and, if necessary, check the air pressure in the tires.
2. Place the vehicle perpendicular to a smooth wall (such as a garage) at a distance of 5 m. Place an additional 75 kg weight on the driver's seat. Mark the screen on the wall as shown in Figure 1. The longitudinal plane of symmetry of the car should run along line 0 on the screen.
3. Increase the height of the headlight to the floor of your car. This will be the distance h on the screen (for a new car h = 600 mm).
4. Turn it close
5. Turn the rotary switch to position “I” (driver and front passenger).
6. Open the cover and adjust the position of the spotlight for each spotlight on the screen, if the position of the bright spots on the screen does not match the image, using screws 1 (horizontal plane) and 2 (vertical plane) manual beam adjustment.
7. Adjust the direction of the spotlight for each headlight separately. When adjusting opaque material, cover the second headlight.
8. The headlight illumination is considered adjusted if the upper border of the left parts of the light spots coincides with line N, and the vertical lines A and B pass through the intersection points C1 and C2 of the horizontal and inclined sections of the bright spot.
If you like it? Share with a friend and friend or with all your heart. Thank you friends (The social network was connected in August 2013)
VAZ 2110 | External lighting control
1.7.1 Control of external lighting devices
1. Central switch for exterior lights 2. Warning horn - headlight switch 3. Power control (optional) 4. Turn signal switch 5. Headlight high beam switch 6. Headlight high beam signal 7. Fog lamp switch 8. Rear fog lamp switch 9. Windshield wiper/washer operating mode switch 10.
1.7.2 Central switch for exterior lights
1.7.3 Warning sound -, headlight switch signal
Attention: if, with the exterior lights on, turn the ignition key to the “LOCK” or “ACC” position and open the driver’s door, a warning signal will sound, reminding the driver to turn off the lights. .
1.7.4 Power controller (optional)
1.7.5 Turn signal switch
1.7.6 Headlight high beam switch
1.7.7 High beam signal
1.7.8 Fog light switch
1.7.9 Rear fog lamp switch
1.7.10 Windshield wiper/washer operating mode switch
1.7.11 Brief activation of the windshield wiper
To turn on the windshield wiper briefly, move the lever slightly towards the INT position and release it. The lever will automatically return to the OFF position. In this case, the windshield wiper blades will make one stroke and return to their original position. .
1.7.12 Windshield washer
1.7.13 Rear window wiper and washer (optional).
1.7.16 Headlight corrector
1.7.17 Daytime running lights (optional)
If your car is equipped with this system, the lights come on automatically when you turn on the engine, and turn off in the following cases: – turning off the engine; – turning on the side lights; – turning on the low beam or high beam headlights. .
1.7.18 Ignition switch
1.7.19 Car ignition and door key
1.7.20 Remote central locking system (optional)
1.7.22 Sound signal
1.7.23 Cigarette lighter
1.7.24 Front.ashtray
1.7.25 Cup holders
1.7.26 Glove box
1.7.27 Folding table (optional)
1.7.32 Outdoor antenna
1.7.33 Rear view mirrors
1.7.34 Central interior lamp
1.7.35 Ventilation (solar) luxury with electric drive (optional)
1.7.36 Digital clock
1.7.37 Car radio
How to turn on the high beam on a VAZ-2114: photos and videos
Car: VAZ-2114. Asked by: Svetlana Ivashina. The essence of the question: How to turn on the high beam headlights?
Hello! Please tell me how to turn on high beams on a VAZ-2114? This is my first car, so I have small questions, and I’m somehow embarrassed to ask my friends!
1.2.7.5 Turning on the high beam headlights
With the headlights on low beam, move the steering column stalk towards you. At the same time, the high-beam headlight warning lamp on the instrument panel lights up. To turn on the low beam headlights again, move the switch lever towards you again.
1.7.3 Warning sound, headlight switch signal
Attention: if, with the exterior lighting on, turn the ignition key to the “LOCK” or “ACC” position and open the driver’s door, a warning signal will sound, reminding the driver to turn off the lighting.
1.7.35 Ventilation (solar) luxury with electric drive (function)
1.7.6 High beam switch
VAZ 2110 | Outdoor lighting devices
1.2.7.1 External lighting devices
Turning on the side lights Turning on the low beam Automatic operating mode (depending on the vehicle configuration) Turning on the high beam headlights Function “Accompaniment of light to the doors” Turning off the headlights Fog lights Rear fog light Turning off the external lighting Electrical adjustment of the direction of the headlights in the vertical plane.
1.2.7.2 Turning on the side lights
1.2.7.4 Automatic operating mode (depending on vehicle equipment)
1.2.7.5 Turning on the high beam headlights
With the headlights on low beam, move the steering column stalk towards you. At the same time, the high beam indicator light on the instrument panel lights up. To turn on the low beam headlights again, move the switch lever toward you again. .
1.2.7.6 Function “Accompaniment of light to doors”
1.2.7.7 Turning off the headlights
1.2.7.8 Fog lights
1.2.7.9 Rear fog lamp
Adjusting headlights VAZ 2110
Taking into account the fact that the car is often driven at night, you should know how to adjust the headlights on a VAZ 2110. This procedure is often carried out at 100. But it is not always possible to use the services of the station. Therefore, you need to master the headlight option process yourself.
DIY adjustment process
The Abstract presents a step-by-step process on how to adjust the headlights on a VAZ 2110 with your own hands:
- To correctly adjust the VAZ 2110 headlights with your own hands, the distance from the shield to the location of the car should be 5 m. The car is placed at right angles to the markings.
- Instead of the driver, a load weighing around 75 kg is placed on the front seat. The driver's assistant can also sit in this seat if he has the same weight.
- To properly adjust the headlights of the VAZ 2110, you need to install the springs and springs in their natural, working position. This is done by rolling the car by the wing.
- The hood opens. The right headlight is covered. The corrector is set to position 1.
- Before lowering the headlight on the VAZ 2110, you need to find the adjusting screw. If the device shines upward, then it must be lowered by rotating the screw until the beam of light hits the second horizontal line. When the beam is very low, on the contrary, it asks for lifting.
- The same manipulation is carried out with the right headlight.
Placement of adjusting screws and sections on the left headlight unit: 1 - screw for adjusting the light beam in the vertical plane; 2 — screw for adjusting the light beam in the horizontal plane; 3 — cover of the high beam section of the headlights; 4 — cover of the low beam section of the headlights.
Note. On the right headlamp, all elements are placed symmetrically.
To understand how to adjust the high beam headlights on a VAZ 2110, you need to use another annotation:
- The car is also installed from the shield at a distance of 5 m.
- Now the regulator is fixed in position 4.
- The adjustment is carried out according to the same principle as for close light. The difference is that the beam is directed 25 mm below the upper horizontal.
Screen layout diagram for adjusting headlights on a car
- A - vertical line indicating the placement of the low-beam lamp of the left headlight;
- B - vertical line indicating the placement of the low-beam lamp on the right block - headlights;
- C - horizontal line indicating the placement of low-beam headlight lamps;
- D - line indicating the height of the rise of the horizontal border of the light beams;
- O - center line;
- L — distance between low beam headlight lamps;
- A is the distance from the surface of the site on which the car is installed to the headlight lamps.
Preparing the car, site and stand
Understanding how to adjust the headlights on a VAZ 2110, you also need to know about the rules for carrying out preliminary work:
- The reliability of the corrector's operation is checked.
- A flat platform is selected on which the car is installed. It is previously checked by the level. Small slopes will cause a large error when carrying out work. A good option would be a site located in front of the garage door.
- Knowing how to adjust the headlights on a VAZ 2110, so that the work is done correctly, you need to fill the fuel tank one hundred percent, bring the tire pressure to normal, and place a person equal to the driver’s weight in the driver’s seat.
- Make markings on the template or wall. To do this, a vertical line is drawn on it, corresponding to the projection of the car’s axis. Stepping back to the sides, apply 2 more such stripes, which correspond to the centers of the car's headlights. The distance between them is 1108 mm. A horizontal line is drawn along the height of the center of the headlights. Stepping back 75 mm from it, another horizontal line is drawn.
Geometric characteristics of the location of the cut-off boundary of the headlight beam on a matte screen, depending on the height of the headlights and the distance to the screen.
Distance from the optical center of the headlight to the plane of the working platform n, mm
| Nominal angle of inclination of the headlight beam in the vertical plane | Distance R from the projection of the optical center to the cut-off boundary of the headlight on the display, 10 m away, mm | ||
| ang. Min | percent | ||
| Up to 600 | 34 | 1.00 | 100 |
| From 600 to 700 | 45 | 1.30 | 130 |
| From 700 to 800 | 52 | 1.50 | 150 |
| From 800 to 900 | 60 | 1.76 | 176 |
| From 900 to 1000 | 69 | 2.00 | 200 |
| From 1000 to 1200 | 75 | 2.20 | 220 |
| From 1200 to 1500 | 100 | 2.90 | 290 |
Headlight intensity in low beam mode
| Headlight type | Luminous intensity in the direction of the optical axis of the headlight, cd, less | Luminous intensity in direction 52 down from the left side of the light border, cd. More |
| C:CR | 800 | 1600 |
| NS; HCR; DC; DCR | 950 | 2200 |
In case of discrepancy between the characteristics acquired when the engine is not running, measurements are carried out with the engine running.
Headlight inspection
Before adjusting the headlights on the VAZ 2110 with your own hands, you need to work with the lighting devices:
- Using a detergent, all dirt is washed off from the glass.
- The headlight is inspected visually. If there are noticeable scratches on it, they are removed by polishing. It is better to carry out such work at a service center.
- Lenses and reflectors are also checked. If they have cracks, they must be replaced.
- If the lamps have been in use for a long time, they are replaced with new elements. When installing light sources, you should not use over-powered lamps. This is accompanied by excessive heating of the unit, which leads to its breakdown.
Replacing low and high beam lamps VAZ 2110 -2112
Before you start, you should definitely know some nuances that relate to light lighting in a car, namely, the low beam lamp and the high beam lamp are absolutely identical, so if you come to the store and hear the answer: “Do you want a low beam lamp or a high beam lamp? “, then in this case, explain to the seller or leave the store, because these two lamps are installed identically from the factory on these models, namely, the lamps are installed only “H1”!
Disassembling the headlight and removing the Bosh glass - do it yourself
- The glass on a Bosch headlight is very easy to remove, since it is not sealed with sealant. Unfasten the headlight latches.
- To remove the reflector, you need to unscrew the adjustment screws and pull out the cap that covers the low beam bulb; to do this, pry it off with a screwdriver from the other side.
- You have to adjust the headlight beam quite often, especially on station wagons, when the car trunk is heavily loaded and the light is directed into the eyes of oncoming drivers. If at one point you notice that the reflector has fallen and the light adjustment does not work, then you can try to repair the 2110 headlight yourself .
Disassembling the headlight and removing the Kirzhach glass - do it yourself
So, the first thing you need to do is remove the glass from the headlight. I consider this stage to be the longest and most dangerous. Dangerous because if you are not careful you can break the glass.
- We insert a screwdriver or knife into the edge of the headlight, between the glass and the plastic block.
- This will create a small gap through which you can insert a utility knife and begin cutting the sealant.
- Be careful, do not rush, do not insert the screwdriver too deeply, otherwise the headlight glass will simply crack.
- We go through the entire perimeter of the headlight with a knife. If the sealant does not yield, you can warm up the headlight with a hairdryer.
- When the sealant has been slightly trimmed around the entire perimeter of the headlight, you can carefully push the screwdriver deeper into the headlight or insert a thicker screwdriver.
- And again we go through the entire contour with a knife. (I played with the first headlight for 2 hours, with the second one less, either I gained experience, or there was less sealant. The second one succumbed to me in half an hour).
- When the glass has completely come off, remove it from the headlight. Be careful, as the glass caught on the chrome plastic inside the headlight. And then it is fastened behind the headlight with three bolts. Therefore, if this happens to you, pry it with a stationery knife so that it comes unstuck from the glass.
- Remove the chrome insert. To do this, unscrew 3 bolts from behind the headlight.
- If you need to remove the headlight module and reflector, then remove the spring through the hole for the hydraulic corrector.
- Now tighten the adjustment screws as much as possible, insert the screwdriver handle and unscrew the adjustment screws.
- Now you can remove the board from the plastic headlight housing
Rules for adjusting headlights
Often, adjustment of VAZ 2110 headlights takes place without removing such devices from the car. At a car service station, adjustment of VAZ 2110 headlights is carried out using boards on which there are markings applied to the personal model of the car. At home, setting up VAZ 2110 headlights requires a homemade template. It is made from sheets of plywood. If possible, markings are applied specifically to the wall. The position of the devices is changed using 2 regulators. One of them is responsible for changing the position of the headlights horizontally, and the other vertically.
On a VAZ 2110 car, headlight adjustment is necessary so that the flow of light from incorrectly adjusted devices does not blind drivers of oncoming cars. It consists of a main step and several preliminary ones:
- Preparation of the car, platform and shield;
- Inspection of adjustable parts;
- Adjustment process.
The right choice of headlights for VAZ 2110
There are 2 types of headlights installed in a VAZ car:
- "Kirzhach", which are Russian-made. The lenses emit a beam of light. On the one hand, adjusting the headlights of the VAZ 2110 should take place without problems, but when passing through the outer lens, the light is distorted. Bad weather conditions also contribute to the dispersion of light.
- Bosch is an imported manufacturer. Due to the high quality of the device parts, the light beam is characterized by precise directionality.
Both types have different designs. But adjusting the headlights of the Bosch VAZ 2110 is no different from its Russian counterpart.
Reasons for replacing headlights on VAZ 2110 – 2112
The VAZ 2110 -2112 model's lighting devices periodically break down - there is no low beam, insufficient brightness, or the lights simply do not light.
After several years of operation, car enthusiasts note the failure of the standard hydraulic corrector for factory optics. This is due to sudden sub-zero temperature changes and poor quality of device seals.
Correctors lose working fluid and need to be replaced. In rare cases - less than 10% - there is a factory defect in the standard dampers and block.
Breakdowns that prevent adjustment
The question often arises of how to adjust the headlights of a VAZ 2110 if the headlight is damaged or the hydraulic corrector breaks down. The latter device is needed so that when driving, the headlights are automatically adjusted. If the car is stationary loaded, then the light flows onto the road. If the rear part of the machine is heavily loaded, the front part moves up and the light beam begins to shine into the sky. At this moment the corrector turns on. With its help, the headlights are automatically lowered.
Eliminating headlight diff
If adjusting the VAZ 2110 headlights does not give the expected results, the inspection begins with these devices. Their disassembly is carried out as follows:
- All fasteners are turned out and the headlights are removed from the socket.
- The lamps are removed from them.
- To separate the diffuser, use a hairdryer. It is used to melt the sealant. Separation is carried out with a screwdriver or other flat object. If this is a Bosch headlight, then you will also need to remove the brackets securing the glass.
- The reflector is removed. It is supported by 3 points.
- All parts of the disassembled headlight are washed. Faulty elements are replaced with new ones. Then the assembly is carried out in reverse order. Silicone is used as a sealant.
Corrector repair
A common failure is loss of corrector density. Since this device is non-separable, in order to adjust the headlights 2110 it needs to be changed.
The work is carried out in the following order:
- The first step is to remove all the clamps that secure the product to the body, as well as the expansion tank. The control knob is removed from the interior. All tubes are dismantled. In some cases, they are removed in parts, by biting.
- To remove the cylinder, you need to grab the switch on the panel with your hand and pull it towards you. Then the cylinder is simply removed.
- After cleaning the debris, a brand new tube is pulled through.
- The entire installation is carried out in reverse order. Attention is paid to seals.
In order to carry out proper adjustment of the 2110 headlights with your own hands, you need to carefully study the instructions. The work is not difficult, but requires painstaking preparation. Increased attention is paid to the location of the work. It should be level and without tilting. Next you need to follow all the controls correctly.
Replacing lamps
Choice
The process of replacing lamps on a VAZ 2110 is extremely simple. However, before you begin this operation, you must purchase new lighting elements.
This vehicle is factory equipped with H7 standard halogen bulbs. Today there is a large selection of lamps on sale, not only halogen, but also other types - xenon and LED.
The photo shows a H7 standard halogen lamp
Their features, advantages and disadvantages have been discussed many times on car enthusiast forums, so below we provide only a comparative table with the main characteristics of these lamps:
| LED | Xenon | Halogen | |
| Brightness | Up to 2000 lm | Up to 3300 | Until 1550 |
| Durability | 50,000 hours | 3000 hours | 1500 hours |
| Colorful temperature | 4300-8500 K | 4300-8500 K | 3300 K |
| Lamp price | From 10 USD | From 30-40 USD | From 20-30 USD |
Note! The most optimal color temperature of the light flux is in the range of 4300 – 5000 K.
It must be said that in addition to the data from the table, when choosing, you should also take into account the penetrating ability of the light flux. Halogen lamps are the leaders in this parameter - they illuminate the road much better in rain, fog or snow.
In addition, installing xenon or LEDs in the fog lights of the VAZ 2110 will require electrical intervention, in particular the installation of additional equipment (ignition units). Therefore, it will not be possible to perform their high-quality and safe installation with your own hands.
Note! Experts recommend changing light bulbs in pairs so that both headlights shine equally. In addition, their service life is approximately the same, so if one of them burns out, the second one will soon fail.
Each car owner must choose for himself which light for the VAZ 2110 will be better based on his own financial capabilities, weather conditions of the car, etc.
How to replace the lamp
Instructions for replacing light bulbs look like this:
- First of all, you need to open the hood and disconnect the terminal from the battery.
- Then you need to remove the plug located closer to the wing.
- Next, you need to unfasten the spring clip, which presses the light bulb to the headlight housing.
Disconnecting the block from the contacts
- After this, you should carefully disconnect the block from the contacts and remove the light bulb itself, since nothing else interferes with it.
- Now you need to insert new light bulbs in the same position in which the old ones were located, connect the block to the contacts and secure everything with a bracket.
- At the end of the work, you should install the plug in place.
Note! When replacing lamps, it is important not to touch the glass with your fingers. Otherwise, grease stains will remain on the surface, which will lead to overheating and failure of the lighting element.
The lamp replacement is now complete. As a rule, this operation takes several minutes even for beginners.
Advice! Many car owners are interested in how to improve headlights? The easiest way is to disassemble the headlights, wash them, replace the glass if necessary and adjust the light beams. As a rule, these simple procedures give good results.
Purpose of the VAZ 2110 low beam lamp and choice of alternative
Everyone knows that even in the daytime, you need to drive with your low beams on. Today we will talk about what a low beam lamp should be like for a VAZ 2110. If we assume that we switch from high beam to low beam mainly only when oncoming traffic is within sight, then it wouldn’t hurt to make the lighting of our route better.
After all, a bad neighbor is not only an inconvenience for the driver, but also one of the reasons for collisions with pedestrians, who are not always visible in the dark.
Low beam lamp
How it all works
Replacing the low beam lamp in a VAZ 2110
First of all, if the question arises of replacing the lamp responsible for the low beam, you should understand the reasons that could cause the malfunction. It was as a result of this that the light bulb stopped burning. The VAZ 2110 is equipped with a headlight unit, inside of which there are direction indicators and also low and high beam lamps. The electrical wiring provides two special plugs for connecting both one and the other type of headlights.
Note. There are differences between the two sets of headlights. In one version, the headlight unit contains two single-filament lamps for operation of both high and low beam lighting, and the second option involves one double-filament lamp.
To understand the operating principle of the VAZ 2110 electrical circuit, you need to understand which elements take part in it:
- It is impossible to imagine normal operation without an external light switch (it is located in the cabin on the front panel);
- Equally important is the headlight switch located on the steering column;
- And there’s nothing to say about the low and high beam relay;
- In addition, four fuses are important, which are located in the mounting block and are responsible for normal operation;
- And, of course, the high beam warning light.
Replacing fuses
If after replacing the bulbs the lighting still does not work, you should check the fuses. The mounting block is located on the left side of the steering wheel.
Fuse layout
Fuse F2 is responsible for low beam lighting in the left headlight unit, and F12 in the right one. It must be said that a fuse malfunction cannot always be detected visually. Therefore, it is better to install new fuses.
Device
Low beam lamps are a component of the VAZ 2110 headlight units, which also include high beam headlights. In addition, lighting devices also include PTF (not available on all models, but, in principle, many install PTF on their own) and various backlights.
Standard lamps for low beam and PTF are produced by the Avtosvet plant, located in the city of Kirzhach. These lamps are halogen, but today many people believe that LED lamps are much better, although their cost is also higher than Kirzhach.
High beam on VAZ 2112, 2111, 2110
A large number of European countries are already advising their motorists to install daytime running lights, the reflectors of which have a 12 W halogen screwed into them, and in this case the result will be a parody of high beams. In this case, this light will blind drivers who are moving towards you, and the DRL lamp will then direct the light completely towards the car.
In this article, the installation of DRL will be carried out on a domestic car VAZ 2112, 2111, 2110, and in this case, the high beam will not shine at full power or even at half, but only at 33 percent and will serve as a DRL. First you need to get acquainted with daylight, which is very similar to distant light. If you press on the high beams, then the car will be a little noticeable among the general flow of cars. If you need to use real high beams, then the DRL function is turned on and the optics begin to work in the same mode.
So, let's begin the installation process. To install the wiring, it is better to use double-insulated wires, and one of these wires must be laid to the headlight. After this, the wire needs to be connected to relay 87. After this, you need to open the high beam model, which is located very close to the main radiator, pull out the negative wire and cut it out in the middle part.
One end of the wire that comes from the headlight must be properly insulated, and the other end must be connected to the wire that will be laid through the headlight ventilation. Wiring should only be installed on the outside of the headlights.
You need to work very carefully and in this case you should not allow the wire to touch the headlight base, because in this case marks may remain. In this case, the wire will serve as ground for the DS light bulb. It needs to be connected to relay 30, after which relay 85 needs to be connected to the green high beam wire. Relays 86 and 87 need to be connected to the negative wire.
In this case, the wire was laid to the spar. This is where all the wires of the headlights, turn signals and PTF are connected. Immediately, all connections must be carefully wrapped with insulating tape, and after that the entire structure must be placed on a heat-shrinkable tube. After this, open the fuse box and connect the wire to the PTF connector. It turns out that only the button that remains, the fuse and the relay from the fog lamp circuit are taken. The device needs to be powered only after the ignition switch, in which case the high beam will light up immediately after ignition. In addition, you need to install a 5 A fuse.
Repair
If the fuses are intact, but the lighting still does not turn on, you need to find the cause of the malfunction. To do this, you will need a test lamp, or even better, a multimeter.
Head lighting diagram for VAZ 2110
It must be said that repairing the low beam on a VAZ 2110 is not difficult - you just need to ring the circuit and find a break in order to fix it.
Below is the optimal procedure:
- Since the low beam relay on the VAZ 2110 is often the cause of a low beam malfunction, you can start checking with it. Using the device, you need to determine whether voltage is supplied to it and whether it is at the output. If there is no voltage at the output, then the relay needs to be replaced.
- If there is no voltage supplied to the relay and there is no voltage at the fuse terminals, then you should check the VAZ wiring from the switch to the fuses, as well as the switch itself.
- If there is voltage at the output of the relay, you need to check whether it is supplied to the lamp connector. Often the cause of the malfunction is burnt or oxidized contacts. If the low and high beams disappear at once, then the ground wire in the headlight may have come loose.
Note! The cause of relay malfunction is often oxidized contacts, which simply need to be cleaned.
Thus, by checking all the main components along the circuit, you will definitely find the cause of the malfunction. The low beam diagram for the VAZ 2110, which is shown above, will help to simplify this work.
Low beam adjustment diagram
How do lights work on a car?
Malfunctions that arise may be in the nature of a complete failure of the headlights or their periodic inoperability; there may be cases when your light will burn dimmer than usual and intermittently.
High beam is usually adjusted for night driving on the highway, in contrast to the fact that low beam is often used during the day, in combination with fog lights. The easiest way to troubleshoot a complete failure of the VAZ 2110 light. In this case, there is a specific breakdown or malfunction that you can simply methodically identify and eliminate. In the case of periodic failures, and at the time of elimination, when everything is working, this malfunction is much more difficult to determine, since it can hide anywhere. Before searching for the reason for the failure of the low beam or high beam headlights, you should understand the mechanism of operation and the principle of operation, which is as follows:
Power from the battery is supplied to the ignition switch - then power goes to the side light switch - from which it goes to the light switch located on the steering column - then control goes from it to the corresponding relay in the fuse box, the steering switch turns on a certain relay, supplying voltage to his contacts.
Thus, if the lighting fails, you need to understand and find out in which part of the circuit the circuit break or voltage loss occurred. Or determine that the malfunction lies in the failure of the lighting lamps. On this car, the low and high beam are divided into two lamps in each headlight.
- Headlight unit
- Fuse box
- Light switch
- Side light switch
- Ignition switch
- Dashboard
- K4 - Low beam headlight relay
- K5 - High beam headlight relay
- F12 - Right headlight fuses, low beam
- F13 - Right headlight high beam fuses
- F3 - Left high beam headlight fuses, high beam CL
- F13 - Right high beam headlight fuses
Let's consider the case when the right high beam does not work. Do not forget that the light is turned on by a relay, and in the event of a failure of the low or high beam of one headlight and at the same time the functionality of the other, this means that the light switching circuit before the relay is functioning normally and the cause should be looked for after the relay, starting with the fuses. Almost all circuits are protected by fuses, even installed additional accessories - navigator, video recorder, radar detector, receive power from the cigarette lighter, which is protected by a fuse
Fuse F13 is responsible for the far right fuse; we take it out and check for functionality; if by visual inspection it is not clear whether it works or not, replace it with a known-good fuse of the same power. When replacing it, two options are possible: the light will not light up or the fuse will blow. In case of short circuit. We need to look for its cause. Next, open the headlight and replace the high beam bulb. All this can be made a little easier if you have a test light at your disposal, which you can use to check whether voltage is supplied to the headlight itself, since removing the light bulb requires a little skill.
If you determine that when you turn on the high beam, the voltage approaches the headlight, then you can safely remove its pot from the back of the headlight and replace the bulb. There is one more malfunction, this is a break and loss of “mass” on the paw, take this point into account and do not rush to immediately spend money buying a new light bulb. Perhaps this wire is simply disconnected and when power comes to the lamp, there is no ground power.
Changing lamps
Remember: when working with electrical appliances, first of all we disconnect the battery. Even if we just change a light bulb in a headlight or PTF. It is better to protect yourself from discharge.
- remove the casing from the engine compartment;
- disconnect the wire block;
- remove the spring that secures the light bulb;
- rotate the holder and remove the light bulb;
- This is followed by replacing it with a new one, and putting everything back together in reverse order. If it is halogen, you should not handle it with bare hands - it will burn much faster. Use gloves. If you do touch the flask, wipe it with alcohol.
Adjustment
Once a year, the low beam on the VAZ 2110 should be adjusted. This procedure is necessary in order to increase the lighting efficiency and also to prevent dazzling oncoming drivers.
Below we will take a closer look at how to adjust the low beam headlights:
- You need to find a flat area with a wall that will serve as a screen.
- The car should be placed at a distance of five meters from the screen. A passenger must sit in front. You can also put a load weighing 75 kilograms in the car.
- On the screen you need to draw a horizontal line at 600 mm, as well as a second line 75 mm below the first.
- Then you need to draw three vertical lines - the two outer lines should correspond to the centers of the headlights, and the middle one should be located in the middle between them.
- The headlight hydraulic adjustment handle should be moved to the position corresponding to the minimum load.
- One of the headlights must be covered with cardboard or a sheet of plywood.
- Then the light beam is adjusted according to the diagram. Adjustment is carried out with screws with plastic heads, which are located on the back side of the headlights. They rotate the optical element around the horizontal and vertical axis.
- Next, you need to adjust the second headlight in the same way.
Here, in fact, is all the information on how to adjust the low beam headlights.
Fuses are important components
Replacing the low beam lamp on a VAZ 2110 and fuses
Turning on the headlights must be accompanied by illumination of all four filaments of the exterior lighting lamps. When one or more of the lamps do not light, you need to check the integrity of the fuses located in the fuse box. This can be done from inside the car. Each of the fuses performs a protective function, having its own purpose:
- One is responsible for the low beam of the left headlight;
- The other is for the high beam of the left headlight;
- The third is for the low beam in the right headlight;
- The fourth is for the high beam of the right lamp and warning lamp;
Low and high beam VAZ 2110
Lighting and light signaling are one of your guarantees of safe driving on the road. Malfunctions usually occur in this system for several reasons: weakening of contact connections, leading to periodic losses of current in their circuit, oxidation of these connections, as a result of which the passing current through this circuit increases, causing the fuse to blow. Failure of the lighting lamp. Malfunctions with lighting are divided into cases of complete failure of the light, or short-term unstable operation. Let's look at all these reasons in this article and find out how to eliminate them.
Low beam on VAZ 2110 - replacement of lamps and repairs
Did you like the article? Follow our channel for new ideas of useful car tips. Subscribe to us in Yandex.Zen. Subscribe.
As a rule, the cause of low beam malfunction on a VAZ 2110 is burnt out light bulbs. However, sometimes the lack of lighting is due to the failure of other components. Below we will look at how to replace lamps, as well as the most common reasons why the low beam does not light up and how to eliminate them.