Replacement of exhaust pipe gasket for VAZ 2114 8 valves
- To the beginning of the forum
- Forum Rules
- Old design
- FAQ
- Search
- Users
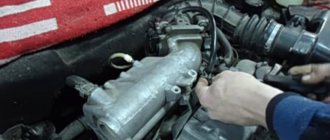
I'm looking at the nuts that have to be unscrewed
Tell me what I need to buy in advance
wrap it overnight with a rag soaked in kerosene.
And then how to get to the garage? Will the sprinklers and locks be of any use if the pipe then warms up?
Is it recommended to apply graphite during reassembly?
By the way: what is this little ratchet? Can I give you a link so I know what to look for?
Take a gasket and new brass or copper-plated nuts
Can you tell me approximately how long?
The exhaust pipe gasket needs to be replaced, the following questions arise:
2. What else do you need to buy: 4 brass nuts, 4 M8x25 studs, anything else?
Information on icons and features
You can not
start topics You
cannot
reply to messages You
cannot
edit your messages You
cannot
delete your messages You
cannot
vote in polls You
can
attach files You
can
download files
Source
Exhaust pipe laying for VAZ 2114 8 valves
Photo and video instructions for independently replacing the exhaust pipe of the exhaust system on VAZ 2113, 14, 15 cars.
To carry out the work of replacing the intake pipe, you need an overpass or inspection hole.
- Unscrew the catalyst from the exhaust pipe.
Using a 13mm wrench, unscrew the 2 nuts securing the clamping bar and remove it from the bracket.- Using a 13mm wrench, unscrew the fastening of the bracket to the cylinder block.
- Remove the bracket from the car.
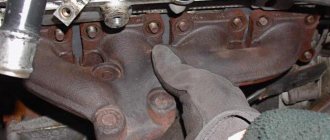
- Using a screwdriver, bend the edges of the locking plates of the nuts securing the exhaust pipe to the exhaust manifold.
- Using a 13mm socket wrench with an extension, unscrew the 4 nuts securing the exhaust pipe to the exhaust manifold.
- Remove the exhaust pipe from the car.
- Remove the old gasket from the studs.
- Reinstall the exhaust pipe in reverse order. Before installation, replace the gasket with a new one.
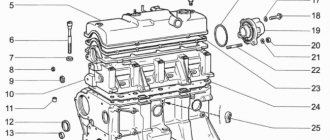
Features of the 2111 (1.5i) engine power system
Location of elements of the 2111 (1.5i) engine power supply system in the engine compartment:
1 - receiver; 2 — vacuum supply hose to the fuel pressure regulator; 3 — throttle assembly; 4 - fuel rail; 5 — fuel pressure regulator; 6 — air supply hose to the throttle valve; 7 - adsorber; 8 — air filter; 9, 10 and 11 — hoses of the crankcase ventilation system; 12 — throttle valve drive cable; 13 — diagnostic fitting
Read more: Resistances for 12V LED
combined with the fuel level indicator sensor into a single unit - fuel module
(often called an electric fuel pump). The pressure pump delivers fuel from the tank through the fuel filter to the fuel rail.
Engine Fuel Module 2111 (1.5i):
1 — fuel level indicator sensor; 2 — connecting block; 3 — inlet pipe; 4 - outlet (discharge) pipe; 5 — module cover; 6 — module cover guide; 7 - electric fuel pump in a plastic casing; 8 - intake chamber
Fuel rail for engine 2111 (1.5i) complete with injectors:
1 — diagnostic fitting; 2 - fuel rail; 3 — fuel supply tube to the fuel rail; 4 — fuel pressure regulator; 5 — tube for draining (draining) fuel into the tank; 6, 7, 8 and 9 - injectors
Fuel pressure control
installed on the fuel rail. Excess fuel is returned to the tank through the fuel return line.
Engine power supply system diagram 2111 (1.5i):
1 - nozzle; 2 - fuel rail; 3 — diagnostic fitting; 4 - adsorber; 5 - check valve; 6 — throttle assembly; 7 - gravity valve; 8 — safety (two-way) valve; 9 - separator; 10 - filler pipe; 11 — fuel filter; 12 — fuel drain line; 13 — fuel line hose connecting the outlet pipe of the fuel module to the fuel filter; 14 — fuel module; 15 — fuel tank; 16 — fuel line connecting the fuel filter to the fuel rail; 17 - fuel pressure regulator
Why did it happen so?
Perhaps the automatic requests do not belong to you, but to another user accessing the network from the same IP address as you. You need to enter the characters into the form once, after which we will remember you and be able to distinguish you from other users exiting from this IP. In this case, the page with the captcha will not bother you for quite a long time.
You may have add-ons installed in your browser that can make automatic search requests. In this case, we recommend that you disable them.
It is also possible that your computer is infected with a virus program that is using it to collect information. Maybe you should check your system for viruses.
If you have any problems or would like our support team, please use the feedback form.
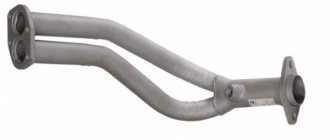
Exhaust system design
All parts of the gas exhaust system of the VAZ-2115 car can be easily disassembled, which allows you to replace them yourself, without the involvement of specialists. Main parts of the gas outlet unit:
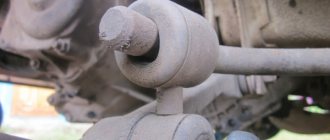
- Bracket mounting of the exhaust pipe.
- A gasket located between the pipe and the intake manifold.
- The clamping part of the bracket (represents a plate).
- Pipe for receiving gases from the engine.
- Metalgraphite gasket in the form of a ring.
- Catalyst.
- Rubber mounting pad.
- First (additional) muffler.
- Main muffler.
- Rear mounting cushion.
- Fastening clamp (often called brackets).
System functions and properties
In addition to removing exhaust gases, the exhaust system of the VAZ 2114 weakens the impact of sound vibrations that the engine emits during operation. The engine creates a lot of noise, and only thanks to the exhaust pipes can it be muffled.
The design of the unit consists of the following main parts:
- muffler for VAZ main;
- secondary muffler pipe;
- neutralizer (only in injection engine models);
- collector pipe;
- exhaust pipe;
- corrugation;
- resonator;
To maintain environmental standards, a catalytic converter was installed in engines with fuel injection through an injector - a device that helps reduce emissions into the atmosphere. The catalyst allows you to burn up to 95% of the fuel that enters the combustion chamber, thereby reducing the amount of combustion products and increasing engine productivity. Thanks to a set of sensors through the computer in the car, the neutralizer can regulate the amount of toxic substances in the exhaust gases. But at the moment this design is an outdated option and is practically not used in modern cars.
How to notice a node malfunction
It is not difficult to determine that it is time to change parts of the exhaust system on a VAZ-2115 with an 8-valve engine.
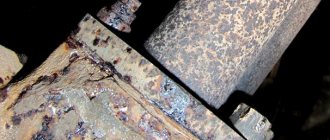
Even a novice car enthusiast can cope with this, since the main signs are the appearance of a strong smell of exhaust gases in the cabin and an increased noise level. Most often, faults are hidden in the additional or main muffler, as well as in the gaskets between the connections, which can burn out over time. The classification of the most frequently occurring faults is as follows:
- mechanical damage to the muffler;
- burnout of gaskets;
- corrugation burnout;
- loosening of connections at joints;
- cracks in the system pipes.
Problems can be spotted by visual inspection. Experienced specialists recommend removing gas exhaust units for these purposes. This way you can examine them from all sides and notice the slightest damage. After you conduct a visual inspection of the system, you need to buy spare parts and begin repairs. It's easy to do it yourself.
If there are no external problems, you can try replacing the internal resonator. This repair method will only help those who know how to handle welding equipment.
Small burns and holes can be covered with sealant. Just pay attention: it must easily withstand temperatures up to 1000 degrees. Before applying the composition, it is necessary to thoroughly clean and degrease the surfaces.
Muffler replacement
Using the example of replacing this component, we will show that it is not difficult to repair the exhaust system and dismantle its components. To work, you will need to install the car in the garage above a pit or drive it onto an overpass. Disassembling this node is not so difficult:
- disconnect the main and additional muffler;
- bend the hooks of the hanging straps;
- remove the brackets;
- remove the main muffler, which is mounted on the cushions.
The exhaust system of the VAZ 2115 car is a complete analogue of the exhaust system of the VAZ 2114 car (Repair of the VAZ 2114 exhaust system). The main elements of this system are: a downpipe, a catalytic converter, an additional muffler and a main muffler.
Like the VAZ 2114, the exhaust system of the VAZ 2115 is equipped with an oxygen sensor, which is installed in the exhaust pipe of the exhaust system. With its help, automatic adjustment of the composition of the fuel-air mixture supplied to the engine cylinders is ensured.
To minimize the influence of vibrations on the car body, the main and additional mufflers are suspended due to rubber suspension cushions.
Silencer - purpose, device, operation
An important element of the exhaust system is the muffler; operating a car without it is impossible. As a rule, the muffler is located at the rear of the vehicle and, in conjunction with the exhaust system, serves to remove harmful gases from the engine, bypassing the vehicle interior.
Car mufflers are made from stainless, aluminized and regular black steel. Stainless steel “silencers” are practically not available for sale due to their high cost and long service life (their service life is 10–15 years). Aluminized mufflers are installed on VAZ 2114/2115. They are common in the domestic and European markets (service life 3–7 years). Regular black steel mufflers are cheap substitutes and last only a few months, so are rarely used.
Replacing the main muffler on a VAZ 2115 car
To complete this work we will need two “13” keys and a metal brush. We drive the car onto an overpass or inspection hole. Be sure to wait some time until the system elements have completely cooled down.
Using a metal brush, thoroughly clean the mounting clamp, with which the inlet pipe of the main muffler is connected to the outlet pipe of the additional one. Then we treat the bolts holding the clamp together with a substance that corrodes rust. For example, VD-40 can be used as such a product.
Now you can unscrew the bolts: with one key we hold the nut from turning, and with the second we “influence” the bolt itself. It should be noted that in case of severe sticking and corrosion, it may not be possible to unscrew the bolts. In such a situation, they can be cut using a grinder. Such dismantling must be carried out with extreme caution so as not to damage the flanges of the exhaust pipe of the additional muffler.
After the clamp is removed and the muffler pipes are separated, slightly lift the main muffler and remove it first from the rear and then from the front rubber hangers.
Installation of a new muffler is carried out in the reverse order of removal.
Reasons for part failure
The muffler is affected by several different factors that can lead to failure, these are:
- Atmospheric precipitation, dirt. Precipitation means the occurrence of rain and snow. A mass that periodically falls on a hot pipe causes temperature changes, destroying the strength of the metal. Unfortunately, it will not be possible to protect the muffler in any way; moisture will in any case affect the metal. A smart solution would be to avoid driving through deep puddles and drive slowly on contaminated sections of the road. If the muffler and pipe are dirty, it is necessary to clean it with water (you can use a pressure jet from a hose). After cleaning, it is recommended to start the engine so that any water that has entered the muffler evaporates.
- Condensate. When the unit is idle for a long time, condensation forms in the muffler, causing a corrosive process. This leads to inevitable destruction of the internal parts of the muffler. This happens extremely rarely, but before the trip it is recommended to increase the operating speed by pressing the accelerator several times. The flow of exhaust gases removes moisture from the silencer.
- Chemical influence. As a result of the release of exhaust gas, a lot of toxic chemical particles settle on the walls of the muffler, destroying the metal, and allowing road reagents to get into the muffler.
- Physical influence. Hitting stones and blows from the muffler when driving on roads also lead to a lot of damage.
Replacing an additional muffler
As practice shows, the additional muffler fails (“burns out”) much less often than the main one. Nevertheless, this happens, and therefore we consider it necessary to describe the process of replacing it. To complete this work we will need two keys for “13” and two keys for “17”.
First of all, unscrew the bolts securing the resonator to the catalytic converter. We pull out the bolts and disconnect the pipes.
Then we need to disconnect the additional jammer from the main one. To do this, unscrew the two bolts of the tightening clamp using two “13” keys. Remove the clamp and disconnect the pipes. Next, lifting the resonator, remove it from the rubber cushion and pull it out from under the car. If manually removing the muffler from the rubber clamps is problematic, pry them off with a screwdriver.
Gas exhaust system (muffler diagram)
For 1.5l engines
- Reception pipe connection bracket.
- Pad.
- Bracket seal.
- Secondary muffler. (Muffler resonator)
- Muffler suspension cushions.
- Main muffler.
- Muffler pipe connection clamp.
- Hinge O-ring.
- Neutralizer.
- Connecting ring.
- Oxygen concentration sensor.
For 1.6l engines
The exhaust system on 1.6-liter engines is distinguished by the absence of a converter (a metal corrugation is installed instead) and the presence of a catalytic manifold (installed immediately after gasket number 3).
For information, the toxicity standard for VAZ 2114, 2113, 2115 is R 83.
Removing and installing the catalyst
Removing and installing a catalytic converter on a VAZ 2115 is a relatively simple task. The procedure itself is carried out in several stages:
1. Using keys “17”, unscrew the fastening of the catalyst to the exhaust pipe of the exhaust manifold. We take out the bolts and spring washers;
2. Place a suitable stand under the catalyst. The fact is that the catalyst on the VAZ 2115 car is not fixed with the help of any rubber hangers, and therefore, in order for it not to fall on your head, after unscrewing the fastening bolts, it must be secured somehow. This can be done either by installing a stand under it, or by temporarily securing it with wire;
3. Now unscrew the catalyst from the inlet pipe of the additional muffler and carefully remove it.
We install the new catalyst in the reverse order.
Article: 2108-1203040/42, additional articles: 2108-1203040
Order code: 007411
- Buy with this product
- show more
Bracket for the exhaust pipe assembled with a bolt + clamp for the exhaust pipe bracket VAZ – 2108
Compatibility:
VAZ-2108 VAZ-21083 VAZ-2109 VAZ-21093 VAZ-21099 VAZ-2114 VAZ-2115
- Passenger cars / VAZ / VAZ-21084 drawings
- » href=»/catalog/vaz-3/legkovye_avtomobili-30/vaz_2108-18/truby_vypusknye_i_glushiteli-114/#part28748″>Bracket clamp Exhaust gas system / Exhaust pipes and mufflers
- » href=»/catalog/vaz-3/legkovye_avtomobili-30/vaz_2108-18/truby_vypusknye_i_glushiteli-116/#part28817″>Bracket Exhaust gas system / Exhaust pipes and mufflers
- » href=»/catalog/vaz-3/legkovye_avtomobili-30/vaz_2108-18/truby_vypusknye_i_glushiteli-114/#part28751″>Bracket Exhaust gas exhaust system / Exhaust pipes and mufflers
- » href=»/catalog/vaz-3/legkovye_avtomobili-30/vaz_2108-18/truby_vypusknye_i_glushiteli-116/#part28814″>Bracket clamp Exhaust gas system / Exhaust pipes and mufflers
- Passenger cars / VAZ / VAZ-210992 drawings
- » href=»/catalog/vaz-3/legkovye_avtomobili-30/vaz_21099-79/truby_vypusknye_i_glushiteli-115/#part36763″>Bracket Exhaust gas system / Exhaust pipes and mufflers
- » href=»/catalog/vaz-3/legkovye_avtomobili-30/vaz_21099-79/truby_vypusknye_i_glushiteli-115/#part36760″>Bracket clamp Exhaust gas system / Exhaust pipes and mufflers
- Passenger cars / VAZ / VAZ-21114 drawing
- » href=»/catalog/vaz-3/legkovye_avtomobili-30/vaz_2111-11/truby_vypusknye_i_glushiteli-136/#part45404″>Bracket clamp Exhaust system / Exhaust pipes and mufflers
- » href=»/catalog/vaz-3/legkovye_avtomobili-30/vaz_2111-11/truby_vypusknye_i_glushiteli-137/#part45432″>Bracket Exhaust gas system / Exhaust pipes and mufflers
- » href=»/catalog/vaz-3/legkovye_avtomobili-30/vaz_2111-11/truby_vypusknye_i_glushiteli-136/#part45399″>Bracket Exhaust gas system / Exhaust pipes and mufflers
- » href=»/catalog/vaz-3/legkovye_avtomobili-30/vaz_2111-11/truby_vypusknye_i_glushiteli-137/#part45438″>Bracket clamp Exhaust gas system / Exhaust pipes and mufflers
- Passenger cars / VAZ / VAZ-2110, 2111, 21124 drawings
- » href=»/catalog/vaz-3/legkovye_avtomobili-30/vaz_2110__2111__2112-415/truby_vyhlopnye-156/#part1303657″>Bracket clamp Exhaust system / Exhaust pipes
- » href=»/catalog/vaz-3/legkovye_avtomobili-30/vaz_2110__2111__2112-415/truby_vyhlopnye__10__11__14_-155/#part1303623″>Bracket Exhaust gas system / Exhaust pipes (10, 11, 14)
- » href=»/catalog/vaz-3/legkovye_avtomobili-30/vaz_2110__2111__2112-415/truby_vyhlopnye__10__11__14_-155/#part1303626″>Bracket clamp Exhaust gas system / Exhaust pipes (10, 11, 14)
- » href=»/catalog/vaz-3/legkovye_avtomobili-30/vaz_2110__2111__2112-415/truby_vyhlopnye-156/#part1303651″>Bracket Exhaust gas system / Exhaust pipes
- Passenger cars / VAZ / VAZ-21142 drawings
- » href=»/catalog/vaz-3/legkovye_avtomobili-30/vaz_2114-647/truby_vyhlopnye__s_neiytralizatorom_-46/#part1669708″>Bracket Exhaust gas system / Exhaust pipes (with converter)
- » href=»/catalog/vaz-3/legkovye_avtomobili-30/vaz_2114-647/truby_vyhlopnye__bez_neiytralizatora_-45/#part1669689″>Bracket Exhaust gas system / Exhaust pipes (without converter)
- Passenger cars / VAZ / VAZ-21092 drawings
- » href=»/catalog/vaz-3/legkovye_avtomobili-30/vaz_2109-9/truby_vypusknye_i_glushiteli-115/#part32821″>Bracket clamp Exhaust gas system / Exhaust pipes and mufflers
- » href=»/catalog/vaz-3/legkovye_avtomobili-30/vaz_2109-9/truby_vypusknye_i_glushiteli-115/#part32824″>Bracket Exhaust gas system / Exhaust pipes and mufflers
- Passenger cars / VAZ / VAZ-21104 drawings
- » href=»/catalog/vaz-3/legkovye_avtomobili-30/vaz_2110-10/truby_vypusknye_i_glushiteli-136/#part41096″>Bracket clamp Exhaust gas system / Exhaust pipes and mufflers
- » href=»/catalog/vaz-3/legkovye_avtomobili-30/vaz_2110-10/truby_vypusknye_i_glushiteli-137/#part41124″>Bracket Exhaust gas exhaust system / Exhaust pipes and mufflers
- » href=»/catalog/vaz-3/legkovye_avtomobili-30/vaz_2110-10/truby_vypusknye_i_glushiteli-136/#part41091″>Bracket Exhaust gas system / Exhaust pipes and mufflers
- » href=»/catalog/vaz-3/legkovye_avtomobili-30/vaz_2110-10/truby_vypusknye_i_glushiteli-137/#part41130″>Bracket clamp Exhaust gas system / Exhaust pipes and mufflers
- Passenger cars / VAZ / VAZ-21124 drawings
- » href=»/catalog/vaz-3/legkovye_avtomobili-30/vaz_2112-12/truby_vypusknye_i_glushiteli-136/#part49712″>Bracket clamp Exhaust gas system / Exhaust pipes and mufflers
- » href=»/catalog/vaz-3/legkovye_avtomobili-30/vaz_2112-12/truby_vypusknye_i_glushiteli-137/#part49740″>Bracket Exhaust gas exhaust system / Exhaust pipes and mufflers
- » href=»/catalog/vaz-3/legkovye_avtomobili-30/vaz_2112-12/truby_vypusknye_i_glushiteli-136/#part49707″>Bracket Exhaust gas system / Exhaust pipes and mufflers
- » href=»/catalog/vaz-3/legkovye_avtomobili-30/vaz_2112-12/truby_vypusknye_i_glushiteli-137/#part49746″>Bracket clamp Exhaust gas system / Exhaust pipes and mufflers
- Passenger cars / VAZ / VAZ-21152 drawings
- » href=»/catalog/vaz-3/legkovye_avtomobili-30/vaz_2115-65/truby_vypusknye_i_glushiteli__dlya_ksporta_-100/#part53479″>Bracket Exhaust gas system / Exhaust pipes and mufflers (For export)
- » href=»/catalog/vaz-3/legkovye_avtomobili-30/vaz_2115-65/truby_vypusknye_i_glushiteli-99/#part53454″>Bracket Exhaust gas system / Exhaust pipes and mufflers
- Passenger cars / VAZ / VAZ-21132 drawings
- » href=»/catalog/vaz-3/legkovye_avtomobili-30/vaz_2113-648/truby_vyhlopnye__bez_neiytralizatora_-45/#part1669689″>Bracket Exhaust gas system / Exhaust pipes (without converter)
- » href=»/catalog/vaz-3/legkovye_avtomobili-30/vaz_2113-648/truby_vyhlopnye__s_neiytralizatorom_-46/#part1669708″>Bracket Exhaust gas exhaust system / Exhaust pipes (with converter)
There are no reviews for this product yet.
The series of articles “Crystal VAZs, or typical breakdowns of domestic cars” talks about typical problems and malfunctions of cars produced by the Volzhsky Automobile Plant. Today we will talk about the front-wheel drive Samara family, as well as its modern analogues.
Tuning the exhaust system of VAZ 2115
Direct flow installation
In this case, everything depends on the financial capabilities, preferences and wishes of the car owner. If we talk about the most common option, it looks like this:
1. First of all, the exhaust manifold is replaced with a tuned “spider”;
3. Instead of the standard main muffler, a modernized one is installed - specially designed for the construction of direct-flow exhaust systems.
If you believe the statements of car owners, this kind of improvement allows you to increase the car’s power by about 7-10 hp.
Installing the "dragon language"
This type of tuning is usually chosen by those who, first of all, care about appearance rather than driving performance. In fact, the installation of the so-called “dragon tongue” does not bring anything useful other than spectacular effects. The essence of this modification is that the release of exhaust gases from the main muffler is accompanied by small fiery flashes and flames.
To implement this idea, you will need to purchase a special kit consisting of a special spark plug and an electronic control unit. You will also need electrical wires and a switch button.
The switch button is necessary to temporarily turn off several spark plugs, which will thereby lead to a higher saturation of the exhaust gases with gasoline vapors. In addition, this button will be used to briefly start the electronic unit, which will supply voltage to the spark plug, which in turn will ignite the exhaust gases.
An important point: you should remember that such tuning, if installed incorrectly, can lead to malfunctions in the vehicle's electrical equipment and disrupt the proper operation of the exhaust system. That is why, unless you have the appropriate skills and experience, it is best to have such a system installed by a qualified mechanic.
Briefly, the installation process is as follows:
1. The entire electrical system of the car is disconnected from the power source (the negative terminal of the battery is disconnected);
2. Power supply of the electronic unit is connected. In this case, the positive wire of the unit is connected either through a button or to the ignition switch. In the latter case, the flame will be released only when the ignition is turned on;
3. A system switch is installed. The installation location can be anywhere - the main thing is that the button is always at hand;
The candle is connected to the system and tested for functionality. An important point: when connecting the spark plug, it is very important that the high-voltage wire does not touch the elements of the exhaust system. Otherwise, its insulation may melt, which may result in a short circuit that will render the electronic control unit unusable.
The exhaust system of the VAZ-2114 is popularly called simply a “muffler,” which is not entirely true. People forget or don’t know, but the complex that makes up the exhaust system includes not only a muffler, but also other devices. The main purpose of the exhaust system is to remove exhaust gas outside the vehicle's dimensions, preventing it from entering the passenger compartment. It also suppresses the sound vibrations that the engine makes during operation.
Interesting!
Since the introduction of environmental standards, regulation and reduction of exhaust gas toxicity have been added to the functions of the exhaust system.
Features of the VAZ-2114 exhaust system
In all VAZ models, the exhaust system is almost identical. Differences can only be observed in the later versions of the system, which are equipped with a more complex catalytic converter design.
The muffler system of the VAZ-2114 with an injection engine includes:
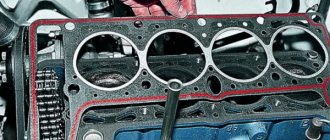
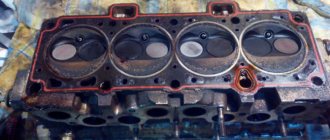
an exhaust manifold. It is attached to the cylinder head through a gasket, so it is the first to take on thermal and dynamic load;
How to repair a “glushak” with your own hands
The muffler on the “fourteenth” and “fifteenth” is considered one of the most vulnerable points of the car. The fact is that due to exposure to high temperatures, the metal quickly burns out, that is, the tightness of the system is broken. Therefore, the part must be changed as soon as there is a suspicion that it is not working.
Reasons for failure
Most often, mufflers “burn out” - that is, due to hot exhaust, the metal inside the housing begins to thin out, which ultimately leads to the appearance of holes. However, this is not the only reason why the silencer may fail:
- using a homemade device - handicraft products do not differ in quality and long service life;
- mechanical shocks from uneven roads - dents and deformations of the pipe also lead to loss of tightness;
- Rust and corrosion sooner or later affects even the highest quality original mufflers.
In general, all of the above factors influence service life to some extent. The car owner can easily identify all of the above faults - just drive the VAZ into the inspection hole and visually examine the muffler. In addition, when deformations, burnouts and corrosion reach their “peak”, the part will begin to make characteristic sounds when moving - gurgling, sharp pops, knocking.
Why is the muffler knocking?
This part on the VAZ 2114/2115 can make knocking noises only in two cases:
- it hits the body;
- When moving, it touches the gas tank housing.
In any case, it is necessary to immediately take measures to eliminate this malfunction. Most often, the problem lies in severe wear of the rubber suspensions. It is enough to change them and the muffler will again return to its normal position under the bottom of the car.
Pendants are inexpensive, so you can buy new products without spending any money.
In some cases, the silencer begins to knock when its elements have been installed incorrectly - for example, after replacing the resonator or exhaust pipe. In this case, you will need to double-check that all fasteners and gaskets are installed correctly.
Citizens! It's simple! I had a knock and I was cured in five minutes! The pipes are connected with a clamp, and inside there is a spherical ring. But the connection is not movable. By changing the angle between the pipes at this connection, we change the center of gravity of the entire exhaust structure. You can also change the slope of the pipe arc, thereby moving it away from the gas tank. Experiment! Repair is a scam!!! They will loosen the clamp, change the degree and charge you 800. Tough!
Marseal
https://autolada.ru/viewtopic.php?t=227961
What to do if the plug is clogged
During vehicle operation, dirt, soot, fuel impurities and other sediments will inevitably accumulate in the exhaust system pipes. Gradually, they will settle on the walls of the muffler and clog its working space.
The driver can notice this only by the behavior of his car:
- At first, it will be difficult to gain speed when overtaking.
- Then, even with uniform movement, the car will have difficulty maintaining the set speed limit.
- Black exhaust from the pipe, loss of engine dynamics.
Cleaning the muffler is a tedious and time-consuming procedure. In addition, if the pipes are clogged, then, most likely, after cleaning, other defects will be revealed - such as rust or burnouts. Therefore, it is more advisable to simply install a new one.
If the catalyst is clogged or the partitions in the muffler are destroyed and interfere with the exhaust, then after replacement it will certainly fly, but if nothing is clogged, then you won’t notice these 2 unfortunate horses at all.
Kirusha27
https://forums.drom.ru/mazda-capella-626/t1151289161.html
Thermal insulation is completely burnt out
The car owner needs to carefully ensure that the resonator coating is always sealed. The barrel is covered with special thermal insulation materials, which sooner or later burn out during the operation of the machine. If you do not change the insulation in time, you will soon have to change the muffler itself.
To do this, the pipes are dismantled from under the car and separated in parts. A special heat-resistant cloth is glued to the surface, which can be purchased at any auto store. Such protection will ensure a longer service life and significantly reduce the noise of the motor.