What is a cylinder head and its functions in a car engine
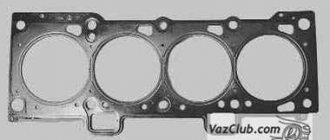
To ensure that the connection between the head and the cylinder block itself is sufficiently tight and airtight, a gasket is used. It performs three functions:
- seals the cooling system channel;
- prevents oil leakage;
- distribution - the cylinder functions normally, as a result of which the mixture of gasoline and air does not leak out.
The seal is used only once and is changed during any engine repair. You can use the following types - asbestos, non-asbestos, steel. Each gasket is good in its own way: metal gaskets distribute mechanical stress well, asbestos gaskets are more elastic and can withstand high temperatures.
You will need the following equipment: a 10 mm wrench, pliers and a flathead screwdriver. Different cars have their own design features, engine models and bolt patterns. It is impossible to create the same algorithm for all machines. Let's look at exactly how to do this with your own hands.
Replacing the camshaft VAZ-2123
The camshaft is replaced in the following cases:
– the pressure in the engine lubrication system has dropped.
The cause of this malfunction is often increased wear of the camshaft journals and seats in the camshaft bearing housing.
If the tensioner and its shoe are in good working order, as well as the drive sprockets are not worn, it is not possible to restore the chain tension, it means that the chain is overextended and must be replaced.
You will need: keys “10”, “13”, “17”, a special wrench for the crankshaft pulley mounting nut, a screwdriver, a mounting blade, a hammer, and a bit.
Replacing the cylinder head gasket on cars
General rules suitable for any car, including the Chevrolet Niva:
- When disassembling, mark all attached parts with a marker - this way you will not get confused during the reverse process;
- when purchasing a gasket, buy exactly the type recommended by the engine manufacturer;
- be sure to remove any oil deposits on the fastening bolts;
- perform half or one turn when loosening the bolts to reduce the pressure;
- The cylinder head is assembled using special bushings;
- The bolts are finally tightened with a special wrench very carefully so as not to twist.
After replacing the gasket, carefully observe to see if there are any signs of leakage to ensure that it is properly replaced on the Chevrolet Niva.
Draining antifreeze in Chevrolet
This is the first stage that is performed when replacing a damaged Niva gasket. Initially, you need to remove the mudguard and the lubrication sump housing - they are located in the engine compartment.
Further:
- reduce the pressure in the coolant supply system by opening the cap of the distribution tank (be sure to close it afterwards - this will reduce the antifreeze pressure);
- place a container of at least 9 liters under the drain (it is under the radiator on the left);
- unscrew the cap and wait until the liquid pours out;
- inspect the gasket of the drain plug - if it is worn out, replace it too;
- Remove the cap from the expansion tank again.
Now you need to get rid of the antifreeze remaining in the cooling system of the engine itself. To the left of the cylinder head, near the ignition unit, there is a separate drain hole. Place a container under it and unscrew the plug with a 13 key.
When the liquid flows out, tighten the radiator cap and cylinder head. In the latter case, a force of at least 25 N∙m will be required.
Replacing the cylinder head gasket on a Niva Chevrolet car
- We remove the battery wiring and drain the antifreeze.
- We free the carburetor from cables and hoses.
- We dismantle the controller with voltage wires.
- Carefully remove the starter screen and heater tube from the manifold.
- Remove the antifreeze temperature sensor.
- Remove the brake booster hose.
- Remove the hoses from the cooling system and heater.
- Disconnect the camshaft and valve levers.
- We dismantle the chain and secure it.
- We unscrew the fasteners and remove the cylinder head with the pipe, carburetor and manifold.
According to reviews from Chevrolet Niva owners, you need to pay attention to the following subtleties:
- you should buy a metal seal as it is more durable and of higher quality;
- If the head fastener does not unscrew, you need to tap it with a hammer - this way you will minimally damage the surfaces and the key will not turn.
As you can see, replacing a gasket is not an easy task; you can do it yourself only if you have good general technical knowledge, skills and abilities. Remember, this is still the engine, the main part of the car. Before you do this, study the engine diagram well, the features of your car, do everything slowly, preferably in the morning with a fresh mind, because replacing a gasket is a feasible thing, but it requires attentiveness, scrupulousness and accuracy.
Any engine sooner or later requires repair, especially when the car has to be operated in difficult conditions, which is important for jeeps, which is what the Chevrolet Niva is.
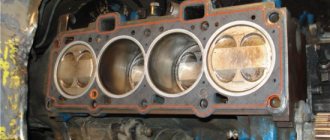
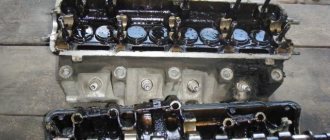
Block plane and broken gasket
rough plane of the engine block
A “punched” cylinder head gasket on Nivas and Shnivas is a birth defect. At some point they just went en masse. There is no need to be surprised. With modifications to the engine to meet new environmental standards, the designers are pushing the fan operating temperature further and further. This gives us an element of “glow” ignition. At a mileage of 15-25 thousand, the cylinder head gasket breaks, and so on down the list. Antifreeze to oil, oil to antifreeze. What do they do in the Papuan service? They buy a Fritex metal bag, install it, and 10 thousand later the client comes back with a new one, with the same question. Or rather, with two. How long? And the classic “what should I do?” It is not the Niva cylinder head gaskets or bolts that are to blame, it is the factory quality of processing of the block plane and the cylinder head plane that is to blame. Below I publish a photo of one of the blocks. I personally changed the gasket on it twice until I found the optimal set, which I now recommend. The metal bag does not help, but rather hinders. It cannot be crimped and does not fill uneven surfaces of the block. You need a shrink gasket that will completely accept the topography of the surface and the bolts that will constantly press it. This is the reason why hardened bolts are not rolled here. For a long time, the plant installed the Yaroslavl metal package “Fritex”, and now they have switched again to shrink gaskets. In a decent production facility, it would be easier to update the machine park and equipment, but at AvtoTAZ it turned out to be easier to go back ten steps along the road of technical progress.
When should you change the cylinder head gasket?
Such work will have to be done when the gasket is damaged. These could be cracks or holes in the gasket. If damaged, the car owner will observe the appearance of air in the cooling system . This will also be indicated by the bubbling of antifreeze.
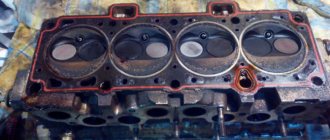
Crack in the cylinder head gasket.
You will also need to change the gasket when there is not enough compression in the combustion chamber. In this case, the gasket may simply wear out and will no longer be able to perform its functions. Also, when cracks appear, antifreeze will enter the combustion chamber, which will lead to unstable engine operation.
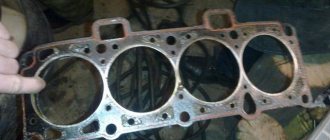
The cylinder head gasket on the Shniva burned out.
In all of the above cases, replacing the gasket will be simply necessary . If you do not replace it in time, the consequences can be dire.
Video about the signs of a broken cylinder head gasket in a Niva Chevrolet
Set of "cylinder head installation"
As I promised earlier, at the request of services and mechanics, a kit called “cylinder head installation” was born. This kit includes the gaskets and components that need to be replaced if you are removing the cylinder head/exhaust manifold assembly. This is the most convenient and correct option. The kit includes:
- Niva cylinder head gasket, shrinkage (Egoryevsk)
- Deformable cylinder head bolts
- Manifold gasket (smile)
- Receiver gasket
- Inlet pipe laying
- Intake pipe nuts, m8, copper-plated, with a narrowed upper part. Do not unscrew due to vibrations (made in Germany)
- Cork valve cover gasket (from Fiat, made in Germany)
The whole thing is shipped on a rigid plywood backing as there have been complaints about the pads being damaged in transit. I hope this issue will be closed. In the price list, this kit is located in the engine-cylinder head section, and is called “cylinder head installation”.
conclusions
If you do not have sufficient skills in this work, it is recommended to seek help from specialists at a service station.
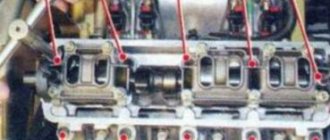
We carry out the work on an inspection ditch or overpass. We remove the cylinder head complete with throttle assembly, receiver, fuel rail, intake pipe, exhaust manifold and thermostat. Relieve the pressure in the fuel rail (see Replacing the fuel filter). Disconnect the wire terminal from the negative terminal of the battery. Drain the coolant from the radiator and cylinder block (see Replacing the coolant). We remove the tips of the high-voltage wires from the spark plugs (see Checking the condition and replacing spark plugs) and remove the oil level indicator from the guide tube. We disconnect the tip of the throttle valve drive cable from the throttle assembly sector (see Removing the throttle drive, replacing the cable). Then we disconnect from: • the receiver - the throttle cable and the brake booster hose (see Replacing the receiver gasket); • cooling jacket outlet pipe - upper radiator hose (see Removing and installing the engine); • thermostat - lower radiator hose and fluid supply hose to the coolant pump (see Replacing the thermostat); • cylinder head pipe and heater radiator outlet pipe - heater radiator hoses (see Removing and installing the engine); • canister purge valve - a tube connecting the valve to the adsorber (see Removing elements of the fuel vapor recovery system); • fuel rail - fuel supply hose (see Removing the fuel rail and injectors); • exhaust manifold - exhaust pipe (see Removing the exhaust pipe) and starter shield (see Replacing the gasket of the intake pipe and exhaust manifold); We disconnect the engine management system wiring harness connectors from the injector wiring harness, the control system coolant temperature sensors and the coolant temperature indicator, the crankshaft position sensor, the phase sensor, the idle speed controller, and the canister purge valve (see the relevant sections). Remove the cylinder head cover. Turn the crankshaft until the mark on the camshaft sprocket aligns with the mark on the camshaft bearing housing (see Removing the camshaft and valve drive levers). Remove the hydraulic timing chain tensioner (see Removing the hydraulic timing chain tensioner).
We remove the sprocket from the camshaft toe and tie the chain with wire. Remove the camshaft and valve drive levers (see Removing the camshaft and valve drive levers).
Using a 13mm socket, unscrew the cylinder head mounting bolt located next to the upper mounting bolt of the generator bracket.
We turn off the E16 head...
...ten bolts securing the head to the cylinder block... ...and remove the bolts.
Remove the cylinder head assembly with thermostat, throttle assembly, receiver, intake pipe, fuel rail and exhaust manifold. The cylinder head can also be removed from the engine by first removing the intake pipe and exhaust manifold (see Replacing the intake pipe and exhaust manifold gasket).
Remove the cylinder head without the exhaust manifold and intake pipe.
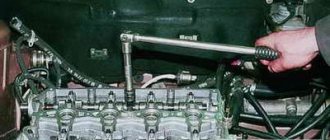
Remove the cylinder head gasket. Before installing a new gasket, clean the mating surfaces of the head and cylinder block from remnants of the old gasket, deposits and oil. Using a syringe with a needle or a rubber bulb, remove oil and coolant from the holes in the cylinder block for the head bolts. We install the gasket and cylinder head using two centering bushings. When installing the head on the cylinder block, we thread the chain with wire through the hole in the head. Having installed the cylinder head bolts, tighten them in the order shown in the figure.
Procedure for tightening the cylinder head bolts. To ensure a reliable seal and avoid tightening the bolts during vehicle maintenance, we tighten them in four steps: 1st step - tighten bolts 1–10 with a torque of 20 N m (2.0 kgf m); 2nd step - tighten bolts 1–10 to a torque of 69.4–85.7 Nm (7.1–8.7 kgf m), and bolt 11 to a torque of 31.4–39.1 Nm ( 3.2–4.0 kgf m). Then we turn bolts 1–10 by 90° (3rd step) and another 90° (4th step). We carry out further assembly in reverse order.
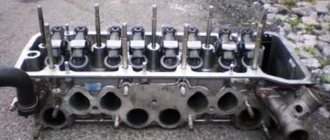
Removing the cylinder head cover
Place the machine on a pit or ramp.
First, the holders of the brake booster pipe and the throttle valve drive cable should be disconnected from the cylinder head cover. They are mounted on special brackets on the left and right sides of the block.
Next, use a 10mm wrench to unscrew the bolt securing the air duct couplings. Move it aside. Next, using a screwdriver, slightly loosen the clamp of the crankcase ventilation pipe, which connects it to the air duct. Now use a 10mm socket to unscrew the bolts holding the cylinder head cover. The order is not important here.
OLYMPUS DIGITAL CAMERA
After that remove:
- brackets for the throttle cable and motor screen;
- lid pressure washers;
- ventilation and air hoses.
Next, all that remains is to remove the cylinder head cover.
In what cases is it necessary to change the cylinder head gasket on a Niva?
In principle, the element of the main cylinder block in question does not have a certain resource, that is, the gasket is replaced when it is damaged, which, however, usually occurs after 60,000 or 80,000 km. A breakdown is indicated by:
- air entering the antifreeze circulation system;
- lack of operating pressure in the combustion chamber of the air-fuel mixture;
- the presence of coolant in the lubricant or, conversely, the latter in the antifreeze (an oil film appears in the expansion tank).
All these problems lead to unstable operation of the Chevrolet engine.
In these situations, the gasket must be replaced immediately.
Cost of repair and replacement of the Chevrolet Aveo block head (Chevrolet Aveo) in St. Petersburg
We do everything to ensure that drivers receive effective repair and diagnostic service. Prices for our work are always minimal and are calculated in rubles.
When is cylinder head repair and replacement required?
The causes of damage to the cylinder head are varied. When the device heats up, it is often recommended to replace the head gasket. The condition of the cylinder head is also affected by a contaminated fuel mixture. An increased compression ratio leads to the use of a replacement service. Low reliability of bolts is also a reason for repairs.
Damage can be easily identified based on various signs.
- oil leakage;
- the color of the exhaust gases became white;
- exhaust gases are detected in the cooling fluid system.
Search
How to change the cylinder block gasket in a Chevrolet ?
Sooner or later, the engine of any car will need maintenance or repair. Especially if the car is operated in difficult and extreme conditions, which is especially important for domestically produced SUVs. Now you will learn how to do it, Chevrolet Niva,
spare head gasket, balloons and what to prepare.
When should I change my cylinder head gasket?
Cylinder head gaskets need to be replaced
Niva Chevrolet
and, accordingly, the need for its tightening torque arises in some cases.
Replacing the Chevrolet niva cylinder head gasket: video. If damaged, the gasket in the vehicle must be replaced. This means that there are cracks and breaks in the structure the cylinder cover . 3 grenades. 3.1 video about Chevrolet Drive on Chevrolet Niva:. In this case, field owner Chevrolet
A gas rupture will occur in the cooling system, as evidenced by regular drilling of antifreeze.
Tightening cylinder head screws for Niva Chevrolet
You may also like
- Replacing the Timing Belt Daewoo Matiz 0 8 Daewoo Matiz F8CV EngineThe compact hatchback Daewoo Matiz was released in 1998, thanks to its low gas consumption, maneuverability and reliability, the car gained considerable popularity. Daewoo Matiz 0.8 engine. The simplest power supply is installed...
- How to turn on Webasto BMW E39
Diagram of laying iron pipes along the engine: the harness runs in the engine compartment, etc. Connection diagram of the upper air heater with a combined timer. And if anyone has it, write a letter. I took the diagram from the website from the article “Understand”. Install...
What's Faster: BMW or Mercedes?
German quality has long been a household name in the automotive industry. This is especially true when it comes to premium cars from Audi, BMW and Mercedes. The last two will be discussed in the current article. These cars have a lot in common…
Replacing Front Pads Daewoo Nexia
Features of the Daewoo Nexia brake system On Daewoo Nexia cars, the manufacturer provides for the installation of two independent brake systems. Works. A basic system that is designed to provide braking during any vehicle movement...
Replacing the E46 Rear Wheel Bearing
Replacement of rear hub bearings Rear wheel hub assembly 1. Cover 2. Axle axle 3. brake drum 4. hub 5. Bearing 6. Oil seal7. bolt securing the axle to the lever 8. Bearing 9. Washing machine 10 is a nut 11. Washer for the switch…
Repairing the Rear Beam of a Peugeot 405 Do-It-Yourself
Peugeot 205 1.8 XLD ›Logbook› Repair of rear Peugeot Beams part 1: make yourself a special Peugeot tool Many Peugeot / Citroen owners at some point were faced with the need to repair the rear beam, and I was no exception. At first…
In addition, it is necessary to replace the Niva Chevrolet head gasket due to insufficient compression in the combustion chambers. The gasket may have worn out and will no longer be able to do its full job. In addition, if cracks appear in the cylinder
antifreeze will enter the engine fluid and vice versa.
In these cases, replacing the cylinder head gasket is mandatory. If you start this business, things can get even worse. Therefore, if in your area Chevrolet
At least one of these features as described above has been identified and the gaskets
cylinder heads .
Replacement process and tightening torque
Tools you need
To perform this work, replace head gasket Niva Chevrolet
and when tightening the cylinder head bolts, be prepared:
Calculator for converting pressure in bar to MPa, kgf and psi
Online converter to convert pressure in megapascals (mPa) to kilograms (kgf cm2), bar, pound force (psi) and atmosphere
The Chevrolet Niva engine head is not particularly different from other VAZ heads. On VAZ 21213 engines, hydraulic compensators were installed from the factory to avoid problems with valve adjustment. But on our engine head, someone has already replaced the hydraulic compensators with ordinary toy soldiers with manual adjustment of valve clearances.
The engine was disassembled due to the formation of an emulsion in the lubrication system. The cylinder head was being crimped and a rotten cooling system plug was discovered. The formation of holes in the cylinder head plugs is a very common problem in VAZ engines. This happens mainly due to poor quality coolant. Car enthusiasts save their money and purchase low-quality antifreeze, and then wonder why their power unit failed so quickly... After the above manipulations, the engine was reassembled and continued normal operation
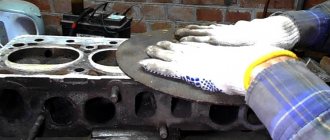
This photo report will show step by step the process of assembling the Chevrolet Niva cylinder head and its installation on the engine block. The engine head plugs were welded, the head was planned, and the valves were ground in.
Replacement process and tightening torque
Required Tools
To carry out this work on replacing the cylinder head gasket of the Niva Chevrolet and tightening the cylinder head bolts, you should prepare:
- Phillips and slotted screwdriver;
- set of open-end wrenches;
- torque wrench.
Without the last element, tightening the cylinder head pulleys will be impossible.
Step-by-step instruction
- Initially, of course, you need to dismantle the cylinder head cover itself.
- Then place a container under the bottom of the car to collect the waste refrigerant. Unscrew the drain plug and drain the antifreeze.
- Then you should disconnect the throttle cable from the receiver and assembly.
- After this, the timing pulley should be removed along with the bearing housing.
- Next, we dismantle the valve lever, and then unscrew the lever supports themselves. Also dismantle the engine fluid supply ramp to the hydraulic supports.
- Now you need to disconnect the cable harness from the TPS. In the same way, disconnect the wiring from the idle speed sensor and antifreeze.
- You need to squeeze the plastic clip and then disconnect the connector with the wires that are designed to power the injectors. Here you also need to remember to disconnect the wiring harness from the knock sensor.
- Now disconnect the high voltage cables from the spark plugs. Also disconnect the cable that powers the engine temperature control device.
- Slightly compress and disconnect the exhaust pipe from the intake manifold. Then the upper screw securing the inlet tube spacer and, slightly loosening the lower screw, the spacer should be moved to the side.
- The clamp should be loosened slightly, then the adsorber purge pipe should be disconnected from the throttle assembly.
- The clamps must be loosened and the cooling system pipes must be disconnected from the cylinder head.
- Using open-end wrenches, you now need to disconnect the fuel lines. To do this, unscrew the nuts of the fuel hoses intended for draining and supplying gasoline.
- Now use a wrench to remove the top screw that secures the rear intake tube brace. The bottom screw should also be loosened a little. After these steps, the spacer must be removed to the side.
- When all the above steps have been completed, the camshaft pulley drive chain tensioner should be removed.
- Then dismantle the brackets that secure the power steering device.
- Now you can remove the chain with the timing pulley star.
- After this, using a socket with an extension, you will need to unscrew the screws securing the cylinder head, and then dismantle it.
- The cylinder head gasket can now be removed. Mount a new component in its place, having previously lubricated its perimeter with sealed glue. Actually, at this point the work on replacing the cylinder head gasket in the Chevrolet Niva can be considered completed. All further work on assembling the power unit must be performed in the reverse order. But that is not all. To ensure a reliable fit of the cylinder head to the block itself, you need to correctly tighten the screws and maintain the tightening torque.
- The procedure itself consists of several stages. First of all, using a torque wrench and following the order indicated in the diagram, you need to tighten the screws from the first to the tenth. In this case, the tightening torque of the Niva Chevrolet cylinder head should be 20 Nm.
- Next, when all the bolts are tightened in turn, you need to tighten all the cylinder head screws again. The tightening torque should now be 69.4–85.7 Nm. The last, eleventh pulley needs to be tightened to 31.4–39.1 Nm.
- After these steps, the screws marked with numbers from one to ten need to be turned 90 degrees, and then, when they are all screwed, you should repeat the procedure and turn them again 90 degrees. At this point, the screw tightening procedure can be considered complete.
If all the steps were performed correctly, then after replacing the component you will no longer have the problem of engine fluid getting into the antifreeze and vice versa. But keep in mind: everything must be done according to the steps specified in this manual.
If, for example, you tighten the cylinder head bolts incorrectly, that is, do not tighten them or overtighten them, then this can result in more serious problems.
If the screw is not tightened, the cylinder head will not fit tightly to the block. This is fraught with engine fluid leakage. If, on the contrary, you overtighten the pulleys, this can cause cracks to form on the power unit. If microcracks appear, then you will have to either weld the cylinder head or replace it. Therefore, before you begin such repairs, think carefully - can you do everything right?
Torsion bolts (plastically deformable)
new cylinder head bolt
Part number: 21213-1003271-01-0. Name: Torx cylinder head bolt. This name (torsion bar bolts) is fundamentally incorrect, but what can you do if they are called that on all forums and in all stores. According to science, when they say torsion bar, they mean deformation from twisting. And in this case, tensile deformation. In stores, these bolts are also called cylinder head bolts for Niva Chevrolet or cylinder head bolts of a new type. I also came across the name torx or chamomile. These bolts, unlike hardened ones, provide a constant load. That is, in a very primitive way we can talk about the grommet effect, that is, about the constant force to compress the cylinder head gasket in the axial direction of the bolt. These bolts are widely used on imported engines because they avoid human factor errors. In fact, you don't need to tighten with the precision of a torque wrench. The final values are taken as angular values. I don’t really like this approach, but such things are now commonly called “assembly guarantee”.