January 18, 2016 Lada.Online 109 918 1
During operation of the vehicle, the headlight bulbs may burn out. If you decide to replace them not at the dealer, but yourself, we recommend that you first study the instructions. The fact is that on the Lada Largus the lamps in the headlights change with some features, which we will discuss later.
You can replace faulty lamps yourself using the methods described below. If replacement seems difficult, it is recommended to contact a LADA dealer.
WARNING!
- Before replacing a lamp, ensure that the associated signal light is turned off.
- Wear protective gloves when replacing lamps.
- Do not touch the glass bulb of the lamp with your bare hands. Hold it by the plinth.
- Halogen lamps are under pressure and may explode when replaced. This may cause injury.
ATTENTION!
- For normal operation of the lighting and light signaling systems, use lamps recommended by the factory.
- Failure to comply with these recommendations may lead to destruction in the form of cracking or melting of the diffuser due to its overheating.
Choice
First of all, it should be said that the low beam lamp for the Lada Largus uses a halogen H4 standard, i.e. contains two threads and is responsible not only for near, but also for distant lighting.
Currently on the market you can find such lamps from a variety of manufacturers, among which are the following:
- Bosh;
- Osram;
- Philips;
- Narva, etc.
In addition, domestic Mayak light bulbs have recently proven themselves to be quite good. Their advantages include not only low price, but good quality.
H4 standard lamp
Advice! It is advisable to purchase light bulbs in specialized stores, since recently a lot of counterfeit products from China have appeared that quickly fail or produce poor-quality light.
Of course, when choosing lamps you need to pay attention not only to the brand, but also to the following characteristics of the lighting element:
| Characteristics | Optimal parameters |
| Brightness (light beam power) | Up to 1550 lm |
| Lifetime | Up to 1500 hours |
| Power | 45-60 W |
Standard halogens provide an unnatural yellowish glow. However, recently light bulbs have appeared with a bluish glow. People call them pseudo-xenon.
However, it should be noted that such light illuminates the road well only in dry weather. In fog or rain, ordinary lamps are preferable.
Moreover, in bad weather, even the expensive “xenon” and “LEDs” are inferior to the latter, the power of the light beam is one and a half to two times more powerful than that of halogen bulbs. This is due to the fact that the light of these elements has insufficient penetrating power.
Note! To install xenon and halogen lamps, you should contact a service center for help, since this work requires the installation of additional equipment and changes to the software. Accordingly, the installation of such lighting is quite expensive.
What lamps are available and which ones can be installed?
Before we start replacing, let’s find out which lamps are installed in the low beam headlights on the Suzuki Grand Vitara and which ones can be installed instead of the standard ones.
The Vitara manufacturer installs halogen devices with an H7 socket with a power of 55 W from the OSRAM concern in its car.
Is it possible to replace them with some others with the same base, and if so, is it worth it? Of course you can! Moreover, it is not only possible, but sometimes necessary. Bulbs with such a base are produced by many manufacturers and differ greatly in characteristics.
There are devices with a long service life, increased brightness and different color temperatures. The latter is very important, since the effectiveness of the device in certain weather conditions depends on this parameter.
If we often drive in bad weather, then we should pay attention to devices with a relatively low (3,000-4,200 K) color temperature - “warm” light penetrates better through fog, rain and snow, and also does not glare on wet asphalt. This low beam lamp is perfect for driving in bad weather.
This low beam lamp is perfect for driving in bad weather.
Bulbs with a higher color temperature fail in such conditions, but in clear weather they illuminate the road better and do not tire the eyes. The light of such devices approaches daylight, but we are accustomed to it from birth.
This device illuminates the road well in clear weather and does not tire the eyes.
Lamp rating - which one is better to choose?
Now let’s look at the test results of sixteen “near” H7 light bulbs from different manufacturers and characteristics. The test was carried out using a lux meter placed in front of the headlight, and, naturally, took into account the quality of lighting.
A stationary lux meter will be used to carry out the test.
Rating of H7 low beam lamps based on the strength of the luminous flux they create
| Place | Appearance | Lamp | Luxometer readings, klk | Peculiarities |
| 1 | OSRAM Night Breaker Unlimited +110% | 32.1 | quite high cost, but the brightest from the list | |
| 2 | GE MegaLight Plus +50% | 30.6 | excellent price/quality ratio | |
| 3 | PHILIPS X-tremeVision +130% | 29.1 | high cost, white light | |
| 4 | GE Halogen | 28.6 | low cost | |
| 5 | PHILIPS VisionPlus +60% | 28.4 | unreasonably high cost | |
| 6 | NARVA Range power 50+ | 28.1 | – | |
| 7 | NARVA Contrast+ | 27.5 | yellowish (fog) light | |
| 8 | PHILIPS Vision +30% | 27.0 | good price/quality ratio | |
| 9 | NARVA LongLife | 26.8 | extended service life | |
| 10 | PHILIPS BlueVision ultra | 26.7 | partially blue bulb “for xenon” | |
| 11 | OSRAM Original | 25.3 | standard lamp | |
| 12 | OSRAM AllSeason | 24.5 | yellowish (fog) light | |
| OSRAM UltraLife | 24.5 | increased service life | ||
| PHILIPS LongLife Eco Vision | 24.6 | really last a long time | ||
| 13 | PHILIPS Crystal Vision | 22.7 | blue bulb “for xenon” | |
| 14 | MTF Platinum light | 20.8 | blue bulb “for xenon” |
As can be seen from the test, there are a huge number of lamps that shine much better than the original one, which took 11th place. So there is plenty to choose from.
About related faults
Replacing the low beam bulb on a Lada Largus
A lighting device for any purpose that refuses to perform its function can signal to the owner of the Lada Largus that the fuse is faulty. If it is discovered that the jumper in the fuse link has burned out, then such an element requires unconditional replacement, which also means replacing the marker light bulb. This is quite easy to do. The mounting block is located on the left edge of the interior panel in close proximity to the unit for switching the modes of lighting devices. Here are the inserts numbered F1 - F39. Fuses numbered 9 and 10 are responsible for ensuring the operation of the low and high beam, respectively for the left and right headlights of the Lada Largus car.
Insufficient contact at the terminals in the fuse block can also cause problems with the normal functioning of the head optic components.
There may be cases of premature burnout of the contact inside the lamp itself or banal oxidation of contacts with the ground. The last option can be easily eliminated. To do this, it is necessary to thoroughly clean the contacting surfaces of the cable lugs. A wire brush will do.
If these methods do not give the desired result and the functionality of the Lada Largus lighting devices is not restored, then you will need to contact professionals for a more thorough diagnosis of the causes of the malfunctions and their subsequent elimination.
Features of fog lights on Largus
If we consider the Russian station wagon Lada Largus, then its PTFs have design differences depending on the period the modification is on the assembly line. Some configurations (“Norma”) are not equipped with this lighting equipment, so before purchasing, the owner of a Lada Largus should look into the bumper and make sure that there are corresponding niches under the PTF. Usually they are closed with special plugs. All versions of headlights on the market are initially equipped with light bulbs.
As an option, you can resort to installing xenon lighting equipment. Here we recommend that you consult in advance about the applicability of the xenon lamp to the headlight body, since their geometric features may not coincide. If everything fits, then this will be the most rational option, because xenon lamps will save PTF glass from constant cracking due to heating temperature. We also note the possibility of installing LED lighting sources.
Standard replacement procedure
- Replacing the low beam lamp, as well as the high beam, begins by disconnecting the on-board power supply. This precedes all electrical repair work. In this case, a special switch is turned or the negative terminal is disconnected from the battery, which avoids accidental short circuits or erroneous connections during installation.
- The place where the Largus lamp will be replaced is determined. There, the rubber plugs covering the electrical components are removed, and two metal antennae are opened in front of the car owner, fixing them in the reflector. They are separated so that the used parts can come out of their seat without damaging the housing.
- Next, you need to disconnect the plugs from the wiring that was previously disconnected. Here it is worth paying attention to the order of arrangement, otherwise, during the installation of new parts, everything can be mixed up and they will have to be changed again.
- After connecting the plug with wiring to the new parts, they are mounted in place and secured with antennae. You should try not to touch the flasks with your hands, as this can lead to their rapid failure.
- If the light is dim during lighting, and the headlights flash when you turn on the headlights, then it is imperative to restore the contacts of the wires with the vehicle body. This is especially true for a marker lamp, because the fat that gets there begins to evaporate when heated and can cause ignition.
- At the end of this procedure, you need to put on the rubber plugs and secure all the parts in their places. After this, the car will be ready for use and the driver does not have to worry about malfunctions of the Lada Largus lighting fixtures.
As practice shows, in modern domestic cars, one of which is the Lada Largus, lamps with directional luminous flux are most often used. The essence of such lighting is a reliable view in front of and behind the car. At the same time, inconvenience to other traffic participants heading towards the driver or driving behind is excluded.
Removing and installing license plate lighting
We prepare the car and disconnect the negative terminal of the battery.
The license plate light is integrated into the outer trim of the left rear loading door.
Using a screwdriver with a TorxT20 bit, unscrew screw 1 securing lens 4 of the license plate light to the trim of the left rear loading door.
We disengage the latch and remove the license plate light from the socket in the trim of the left rear loading door of the car.
Disconnect block 2 of the wiring harness from the license plate light 3.
Turn and pull the lamp towards you.
Installation
Install the license plate light in the reverse order of removal.
How to choose a lighting element
The range of lamps for installation in car headlights is very extensive. However, there are two factors that significantly limit your choice:
- the design of the headlamp block does not allow the use of any options you like;
- code requirements that expressly prohibit the installation of any elements other than those originally used by the manufacturer.
In the Lada Largus car, the functions of low and high beam are performed by one double-filament halogen lamp. This is convenient as it allows you to save space under the hood and reduce the size of the headlight unit. One tungsten filament produces a beam of light of greater brightness, directed primarily horizontally (high beam), and the second creates a beam with an opening angle of 30°, of which 10° are directed above the horizontal, and the remaining 20° below it.
The ability to reduce the size of the headlight unit results in the need to change the light bulb when any filament fails, even if the second one works quite reliably. In addition, you always have to change both lamps, left and right, since for high-quality lighting you need a set of two lamps selected according to their characteristics.
Lada Largus lamp base
High and low beam are realized using one light bulb with h4 socket. In addition, the following types of base are used for different positions:
- h11;
- P21/5W;
- PY21W;
- P21W;
- WY5W;
- W5W.
Tuning with “protection elements”
During a complete transformation of a car, it is worth thinking about its safety. Most often, the protection system concerns the rear and front bumpers. They are equipped with special elements made of stainless steel or polymer coated. These pads are used to prevent damage to the rear bumper from damage, for example when loading luggage through the rear doors. To protect the wheels from various stones and dust, wheel arch liners are used.
A rubber seal is installed on the rear doors of the car, which serves as a soundproofing element. To protect the radiator, you can install a special mesh (most often black or chrome is used), its cells allow air to pass through perfectly, and at the same time protect the radiator from various types of foreign bodies (stones, dust, insects).
Carbon film is an excellent element of protecting the body from minor scratches, which will also give a stylish look to your car. There is a huge selection of different colors and materials.
Thus, in order for your improved “steel” friend to serve you for a long time and reliably, tuning should be approached comprehensively. In any case, after tuning, the quality and appearance of the Lada Largus depend on the amount of money invested, as well as the skills and patience of the owner.
Block lights
Structurally, each block headlight of the LADA Largus station wagon consists of two sections. One contains:
- "marker" lamp (W5W).
- double-filament lamp for low and high beam (type H4);
Nearby is the section in which the PY21W turn signal lamp is located.
The headlight unit is dismantled when it is damaged or needs to be modified (tuning).
Replacing the headlight
Before you begin work related to replacing the headlight, you must:
- Secure the station wagon using the handbrake.
- Remove the key from the ignition.
- Remove the negative wire from the battery terminal.
The dismantling of the headlight block of the LADA Largus station wagon begins by first removing the front bumper. This operation is shown in detail on the video page:
After this, access to the fastening elements in the lower part of the case will open. Next, you need to disconnect the electrical wires:
- going to the H4 type lamp. To do this, remove the cover 3 and disconnect the pads;
- remove the sockets for the direction indicator lamps 5 and indicator lamps 7;
- remove the actuator of the headlight hydraulic corrector (if equipped) from the headlight housing, to do this, slide boot 4 along the cable and unclip the fastening latch.
- after this, you need to unscrew the fastening bolts (items 1, 3 and 4) located around the perimeter of the body part (2);
- push the headlight housing forward a little and remove it.
The new headlight unit is installed in the reverse order, maintaining a uniform gap between housing 2 and body parts.
Adjusting the luminous flux
After carrying out any work related to the head optics of the LALA Largus car, it is mandatory to check and adjust (if necessary) the direction of the luminous flux of the switched on lamps. To do this, it is best to contact a specialized service station, equipped with special instruments and staffed by qualified specialists. However, in case of emergency, such an operation can be carried out independently and without the necessary equipment. In practice, there are several ways to check and adjust headlights. You can see one of them by watching the video:
Replacing lamps in a headlight
Among the sudden malfunctions that almost all car owners encounter, one of the first places is the failure of head optics light sources. These include lamps:
- low/high beam;
- direction indicator;
- Dimensions indicator.
All of them are located inside a separate headlight and changing them, if necessary, is not difficult.
Replacing the low/high beam lamp
Change the low/high beam lamp in the LADA Largus headlight in the following order:
- remove the protective cover;
- disconnect the block with wires;
- pull out the rubber seal;
- pressing on the spring holder, remove it from under the latch;
- Carefully releasing the holder, carefully remove the burnt out lamp.
The new lamp is inserted into the reflector hole and secured using standard fasteners. Then all the removed parts are returned to their places.
Attention! Lada Largus uses halogen light sources, the glass surface of which is not recommended to be touched. To avoid darkening of the flask when heated, it is recommended to hold them by the base.
How to install fog lights?
Before starting the procedure for installing a set of fog lights in the Lada Largus bumper, we carry out a number of preparatory manipulations related to preliminary checking the correct connection of the wires and the functionality of the products, and also stock up on the necessary tools, the set of which is very simple.
The installation procedure is simple, so we can safely proceed to its implementation.
We open the hood and de-energize the network by removing the terminals from the battery. Now you can remove the front bumper, which will allow you to correctly install and connect the fog lights, as well as secure the wiring. We unscrew the screws from below that hold this element to the body of the LADA Largus. We do the same with the bolts under the hood and the screws in the wheel arches
We pay special attention to the two bolts hidden in the corners of the bumper, since without their “surrender” it will not succumb to removal, because the wings will not “set it free”. To defeat these fastening components we will use a screwdriver. During manipulation, carefully move the fender liner so that it does not interfere with our actions
We remove the bumper carefully, pulling it straight forward (in the direction of travel). Next, having conveniently positioned the bodywork, we dismantle the plugs. On the inner surface of the bumper we unhook the fixing components, after which the plugs are easily removed. We place new PTFs in the bumper niches and begin to securely fasten them. This is done using screws with which we fasten the lighting devices to the body element. Now we lay the wiring along the inner cavity of the bumper and fix it with tape and clamps. We do this on both sides of the body element. We fasten the negative wires to the body, which acts as the “ground” of the Lada Largus car. We install the bumper and secure it with the specified list of fasteners, proceeding in the reverse order. Next, you will need to bring the end sections of the PTF wires into the engine compartment area. When laying, we also use fastening ties. We move into the cabin and select a place to attach the pre-purchased PTF power button. The button itself can be embedded into the desired area of the panel, which will be more aesthetically pleasing compared to fixing it on the surface of the interior element. The ends of the wiring attached to the button terminals are directed to the mounting block with relays and fuses. Remembering the cable ends of the PTF, we also bring them to the area where the unit is located, which is located on the left side of the steering column. We act according to the instructions included with the optics kit. We carry out all switching manipulations, connecting the wires as indicated in the instruction diagram. Finally, we check the functionality of the new lighting devices and, if necessary, adjust the correct direction of the light beam.
Replacing light bulbs on Lada Largus - photo, video of replacement
Constant use of the car will one day lead to the need to replace light bulbs on the Lada Largus. This is easy to do at a specialized service station, but you can do all the necessary work yourself. To achieve the desired result, you need to carefully study the instructions. This is due to some nuances that should be taken into account when replacing light bulbs on a Lada Largus. Let’s talk about all these subtleties of work in more detail.
Replacing low and high beam bulbs on a Lada Largus
Any replacement of light bulbs must begin with turning off the power. These actions are required for working with electrical equipment of a car. The power is disconnected by turning a special lever or removing the terminals from the battery. This way you will completely eliminate short circuits caused by improper connection of wires. You need to understand that one bulb is used for the low beam of Largus, and the second for the high beam. The average lamp operating life ranges from 2-4 thousand hours. You can gain access to the left light by removing the battery.
- Turn the lid counterclockwise;
Installing the working light bulb in the Largus lantern is carried out in the reverse order. Remember that you should only hold the lamp by the base, and it is advisable not to touch the bulb. As a last resort, you can wipe the light bulb with a lint-free microfiber cloth. You can watch the correct process of replacing a low beam light bulb in the video:
Replacing side light bulbs on Largus
If it is necessary to replace this lamp, the entire lamp must be removed. This is the only way to ensure access to the side lights of Largus
After dismantling, we disconnect all power wires with extreme care and attention. After disconnecting the power from the battery, you need to remove the front bumper, which serves as additional protection for the dimensions. Ideally, work is carried out wearing sterile gloves.
If the device was touched by negligence, it must be treated with a lint-free microfiber cloth.
Ideally, work is carried out wearing sterile gloves.
If the device was touched by negligence, it must be treated with a lint-free microfiber cloth.
- We remove the fender liner by removing the fasteners;
- We remove the socket with the light bulb by turning it in the direction of the clock, and for the right side you need to turn it in the opposite direction;
- Remove the burnt out lamp from the base.
To replace the backlight on Largus, turn the socket counterclockwise. Then carefully connect the 2 wires to the battery. And now all that remains is to install the working lamp and carry out the assembly. Installing all components in place is carried out in the reverse order and does not take much time.
Replacing turn signal bulbs on Lada Largus
It is impossible to get to this lamp from the engine side, so we will replace it from below the car.
We remove the fender liner by removing the fasteners; We unscrew the socket with the burnt out lamp counterclockwise; Remove the lamp by carefully pressing it and at the same time turning it counterclockwise.
Reinstalling all parts is carried out in reverse order.
Replacing bulbs in fog lights
As in the previous case, the replacement is carried out from below the car.
- We unscrew the fasteners and dismantle the fender liner;
- Unlock the latch and disconnect the block from the lamp;
- Carefully turn the light bulb counterclockwise and remove it from the socket.
Installing the work lamp is carried out in the reverse order.
Interesting to know! In reality, replacing light bulbs on a Lada Largus is much easier. We have described the ideal and correct option. Having trained your hand, you can do all the work with the least amount of effort and time.
Let's sum it up
It is imperative to monitor all lighting elements and change them on time. Reduced efficiency of light bulbs can easily lead to dangerous situations while driving!
Turn signals
After opening the hood, disconnect each wire from the turn signal. To do this, you need to release the spring tip by pressing its lock. After a characteristic click, pull out the part.
After installing new lighting elements, connection and assembly occur in the reverse order. Moreover, after installation, the wire blocks should be checked.
A special feature of this procedure is the preliminary dismantling of the headlight unit, under which the side light lamps are located. After this, it is necessary to disconnect the wires from the battery, which is done with extreme care.
Removing the front bumper will allow you to get to the cover that protects the dimensions. Since they come into contact with other light devices, it is advisable to carry out all procedures using sterile gloves. If any device has been touched, it must be wiped with a clean, lint-free cloth.
To replace the side light bulb in Largus, the socket of the old part is turned counterclockwise. The black and yellow wires connect it to the battery, so it turns off from them. A new part is installed in this place, and assembly is carried out in the reverse order.
You need to make it a rule to regularly change not only the lamps, but also monitor other lighting elements. After all, the process of reducing their brightness occurs slowly and the driver simply does not notice the deterioration in road lighting.
Low and high beam
One lamp is responsible for low and high beam. Its resource is 2000-4000 hours. To gain access to the left headlight unit, you must remove the battery.
- Turn the lid counterclockwise;
- Remove the cover by releasing the latch.
- Remove the block with wires by unclipping the lock;
- Remove the rubber cover by prying it off by the edge.
- Unscrew the lamp clamp to the side;
- Remove the headlight bulb.
Installing a new lamp in the Largus headlight is carried out in the reverse order. You need to hold the lamp by the base; it is not recommended to touch the bulb with your fingers. If necessary, wipe the flask with a microfiber cloth that does not leave lint. The process of replacing the H4 lamp is also shown in the video:
Conclusion
You can get additional useful information on the discussed topic from the video in this article.
A note about what kind of lighting lamps are installed in the Largus headlights; which of them are low/high beam, and which are responsible for the side lights. How to change lamps yourself. How much do originals and analogues cost in Yaroslavl?
Good day, future and aspiring gentlemen Largusovod!
On Largus, the low/high beam and headlight lamps often burn out. At least for 70 thousand I have already changed it five times on each side.
The following light bulbs were installed on my car:
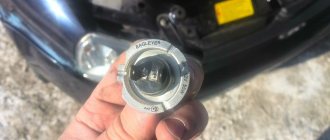
1. Low/high beam: halogen, Osram H4 12v 60/55w. (art. 64193). Price from 109 rub.
There are many analogues. Here are some of them:
370 rub. General Electric (34454)
117 rub. Valeo (032007)
2. Front dimensions: halogen baseless 12V Osram (art. 2825). Price from 17 rub.
26 rub. Lynx (L12805)
9 rub. Fortluft (2825)
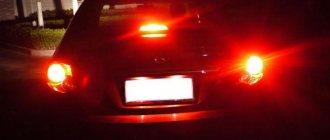
3. Rear dimensions: two-pin with filament, base BAY15D. Beacon 12V P21/5W.
from 56 rub. Fortluft (7528)
They burn out less often. I changed it only once in the right lamp. This is what she looks like:
How to replace headlight bulbs
1. First, remove the protective cover. It turns a little, then a small latch is released.
2. The block with wires is removed.
3. Remove the rubber protective sleeve.
4. The lamp is pressed U -shaped clamp. It needs to be pulled to the side and back.
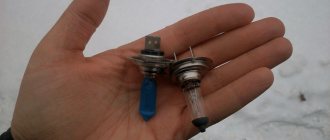
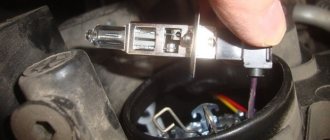
5. Take out the lamp. Remember its orientation. Two teeth at the bottom, one at the top. And if you look at it from the side of the headlight, the inscription (marking) will be on top.
6. Install a new lamp. You should not take it with your bare hands, as greasy marks from the pores will remain on the bulb and the lamp will fail faster. This applies to all halogen lamps. It is better to hold it by the plinth or use a microfiber cloth.
7. Assembly is carried out in reverse order. First the clamping clamp, then the rubber bushing and finally the top cover.
How to replace front markers
There isn't much action here. The main thing is to get to the cartridge and turn it 90 degrees. The most inconvenient thing to change is the battery side. Not enough space. If your hand is large, it is better to remove it.
Thus, the procedure is as follows:
- Found a cartridge
- They turned it over and took it out
- Removed the lamp
- It is better to wear gloves when installing a new lamp into the socket.
- Then we insert the cartridge back into the headlight and rotate it 90 degrees.
Troubleshooting Some Problems
If, after replacing the lamp, the low beam on the Lada Largus still does not light up, the cause of the malfunction may be a blown fuse. Replacing them is even easier than the paws, since they are located in the cabin, on the left side of the steering column.
Two fuses are responsible for the low beam:
- F9 – left headlight.
- F10 – right headlight.
Note! Even if the fuse is not visually damaged, a new one should be installed in its place.
Fuse box diagram
Often the cause of a malfunction is poor contacts of the fuse terminals. In this case, you just need to clean them.
It should be noted that there is no low beam relay on the Lada Largus, therefore, if replacing the fuses did not produce results, all that remains is to check the contacts in the headlight itself, which could have burned out or oxidized.
Often the light goes out due to poor contact of the machine ground wire. In this case, the problem is also solved by thoroughly cleaning the contact. If it was not possible to restore the light, you need to contact a service center for help.
Here, perhaps, are all the instructions for correcting the most common VAZ wiring faults.
Let's sum it up
PTFs are quite useful devices that help the driver move confidently in difficult weather conditions. As you can see, not all Lada Largus configurations initially have such lighting devices in their arsenal. For caring owners, this is not an obstacle, and they easily purchase and install PTF in their cars.
We examined two options for installing lighting equipment in LADA Largus and found that they are quite simple. If your station wagon does not yet have these useful products, then feel free to purchase them and install them, after which the bad weather will not be able to scare you.
Replacing a low beam lamp on a Lada Largus: how much does it cost?
The ability to independently replace light bulbs in your car's lighting fixtures is very useful, as it allows you to save both time and money. Today we will see that replacing a low beam lamp in a Lada Largus is a fairly simple task that anyone can do.
General information about this model
The first LADA Largus car rolled off the AvtoVAZ assembly line and went on sale in 2012. It was a Romanian Dacia Logan MCV, adapted for the Russian market. The car is produced to this day and has four modifications:
- Largus R90 – passenger station wagon for five and seven seats;
- Largus F90 – cargo van;
- Largus Cross is essentially the same five- and seven-seater station wagon, but with increased ground clearance and slightly different exterior and interior trim;
- Largus CNG – production started in 2022. Modification with gas cylinder equipment.
Passenger station wagon (left) and Largus Cross Note. The first Largus rolled off the assembly line a year earlier - in 2011, but was intended for sea trials.
What lamps are used
Before we figure out how to change a light bulb on Largus, let’s determine what lighting devices are used in the headlights of this car. The Largus headlights have only three lamps:
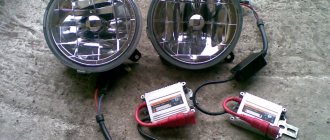
Low/high beam. Halogen double helix with H4 base. The power of the spirals is 55 and 60 W, respectively.
High and low beam lamp for Largus
Parking lights. Incandescent bulbs with W5W socket. Power 5 W.
Front side light bulb Lada Largus
Turn indicator. Incandescent bulb with an orange cylinder with a PY21W base. Power 21 W.
Front turn signal lamp Lada Largus
Closer to the side there is a turn signal light, in the center there is a device responsible for high and low beam, and underneath it is a side light bulb.
So, we figured out the types of lamps. A bulb with an H4 socket is responsible for the low and high beam. All that remains is to decide which one to choose, because the range of light bulbs with such a base on the modern market is quite wide.
But by what criterion should you choose? Price? Quality of light? Life time? Colorful temperature? All these parameters are important for any light bulb, but, alas, they often exclude each other - cheap cannot be of high quality, and vice versa. This means that we will choose according to the price/quality ratio and our financial capabilities, focusing on the brand.
According to independent experts of the company, the price/quality ratio of the lamps was distributed as follows:
- Bosch;
- Osram;
- Philips;
- Narva;
- "Lighthouse".
Of course, the above rating does not mean that you should only take Bosch. The products of this manufacturer are quite expensive, although they have the highest characteristics.
Domestic Mayak lamps, for example, are inferior to Bosch in many respects, but are much cheaper than the latter.
Thus, the choice will depend not only on the desire to get the best, but also on material capabilities.
Important! In order not to buy a Chinese counterfeit instead of Bosch or Narva, we will only buy light bulbs in specialized stores. And the fact that the same lighting device on the nearest market costs half as much should not rejoice, but be alarming.
What do we need for work?
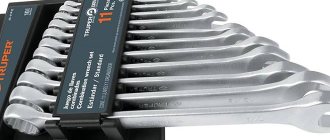
In order to replace the lamps in the headlights of the Lada Largus, we will need:
- Torx key T-20;
- clean cotton gloves;
- replacement H4 bulbs.
Let's start replacing
If everything is ready, then you can start replacing the low beam bulb. In order to gain access to the Lada Largus headlight, you need to remove the plastic fender liners. Take the Torx key and unscrew the screws securing it.
To remove the fender liner, you need to unscrew several screws
There are two headlights in front of us: below is the fog light (PTF), above it is the head light. Naturally, we need the latter. For clarity, in the photos below, all actions will be performed with the headlight removed. We will work from under the wing.
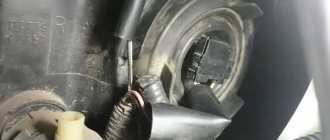
We find the hatch for the high/low beam lamp. It is closed with a protective plastic cover. Press the latch and remove it.
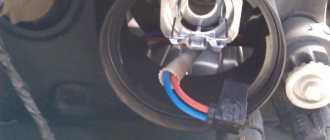
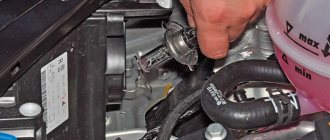
Under it we see a rubber boot, from the center of which protrudes the light bulb power connector. We remove it from the lamp by simply pulling it out.
Now you can remove the boot itself.
In front of us is a light bulb, pressed with a spring clamp. We press our finger on the upper part of the lamp clamp and remove it from under the hook on the reflector.
After this, simply fold the spring down, freeing the lamp.
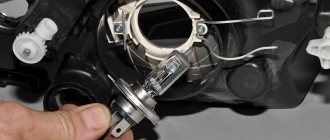
Now nothing holds the lamp
We take it by the body and remove it from the reflector. It's time to put on gloves, because you can't handle the bulb of a halogen lamp with bare hands: the remaining particles of sweat on it will cause local overheating of the glass, and it will simply melt. If you don’t have gloves, then hold the new light bulb only by the base, without touching the bulb.
If we accidentally touched the flask with our bare hands or simply got it dirty with something, we wipe it with a napkin soaked in alcohol.
We install the device in place of the burnt one, monitoring the position of the keys on the base. One of the keys looks up, two symmetrical to it look down. We fix the lamp with a bracket, put on the boot, power supply, and protective cover. Now you can check if everything works, and if so, then install the fender liner in place, securing it with screws.
On a note. Some craftsmen do without removing the fender liners, performing all manipulations from the engine compartment. But, firstly, for this you need to have the hands of a pianist, and secondly, when working with the left headlight, you will still have to remove the battery.
In order to climb through all these pipes, you need to have the hands of a pianist and remarkable patience
What to do if the light still doesn’t work
If after replacing the lamp the low beam still does not work, you will have to look for the fault. First of all, we check the fuses responsible for the corresponding headlight. They are located in the mounting block, which is located on the left side of the driver and is closed with a decorative cover.
Location of the mounting block in Lada Largus (decorative cover removed)
The low beam is controlled by fuses F9 and F10 for the left and right headlights, respectively. You can find them based on the following photo:
Numbering of fuses in the interior mounting block of Lada Largus Useful! The numbering and location of the fuses are marked on the inner surface of the decorative cover. There are also spare inserts and tweezers for replacing them.
If the fuses are intact, then you will have to look for the problem in the wiring and connecting blocks. The contacts in the pads may oxidize, the wire may fray or, due to poor contact, burn away from the pads. If we have electrical knowledge, we look for it ourselves.
If not, contact a qualified specialist or even a regular electrician.
So we learned how to change low beam bulbs in a Lada Largus ourselves. Now there is no point in wasting time and money on a trip to the service station - after all, you can do everything yourself in a matter of minutes.
General information about the car
Experts talk about five undoubted advantages of Largus.
- Spacious seven-seater saloon. Before this, the domestic auto industry did not offer such convenient solutions for large families or large companies, especially in the budget price segment. It is noteworthy that the third row is not a symbolic place for children. Adults can also be accommodated comfortably in Largus: full seats, opening windows and even cup holders will make any trip enjoyable.
- Capacity. Formally, this station wagon belongs to the B-class, since the model was based on the French Renault Logan. But the actual dimensions are much higher than the average. For example, with the third row of seats folded, the trunk volume increases to 560 liters, and with a two-seat configuration - up to 2350 liters! Even when fully seated, 135 liters of luggage space remains free. If you consider that some things can be placed on the top shelf (which was made possible thanks to the very high ceiling), and roof rails are included as standard, then the actual capacity of the car increases significantly.
- Options and modifications. After they stopped producing “heels” in Izhevsk, there were no cheap low-capacity cargo vans in our country. Then AvtoVAZ offered a version of the Largus cargo truck - and it was right. The car immediately became one of the most popular cars among entrepreneurs. This is understandable: an affordable price, two side doors and one rear door - this is more than many foreign concerns offer. But there is also a cross-version of the station wagon with ground clearance increased to 170 mm, good body kit and interior trim.
- Reliability. Car owners note that the car is very reliable, durable even on domestic roads, and is suitable for use in the commercial sector and cargo taxi. Replacing foreign engines with Russian ones also benefited the car: power increased, but fuel consumption decreased noticeably.
- Available content. A car rarely requires large investments, and the cost of spare parts is quite moderate. Especially if you buy through trusted stores - such as Auto-Tech. We have entered into a direct supply agreement with AvtoVAZ, so we guarantee the high quality of all parts and consumables. In addition, the car has many common parts with other cars common in our country: Nissan Almera and Renault Logan (as well as Duster and Kaptur), Lada X-ray.
As for the minuses, there is only one – ascetic design. The interior has not changed since the first station wagon rolled off the assembly line, and among the options there is only the necessary minimum. There are also a lot of shortcomings from an ergonomic point of view.
PTF lamp (fog lamp)
There is no access to the lamp from the engine compartment, so replacement is made from below.
- Remove the fender liner by removing the screws;
- Disconnect the block from the lamp by pressing the lock;
- Remove the lamp by turning it a third of a turn counterclockwise.
Install the lamp in the reverse order.
Attention! In practice, replacing lamps in a Largus headlight is much easier. In other words, it is not at all necessary to remove the battery and fender liners (lockers). If you get the hang of it, you can access all the headlight bulbs from the engine compartment.
Let us remind you that other operating and repair instructions for Lada Largus are in this category. It is convenient to find the answer to your question based on the content.
We will show you how to replace the headlight bulb in the front headlight of a Lada Largus with your own hands. This is not the easiest task as it might seem at first glance; many people, when changing these lamps, remove the battery; we will show a method without dismantling it. This applies to the left headlight, where the battery is located; the right one will be simpler.
Backup video on how to replace a side light bulb in a Lada Largus headlight:
Why is it better to replace a light bulb without removing the battery? When you remove it, the radio settings are reset; when connecting back, you will have to look for the code on the Internet.
During operation of the vehicle, the headlight bulbs may burn out. If you decide to replace them not at the dealer, but yourself, we recommend that you first study the instructions. The fact is that on the Lada Largus the lamps in the headlights change with some features, which we will discuss later.
What kind of bulbs are in the headlights?
- Low and high beam lamp - H4, power 12V, 60/55W;
- Bulb dimensions - W5W, power 5W;
- Front turn signal lamp - PY21W;
- Fog lamps - H11, power 12V, 55W.
Low and high beam lamp - H4, power 12V, 60/55W
Bulb dimensions - W5W, power 5W
Front turn signal lamp - PY21W
Fog lamps - H11, power 12V, 55W
Low and high beam
One lamp is responsible for low and high beam. Its resource is 2000-4000 hours. To gain access to the left headlight unit, you must remove the battery.
- Turn the lid counterclockwise;
- Remove the cover by releasing the latch.
replacing low and high beam lamps Lada Largus
replacing low and high beam lamps Lada Largus
- Remove the block with wires by unclipping the lock;
- Remove the rubber cover by prying it off by the edge.
replacing low and high beam lamps Lada Largus
replacing low and high beam lamps Lada Largus
- Unscrew the lamp clamp to the side;
- Remove the headlight bulb.
replacing low and high beam lamps Lada Largus
replacing low and high beam lamps Lada Largus
Side light bulb
There is no access to the lamp from the engine compartment, so replacement is made from below.
- Remove the fender liner by removing the screws;
- Remove the lamp socket by turning it clockwise (for the right one - counterclockwise);
- Remove the baseless lamp from the socket.
Turn signal lamp
There is no access to the lamp from the engine compartment, so replacement is made from below.
- Remove the fender liner by removing the screws;
- Remove the lamp socket by turning it counterclockwise;
- Remove the lamp by pressing and then turning it counterclockwise.
PTF lamp (fog lamp)
There is no access to the lamp from the engine compartment, so replacement is made from below.
- Remove the fender liner by removing the screws;
- Disconnect the block from the lamp by pressing the lock;
- Remove the lamp by turning it a third of a turn counterclockwise.
Install the lamp in the reverse order.
Attention! In practice, replacing lamps in a Largus headlight is much easier. In other words, it is not at all necessary to remove the battery and fender liners (lockers). If you get the hang of it, you can access all the headlight bulbs from the engine compartment.
LEDs instead of halogens in standard headlights: a complete failure!
The reason is the use of a mixture of halogen and xenon pumped into the bulb bulb under high pressure. The thread burns stronger, the light is brighter. But it is not yet possible to increase the service life of the filament. To extend the life of the lamp, which is shortened by the traffic rules requirement to constantly drive with a neighbor, I am going to install an RXO. The bottom line is that you can use high beams at half-incandescence (30,40,50% brightness) as DRLs. They will not blind anyone and dimensions will not work unless necessary. It will be easier for the generator and battery. As for light temperature, everyone chooses for themselves what they like. The color of headlights depends on the spectrum, from red to blue. Between them is yellow and green. Accordingly, the headlights change from yellow to white. The higher the temperature, the whiter the headlights. For the human eye, yellowish light is more comfortable; the light-shadow boundary is not so contrasting.
I didn’t remove anything there, not even the battery, I squeezed my hand in, turned out (did not pull out) the socket, replaced the lamp and that’s it! The LED is marked + and -, which I think is convenient. The light is yellowish, not bluish. Edited: 1 time (Last: November 6, 2013 at 10:16 am) RE
Visitor Tomsk Messages: 148 RE: To replace, they removed the fender liners or mudguards, or in some other way. Although the question is not for me, but I’ll get into it. I changed the light bulbs on top. I quickly changed the one on the right, and removed the battery on the left.
Although some manage to do so. Although the question is not for me, I’ll get in on it. I changed the light bulbs on top. I quickly changed the one on the right, and removed the battery on the left.
Although some manage to do so. Thank you! What kind of fender liner removal are we talking about? I installed it in the dimensions (in the headlights). I didn’t remove anything there, not even the battery, I squeezed my hand in, turned out (did not pull out) the socket, replaced the lamp and that’s it! Thank you! I didn’t come up with the idea of removing the wheel arch liners. I decided to clarify, because...
Diode board for the lamp of Lada Largus
| How many? |
LED bulbs for fog lights for Lada Largus
Diode board for brake light
| How many? |
LED marker lamps for Lada Largus
| How many? |
Diode lamp in brake light/side light for Lada Largus
What do we need for work?
In order to replace the lamps in the headlights of the Lada Largus, we will need:
- Torx key T-20;
- clean cotton gloves;
- replacement H4 bulbs.
Let's start replacing
If everything is ready, then you can start replacing the low beam bulb. In order to gain access to the Lada Largus headlight, you need to remove the plastic fender liners. Take the Torx key and unscrew the screws securing it.
There are two headlights in front of us: below is the fog light (PTF), above it is the head light. Naturally, we need the latter. For clarity, in the photos below, all actions will be performed with the headlight removed. We will work from under the wing.
We find the hatch for the high/low beam lamp. It is closed with a protective plastic cover. Press the latch and remove it.
Removing the protective cover
Under it we see a rubber boot, from the center of which protrudes the light bulb power connector. We remove it from the lamp by simply pulling it out.
Disconnecting the power supply
Now you can remove the boot itself.
In front of us is a light bulb, pressed with a spring clamp. We press our finger on the upper part of the lamp clamp and remove it from under the hook on the reflector.
Removing the spring clip
After this, simply fold the spring down, freeing the lamp.
We take it by the body and remove it from the reflector. It's time to put on gloves, because you can't handle the bulb of a halogen lamp with bare hands: the remaining particles of sweat on it will cause local overheating of the glass, and it will simply melt. If you don’t have gloves, then hold the new light bulb only by the base, without touching the bulb.
If we accidentally touched the flask with our bare hands or simply got it dirty with something, we wipe it with a napkin soaked in alcohol.
We install the device in place of the burnt one, monitoring the position of the keys on the base. One of the keys looks up, two symmetrical to it look down. We fix the lamp with a bracket, put on the boot, power supply, and protective cover. Now you can check if everything works, and if so, then install the fender liner in place, securing it with screws.
On a note. Some craftsmen do without removing the fender liners, performing all manipulations from the engine compartment. But, firstly, for this you need to have the hands of a pianist, and secondly, when working with the left headlight, you will still have to remove the battery.
In order to climb through all these pipes, you need to have the hands of a pianist and remarkable patience
Step-by-step replacement instructions
After the burnt-out lamp is removed, you must perform the following steps:
- wear medical or clean fabric gloves;
- take the new H4 lamp by the base and insert it into the socket;
- Gently wipe the flask with a clean cloth soaked in alcohol;
- install the socket with the lamp into the socket and secure it with a lock;
- Replace the rubber boot and cover.
It is important to ensure that the protective elements are attached tightly, without distortions or cracks. During shaking and vibration, an incorrectly installed cover and boot will fall off and leave the cartridge without protection from external influences and moisture.
It is necessary to wipe the flask with alcohol, since halogen devices become very hot during operation. Traces of grease or sweat from the hands will form dark spots and will cause premature destruction of the lamp. This is an important point, so you need to prepare alcohol and clean rags in advance.
Cost of lamps
All of the above lamps can be purchased at almost any auto store. For example, a Philips H4 Premium +30 low beam lamp installed from the factory costs about 120-150 rubles. PTF lamp H11 Philips Eco Vision about 500-600 rubles per joke. All other lamps cost no more than 40-50 rubles.
Low beam bulbs on a Lada Largus car are a short-lived element, so sooner or later car owners will definitely have to deal with replacing them. For beginners, this task usually raises many questions. Therefore, below we will look at how to choose the right one and how to change the low beam bulb on Largus.
Choice
Currently on the market you can find such lamps from a variety of manufacturers, among which are the following:
In addition, domestic Mayak light bulbs have recently proven themselves to be quite good. Their advantages include not only low price, but good quality.
Of course, when choosing lamps you need to pay attention not only to the brand, but also to the following characteristics of the lighting element:
However, it should be noted that such light illuminates the road well only in dry weather. In fog or rain, ordinary lamps are preferable.
Note! To install xenon and halogen lamps, you should contact a service center for help, since this work requires the installation of additional equipment and changes to the software. Accordingly, the installation of such lighting is quite expensive.
Thus, each driver can choose the most suitable light bulb, taking into account his own financial capabilities and the conditions in which the car will be operated.
Replacing the low beam lamp on a Lada Largus is carried out in the following order:
- Next, you need to install a new light bulb in place. It is better to do this work with gloves so as not to touch the glass flask with your own hands. The fact is that traces of fat can lead to rapid burnout of the lamp.
- Then you need to fix the base with a spring clip, put the block on the contacts and then install the plug in place.
- At the end of the work, you should connect the battery and check the operation of the headlights.
This completes the replacement of the low beam lamp in Largus. As we can see, this operation is carried out extremely simply.
If, after replacing the lamp, the low beam on the Lada Largus still does not light up, the cause of the malfunction may be a blown fuse. Replacing them is even easier than the paws, since they are located in the cabin, on the left side of the steering column.
- F9 - left headlight.
- F10 - right headlight.
Often the cause of the malfunction is poor contacts of the fuse terminals. In this case, you just need to clean them.
Often the light goes out due to poor contact of the machine ground wire. In this case, the problem is also solved by thoroughly cleaning the contact. If it was not possible to restore the light, you need to contact a service center for help.
What to choose for replacement
The standard factory installation is a halogen H4 light bulb on Largus. However, the modern car market offers alternative options for daytime car optics. There are three analogues:
- LED,
- xenon,
- halogen.
Xenon ones have a bluish glow, which is inconvenient in cloudy or rainy-snowy weather. Halogen units shine brightly and warmly. They are a common installation option, although they are inferior in power to other analogues. The advantage of LED elements is that they can store energy for a long time at high power.
Stop signal
The principle of replacement is similar to the installation of the above-mentioned lamps, but it has its own nuances. Here, first, the trunk lid is opened and its decorative panel is removed. So, in order to replace the brake light, you must first of all clear the approach to the wing nuts.
After removing them, the entire headlight is turned out, which would be very problematic to do on your own. After all, you need to bring out its upper and lower parts at the same time so that they do not become a surprise. After unscrewing the screws, access to the lamp is open. The failed part is replaced, and all the previously listed steps are performed in the reverse order.
Sources
- https://FokSevmash.ru/servis-i-uhod/zamena-lampy-blizhnego-sveta-lada-largus.html
- https://CarsUp.ru/pro-elektriku/kak-pomenyat-lampochku-v-lade-largus.html
- https://www.zr.ru/content/articles/824373-zamena-lamp-v-blok-fare-lada-largus/
- https://voltage-stab.ru/zamena-avtolamp/kak-pomenyat-lampochku-blizhnego-sveta-na-lada-largus.html
- https://GlKey.ru/obzory/lampochki-lada-largus.html
- https://car-engine.ru/2021/08/29/%D0%BA%D0%B0%D0%BA-%D0%BF%D0%BE%D0%BC%D0%B5%D0%BD% D1%8F%D1%82%D1%8C-%D0%BB%D0%B0%D0%BC%D0%BF%D0%BE%D1%87%D0%BA%D1%83-%D0%B1% D0%BB%D0%B8%D0%B6%D0%BD%D0%B5%D0%B3%D0%BE-%D1%81%D0%B2%D0%B5%D1%82%D0%B0-4 /
- https://zsm-miass.ru/obsluzhivanie-i-uhod/largus-zamena-lampy-blizhnego-sveta.html
- https://LampaExpert.ru/avtomobilnye-lampy/neispravnosti/largus-zamena-lampy-bliznego-sveta
[collapse]