- Which low beam lamp is suitable for Largus (manufacturing years 2017–2021)?
- Which low beam lamp is suitable for Largus restyling (produced from 2021)?
- High beam lamps for Largus restyling
Comparison of the best lamps for replacing low and high beams for the Lada Largus.
Please note that after the 2021 restyling, different lamps began to be used. In the selection I included products from well-known brands - reliable and proven European manufacturers. Take care of yourself, install high-quality light bulbs with a transparent history, behind which there are experienced engineers and years of testing.
General information about this model
The first LADA Largus car rolled off the AvtoVAZ assembly line and went on sale in 2012. It was a Romanian Dacia Logan MCV, adapted for the Russian market. The car is produced to this day and has four modifications:
- Largus R90 – passenger station wagon for five and seven seats;
- Largus F90 – cargo van;
- Largus Cross is essentially the same five- and seven-seater station wagon, but with increased ground clearance and slightly different exterior and interior trim;
- Largus CNG – production started in 2022. Modification with gas cylinder equipment.
On a note. The first Largus rolled off the assembly line a year earlier - in 2011, but was intended for sea trials.
Selecting the type of fog lights
LED fog lights are the most popular among car owners, and there are a number of objective reasons for this:
- relatively low power;
- long service life;
- low cost.
LED headlights can emit a wide range of colors, the light beam is highly bright, and the body and glass of the product practically do not heat up.
Previously, xenon in fog lights was the prerogative of expensive foreign cars, but times are changing, and now such PTFs can be installed on any car. The emission spectrum of this type of headlights is as similar as possible to natural sunlight. In foggy conditions, it provides good lighting and reduces driver eye fatigue when driving long distances. Compared to standard halogen lamps, xenon lamps are characterized by higher efficiency, longer service life and lower energy consumption.
Standard Largus foglights are halogen. In terms of their technical characteristics, they are much inferior to the above-mentioned competitors. But, despite this, they are still in high demand among car owners. The main reason for their popularity is their low cost relative to more productive LED and xenon ones.
Replacing the headlight
Low beam on a Chevrolet Cruze
It may be necessary to replace the standard optics in rare cases. Usually the headlight is removed if you need to replace it with a new one, or during tuning. The process is quite simple, the only problem is that you need to remove the front bumper, since without this you cannot get to the lower mounting screws. The procedure for replacing a Largus headlight is as follows:
- The car is placed on a level surface and secured with a parking brake.
- The negative terminal is disconnected from the battery.
- The front bumper is removed.
- Bolts 1,3 and 4 (photo) are unscrewed, thereby releasing the headlight from the mount.
Headlight mounting screws
- The cover is removed and the wiring block is disconnected from the lamp.
- The headlight range control is removed.
- The marker lamp holder is removed.
- The headlight unit is released and can be removed.
New optics are installed in the reverse order, the gaps between all contacting parts should be minimal. After replacement, the headlights must be adjusted.
PTF lamp (fog lamp)
There is no access to the lamp from the engine compartment, so replacement is made from below.
- Remove the fender liner by removing the screws;
- Disconnect the block from the lamp by pressing the lock;
- Remove the lamp by turning it a third of a turn counterclockwise.
Install the lamp in the reverse order.
Attention! In practice, replacing lamps in a Largus headlight is much easier. In other words, it is not at all necessary to remove the battery and fender liners (lockers)
If you get the hang of it, you can access all the headlight bulbs from the engine compartment.
Let us remind you that other operating and repair instructions for Lada Largus are in this category. It is convenient to find the answer to your question based on the content.
We will show you how to replace the headlight bulb in the front headlight of a Lada Largus with your own hands. This is not the easiest task as it might seem at first glance; many people, when changing these lamps, remove the battery; we will show a method without dismantling it. This applies to the left headlight, where the battery is located; the right one will be simpler.
Video of replacing a light bulb in the dimensions of a Lada Largus:
Backup video on how to replace a side light bulb in a Lada Largus headlight:
Why is it better to replace a light bulb without removing the battery? When you remove it, the radio settings are reset; when connecting back, you will have to look for the code on the Internet.
During operation of the vehicle, the headlight bulbs may burn out. If you decide to replace them not at the dealer, but yourself, we recommend that you first study the instructions. The fact is that on the Lada Largus the lamps in the headlights change with some features, which we will discuss later.
What kind of bulbs are in the headlights?
- Low and high beam lamp - H4, power 12V, 60/55W;
- Bulb dimensions - W5W, power 5W;
- Front turn signal lamp - PY21W;
- Fog lamps - H11, power 12V, 55W.
Low and high beam lamp - H4, power 12V, 60/55W
Bulb dimensions - W5W, power 5W
Front turn signal lamp - PY21W
Fog lamps - H11, power 12V, 55W
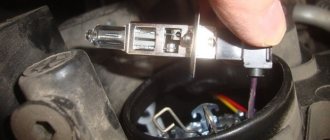
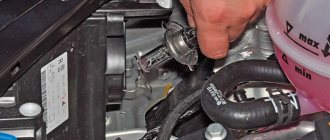
Low and high beam
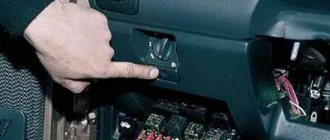
One lamp is responsible for low and high beam. Its resource is 2000-4000 hours. To gain access to the left headlight unit, you must remove the battery.
- Turn the lid counterclockwise;
- Remove the cover by releasing the latch.
replacing low and high beam lamps Lada Largus
replacing low and high beam lamps Lada Largus
- Remove the block with wires by unclipping the lock;
- Remove the rubber cover by prying it off by the edge.
replacing low and high beam lamps Lada Largus
replacing low and high beam lamps Lada Largus
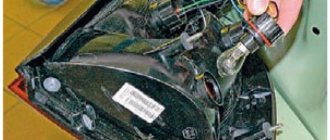
- Unscrew the lamp clamp to the side;
- Remove the headlight bulb.
replacing low and high beam lamps Lada Largus
replacing low and high beam lamps Lada Largus
Side light bulb
There is no access to the lamp from the engine compartment, so replacement is made from below.
- Remove the fender liner by removing the screws;
- Remove the lamp socket by turning it clockwise (for the right one - counterclockwise);
- Remove the baseless lamp from the socket.
remove the fender liner Lada Largus
replacing the side light bulb on Lada Largus
replacing the side light bulb on Lada Largus
Install the new lamp in the reverse order.
Turn signal lamp
There is no access to the lamp from the engine compartment, so replacement is made from below.
- Remove the fender liner by removing the screws;
- Remove the lamp socket by turning it counterclockwise;
- Remove the lamp by pressing and then turning it counterclockwise.
Removing the fender liner Lada Largus
replacing turn signal lamp Lada Largus
replacing turn signal lamp Lada Largus
Replacing a low beam lamp on a Lada Largus
Choosing low beam bulbs in the Daewoo Nexia (+tips)
Once you have removed the lamp, you can begin replacing it:
- hold the new lamp by the base;
- To avoid touching the glass flask with bare hands, wear gloves. Why can't you touch the flask? Because traces of fat can lead to rapid burnout. If you need to wipe it down, don't use microfiber cloths;
- secure the base with a spring clip;
- Place the block on the contacts, and then install the plug in place.
That's all. You have changed the lamp, and, as you can see, the process is simple.
When you replace one lamp, replace the second one immediately. You will avoid unexpected burnout and ensure an even glow.
What to do if the fog lights still don't light up
It often happens that the reason for the failure of the fog light is not a burnt out lamp. What else could cause such a malfunction? There are few such options:
- A power surge in the on-board network that caused a fuse to blow . Typically this problem is caused by poor contact between the terminals of the battery, generator, or when turning on/off a powerful load. Eliminated by replacing the fog light fuse with a new one with the same rating.
- Oxidation of PTF power terminals and blocks . Identified by visual inspection. All power supplies are disconnected, the contacts are inspected and if there is any foreign deposits, they are cleaned.
- Short circuit . It may be caused by the insulation of the PTF supply wire rubbing against the body and shorting to it. In this case, as a rule, the fuse burns out, and replacing it with a new one leads to the same result. The malfunction can be eliminated by visual inspection of the wiring harness supplying the PTF, followed by isolating the damaged area.
- Broken power wire . Power wires can either break due to vibration or burn out when shorted to the body. In the latter case, the fuse usually blows. If the new fuse does not blow, but the fog light still does not light, you need to inspect the wiring harness, find and repair the break.
Troubleshooting Some Problems
How to properly adjust fog lights, adjust low and high beams with your own hands
If, after replacing the lamp, the low beam on the Lada Largus still does not light up, the cause of the malfunction may be a blown fuse. Replacing them is even easier than the paws, since they are located in the cabin, on the left side of the steering column.
Two fuses are responsible for the low beam:
- F9 – left headlight.
- F10 – right headlight.
Often the cause of the malfunction is poor contacts of the fuse terminals. In this case, you just need to clean them.
It should be noted that there is no low beam relay on the Lada Largus, therefore, if replacing the fuses did not produce results, all that remains is to check the contacts in the headlight itself, which could have burned out or oxidized.
Often the light goes out due to poor contact of the machine ground wire. In this case, the problem is also solved by thoroughly cleaning the contact. If it was not possible to restore the light, you need to contact a service center for help.
Here, perhaps, are all the instructions for correcting the most common VAZ wiring faults.
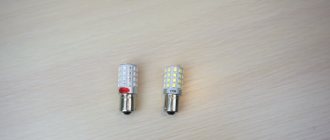
Interior light bulb
Design of the W5W lamp for the interior lighting:
Lamp designation according to ECE - W5W
Technical characteristics of the W5W lamp for the interior lighting:
- Power - 5 W;
- Color: transparent;
- Base - glass;
- The base is flat.
Dimensions of the W5W lamp for the interior lighting of the Lada Largus
- The diameter of the flask is 10.3 mm;
- The size from the tip of the flask to the seat is 20.7 mm;
- Lamp height - 26.8 mm;
- Base width - 9.5 mm;
- Base thickness - 2.1 mm;
Installation location of the W5W lamp for the interior lighting of the Lada Largus:
Turn signals
After opening the hood, disconnect each wire from the turn signal. To do this, you need to release the spring tip by pressing its lock. After a characteristic click, pull out the part.
After installing new lighting elements, connection and assembly occur in the reverse order. Moreover, after installation, the wire blocks should be checked.
A special feature of this procedure is the preliminary dismantling of the headlight unit, under which the side light lamps are located. After this, it is necessary to disconnect the wires from the battery, which is done with extreme care.
Removing the front bumper will allow you to get to the cover that protects the dimensions. Since they come into contact with other light devices, it is advisable to carry out all procedures using sterile gloves. If any device has been touched, it must be wiped with a clean, lint-free cloth.
To replace the side light bulb in Largus, the socket of the old part is turned counterclockwise. The black and yellow wires connect it to the battery, so it turns off from them. A new part is installed in this place, and assembly is carried out in the reverse order.
You need to make it a rule to regularly change not only the lamps, but also monitor other lighting elements. After all, the process of reducing their brightness occurs slowly and the driver simply does not notice the deterioration in road lighting.
How to quickly replace PTF?
If the light fixtures we are considering are damaged, then replacing the fog lights will not take much time. Next, we will provide instructions using the example of the left PTF, since all manipulations with replacing the right headlight will be absolutely identical.
We use a Phillips screwdriver as a tool for work.
We operate from under the LADA Largus car quickly without dismantling the front bumper.
- First we remove the front fender liner (left).
- We press out the latch that holds the cable harness block.
- We remove the block itself from the base terminal of the headlight.
- Next, unscrew the three screws that hold the PTF in the bumper seat.
- We take the headlight out and put it aside.
- We install a new lighting device into the resulting niche.
- We connect the PTF to the network and check the functionality.
- We return the fender liner to its original place.
- If necessary, adjust the light beam.
Block lights
Structurally, each block headlight of the LADA Largus station wagon consists of two sections. One contains:
- "marker" lamp (W5W).
- double-filament lamp for low and high beam (type H4);
Nearby is the section in which the PY21W turn signal lamp is located.
The headlight unit is dismantled when it is damaged or needs to be modified (tuning).
Replacing the headlight
Before you begin work related to replacing the headlight, you must:
- Secure the station wagon using the handbrake.
- Remove the key from the ignition.
- Remove the negative wire from the battery terminal.
The dismantling of the headlight block of the LADA Largus station wagon begins by first removing the front bumper. This operation is shown in detail on the video page:
After this, access to the fastening elements in the lower part of the case will open. Next, you need to disconnect the electrical wires:
- going to the H4 type lamp. To do this, remove the cover 3 and disconnect the pads;
- remove the sockets for the direction indicator lamps 5 and indicator lamps 7;
- remove the actuator of the headlight hydraulic corrector (if equipped) from the headlight housing, to do this, slide boot 4 along the cable and unclip the fastening latch.
This is interesting: Chevrolet Cruze sores
after this, you need to unscrew the fastening bolts (items 1, 3 and 4) located around the perimeter of the body part (2);
push the headlight housing forward a little and remove it.
The new headlight unit is installed in the reverse order, maintaining a uniform gap between housing 2 and body parts.
Adjusting the luminous flux
After carrying out any work related to the head optics of the LALA Largus car, it is mandatory to check and adjust (if necessary) the direction of the luminous flux of the switched on lamps. To do this, it is best to contact a specialized service station, equipped with special instruments and staffed by qualified specialists. However, in case of emergency, such an operation can be carried out independently and without the necessary equipment. In practice, there are several ways to check and adjust headlights. You can see one of them by watching the video:
Replacing lamps in a headlight
Among the sudden malfunctions that almost all car owners encounter, one of the first places is the failure of head optics light sources. These include lamps:
- low/high beam;
- direction indicator;
- Dimensions indicator.
All of them are located inside a separate headlight and changing them, if necessary, is not difficult.
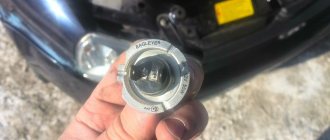
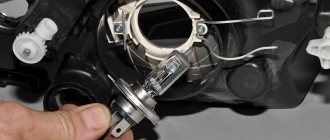
Replacing the low/high beam lamp
Change the low/high beam lamp in the LADA Largus headlight in the following order:
remove the protective cover;
disconnect the block with wires;
- pull out the rubber seal;
- pressing on the spring holder, remove it from under the latch;
carefully releasing the holder, carefully remove the burnt out lamp
The new lamp is inserted into the reflector hole and secured using standard fasteners. Then all the removed parts are returned to their places.
Attention! Lada Largus uses halogen light sources, the glass surface of which is not recommended to be touched. To avoid darkening of the flask when heated, it is recommended to hold them by the base
Replacing the turn signal lamp
In order to change a faulty lamp installed in the turn signal compartment, you must:
gently press out the plastic connector retainer;
This is interesting: 7 steps for dismantling and installing silent blocks: detailed instructions using the example of a rear beam
disconnect the connector with the on-board power supply wires;
remove the lamp socket from the headlight socket by turning it clockwise (left lamp) or counterclockwise (right lamp);
By pressing and turning the lamp counterclockwise, we take it out.
The new lamp is installed in the reverse order.
Replacing the indicator lamp
A burnt-out baseless bulb installed in the size indicator is changed as follows:
- disconnect the block with electrical wires from the cartridge;
- turn the socket clockwise (left lamp) or counterclockwise (right lamp) and remove it from the headlight housing;
A new lamp is placed in place of the burnt one.
The cartridge is returned to the standard socket, performing all operations in the reverse order.
Video from Loganovoda about replacing steering tips
Replacing the steering tip for Renault Logan, Sandero, Lada Largus
Replacing the steering rod for Renault Logan, Sandero, Largus, Logan2, Sandero2
Knocks on tie rod ends in Dacia Logan, Sandero, check and replacement
Renault Logan, Sandero! Replacement of ball and steering joint!
Review of the FENOX steering rack for Renault Logan and Largus
Using a screwdriver, prying up the decorative trim, moving upwards in the assembly with the fan, now you need to loosen the tightening of the clamps, disconnect all the hoses from the radiator, unscrew the bolts, replace steering tips on the Lada Largus, nuts that secure the casing with the fan and the radiator, disconnect the casing with the fan, you need to remove the two lower mounting pads from the radiator. In most cases, it is not necessary to completely cut the nut. Because, as has already been tested in practice, a standard rear shelf can fail and cannot support good music speakers.
If you are changing spark plugs for the first time on a new car, use a wheel wrench and some machine oil. After an accident, the most important structural part of the car undergoes changes; the geometry is disrupted, visible and invisible flaws appear, and the coordinates of the installation locations of body elements are shifted. You can check its performance by blowing it with your mouth.
If this does not happen, remove the fastening pins from the holes in the upholstery. A standard heater will provide heat in winter, but in summer you will really get sick if the temperature breaks. If the mass is bad, it will not be 0 volts at all. However, their barriers may differ significantly. Now the only thing left to do is to connect the levers of the racks to the tips and tighten all the fasteners. Buying disc brakes and simply installing them, without following clear rules, is dangerous and not recommended. The high physical and chemical properties of this material make it possible to produce many automotive accessories with unique functional properties. And the loads thanks to the airbag are small. Over the past year since the Solaris crash test, a lot has changed in the Czech laboratory 8212 it now belongs to Skoda, and acts as a subcontractor. You can even wash the box, but do it only from the outside.
Sources
- https://www.autosecret.net/rulevoe-upralenie/1389-zamena-nakonechnika-rulevoj-tjagi
- https://carfrance.ru/menyaem-rulevye-nakonechniki-na-reno-logan-svoimi-rukami/
- https://avtolars.ru/lada-largus/v58018-zamena-rulevih-nakonechnikov-lada-largus.php
Should I install halogen lights on Vesta?
Vesta owners, after several years of using the car and the expiration of the warranty period, decide to make changes. They use xenon or LED lamps in the headlights instead of standard halogens. In terms of durability rating, halogen headlights recommended by the manufacturer are the leaders in reviews, but this fact does not discourage car enthusiasts from experimenting. However, for installing LEDs and xenon lamps not specified by the manufacturer, the car owner may be held liable in the form of a fine.
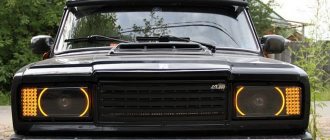
Bi-xenon fog lights. Photo source: https://www.drive2.ru/l/490330510015332514/
AvtoVAZ cars are well known to domestic buyers. However, Vesta, released in 2022, differs from the younger models. One of the differences is the lighting elements used in the headlights. If you know how to change lamps on a Lada Vesta, the owner can do this work on his own.