Replacement of camshafts on the 16-valve VAZ-2112 engine occurs when they wear out and the support journals wear out. Most often this happens when the time for a major overhaul of the power unit or cylinder head passes. This is a rather complicated procedure, but you can really do it yourself.
The video below shows the installation of camshafts and split gears on a 16-valve engine of the VAZ family
The video material will tell you how to replace camshafts on a VAZ-2112 16 valves, and give some recommendations and advice.
If the camshaft fails
The camshaft on the VAZ 2106 model is rarely dismantled. Typically during repair or disassembly. Sometimes to replace it.
Signs
First, let's talk a little about the signs that indicate that the camshaft is faulty, its journals or beds are worn out. It is difficult to determine whether the shaft or something else is knocking in the VAZ 2106 engine, but it is possible. The knock of the camshaft is dull and clearly audible. As engine speed increases, the knocking becomes more frequent.
Some drivers determine knocking in this unit using a stethoscope or a stick through the valve cover. But often it is difficult for an inexperienced driver to do this. Therefore, the best way to diagnose the camshaft is to remove it, wash it and inspect it.
If the camshaft is faulty, the following symptoms may occur:
- a dull knock, reminiscent of hammer blows;
- it is impossible to adjust the valve clearances; while the crankshaft is turning, the camshaft is constantly in different positions.
This video shows how you can eliminate longitudinal runout of a camshaft.
The most reliable method for diagnosing problems with the VAZ 2106 camshaft is to dismantle it from the car and wash it. You can wash it in gasoline or other cleaning liquid. Next, you need to hold the shaft and hit the bed, when you hear the slightest knock, we determine whether the mechanism is worn out. Be sure to make sure that the shaft does not move in bed, because when it hits the limiter it will make a dull knock.
Removed shaft
The camshaft has a great influence on the pressure in the lubrication system. If the gaps between the bed and the camshaft are large, then the pressure will be low, and as a result, unsatisfactory lubrication of other parts.
Causes
The main malfunctions that result in the need to replace the camshaft are its wear, the appearance of various scuffs and grooves on the bearing journals. Likewise, replacing the camshaft is necessary if it is found to be deformed or cracked. When such malfunctions occur, the power unit loses power and also begins to function intermittently. Problems with the camshaft are identified by a knocking sound in the cylinder head.
The camshaft on the “six” is rarely removed. In addition to the above reasons for replacing and reconfiguring the power unit. After this, you can notice a significant increase in power, like in sports cars.
How to remove the camshaft of a VAZ 2107
Replacing the VAZ 2107 camshaft begins with its dismantling. To do this you need to do the following:
- place the car on a level surface;
- wait until the engine cools down;
- clean the engine head cover from dirt;
- remove the air filter, disconnect the cable, tip and rod of the throttle valve drive, remove
- fuel hose from the bracket (on a car with a carburetor engine);
- disconnect the air supply hose, vacuum hose and remove the fuel filter from the bracket (on a car with an injection engine);
- Using a 10mm wrench, unscrew the nuts securing the cylinder head cover;
- remove the washers from the cylinder head cover;
- release the wiring harness, crankcase exhaust and power steering hoses, and the headlight hydraulic adjustment tube from the bracket mounting;
- remove the cylinder head cover from the studs;
- remove the gasket;
- set the camshaft position so that it corresponds to the end of the compression stroke in the fourth cylinder;
- Use a chisel to bend the petal of the camshaft sprocket lock washer;
- engage first gear to prevent crankshaft rotation;
- Using a 17mm wrench, unscrew the camshaft sprocket mounting bolt;
- remove the bolt together with the lock washer;
- Using a 10mm wrench, unscrew the two nuts securing the chain tensioner;
- remove the tensioner;
- tie the chain to the camshaft sprocket with wire so that it does not jump off;
- remove the sprocket and chain, move it forward;
- Using a 13mm wrench, unscrew the nuts securing the camshaft bearing housing (this must be done evenly so that the housing does not “lead”);
- remove the bed along with the camshaft from the studs;
- use a 10 mm wrench to unscrew the two nuts securing the thrust flange;
- remove the flange from the groove in the front journal of the camshaft;
- pull the camshaft out of the bed (bearing housing).
If signs of wear are visible on the camshaft journals or cams, the camshaft needs to be replaced. It also needs to be changed if cracks or deformation appear. Sometimes the cause of a knocking noise may be wear on the camshaft housing bearings. In this case, it is enough to replace only the bed.
Replacement Guide
The work of removing the crankshaft on a VAZ 2106 is somewhat labor-intensive, but a driver with little experience can do it. We do not need special equipment or special tools to work.
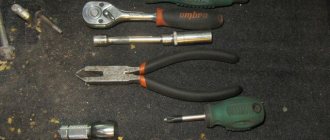
Set of tools
- set of heads;
- ratchet;
- knob;
- extension;
- a set of keys;
- rags.
Wrenches for tightening and loosening bolts
Sequencing
- To get to the crankshaft, you first need to remove the air filter and housing.
- Next, disconnect the choke cable.
- Gas damper drive.
- Clean and wash the valve covers thoroughly. Usually dust and dirt accumulate on it, otherwise they may get inside the motor.
- Now you need to unscrew all the nuts and remove the valve cover. Experts recommend replacing the gasket when removing the valve cover. When purchasing, buy a rubber-cork one, as it holds oil much better than rubber.
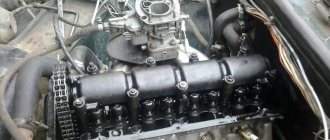
- By removing the cover, we gain access to the camshaft; in most cases it is very dirty.
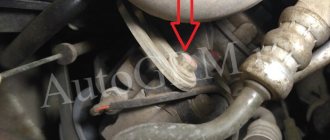
- Now you need to loosen the camshaft sprocket fasteners. To prevent the motor from turning over, insert a screwdriver between the sprocket and the chain.
- Important! Be sure to align the mark on the crankshaft and the camshaft sprocket. You must strive to ensure that the mark on the crankshaft pulley is against the long mark, and the mark on the camshaft sprocket is against the protrusion on the camshaft bed.
- After alignment, we proceed to removing the chain tensioner.
- Unscrew the nuts with a wrench.
- Remove the tensioner.
- We remove the star, which is located on the guide pin.
- After unscrewing the bolt securing the sprocket, remove the sprocket. A hammer may be needed here.
- We tie it to a chain.
- Now you need to unscrew the nuts securing the crankshaft and remove it.
- By the way, it will be noted that if a stud with a nut is turned out, then it is screwed back in with a special stud turner.
- Next, we inspect the camshaft and replace it if necessary.
- The shaft is clamped according to the diagram. The tightening order must be observed. The tightening torque is also important. On a VAZ 2106 car, the tightening torque is 18.3 N/m.
- When assembling, be sure to check that the marks are aligned correctly. If they are out of order, they need to be set correctly.
- Finally, adjust the tension of the chain and valves.
Replacing the camshaft — Lada 2106, 1.6 l., 1999 on DRIVE2
The most important malfunctions and replacement of the camshaft on a VAZ 2106
So I’m tired of the eternal knocking of the valves, and their numerous adjustments no longer help, so after doing a simple analysis, it turned out that the camshaft had long been worn out, this is evidenced by its wear and, as a result, the terrible condition of the rockers.
First, you need to remove the valve cover and align the marks on the camshaft sprocket with the mark on the crankshaft, then unscrew the sprocket and tie the chain with a rope so that it does not fall anywhere. All that remains is to unscrew the case with the camshaft and then see that the rocker also needs to be replaced.
On the right extreme rockers their wear is clearly visible
We purchased a set of new rockers, prepared them for installation, I decided to lightly sand them with light sandpaper. A new chain tensioner and damper were immediately purchased.
Preparing rockers
We install new rockers to replace the old ones.
Rockers installation
- After installing them, lubricate them with a small amount of oil.
Pour oil into the plug and carefully pour the new rockers
- I would like to note that it is better to change the camshaft together with the rockers to avoid uneven wear.
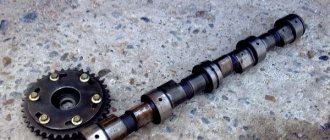
- The next stage is the installation of a new camshaft, which we got from friends, a completely new one that had been lying in the garage for several years, luckily it was lubricated with lithol for storage, so after cleaning it, you can install it.
A healthy person's camshaft and a smoker's camshaft
The camshaft is already assembled with the canister, so there are no problems during installation. Install and tighten in accordance with the correct sequence.
Bolt tightening sequence
We take two 17mm wrenches and adjust the valve clearances, and don’t forget to install a new valve cover gasket, it costs almost free and there is no point in saving on it. By the way, the chain tensioner and the new damper have not changed; we decided not to disturb those components that are already working properly))
And as they say in all the guides: we assemble in reverse order). We put the camshaft sprocket in place, tighten the chain, install the valve cover, pan, cooling fan, etc.
As usually happens, the repairs dragged on until late at night))
Issue price: 870 ₽
Video “Replacing the shaft”
This video shows how to properly remove and install the camshaft, replace rockers, springs and other shaft components on a VAZ 2106 car. And also at what torque the tightening occurs.
In the VAZ 2106 car engine, the camshaft plays a key role, which drives the valves. Thanks to it, timely intake of the air-fuel mixture into the combustion chambers and release of gases from them occurs, and according to the operating cycle. The shaft is located in the upper part of the engine, under the cylinder head cover (cylinder head). There is a sprocket on the camshaft with which it is connected to the crankshaft. One revolution of the crankshaft corresponds to two revolutions of the camshaft.
The main malfunctions of the camshaft are risks and scratches on the journals, deflection relative to the axis of rotation, increased wear, and multiple scuffs. If the camshaft journals are worn excessively, the oil pressure in the system decreases. But this option is also possible if the seats for the camshaft bearings are destroyed. And if you can install new journals for a small amount, then in the case of seats you will have to replace the cylinder head. Tuning is often performed, which requires the installation of a new, lighter camshaft on the VAZ 2106.
Purpose and principle of operation
Replacing the oil pump drive shaft of a VAZ 2106
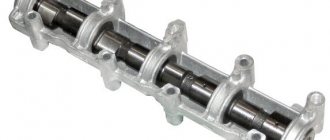
The camshaft is a metal rod on the axis of which eight cams are placed. These are parts that have an irregular shape. They rotate on the axis of the camshaft and are located opposite the inlet valves of the cylinders. Their rotation ensures stable combustion of the fuel mixture inside the cylinders. All these mechanisms are brought into precise synchronization.
Thanks to the proper operation of the shaft, a mixture of air and fuel is released into the cylinders in a timely manner, compression and release of exhaust gases occurs. On the Classic, the camshaft is driven by the fact that its gear rotates as a result of interaction with the crankshaft sprocket through a chain.
On the VAZ 2107, the camshaft is located at the top above the cylinder block. Thanks to this, it is available for self-replacement. This also makes it possible to easily adjust valve clearances.
To better understand the principle of operation of the camshaft, watch the video tutorial.
Removing and installing the camshaft
Removal is most often necessary either during a major overhaul or for replacement in cases of failure. To carry out the work, the following tools are required:
- heads for 10, 13 and 17;
- handle with ratchet;
- knob;
- extension cord with cardan;
- socket wrench 13;
- device for mounting and dismantling the VAZ camshaft.
First, the valve cover is removed, which is bolted to the cylinder head and has a rubber gasket. Try not to damage it, otherwise oil may leak in the future. After this, the timing chain tensioner is unscrewed. It is located on the right side of the engine when viewed from the interior. The camshaft gear is turned by the head to 17.
For convenience, place the car in gear and place wheel chocks under the rear wheel. Move the gear to the side; if necessary, you can pry it off with a convenient tool. Now all the nuts that secure the camshaft housing must be unscrewed. To make the job easier, use a wrench first.
Replacing the cylinder head gasket
In the modern world, you won’t surprise anyone with a good expensive car. Having tried at least once to experience the taste of real quality, the driver no longer wants to go back. However, there is something that unites machines of absolutely all types and levels, namely technical equipment. Everyone knows that this is a complex mechanism, but it can fail from such a seemingly trifle as, for example, a cylinder block gasket.
What are the main reasons for failure?
Replacing the cylinder head gasket is required in many cases:
- Head overheating
- Exposure to exhaust fumes
- External factors
- Chemical and mechanical effects
If the fluid level decreases and no traces of it are found on the engine itself, most likely the gasket is allowing fluid to pass through the oil valves directly into the oil pan. In order to accurately determine this, it is enough to use the oil dipstick. The color of the oil will most likely be coffee-colored and cloudy.
In what cases is it necessary to replace the gasket?
This activity must be carried out if coolant is detected in the oil, or vice versa. However, these are the most obvious signs that almost everyone can recognize. There are more hidden reasons that you need to be able to find.
To accurately determine whether the cylinder head needs to be installed or not, you need to remove the coolant reservoir cap. After this, you need to observe the air for several minutes at medium engine speeds. If there is no leak, then everything is fine.
This is one of the simplest and least expensive methods.
Disassembling and replacing the cylinder head gasket may be necessary at any time, since experts cannot determine its exact service life. This depends solely on driving style, external conditions, as well as the car model and the gasket itself.
Helpful advice
In case of oil leakage, as well as antifreeze leakage at the junction of the head and the block, the necessary measures must be taken. Often, the way out of this situation is to simply tighten the cylinder head bolts. If this does not bring the desired effect, then it is necessary to replace the gasket.
Removing the cylinder head and replacing it is also necessary if white smoke comes out of the exhaust pipe all the time. This indicates that antifreeze is getting into the cylinder itself.
It should also be taken into account that the cylinder head is tightened exclusively using a torque wrench, strictly following the manufacturer’s specified parameters.
What types of cylinder block gaskets are there?
Experts distinguish three main types:
- Metal
- Asbestos
- Non-asbestos
Parts of the first type are considered to be of the highest quality, since in this case the most uniform distribution occurs at the junction of the entire plane.
How much does such a replacement cost?
It should be noted that this is a very important procedure, on which the further performance of the car depends. Therefore, the work must be carried out by a person who knows what he is doing, and only at the highest level.
The cost of replacing the cylinder head gasket will depend on the class of the car, as well as what type of gasket will be installed. When choosing a gasket, you need to be especially careful, because among the variety of assortments on the market, it is very easy to end up with a low-quality fake, so before doing so, it would be a good idea to consult with a specialist.
Below you can watch a video of replacing the cylinder head gasket with your own hands.
How to adjust valves on a VAZ 2106?
On a VAZ 2106 car, it is recommended to adjust the valves every 10-15 thousand km. mileage The optimal value has been selected, because all this time the engine will operate stably. When the gap changes, minor “defects” will begin to appear: valve knocking with a sharp increase in speed, a decrease in throttle response and engine power.
The problems go so far as to cause the engine to stall at high speeds at operating temperature. It is also necessary to adjust the valves after carrying out work related to repairing or replacing the camshaft. In this case, adjustment is inevitable, since the 2 camshafts may differ from each other. To work you will need the following tools:
- a set of keys;
- open-end wrench 17 with good leverage;
- special key 38 for turning the crankshaft;
- flat probe 0.15 mm thick.
If you look closely at the case in which the dipstick is stored, you will see several numbers indicating the sequence of valve adjustment. Pay attention to the temperature: 20 °C is optimal for setting. But if before this the VAZ camshaft was replaced, and the weather is warm, then you don’t have to look at the temperature.
So, first remove the cylinder head cover. Please note that the valves should be counted from the front edge of the internal combustion engine. After this, put the piston of the 4th cylinder in the upper position using a 38 key. Valves “6” and “8” are closed, therefore, the gap between the lever and the cam will be the largest. Place the dipstick and check the gap. The optimal one is one in which the probe can be moved with some effort. If the gap is smaller or larger, the dipstick does not move or passes freely, then proceed with adjustment.
To do this, you need to work with two 17mm wrenches: with one you loosen the lock nut, and with the second you turn the bolt to adjust. Moreover, you should not make many turns with the adjusting bolt; you need to slowly move the feeler gauge while unscrewing or tightening it, so as not to miss the permissible gap value. Afterwards, the locknut must be tightened and once again make sure that the gap is correct. If necessary, the valve is re-adjusted. Valve adjustment procedure:
The crankshaft rotates 180°, which corresponds to a quarter turn of the camshaft. To control the position, it is necessary to use the marks on the crankshaft pulley, as well as on the camshaft. As a last resort, simply remove the distributor cover and perform control using the slider.
Please note that one revolution of the crankshaft is half a revolution of the distributor axis. After the adjustment is completed, assembly is performed. If the rubber gasket is damaged, it should be replaced with a new one.
Split Gear Function
A conventional gear mounted on the camshaft is designed to transmit torque from the crankshaft to the camshaft of the timing mechanism. The part is a single piece without any moving parts. A split gear consists of two components - they can move relative to each other. This design allows the camshaft angles to be changed without affecting the tension of the timing belt or drive chain.
For example, this part on VAZ engines can rotate the shaft 5° in one direction or the other. Here you need to understand that you can change the engine operating characteristics in this way only in specific modes - in the upper or lower ranges.
Very often, to increase power and other engine characteristics, the camshaft and its gear are changed. If you replace them, you can adjust the valve timing differently. It will also be possible to change the valve lag angles. If a split gear is installed on the engine instead of the factory one without replacing the camshaft, then only the overlap angles can be changed.
Camshaft installation
The shaft installation process occurs in the reverse order using the same tools as for its removal. Additionally, you will need a torque wrench that can be used to control the tightening force. The work is carried out as follows:
- Before installing the part into the body, lubricate the support journals, bearings and cams with clean engine oil. Lubricate the camshaft journals and cams with clean engine oil before installing them in the housing.
- We mount the product into the housing and tighten the fastening of the thrust plate. After installing the shaft into the housing, fix it with a thrust plate
- Checking the rotation of the shaft. It should rotate easily around its axis.
- We mount the housing together with the shaft on the studs in the cylinder head and tighten it in a certain sequence with a force of 18.3–22.6 Nm. The camshaft should be tightened to 18.3–22.6 Nm in a specific sequence
- We perform final assembly after marking.
To ensure that the camshaft is evenly pressed against the cylinder head, tightening should be performed in several stages.
Video: installing the camshaft on classic Zhiguli cars
Installation by marks
Upon completion of the replacement, it is necessary to align the camshaft and crankshaft to the marks. Only after such a procedure will the ignition timing be correct and engine operation stable. An additional tool you will need is a wrench to rotate the crankshaft, and the work itself consists of the following steps:
- We put the RV sprocket in place and tighten it, but not completely.
- We tighten the chain. To do this, unscrew the tensioner nut, turn the crankshaft a little, and then tighten the nut back.
- We turn the crankshaft with a wrench until the mark on the pulley is positioned opposite the length of the mark on the timing cover. We turn the crankshaft until the mark on the pulley is positioned opposite the long mark on the timing cover
- The mark on the RV star should coincide with the ebb on the body. If this does not happen, unscrew the bolt, remove the gear and shift the chain by one tooth in the required direction. To install the camshaft according to the marks, the recess on the gear must coincide with the casting on the bearing housing
- We install and clamp the gear with a bolt, check that the marks on both shafts match. We fix the bolt with a special washer. After setting the marks, clamp the camshaft gear with a bolt
- We adjust the thermal clearance of the valves.
- We install the valve cover, tightening it in a certain order. The valve cover must be tightened in a certain order, without applying much force.
- We install the remaining elements in their places.
Tuning on carburetor modifications of the VAZ 2107
All old textbooks on servicing classic Zhiguli models describe a method for setting the moment of spark formation using a light bulb, although experienced motorists can easily do without it. You will understand why this happens as you read this material, but for beginners it will be useful to familiarize yourself with the old proven technique.
To correctly set the ignition of the “seven”, you need to ensure that the following conditions are met simultaneously:
- the notch on the crankshaft pulley is opposite the long mark on the timing cover;
- in this case, the round mark marked on the camshaft chain drive gear coincides with the boss on its body;
- the piston of the 4th cylinder has completed the compression stroke and is at top dead center;
- the contacts inside the distributor are open;
- The movable contact of the slider faces the fixed contact on the distributor cover, where the wire from the spark plug of the 4th cylinder is connected.
Note. On non-contact systems, at this moment the Hall sensor sends a signal to the switch to break the low voltage electrical circuit, which leads to the appearance of a high voltage pulse on the wire leading to the spark plug of the 4th cylinder.
The light bulb is used to control the ignition timing, for which it must be connected with one wire to the “K” contact of the high-voltage coil, and with the second to the vehicle ground. You should know that at the same moment the piston of the first cylinder is also in the TDC position, only there the air-fuel mixture is not compressed, but exhaust gases are released after its combustion. This is why ignorant car enthusiasts often confuse the first cylinder with the fourth when installing the ignition.
When the above actions occur simultaneously, a spark discharge occurs on the electrodes of the spark plug of the 4th cylinder, as evidenced by the flash of the connected light bulb. To achieve these conditions and set the ignition correctly, follow the instructions:
- Turn the crankshaft with a 36 mm wrench, aligning the notch on the pulley with the long notch on the timing cover.
- If at this moment the engine valve cover is removed, then it is better to navigate by the mark on the camshaft gear, placing it opposite the housing boss.
- Take the ignition distributor, remove the cover and turn its shaft to place the slider opposite the wire leading to cylinder No. 4 (there are cylinder number markings on the cover). Insert the distributor into the engine hole, holding the slider and housing in this position, and then secure it with a 13 mm wrench nut.
- Connect the light bulb wires and turn on the ignition by turning the key. Loosen the nut securing the distributor and slowly turn it by the housing until the lamp flashes, indicating the moment of sparking. Reattach the distributor.
- Turn off the ignition and make sure that the contacts inside the distributor are currently open. Take a 0.35 mm feeler gauge and check the gap between them, if necessary, adjust it by loosening the fastening screws with a screwdriver.
Note. The instructions imply that before starting work the distributor was removed from the engine without aligning the marks.
The ignition is considered to be set correctly if, after installing the distributor cap and connecting the wires, you manage to start the engine, and then you need to adjust the timing. The non-contact system is installed in the same way, with the exception of checking the gap in the contact group due to its absence.
How to understand that the camshaft needs to be changed?
You can determine a camshaft malfunction without opening the hood by two signs:
- knock;
- reduction in engine oil pressure.
The main reason for malfunctions in the camshaft is the appearance of gaps. They appear between the shaft bearing journals and the bed bearings on which the camshaft rests. The cracks are formed due to the fact that parts of the camshaft are worn away. Gaps cause the shaft to move in the vertical or horizontal axis. If the shaft play is 1 mm, then this affects the operation of the engine. Reasons for gaps:
- the camshaft was not replaced in a timely manner;
- do not change the oil on time;
- use of low-quality oil;
- the driver drives at low speeds, so little oil enters the timing belt and parts wear out faster.
The camshaft also needs to be changed if the oil channels in it are clogged. Before changing the part, look for any play, fracture, deformation or scuffing of the shaft.
Signs of Camshaft Wear
The operation of the camshaft is associated with constant exposure to high loads, as a result of which the part gradually wears out and requires replacement. The need for repair arises when characteristic symptoms appear:
- knocking when the engine is running under load;
- reduction in power indicators.
There are a number of reasons why the RV fails:
- natural wear and tear;
- low-quality motor oil;
- low oil pressure in the lubrication system;
- insufficient oil level or so-called oil starvation;
- engine operation at high temperatures, which leads to deterioration of the lubricant properties;
- mechanical damage (wear or broken chain).
The main malfunctions that impair the performance of the camshaft are scuffing on the working surfaces (journals and cams) and deterioration of the limiter.
Over time, the camshaft's cams and journals wear out.
It is quite problematic to determine from the sounds coming from the engine compartment that the problem is related specifically to the camshaft, but it is still possible. The knocking sound of the engine resembles the dull blows of a hammer, which become more frequent as the engine speed increases. However, the best way to diagnose a shaft is to dismantle, disassemble and troubleshoot it. During inspection, the shaft should not move in the housing relative to the axis, otherwise a dull sound will be produced when hitting the limiter.
Video: reasons for the longitudinal play of the VAZ camshaft
Power reduction
The drop in power on classic Zhiguli cars is a phenomenon caused by wear of the camshaft and rockers. With proper engine operation (timely oil changes, monitoring its level and pressure), the problem only appears over long vehicle runs. When the cams wear out, the required phase width and valve lift at the intake are no longer ensured.
When the shaft and rockers wear out, the motor power may decrease several times
Deformation
The RV can become deformed under extreme heat, which is caused by problems in the cooling and lubrication systems. At first, the problem may manifest itself as a knocking sound. Therefore, if there is a suspicion of this breakdown, for example, the motor has overheated, then it is recommended to diagnose the shaft in order to avoid more serious troubles with the engine timing belt.
Checking and adjusting clearances in front wheel hub bearings in a service station
To check the clearance, lift the front of the car, support it on stands and remove the front wheels.
Install tool 02.7834.9505 under the wheel mounting bolt.
Press indicator leg 1 against the end of the steering knuckle axis, with the arrow in the zero position and, moving hub 4 along the steering knuckle axis, measure the amount of movement (clearance) against the indicator (2 – bolt; 3 – bracket).
If the gap is greater than 0.15mm, adjust it in the following order:
– unscrew the adjusting nut from the steering knuckle axle;
– install a new or used, but on a different car, nut and tighten it to a torque of 19.6 Nm (0.7 kgf m);
– make mark B on the washer (see Fig. 4), then loosen the nut 20–25° so that edge A slightly does not reach mark B;
– lock the nut in this position by pressing the holes on the neck of the nut into the grooves at the end of the steering knuckle axis.
After adjustment, the clearance in the bearing should be within 0.02–0.08 mm.
When adjusting the gap, it should be taken into account that the direction of the thread on the left axle of the steering knuckle is right, and on the right axle it is left.
The VAZ 2107 wheel bearing wears out over time, which leads to faster wear of tires, brake pads and discs. If measures are not taken to replace the bearing in a timely manner, the part may jam, resulting in loss of vehicle control. This indicates the need to monitor the condition of the mechanism, periodically adjust and replace it.
Timing marks on the injection VAZ 2107
The gas distribution mechanism and its drive of the seven engine produced by the Volzhsky Automobile Plant remained the same - chain. Extraction and excessive wear of the timing chain on the VAZ 2107 power unit by the injector-type power supply system leads to:
- difficulty starting the engine;
- unstable operation in all modes, especially at idle;
- a sharp increase in fuel consumption;
- formation of carbon deposits on valve seats;
- Damage to the injection control system sensors and catalytic converter may occur.
In order to avoid the negative consequences of weakening or stretching the chain drive of the VAZ 2107 car engine, it is necessary to carry out routine maintenance in a timely manner. The list of maintenance operations for the power unit with the injector power system is determined by the service book. The condition of the timing chain and the gaps between the camshaft cams and valve levers is monitored every 30 thousand km.
On warranty VAZ 2107 with an injector-type power system, such work is best carried out at an authorized auto repair center. If malfunctions occur due to the fault of the car plant, they will be eliminated at the expense of the manufacturer. At the end of this period, maintenance of the timing belt and other vehicle systems can be performed independently.