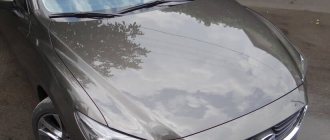
Every car owner tries to make his faithful steed look beautiful and be protected from the negative effects of external factors. There are many ways to do this, and one of them is a deflector or fly swatter that is installed on the hood of the car. To install such an accessory, it is not necessary to go to a car service; you can do the job yourself.
-
EGR hood deflectors are there? - SIM
- Installation on the inside of the hood
The concept of a deflector and its purpose
A “fly swatter”, or as it should be more correctly called, a hood deflector, is an attached part to a car. Protects the surface from pebbles, dirt, midges, flies and other objects that come across while driving. The production uses wear-resistant material: acrylic glass or plastic.
The deflector is manufactured in an aerodynamic design. Due to this, when the car moves, air flows are formed that prevent:
- accumulation of dirt on the windshield, windshield wipers and hood;
- damage to the car glass that can occur from the contact of various objects while driving a vehicle.
Some drivers claim that the device helps to cope not only with minor objects, but also with pieces of dirt and large stones. This is especially important when, for example, a truck or truck passes by.
The most vulnerable part of the car is the front, including the hood and windshield. And with a fly swatter she is safe.
Why is this necessary?
The idea of creating the first deflectors was due to the fact that new cars became noticeably faster. The speed of movement has increased, so we had to think about the use of aerodynamics in civilian and sports cars.
In the same way, an air intake appeared at one time, and now we can buy magnificent bumper covers from Maxton Design.
The first car body models were angular and clumsy. The car had difficulty resisting the flow of oncoming air. Gradually the speed increased. Engineers realized that the cars needed to be made more streamlined and aerodynamic.
For example, do you know that even the current paintwork on cars plays not only a decorative role, but also helps reduce air friction? The car literally cuts air flow, which has a positive effect on speed, controllability and maneuverability. But due to the improvement in streamlining, oncoming debris, insects, pebbles and other nonsense began to actively fly into the car. Some bugs at least leave unpleasant blots, and pebbles can damage the windshield. And the hood itself also suffers from debris and insects. Scratches form and stains are difficult to wash off.
It is precisely to protect against such consequences that improvements in aerodynamics have proposed the use of deflectors. Their shape has an upward tilt at the back. This allows you to redirect the air flow slightly higher than the car. Thus, all debris and insects fly over the car and do not crash into the windshield and other body elements.
Advantages and disadvantages
The installation of the deflector, as well as the fastening of the lock and hinge for the hood, aerodynamic body kits or other tuning elements, has two sides.
Today we are talking about deflectors, so we will consider its strengths and weaknesses. You already understand why such an element is needed. Now it is time to know the pros and cons you get while installing a fly swatter.
Let's start with the advantages. I would include among them:
- attractive appearance;
- affordable price with good visual effect;
- protection from small debris, pebbles and insects;
- a wide range of;
- an easy way to improve the appearance of your car.
Yes, if a large stone or other similar object flies into you, you will need to have your windshield repaired or completely replaced.
By placing a white deflector on a black car, or choosing a dark fly swatter for a light car, playing with contrast pays off. Chrome also looks very advantageous. You can look at different photos and roughly imagine what a Chevrolet Cruze, Renault Duster, Hyundai Solaris or Honda CR-V, for example, will look like.
But let's not forget about the shortcomings. They are also present here. The following disadvantages are highlighted:
- at a speed of less than 90-100 km/h, the deflector acts only as a decorative element due to the oncoming wind flow being too weak;
- in case of incorrect installation or use of a low-quality part, there is a possibility of damaging the paint layer and causing corrosion;
- danger of vibration and noise when the deflector meets air flows at high speed.
The first drawback is controversial. But other disadvantages appear only if you choose or install the element incorrectly. Therefore, be careful, as in the case of installing thresholds on a Niva or when tightening the steering wheel yourself. You should be extremely careful everywhere, take your time and follow the instructions.
Mounting methods
Devices on the hood can be installed in different ways, it all depends on the manufacturer’s plans. This is easy to do, and even a novice driver can fix the fly swatter.
On the adhesive strip
The easiest option. The device already has a special adhesive tape. Before gluing, degrease the surface and attach the deflector as indicated in the instructions.
This fastening is not strong enough and can break at high speed. After it, an adhesive layer remains on the surface of the car, to which any debris sticks.
On brackets
This method of attaching a fly swatter to the hood is the most common. Moreover, it is harmless to the car. The deflector comes with brackets that do not scratch, leaving a small hole between the car and the bump stop. Thanks to the clearance, foreign elements can easily pass under the device.
The installation consists of several stages:
- Attaching the deflector to the hood, marking the locations of the fasteners.
- Pasting the protective film in the marked places. This is important so that the brackets do not damage the paintwork.
- Installing fasteners on the deflector. Attaching a fly swatter.
Silicone dampers are attached under the deflector, preventing the hood from coming into contact with the part and reducing vibration.
For self-tapping screws
The roughest way to attach a fly swatter to a car. The deflector is attached to self-tapping screws, for which holes are drilled in the hood. Despite the fact that not every driver will decide to damage their car, part manufacturers offer to use this method. In addition, corrosion will begin at the holes in the future.
Method 2: fly swatter on the hood with double-sided tape
This option, such as using only double-sided tape, is suitable for exclusively city cars that are not designed for sudden maneuvers and driving at high speeds. For them, the fly swatter on the hood is only a decoration, and therefore does not need strong fastening.
A big mistake is adding additional glue to what is already on the tape. The fly swatter on the hood will indeed hold on more firmly, but if damaged, it will only be possible to tear it off together with the paint or varnish, piece by piece. If you want to increase the reliability of the connection, simply heat the tape with a hair dryer before installing the fly swatter. This will strengthen the connection, but during sudden maneuvers there is still a chance that the accessory will fly off the car.
Priora mount
Installing a fly swatter on a Priora is easy. No special skills are needed. You just need to carry out the actions strictly in accordance with the instructions. The configuration of the part depends on the type of fastening; it can be different. There is no need to drill the body during installation.
The fastening process consists of several steps:
- Apply protective tape in the places where the fasteners will be located. This will prevent damage to the car's paintwork.
- Saturate the surface with a degreasing solution.
- Install and secure fasteners.
- Place the part and install it accurately so that the fasteners do not move.
- Secure the deflector with screws.
When installing, you need to leave a small gap of 1 centimeter from the hood. Thanks to the distance, the surface will be well ventilated, and dirt and moisture will not accumulate.
Basic faults
When driving at high speed, the fly swatter experiences significant loads. The main causes of problems during operation of the deflector are often associated with poor-quality fasteners to the hood cover.
High air pressure and vibration require a careful approach during installation. Even minor inaccuracies and fastening errors can sooner or later lead to the deflector coming off, breaking or damaging the hood.
If the requirements for the established gap are not met, debris, moisture, and snow will accumulate between the cover and the fly swatter. This will cause the hood to corrode.
Advantages of the deflector
Some car owners are afraid that the paintwork will be damaged where the device is mounted, and the appearance of the car will deteriorate. This is not something to be afraid of for several reasons:
- fasteners for a high-quality deflector do not leave damage to the surface of the car;
- The shape of the product is made in accordance with the characteristics of a specific make and model of car. They consider the aerodynamic parameters and appearance that should be combined with the car;
- deflectors are made from wear-resistant material. It can be transparent, black or any other color that matches the surface of the car.
Even a novice driver can install a reflective device with his own hands. You just need to follow the instructions exactly and work diligently.
A replacement for the fly swatter has not yet been invented. Thanks to this device, the driver saves on car cosmetics, which are used for paintwork reconstruction. In addition, the deflector ensures long service life of the windshield.
How to install a hood deflector yourself
1. The main purpose of the hood deflector.
2. Does your car need a hood deflector or not?
3. Deflectors from EGR and SIM manufacturers. Two types of deflectors.
4. First type. Attaching the deflector to the inner surface of the hood. Installation procedure.
5. Second type. Attaching the deflector to the outer surface of the hood. Installation procedure.
The main purpose of the hood deflector.
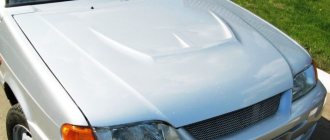
The hood deflector is a specially shaped plastic plate that is installed on the front of the hood and is designed to protect the hood and windshield from scratches and chips.
Drivers sometimes call the hood deflector a “fly swatter.” But the deflector itself does not serve as a shield against the ingress of pebbles, insects and various small debris, since the surface area of this plate is small, although it happens that pebbles fall on the deflector and ricochet over the roof of the car.
The main purpose of the deflector is to change the movement of the oncoming air flow, which can carry debris and small stones flying out from under the wheels of cars in front.
The shape of the deflector is designed in such a way that the air flow does not flow around the hood and glass, but thanks to the upward curved rear edge of the deflector, it rises up and flows around the car along the roof. This way, the hood and windshield remain intact and clean.
Comment:
The deflector performs its protective function best when the vehicle speed is over 70 km/h.
To prevent dirt from accumulating under the deflector, it is attached to the hood so that there is a gap of up to 10 millimeters between the hood and the deflector, and even if dirt gets under the deflector, it is easily removed with water during a regular car wash.
So after all – does your car need a hood deflector or not?
If you value the appearance and health of your car, but you often have to operate it on long-distance highways, where there is a lot of small debris (sand, pebbles, etc.), then a hood deflector is a necessary accessory that will protect the paintwork of the hood and front glass from dirt, scratches, chips and cracks.
Some drivers do not want to install a hood deflector because they are afraid that the appearance of the car, and at the mounting points, the paintwork of the hood itself will be damaged. All fears are vain and unfounded. The fastenings of modern deflectors from trustworthy manufacturers are such that the paintwork of the car will not be damaged during the installation and operation of the hood deflectors.
About appearance: today the shape of deflectors is developed taking into account not only aerodynamic, but also decorative functions. Deflectors are made of durable acrylic glass in various colors, including colorless transparent. Therefore, you can choose a hood deflector that matches the color of the car, and if you don’t find a suitable one, then install a transparent one.
So, you have decided to protect your car and install a hood deflector.
The question arises: which manufacturer’s deflector should you choose to protect your car?
Hood deflectors from EGR and SIM manufacturers. Two types of deflectors.
In our store we offer hood deflectors from two manufacturers: EGR (Australia) and SIM (Russia). The deflectors from these manufacturers are made of high quality acrylic glass; they are quite easy to install in car repair shops or independently. When developing deflectors, the shape of the car hood and aerodynamic characteristics are taken into account. To install the deflector, no additional holes are drilled, and the fastenings do not damage the paintwork of the hood.
The EGR company (Australia) is one of the first manufacturers of plexiglass accessories for cars and today it supplies its accessories to the assembly lines of the most famous American, Korean and European automobile factories.
The SIM company is a manufacturing enterprise in the city of Barnaul, where they develop and manufacture automobile accessories made of acrylic glass for cars of domestic and foreign production.
How to install a hood deflector from these manufacturers yourself?
Installation of the EGR and SIM hood deflectors is very simple. Depending on the shape of the hood and the make of the car, there are two types of hood deflectors. They differ in shape and method of attachment to the hood.
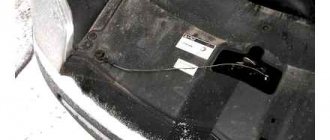
First type. Attaching the deflector to the inner surface of the hood.
The shape of this deflector is such that the deflector is not placed on top and fastened in various ways, but is put on the lower edge of the hood and secured with clips and screws on the back side of the hood in the places where the sealing rubber band is attached. This deflector is easy to recognize - it has curved ears with rectangular holes in the lower part, and there are no holes on the upper part of the deflector. When installing this type of deflector, no additional holes are drilled, nothing is glued, and the standard holes for attaching the sealing rubber to the hood are used to secure the deflector. Since hood deflectors are designed and manufactured strictly for a specific car model, the mounting holes for the deflector will exactly match the standard mounting holes for the rubber sealing strip.
This hood deflector is easy to install, operate and also easy to remove without damaging the paintwork of the hood.
The delivery set for the first type of deflector includes the deflector itself, clips for fastening, screws and installation instructions with pictures.
The procedure for installing the first type of deflector (mounting under the hood).
1) Before installation, the car must be washed - the hood and all fastening points under the hood must be clean and dry. Manufacturers recommend installation in warm and dry weather or in a warm room at temperatures from +20 to +40 degrees Celsius.
2) Prepare tools - required for installation
a) A flat-head screwdriver for removing the clips securing the rubber sealing strip.
b) Phillips screwdriver for tightening the screws securing the deflector to the hood.
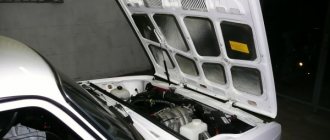
3) Open the hood and attach the deflector to it. Determine the places on the inside of the hood, the standard holes, where the deflector will be attached. The deflector can then be put aside.
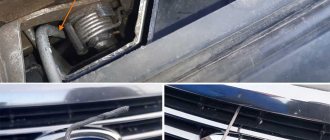
4) The rubber sealing tape is attached to the hood with clips, which must be removed at the previously determined locations. We do this using a flat-head screwdriver.
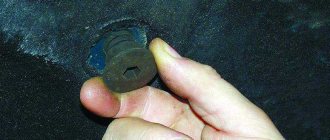
5) We take out the clips from the deflector delivery kit and install them one by one into the vacant holes on the inside of the hood under the rubber band.
6) We take the deflector itself in our hands and insert it onto the hood, bending the rubber sealing tape in the places where the clips were installed.
7) In the deflector ears, which are actually inserted under the hood, there are rectangular holes where you need to fix the installed clips so that they do not spin when screwed.
 Having determined that the deflector is installed correctly, we screw the screws through the holes in the sealing tape to the installed clips, thus attaching the rubber sealing tape and the deflector to the hood.
9) Close the hood, check again for correct installation. The deflector must not come into contact with the outer surface of the hood. The distance between them can reach 10 mm.
For greater clarity, you can watch the video instructions by searching for it on the Internet. We offer you, in our opinion, the most understandable one.
Second type. Attaching the deflector to the outer surface of the hood.
The shape of this deflector is such that it is placed on top of the hood and screwed to the mounting clips installed on the hood. In such a deflector you will see several holes in the lower part, but there are no folding ears. When installing this type of deflector, no additional holes are drilled, but to protect the hood paintwork from abrasion, a protective film is glued under the mounting clips. On some models, the clips in the center of the deflector are replaced with plastic fasteners that are glued to the hood. The paintwork of the hood remains intact during installation and operation of the deflector, but when removing it you will have to work hard to remove traces of adhesive tape.
The delivery set for the second type of deflector includes the deflector itself, clips for fastening (they can be of several sizes in one set), cleaning alcohol wipes, protective adhesive tape and, if provided, plastic fasteners.
The procedure for installing the hood deflector of the second type (Attaching to the outer surface of the hood).
1. Before installation, the car must be washed - the hood on the outside and inside must be clean and dry. Recommended installation temperature is from +20 to +40 degrees Celsius.
2. Prepare the tool - for installation you need a Phillips screwdriver to tighten the screws to secure the deflector to the hood.
3. Open the hood and attach the deflector to it. Determine the locations on the outside of the hood where the deflector will be attached. They should match the holes in the deflector. The deflector can then be put aside.
4. Use an alcohol wipe to wipe the deflector mounting points determined in advance.
5. Cover the cleaned areas with the adhesive tape provided. You need to seal with tape starting from the outer surface of the hood, moving to the inner surface. This operation is necessary to protect the hood paintwork from abrasion.
6. In accordance with the instructions, install mounting clips on the taped areas. Be careful - they may be different in height, so correct installation is especially important.
7. Take the deflector in your hands, place it on the hood and check that the mounting clips are installed correctly. The holes in the deflector must match the holes in the clips.
8. If the clips are positioned correctly, tighten the screws, thus connecting the deflector and mounting clips.
9. For some car models, plastic fasteners are provided for fastening in the central part of the deflector instead of holes. Attaching them is also easy. One part of the fastener is already glued to the inner surface of the deflector. Determine the place on the hood where the second part of the fastener should be, wipe this place with an alcohol wipe and glue the second part of the fastener (with some force for better gluing). Tighten the screws on the deflector where there are mounting clips, and in the center press the deflector in place of the fasteners to secure it.
10. Close the hood and check again for correct installation. The deflector must not come into contact with the unprotected surface of the hood. The distance between them can reach 10 mm - this is necessary so that dirt does not accumulate under the deflector.
The following video shows all these steps for installing the deflector very clearly.
There are deflectors that combine the features of the first and second types. Such deflectors have attachments to the inner and outer surfaces of the hood.
As you can see, installing the EGR and SIM hood deflector is very simple and can easily be done independently at home.
Manufacturers and prices
The purpose of deflectors determines their main properties: lightness, strength, resistance to temperature changes, and ultraviolet radiation. The most suitable material that meets these requirements is plastic.
Thickness is a criterion for choosing a fly swatter, and flawless processing of the edges is also important. For example, for a brand such as EGR, the thickness is 2 - 2.5 mm, for Benevento - from 3 to 4 mm.
Another factor is the mounting method. The fastener design must be thoughtful, reliable, and prevent damage to the hood.
For a fly swatter, the price is determined by a combination of the listed factors. A brief description of the manufacturers of fly swatters for the VAZ Priora, predominant in the Russian market segment, is given in the following list:
- SA Plastic, plexiglass, 1600 – 1900 rubles;
- SIM, acrylic, 1600 – 1730 rubles;
- REIN, Autofamily (Autoparts Logistics), acrylic, 850 RUR;
- Vinguru, Autofamily (Avtoparts Logistics), polycarbonate, 550 rub.;
- Vip Tuning, VIP LLC, acrylic, 730 – 1100 rubles;
- VT52, VIP-NN LLC, acrylic, 1300 rub.;
- ANV, 660 rub.