Noise in VAZ 2115
well... this is a disease
, but have you tried using double-sided tape around the perimeter?
- Türkiye, kalbimde kalacaksın
- Group: Users
- Posts: 7,594
| QUOTE (Taras59 @ Nov 7 2005, 16:33) |
| I don’t want to splurge on a wooden shelf either |
- White as a hospital, birds are afraid of me.
- Group: Users
- Posts: 6,410
| QUOTE (Felix59 @ Nov 7 2005, 16:20) |
| uh... it's a disease |
- Türkiye, kalbimde kalacaksın
- Group: Users
- Posts: 7,594
| QUOTE (terapevt @ Nov 7 2005, 17:52) |
| rattling. and the back of the seat. |
- White as a hospital, birds are afraid of me.
- Group: Users
- Posts: 6,410
- Türkiye, kalbimde kalacaksın
- Group: Users
- Posts: 7,594
- experienced forum member
- Group: Users
- Posts: 2,069
| QUOTE (sapr2000 @ Nov 7 2005, 17:54) |
| It’s strange, but what is there to rattle about and about what? |
| QUOTE (sapr2000 @ Nov 7 2005, 18:52) |
| Likewise |
- Türkiye, kalbimde kalacaksın
- Group: Users
- Posts: 7,594
| QUOTE (rrr @ Nov 7 2005, 19:16) |
| Is there rattling of the rods even after gluing? |
| QUOTE (rrr @ Nov 7 2005, 19:16) |
| if it is not clearly fixed in the locks. |
- experienced forum member
- Group: Users
- Posts: 2,069
| QUOTE (sapr2000 @ Nov 7 2005, 20:37) |
| The rear doors did not make any noise |
| QUOTE (sapr2000 @ Nov 7 2005, 20:37) |
| Fixes it, and how. |
- Türkiye, kalbimde kalacaksın
- Group: Users
- Posts: 7,594
- White as a hospital, birds are afraid of me.
- Group: Users
- Posts: 6,410
| QUOTE (sapr2000 @ Nov 7 2005, 22:25) |
| It is necessary to place a 2-3 mm washer between the stop and the shaped roller into which the latch slides. It's essentially a regular bolt. If you wrap it up a lot, the latch won’t catch. In addition, this bolt also “runs” - here you need to catch the position in which it exactly finds the mother in the seat cushion. Unscrew one bolt any time and you will understand perfectly well what needs to be done. |
- Vovochka
- Group: Users
- Posts: 4,130
- Türkiye, kalbimde kalacaksın
- Group: Users
- Posts: 7,594
- ordinary user
- Group: Users
- Posts: 595
The miracle product is either glue or silicone primer.
Guys, this is why I don’t respect the pelvis. Give away a lot of money, so that later it rattles and creaks.
VAZ 2115 rear parcel shelf rattles, what should I do?
October 20, 2015, 07:17 pm #1 123
Hi all . The problem is that the rear acoustic shelf is very loud. But apparently the problem is aggravated by the fact that the rear seat back on one side does not latch.
- Posts: 12211
- From: Moscow
- Kia Spectra
October 20, 2015, 19:31 #2 123
tape, polyurethane foam, self-tapping screws, liquid nails.
- Posts: 2322
- From: Warsaw, Poland.
- Nissan Pathfinder
October 21, 2015, 17:02 #3 123+ 1
MIFAN, October 20, 2015, 19:17, #1
Hi all . The problem is that the rear acoustic shelf is very loud. But apparently the problem is aggravated by the fact that the rear seat back on one side does not latch.
hands, butt, surgeon. Got the connection?
- Posts: 2
- From: Crimea
October 21, 2015, 20:45 #4 123
Thank you very much for the USEFUL tips.
- Posts: 12211
- From: Moscow
- Kia Spectra
October 21, 2015, 20:50 #5 123
no reason, ask, be interested
- Posts: 2322
- From: Warsaw, Poland.
- Nissan Pathfinder
October 23, 2015, 15:47 #6 123
MIFAN, October 21, 2015, 20:45, #4
Thank you very much for the USEFUL tips.
Dear, before you shit in a personal, think about what they wrote to you, your question looks exactly the same as the question “how to inflate a tire.” Guess why I’m writing here and not in a personal. Because I know how to communicate with people, unlike you.
- Posts: 15
- From: Rostov-on-Don
- Chevrolet Cruze
October 23, 2015, 16:11 #7 123
Many people encounter such a problem at AvtoVAZ, someone tries to do something about it and in most cases it does not work.
Either install another one, but don’t expect big changes, or take it off and ride without it.
- Posts: 9845
October 23, 2015, 20:07 #8 123
Kucha, 23 October 2015, 16:11, #7
Many people encounter such a problem at AvtoVAZ, someone tries to do something about it and in most cases it does not work. Either install another one, but don’t expect big changes, or take it off and ride without it.
Welding! Here is Fse’s way out to walk in a continuous seam -
Video: How to Fix the Rear Shelf of a VAZ 2110
Note. These could be parts left over from an old shelf.
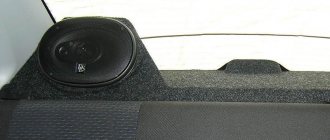
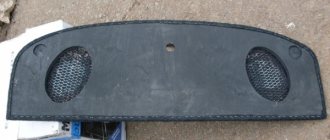
- The main, decorative and adjacent parts must be trimmed. Side supports and gratings are also required.
- Make holes in the main panel for the integrated speakers. Their size must completely correspond to the diameter of the speaker.
Note. You will be able to select different columns. Alternatively, instead of two huge ones, you can install three small speakers.
- Also make these holes in the decorative part. But they should be a few mm larger. The speaker heads should be completely “immersed” in these holes. Use screws to connect them to the main part.
- Glue two circles cut from plywood on top. Wrap them in coarse mesh and cheesecloth on top. Apply glue and let dry completely.
- Stick the strip next to the glass with glue.
- Secure the sides with screws.
- The grille is needed to “hide” the speakers. It's better to make it removable.
- Place the shelf in its designated location.
So, it’s not difficult to make an acoustic shelf with your own hands. Moreover, a home shelf will be much better than an ordinary one. Well, its cost will be lower. Naturally, before you start, you should read photos and videos on this topic. There are many of them on the web. Our annotations may also be needed.
Subwoofer in car 2110
The usual organization of sound in the “ten” is impossible without a subwoofer, at least of medium power. Only this speaker can provide natural reproduction of low-frequency sounds because other components of the speaker system cannot do so. Let's find out which primer is best for the VAZ 2110 and how to install it.
First, to properly install sound in the Veil of the tenth model, you need to understand the speakers (see How to choose speakers for a car radio) and amplifiers. It is more important to choose the correct placement of acoustic wiring.
Rear shelf subwoofer 2110
Types of subp
Without going into details, let's say that there are two main types of subscriptions:
- Active speakers are equipped with a built-in amplifier. Organizing sound in the “top ten” using these eyeliners is much simpler and does not require special knowledge or the use of additional components.
- Passive speakers . This is a large area for testing. In this case, you can adjust the sound so that passengers do not remember an ordinary car showroom, but a real concert hall. But such a unit must be supplemented with an amplifier.
Installing a subwoofer in a VAZ 2110
Record. The quality of active subscriptions will almost always not satisfy the tastes of a real music lover. If you consider yourself a connoisseur of good, true music, it is better to choose passive speakers.
box
Passive blocks are divided into 3 types:
- The design is of the usual type, made in a ZYa box. In this case there are no air holes. The disadvantages of this implementation are weak power and strengths. high quality bass.
- A more common, but less simple design has a special hole in the box for air passage. The advantages of this function are relatively higher than in the first case, efficiency, more bass and deepest sound, minus. highest price.
- 3rd option. bandwidth (see Subwoofer strip. best design), rarely used and complex, but with good qualities.
Installing a subwoofer on a VAZ 2110
Popular on the site
Currently on the forum:
This page is searched for the following queries: The rear shelf on the Lada 2115 rattles, VAZ-2115 forum, VAZ-2115 discussion.
Currently commenting:
Jet black or grey-black
I would like to know the model of injectors, the type of internal combustion engine, the power supply system of the internal combustion engine..
Dimensions and tidy do not light up. CHY, all relays and presets are in order! New button! Backlight on p
On my smartphone it freezes every once in a while, then crashes, it says the pages could not be loaded
Thanks, I think so too
Often, when opening a page, it says that there is no such page, although a few minutes ago someone
Hello! I can’t find the lower rubber bands for the injectors, I found the upper ones, they fit from ten
Do not bother. Xenon in a headlight not intended for it is definitely already a collective farm. And St.
Mine doesn't understand. Is this the end of the update or what?
Wroom.ru
Media registration certificate No. FS 77-76203 16+
I'm tired of the rear parcel shelf constantly rattling. Previously I tried to bend metal fasteners and pave foam rubber, there was an effect, but it was quite insignificant.
I thought for a long time about how to resolve this issue with the best result. Having looked through the Internet, I realized that people don’t really care and buy rear shelves made of wood or completely cover the original ones with noise or vibration insulation.
I like the way my shelf looks, so I decided to leave it. I didn’t have a large amount of Shumka, only small scraps remained, so I couldn’t paste over the shelf and its adjacent areas.
But I found door seals in the garage that were left after they were replaced with three-pipe ones from a V8. I also had a roll of anti-squeak (madeline).
He took down the shelf and started working on collective farms. I simply cut off the required piece of seal and attached it to the shelf. It was decided to attach seals to the entire perimeter of the shelf, so that it would not only be soft in the contact areas, but also provide additional compaction.
This is what the beginning of the process looks like.
And this is what the finished version looks like. I agree, it doesn’t look very aesthetically pleasing, but the main thing is the result.
Using an anti-creaking agent, I glued the plastic side posts on which the shelf rests. The foam rubber was laid earlier, it is not visible at all, but the effect is there.
From the Shumka scraps that remained after soundproofing the steering casing, small pieces were cut out and glued onto the metal supports of the shelf and rear mounts.
Now, when installing the shelf in its place, it fits in a little tight, but it fits correctly. The seat back latched, also with a little effort.
This is what it looks like from the interior.
From the outside, due to the tinting, the seals are not visible at all, and in general they are not noticeable at all.
Now, when driving, the rear parcel shelf is as if it doesn’t exist at all. She doesn't make any noise at all. I was afraid that the rubber seals would creak against the plastic or rear window, but this is not the case, probably due to the fact that the shelf fits very tightly. To make sure of a positive result, he put the passenger back and told him to listen, and so, he only heard the suspension rattling.
So, I can recommend this option for getting rid of the noise from the rear parcel shelf. Probably the cheapest of all options.
Finally, my little new thing, a KIOKI thermometer.
The rear shelf rattled very loudly, made all possible sounds, and creaked and rumbled. I had to turn on the music loudly so as not to hear it. I decided to get rid of it. I read a bunch of advice on the Internet, but I did it my way. I’m sharing my experience with you. It was not in vain that I tried , there is no sound at all now, it’s just a pleasure. I wanted to tear off the original carpet covering on top of the shelf, but after thinking about it I realized that I couldn’t do it as neatly as the factory one. The process was as follows: 1. I tore off the original carpet about 10 cm along the edges 2. I covered the entire shelf with an overlap under the carpet with vibration and soundproofing film 3. I also glued batting material on top of the film 3. At the junction of the shelf with the rear sofa, another layer of batting was applied to remove the gap between the shelf and the seat 4. I glued the original carpet in place 5. I glued the plastic racks around the rear window with Shumka (the material remained just))) 6. In the trunk, I covered 2 iron sticks with the same film (I don’t know what else to call them), which They fit the trunk mechanisms. 7. It was difficult to put the shelf in place, because it had become much thicker) 8. I tightened it on the sides with 2 bolts
The shelf fits better than from the factory) Now I drive as happy as an elephant, no rumble, knocking, squeaking, etc.
Preparing to make a shelf
First of all, you will need to prepare the materials and tools that will be required to complete the work.
Purchase in advance:
- plywood sheet;
- carpet for cladding;
- radio fabric;
- PVA glue;
- fabric glue;
- a box of self-tapping screws.
The tools that will be useful to you are a jigsaw, a drill or screwdriver, and a grinder. Please note that the plywood must be at least a centimeter thick, otherwise the shelf will be no more effective than the standard one.
Many people are interested in how to take the dimensions of a shelf correctly, so as not to make mistakes during manufacturing. To do this, experienced craftsmen recommend removing the standard shelf and using it for a pattern. In any case, you will have to dismantle it; it is better to do this before cutting the material. This way you definitely won’t go wrong with the size.
Removing the stock shelf is not that difficult. To do this you will need:
- Remove the rear seat.
- Locate the four main acoustic panel fasteners and remove them.
- It is important that the seat belt is fully extended while working. To prevent it from gathering into the tension mechanism, move the two latches and remove the belt guide.
- Unscrew all side frame fasteners.
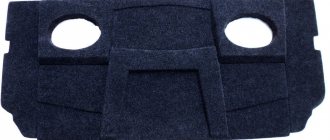
After dismantling, parts of the old panel can be used as a pattern. In this case, a drawing will not be needed. To do this, first draw them on cardboard, and then transfer them to plywood. You have to prepare the following parts of the structure: main, decorative and adjacent. Next, prepare the side supports and grates.
On the side of the seats, on the main part of the panel, there is no need to make cutouts in the corners, since attaching a homemade shelf can be done differently than a stock one. From the old shelf, cut out the part that fits the rear glass and attach it to the new panel. You can also not take the side walls from the design of the old acoustic panel, but cut them diagonally yourself. By stitching, adjust them to the main part. Assemble the structure with screws. It is enough to screw in only a couple so that in case of a mismatch in size, dismantling can be done easily.
In the main part of the stock panel, two holes are usually pre-made for speakers. If necessary, you can make additional holes, for example, so that the shelf can accommodate several different speakers. In the decorative part, each of the holes should be several millimeters larger. Measure them against the speakers you plan to install. The heads must fit freely into the place prepared for them.
VAZ 21099 rear shelf rattles
1. People, this is already boring, even on small bumps the rear shelf dangles and rattles. I tightened all the screws that I could find, but the shelf continues to hang loose. Surely someone has already encountered this problem and solved it. Please advise what to do. 2. The left front door is also rattling, such a metallic sound, I also took it apart and tightened everything I could - it doesn’t help. What should I do? In one car service I saw something like soundproofing for doors, such thick gaskets, you can buy them and install them so that they don’t rattle. 3. The front panel rattles. You can really fix it yourself or take it to a service center for sizing. If you take it in for service, they say it’s better to buy a EURO panel; it rests on the floor and doesn’t rattle, right? Otherwise, buying it is not a cheap pleasure, and you don’t want to exchange sewing for soap
Causes of acoustic shelf failure
VAZ 2115 acoustic shelf on your own
Usually it is not the sheer itself that breaks, but the pins with which it is attached. There may be several reasons for this problem:
- Firstly, they could be poorly clamped. By the way, this is the main reason why they break. Therefore, you can simply replace these fasteners by installing the old shelf in place.
- The second reason is that the car was shaken too much on a rough road. Most often this happens in cars whose drivers live in rural areas. However, the breakdown itself may also be the fault of the driver. If you significantly reduce the speed when crossing such a road, then replacing the pins will not even be necessary.
Note: in addition, high speed negatively affects not only the sound system, but also the entire car as a whole.
But failure of the acoustic shelf itself can occur for the following main reasons:
- Exerting mechanical influences on it. This is in case something falls on it. In addition, it is not recommended to place any heavy objects on it. It is not recommended to install an acoustic shelf in the trunk, since objects of varying weights are usually placed there.
- In addition, the shelf may wear out a little during use. And after a few years it may crack when exposed to mechanical waves coming from the speakers.
VAZ 21099 rear shelf rattles
Moto
I'll try to buy a noisemaker for the windows (this type 12 tubes (| looks something like this) on one side it is adhesive, glue it along the rim where the shelf comes into contact with the trunk plate. And remove everything from the shelf, preferably the speakers too. (the larger the cabinet, the louder it falls . folk wisdom) If during the analysis nothing “like that” is revealed, pull up the door. Like the hinge that the door “grabs” on when closing, move it closer to the interior. Sometimes the window lifts also rattle. It’s difficult to fix and sort out.
VAZ 21099 rear shelf rattles
You can buy automotive vibroplast (self-adhesive), but it is expensive, about 300 rubles per 1 sq.m. It’s better to buy a roll of waterproofing at a hardware store and glue it inside the doors with silicone glue. The effect is amazing and a roll is enough for the whole car, it costs 500 rubles. As for the panel, you can buy a kit for gluing torpedoes specifically for your car in car stores, it costs 1000-1500 rubles. The work is simple but labor-intensive. Instead of the original plastic shelf, buy a wooden one. Good luck
VAZ 21099 rear shelf rattles
The problem with the rear shelf can be solved by gluing Velcro strips to the right and left of the shelf (the kind of fastener on jackets, etc.) and, accordingly, to the plastic shelf supports. You just need to glue them well so that when you open the shelves they don’t come off. I also saw shelves on wing nuts and on products that resembled a flat latch only without a hook - I turned and pressed the shelf to the plastic, and simply on latches. Inside the door, all problems can be solved with the help of foam rubber (wound with tubes on rods, etc.) and the materials suggested above (glued on). Although it is quite possible that the mating part of the lock (the pin from the middle pillar) is incorrectly adjusted. To enhance the effect, you can buy and install a set of new lock fingers (the so-called silent ones - where this pin is covered with plastic) - the doors will make less metallic sound when closing (latching). Torpedo creaks and rattles are solved by purchasing PPE (polyethylene foam) on an adhesive base and gluing all the contacting, and therefore (and naturally for the *Soviet automobile industry) rubbing parts. You can also glue all the internal surfaces of the torpedo at the same time. Yes, it’s also good to make something like small washers - spacers from the inside, under the screws of the fasteners. The gaskets will flatten when screwed in, so no big deal. Although complete silence of the torpedo * still cannot be achieved even after spending a lot of money. However, by tackling the problem yourself, you can save some (and a considerable) amount and get an acceptable *result. * I did all of the above on my *2108 myself, but I didn’t have time to make a complete noise - the machine was stolen. Regarding all sorts of sound-absorbing self-adhesive materials such as Vibroplast, Vizomat, etc. *I don’t remember what kind of company it produces, I can only respond positively. The only thing is that the best result will be when gluing the entire car (cavities, floor, hood, trunk). I rode in such cars - impressive and unusual (for a VAZ). It’s especially interesting to knock on the door from the outside or watch how the hood slams shut if you throw it from a height of only 10 cm. The car probably weighs 30-50 kilograms. Regarding the europanel that rests on the floor, it seems to me that this is a waste of money (if you don’t pursue beauty), especially since the cars on which they are installed regularly have a metal frame rigidly connected to the body (for example, 2115), and 99 doesn't have it. (Although I might have missed something and it’s bugging me). In any case, you can do all of the above yourself, without straining too much, and not even all at once, but according to your mood. However, now it is better to do all these somersaults in a warm box. I hope this helped a little. *Good luck!
DIY acoustic shelf for VAZ 2109
- Install tweeters on podiums.
- Of course, before you start work, you should familiarize yourself with photos and videos on this topic.
The task of the podiums is to absorb vibrations and dampen them. With which you will gain access to the luggage compartment. Consider the route for laying speaker wires to connect the speakers. This problem is usually solved by covering and covering the finished podium with natural or artificial leather. There are internal and external podiums; they are combined into a single system: a podium for speakers and a folding part.
VAZ 21099 rear shelf rattles
We need to look at the root: - firstly, it rattles from the very beginning or is it an acquired syndrome, for example, the supports play, but it radiates to the entire body, I had the same problem. suddenly everything creaked and rattled - I moved the front end, everything was gone; - secondly, of course, it’s best to replace the original short shelf with a wooden tuning one, best of all, to order (1500-2000 rubles), I installed it and forgot what the rumble in the back is, a bunch of unnecessary plastic is thrown out of the trunk (the original shelf mount) and then , the weight of the speakers does not affect the wooden shelf and it looks much more aesthetically pleasing; - thirdly, believe me, it’s best to leave the sizing to a specialist and someone who has specialized in sizing for about 5 years, climbing on your own, especially if you don’t know all the sizing points, is usually useless and then the specialist himself will advise what material to buy, the thing is, that all these waterproofing can have an adverse effect on the body, example: a friend of mine bought some kind of porous material, put it under a standard mat (covering), and a week later he was hospitalized with severe irritation of the respiratory tract. — fourthly, if you want to remove all noise, you have to spend a LOT on it, count on 3000 rubles. - a simple option and 10-15000 - for a complete anti-noise sizing made of good material. Good luck!
VAZ 21099 rear shelf rattles
First, I began to look at the condition of the balls, tips, etc. and found that the support bearings had play and the rubber cushion was broken (it began to bulge upward (I apologize for the “high” syllable)). Well, at the same time, the ball joints, as it turned out, were on the way. Well, in general, I changed the following as a result: ball joints, tips, front shock absorbers, support bearings, “eggs” (stabilizer struts), levers, stabilizer bushings, preventive maintenance of the rack (with replacement of the bearing, bushing and grenade bushings on the “mustache” ) and all the creaking disappeared by 80%. Now the “ass” is approaching, it also starts tapping and rattling, but that’s when it gets warmer. Bye.
Added 5:39 - Feb 16, 2004.
Yes. And the problem with the doors is a “disease” of the 9th family, there are rattling glass guides, the window lifters themselves (50% of the noise comes from them), plus the door lock mechanism, plus the crappy decorative door panel with or without “wooden” clips a single shock-absorbing pad. In general. trouble. Our cars, like renovations in an apartment, cannot be completed completely; we can only stop at some stage. and turn up the music louder. biglaugh:
Added 5:43 - Feb 16, 2004.
I forgot again. You also need to check the fastening of the entire panel (torpedo) after each winter-summer season and constantly tighten it. Uh-uh-uh.
VAZ 2115 rear shelf rattles
The rear shelf rattled very loudly, made all possible sounds, and creaked and rumbled. I had to turn on the music loudly so as not to hear it. I decided to get rid of it. I read a bunch of advice on the Internet, but I did it my way. I’m sharing my experience with you. It was not in vain that I tried , there is no sound at all now, it’s just a pleasure. I wanted to tear off the original carpet covering on top of the shelf, but after thinking about it I realized that I couldn’t do it as neatly as the factory one. The process was as follows: 1. I tore off the original carpet about 10 cm along the edges 2. I covered the entire shelf with an overlap under the carpet with vibration and soundproofing film 3. I also glued batting material on top of the film 3. At the junction of the shelf with the rear sofa, another layer of batting was applied to remove the gap between the shelf and the seat 4. I glued the original carpet in place 5. I glued the plastic racks around the rear window with Shumka (the material remained just))) 6. In the trunk, I covered 2 iron sticks with the same film (I don’t know what else to call them), which They fit the trunk mechanisms. 7. It was difficult to put the shelf in place, because it had become much thicker) 8. I tightened it on the sides with 2 bolts
The shelf fits better than from the factory) Now I drive as happy as an elephant, no rumble, knocking, squeaking, etc.
1. Guys, on a VAZ 2115 the rear parcel shelf rattles on bumps, how did anyone fix the problem? Question from: Pasha Cherkasov 2. Hello. VAZ 2110 8-valve. injector. It starts only with burnt spark plugs. What could it be? Maybe it won't start due to a speed sensor error? Question from: Kahar Egamov. How to fix the rear shelf on a VAZ 2115.
Similar articles
13 comments on “How to fix the rear parcel shelf on a VAZ 2115. On a VAZ 2115 the rear parcel shelf rattles on bumps”
1) install wood and more fasteners
1) Instead of plastic fasteners, fasten it with 2 M6 bolts and glue it around the perimeter with bitoplast
2. In the sense of the hardened ones. Because of this error, no. It does not affect startup.
- Posts: 2
- From: Crimea
October 20, 2015, 07:17 pm #1 123
Hi all . The problem is that the rear acoustic shelf is very loud. But apparently the problem is aggravated by the fact that the rear seat back on one side does not latch.
- Posts: 12211
- From: Moscow
- Kia Spectra
October 20, 2015, 19:31 #2 123
tape, polyurethane foam, self-tapping screws, liquid nails.
- Posts: 2322
- From: Warsaw, Poland.
- Nissan Pathfinder
October 21, 2015, 17:02 #3 123+ 1
MIFAN, October 20, 2015, 19:17, #1
Hi all . The problem is that the rear acoustic shelf is very loud. But apparently the problem is aggravated by the fact that the rear seat back on one side does not latch.
hands, butt, surgeon. Got the connection?
- Posts: 2
- From: Crimea
October 21, 2015, 20:45 #4 123
Thank you very much for the USEFUL tips.
- Posts: 12211
- From: Moscow
- Kia Spectra
October 21, 2015, 20:50 #5 123
no reason, ask, be interested
- Posts: 2322
- From: Warsaw, Poland.
- Nissan Pathfinder
October 23, 2015, 15:47 #6 123
MIFAN, October 21, 2015, 20:45, #4
Thank you very much for the USEFUL tips.
Dear, before you shit in a personal, think about what they wrote to you, your question looks exactly the same as the question “how to inflate a tire.” Guess why I’m writing here and not in a personal. Because I know how to communicate with people, unlike you.
- Posts: 15
- From: Rostov-on-Don
- Chevrolet Cruze
October 23, 2015, 16:11 #7 123
Many people encounter such a problem at AvtoVAZ, someone tries to do something about it and in most cases it does not work.
Either install another one, but don’t expect big changes, or take it off and ride without it.
- Posts: 9844
October 23, 2015, 20:07 #8 123
Kucha, 23 October 2015, 16:11, #7
Many people encounter such a problem at AvtoVAZ, someone tries to do something about it and in most cases it does not work. Either install another one, but don’t expect big changes, or take it off and ride without it.
Welding! Here is Fse’s way out to walk in a continuous seam -
Acoustic shelf repair
VAZ 2115 acoustic shelf and its repair
Repair work usually does not take much time. Removal and installation takes place in a matter of minutes:
- To replace the pins, you first need to find exactly the same ones as before.
Note: you can choose a more convenient way to attach the acoustic shelf. It can also be installed using self-tapping screws. Moreover, this option will be more reliable and effective.
- To remove them, you just need to unscrew the bolts that held them in place.
- Unhook them from the acoustic shelf in the same way.
- Now connect new parts to the place where the old pins were attached. Then attach them to the shelf.
Acoustic shelf VAZ 2115 classic
In some cases, repairing the acoustic shelf itself is impossible. If it is broken, a characteristic creaking sound will be heard in the car. This is mainly why they change it, because the sounds produced are almost unbearable. If the cause of this creaking is just a small crack, then this problem can be eliminated, and even quite easily: you can simply glue it together.
Note: you need to choose high-quality glue. The best option would be to use epoxy glue.
In addition, many people just want to replace the standard rear shelf, even if it is not broken. After all, most often it is made of rubberized plastic, which is why the sound of the speakers (see How to choose speakers for a car radio on your own) is quite unclear.
Acoustic shelf for VAZ 2115 and its dismantling
Some tips
- Of course, it is best to use some kind of wooden material to make a shelf. What exactly to choose for its manufacture is up to everyone to decide for themselves, because they must be guided by their financial capabilities.
- By the way, all materials have different densities. Therefore, you need to select a material that will be easy to work with. A tree is one of those. It is best to choose a piece of plywood with a thickness of 10 mm.
Note: you should not take a thinner piece of plywood, since the resulting acoustic shelf will be practically no different from the standard one.
- Usually custom acoustic shelves are made by hand by craftsmen who have their own studio. Therefore, you can simply purchase a ready-made one.
Note: As a rule, its price is not much higher than the cost of the materials used for its manufacture.
- To spend less effort in your work, you need to stock up on the necessary tools: drill, sandpaper, plane, glue, coarse mesh used to protect the speakers.
Popular on the site
Currently on the forum:
This page is searched for the following queries: The rear shelf on the Lada 2115 rattles, VAZ-2115 forum, VAZ-2115 discussion.
Currently commenting:
Stalin is not an unambiguous personality, a bloody tyrant, but I don’t know, maybe just such a ruler is more
Many will, Putin is a global personality, the most respected politician in the world, with
What is the current government doing? Finishes off and steals Stalin's legacy. Yeah
Are the front fenders from the top suitable for a regular w124
Russia has enough fools for a hundred years. Answer why North Korea is now pla
However, when he died, the whole country mourned. How many people do you think will pay
Is there no error message?
Good day. Such a problem. Priora 2008 release. I arrived yesterday evening and
Wroom.ru
Media registration certificate No. FS 77-76203 16+
How to eliminate squeaking in the cabin
From time to time, so-called “crickets” take up residence in all cars. This means that some parts become loose, fastenings become loose, and a creaking noise appears in the car interior when driving. Over time, the creaking in the cabin begins to irritate, and we all ask the question: “how to get rid of the creaking?”
In this article we will look at the main causes of squeaking and will deal with eliminating crickets in the car interior. The main sources of crickets in the cabin can be: creaking wheels, creaking doors, creaking steering wheel when turning, creaking suspension, creaking when braking, creaking glass, creaking seats, creaking interior trim and much more.
Let's take a closer look at all the main causes of squeaking and try to fix the problem using available means.
How to assemble correctly
The rear acoustic panel is quite easy to assemble:
- Once you have secured the side and main parts, place the speakers in place, secure them and cover them with radio fabric. You can use a grid instead.
- Make a frame from PCB or plywood and cover it with mesh or radio fabric. Glue the material and leave it to dry for several hours.
- Next, glue all the plywood parts and cover the acoustic element with carpet. You can secure the material with glue, but some use a furniture stapler for this purpose.
- A day later, after the shelf has completely dried, you can mount it using the corners. They will be located in the mounting areas of the rear seat of your car. This installation will not take much of your time and effort.
Such a panel will not irritate your ears with squeaks; even speakers that are not of the best quality will sound clearly in it.
Causes of squeaking
In the steering column
A creaking sound appeared in the steering wheel on bumps - the source is the metal brake pipes that rub against the clamps and hoses. The treatment process is as follows: we separate the rubbing surfaces of the tubes and wrap them with electrical tape or other available means.
Doors from below
It squeaks especially strongly in winter or when the car is not warmed up. The source of the squeak is the door pockets, namely the plastic clips where the speakers are located. You can eliminate the creaking of the door by trying to wrap those same clips in electrical tape, or attach the pockets to self-tapping screws, as I did.
Panels
Again, when the car is cold, the plastic is hard; due to engine vibration, a panel crack appeared, namely from the joints of the trim panel on the dashboard. You can glue the joints with paralon glue or bitoplast or madeline.
Rear seats
“Creak from behind” is a disease of all fourteen. Causes:
- Locks on the sides of the rear seats. You need to put a piece of foam on both sides of this pin.
- The backrest mounting bolts have become loose. You just need to tighten them well, you can put washers.
Rear seat head restraints
There are two ways to eliminate them:
- Remove the head restraints.
- Wrap electrical tape around the joints.
Heater cables are noisy
The cables hit the panel. Treatment: Again, wrap the cables where they hit the panel with black electrical tape.
Seat belt buttons
It happens that over time the red seat belt release buttons begin to rattle. Today there is still no more aesthetic way to solve the problem, other than propping it up with something: stick a piece of cardboard, you can try covering it with electrical tape or thin foam rubber.
Side shelves in the trunk
During the operation of the car, the side trunk shelves begin to rub against the body and make an unpleasant sound.
We fix it as follows: remove the bar where the lock for the trunk lid is located, unscrew the shelf and the joints with the body, glue it with either bitoplast, madeleine, or double-sided tape. Better yet, cover these sidewalls with carpet.
Trunk shelf
Here, the cause of the creaking is all the joints of the shelf with the side panels and holders. There are many options for eliminating problems, but they all involve padding, gluing something to the joints. For example, tape, lining, madeline. You can also cover it with carlet and not only the creaking of the trunk shelf will go away, but also the creaking of the side shelves.
Door trim
First you need to check, by pressing along the edges of the trim, whether it fits tightly to the door. If not, you can try re-hammering it into the clip, or removing the trim completely and replacing all the clips. If the cracking remains, you can glue bitoplast to the metal.
Window lifter handles
To begin with, you can spray it with silicone grease, then add foam rubber. You can also use a pipe sealant.
Locks when opening
We disassemble the door, wrap it with electrical tape or glue foam rubber to the joints of the door and the handle cables.
In the steering when starting and braking
Rather than a squeak, it's a knock. The sound of wires hitting plastic.
To get rid of it, you need to disassemble the panel and wrap madeline around the wiring harnesses.
Glove compartment
We take everything out, tighten everything we can, install a metal leash from the windshield wiper, and cover the glove compartment on all sides with thin foam.
Rear seat back handle
Remove it by wrapping it with electrical tape.
Torsion bars under the front seats
We also eliminate it by wrapping something in the places of contact.
On-board computer noise on bumps
We treat it the same way as everyone else, with paralon.
How to assemble correctly
The rear acoustic panel is quite easy to assemble:
- Once you have secured the side and main parts, place the speakers in place, secure them and cover them with radio fabric. You can use a grid instead.
- Make a frame from PCB or plywood and cover it with mesh or radio fabric. Glue the material and leave it to dry for several hours.
- Next, glue all the plywood parts and cover the acoustic element with carpet. You can secure the material with glue, but some use a furniture stapler for this purpose.
- A day later, after the shelf has completely dried, you can mount it using the corners. They will be located in the mounting areas of the rear seat of your car. This installation will not take much of your time and effort.
Such a panel will not irritate your ears with squeaks; even speakers that are not of the best quality will sound clearly in it.
- ladaautos.ru/tuning/kak-samostoyatelno-sdelat-akusticheskuyu-polku-vaz-2115.html
- zen.yandex.ru/media/thesoundteam/akusticheskaia-polka-dlia-vaz-2115-svoimi-rukami-i-kak-ee-izgotovit-5fc5d2b44fa3013b234efc1d
- drive2.ru/l/10564303/
- drive2.ru/l/5940465/
VAZ 2115 rear parcel shelf rattles, problem solution
Show Control Panel
- Published: January 21, 2019
- In this video I’ll tell you how you can get rid of the always rattling shelf on 2115, without changing the shelf to a wooden or acoustic one. We will need 2 scraps from door seals (we used 3-chamber ones from a VAZ 2109), which we will install along the edges of the shelf. Next, we seat and tighten 2 bolts on both sides and the problem is solved! Music: Jane_Fonda VK - id532600955 public178623127 Previous videos: www.youtube.com/watch?v=Ec9Lj. www.youtube.com/watch?v=wt9oV. Radio repair: www.youtube.com/watch?v=woTHF. Registration Teaser bz - teaserbz.info/u/Shekolyan Teaser bz - browser extension for making money Best stores with cashback: ali.pub/36pcjk Double cashback AliExpress: ali.pub/36pbnh
Comments • 30
Anti-creak could not be simply pasted on
@Pasha framee, well, I changed it on the doors, it turned out without investment, well, in principle, it’s not expensive for one door, but the effect is cool. Well, to each his own, you can glue it)
@Alexander Shekolyan, well, you also need to buy some rubber bands or remove them from the door and put them there)))
It's possible, but why? The effect is cool, no investment)
The car is called finish it yourself.
Krassava bro. made it to the topic!
How is the sound on such a shelf? Fine? Don't need a wooden one?
@Alexander Shekolyan Thank you. I wonder then why insert an acoustic wooden shelf
The sound is good, the shelf does not make any extraneous noise even from the subwoofer, it stands firmly
And I was already thinking about fucking screws
Thank you brother, it helped, I endured it for half a year, now the fire is quiet, there is no nasty creaking, thanks again.
I also see that I screwed in the bolts instead of the standard clips! like!
I did it this way and the effect was very good.
Yes, the result is very noticeable.
Hello! All these places are covered in dust. Doesn't it suck in dust?
@Alexander Shekolyan I see, thank you!
No, I didn't even wipe it there
Thanks for the video, tomorrow I'll try to install it like yours. Still wondering how to make the backrest of the rear seat open well? Otherwise, if it fits into those two pins, then I have to stupidly tear it out.
@Evgeniy Evgeniy, disassemble the back of the rear seat, remove the lock (latch), the plastic seal there is broken, throw it away. Pull up the traction and that's it.
@Evgeniy Evgeniy, disassemble the back of the rear seat, remove the lock (latch), the plastic seal there is broken
On the contrary, the back of the rear seat does not latch onto one spinel, the hook does not lock, how can I fix it?
Glad to help) I don’t even know about the back of the rear seat, I recline without problems, with a little effort, maybe try spraying it with silicone, we’ll have to see what’s wrong with it.
We are finalizing the factory version
If the VAZ 2114 acoustic shelf is expensive for you, but you don’t want to make it yourself from scratch, then you can modify the factory shelf.
To do this you need the following tools and materials:
- Plywood.
- Putty.
- Upholstery.
- Self-tapping screws.
- Epoxy adhesive.
- Jigsaw.
- Knife.
- Emery (sandpaper).
- Stapler.
The shelf is easy to modify; for a good result, the steps are performed in the following order:
see also
- We draw a template on cardboard, use it to draw places for the speakers on the shelf, and cut them out with a jigsaw.
- We use the shelf as a template, draw what we need on the plywood, and cut out what we need on the plywood.
- Using epoxy glue, we glue the shelf to a piece of plywood cut out for it.
- We cover (glue) the finished result with carpet (another fabric), not forgetting about the plywood ends.
Such a shelf, due to its rigidity, will significantly improve the sound, but in addition, you can soundproof the trunk and the shelf itself, this will make the music even better.
For soundproofing the following will be useful:
- Bitomast and Vibroplast (1 sheet each).
- Smoothing tool (usually a roller).
- Construction hairdryer.
Due to the fact that vibroplast perfectly dampens vibrations, it is enough to cover 2/3 of the trunk with it. Bitomast is applied to the shelf itself; it is a noise-absorbing material, it improves the sound and removes vibration echoes and unnecessary sounds. To apply, the materials are laid out on the desired surface, then heated with a hairdryer and rolled out over it.
Carefully monitor the quality of rolling; if there are bubbles under the material, the results of your work will very quickly fail.