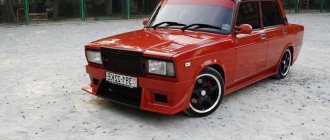
Stylish "six"
The Zhiguli VAZ 2106 began to be produced at the Volzhsky Automobile Plant in 1975. This rear-wheel drive small class III group car with a sedan body is one of the most common among domestic vehicles.
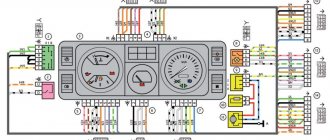
The instrument panel of the VAZ 2106 is a non-demountable metal structure, which is filled with polymer foam and covered with a polymer film. It consists of various vehicle controls and control devices.
Self-tuning of the dashboard
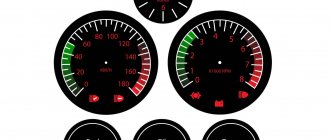
Improving the dashboard of a VAZ 2106 with your own hands is not so difficult. First, release the torpedo placed underneath it. Prepare car instruments with fashionable white dials. A car enthusiast can make dials with a whitish color on his own: you can find the necessary samples on the World Wide Web and reproduce them on a printer using photo paper. Holes are cut out in the scale, and instrument hands are painted with dark varnish to contrast with the white dial.
Once released, the dashboard is covered with flock or faux leather. This will make her more attractive. It is carefully cleaned, coated with Moment glue, onto which the leatherette is attached, the material is smoothed, after which the panel is left for a while to allow the glue to dry.
Improved dashboard
During the drying process, excess leatherette is trimmed, the remains are folded and glued again. You can use electric backlighting consisting of blue light diodes, replacing the old filter at the same time. Diode bulbs are a good addition to the tachometer and speedometer, and one diode is enough to illuminate small sensors and instruments.
Using a felt circle cut out for the edging of the dials will give the LED backlight a vibrant look. Holes are cut in the panel for the measuring sensors, all excess is removed, then the sensors are inserted and connected to the existing wires.
Instead of a clock on the “six” dashboard, it is best to install a voltmeter with a white dial, choosing it so that it is similar in appearance to other sensors. The work of transforming the “six” dashboard is considered very painstaking, but the monetary costs for its implementation will be very small.
So, everything seems to have been pulled together, now let’s get to work:
We remove the standard tidy along with the steering wheel. Removing the instrument panel 2101 is described in detail in the manual for 2101. The steering wheel can not be removed, but then the inconvenience during operation greatly increases.
We try on the dashboard to the seats on the body. The differences in the 2101 and –06 devices immediately become visible:
We begin to eliminate the listed interference:
Installation of both stove levers and places for mismatched fastening (Fig. 6)
The heater valve cable is short. Looking carefully at the end of the cable that fits onto the heater valve lever, we see that it is twisted into a ring 3 times - this is the necessary reserve. Unwind the ring - leaving 1 turn (Figure
The cables are sorted out. Now let's figure out where to place the offset fasteners!
We make a U-shaped bracket (Fig. 9)
Figure 9 – bracket for fastening
And we weld it to the intended place for fastening the dashboard -06. The result is a picture - Fig. 10
Figure 10 – Displacement of the fastening point
Now let's take care of the suction - we need to make brackets for it and place it approximately in the place of the old suction. The bracket is made according to TheForester's drawing (special thanks!)
Figure 11 – Homemade suction bracket
Figure 12 – Hand-made bracket for suction
We weld this example of crazy hands to the crossbar:
Figure 13 – Welded to the cross member
After welding, do not forget to prime to avoid rusting.
We insert a cable with suction into the manufactured bracket and screw in the end switch.
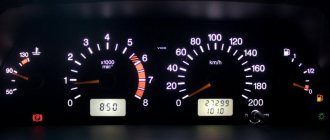
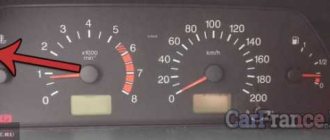
There is another important point - because. the speedometer in 2106 is shifted to the right than in 2101, then it is necessary to rewind the sidometer cable differently (see Fig. 14), however, due to the fact that the cable 2101 is longer, in the new place its length turns out to be excessive even after installing the panel due to excess radii If the cable bends, the speedometer needle may shake, so I recommend using a cable from 2103, 2106 that has a shorter length.
Figure 14 – location of the speedometer cable
This is where the mechanical part of the installation actually ends and the electrical part begins:
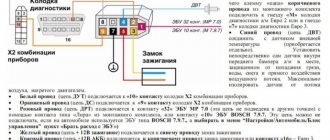
We screw the oil pressure indicator sensor with a tee (Fig. 4) and tighten the wire from the sensor into the passenger compartment, do not forget to put on the boot (2101-3724114 Fig. 4). We tighten the wire from terminal K - the ignition coil into the passenger compartment. We make a connection with the instrument panel harness 2106. The connection diagram when connecting new devices can differ greatly from model to model due to differences in the colors of the on-board network wires, and even the instrument panel harness 2106, so the correct one will be look at your diagram in place and make the appropriate connections.
In short, the decision comes down to a banal reconnection of wires. In 2101 there are 2 connectors of 6 contacts on the left and right, in 2106 - the left connector has 8 contacts, and the right one also has 6, like 2101.
Reconnecting the left connector:
From the existing left connector 2101, bending the contact locking plate, pull out the contact and insert it into the corresponding socket of the new 8-pin connector. We determine compliance using the paper diagram of our 2101 and 2106 harnesses. It often happens that the colors of the wires on the tank (on the CL contact and the rheostat) are mixed up - one option is indicated in the diagram, but in fact it’s the other way around. Having rearranged all 6 contacts of the left connector 2101 into a new 8-pin one, we deliver 2 more wires with contacts that we pre-tightened in steps 1 and 2.
Discontinued - old 6-pin connector 2101.
Reconnecting the right connector:
In principle, the number and list of wires here are the same, and it would seem that the VAZ designers should have left the sequence of wires similar to our 2101 (for the purpose of unification) - but NO, dear designers decided, at least a little, but to add a little more hassle to Kulibin like you and me, so here It also requires studying both schemes, searching for matches and rearranging contacts. To make it more clear, we rearrange it from the old 6-pin connector to the empty 6-pin connector we removed earlier in the previous paragraph of the text.
Connecting the buttons, I think, will not cause any problems.
Since talking on paper is very good, but I also want something as an example, Figure 15 shows a diagram of the connection to the wiring of a VAZ 2101 (precisely 2101). The diagram should be used as a guide, not forgetting about possible differences in reality. I think it will help you figure it out faster.
Next, for complete similarity with the 2106, you need to install the 2106 tape recorder console, but this is not for everyone - and in fact the topic of a separate article, because there it will be necessary to install an emergency light, a fuel pressure control lamp, and a rheostat, which IMHO is not needed at all - it is better to leave the switch in the dashboard as in 2101.
Instructions for dismantling the instrument scale
Removing the casing requires work with a 10 mm wrench and several screwdrivers. The panel is dismantled if it needs to be replaced, as well as when performing body work, since it can become an obstacle and become damaged. The actions are performed in the following order.
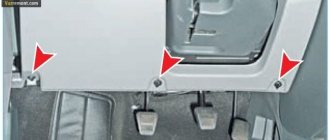
- In the glove compartment, unscrew several nuts on the outermost fastening of the instrument panel and the bolts located under the instrument cluster.
- Carefully, using a screwdriver, remove the plate from the receiver casing with auxiliary adjustment units, inside which there are several bolts securing the radio panel. It is advisable to remove them, while supporting the mounting bar and preventing it from falling. Remove the receiver panel.
- Move the fastening nuts and remove the decorative elements of the steering column.
- Taking care not to damage anything, use a screwdriver to move the clock in the panel. It is advisable to mark and disassemble the wiring, remove the backlight from the clock and remove it.
- Separate the wire from the light box illumination lamp.
- Unscrew the mounting bolts and remove the work shelf.
- Remove the fastening bolts at the bottom of the panel.
- Remove the switch for the electric interior heating fan, mark the connection points with a marker and remove the switch. Using a screwdriver, remove the handles of the heating shutters.
- Remove the instrument panel. Using a screwdriver, lift it up at the fixing points and pull it forward. Unhook the cable from the speedometer. Be sure to mark the packages of electrical wires so as not to get confused during installation. Unplug the electrical wiring and remove the instrument panel.
- Remove both side decorative trims from the windshield frame by removing the three fastening screws.
- Release the radio panel by removing the side fasteners.
- Lift and remove the panel from the VAZ 2106.
This completes the dismantling of the VAZ 2106 instrument panel. Assembly is carried out in reverse order.
Modernization ideas: headlights and everything else
Headlights are the eyes of the car. Over time, glass becomes dull, turns yellow, or even becomes unusable. But this is not the reason for their modification or complete replacement, but the desire to turn the VAZ into a beast with bright, powerful headlights.
Oddly enough, a simple way to improve is complete replacement. It is worth noting that body parts for the VAZ 2106 are similar to BMW parts, so we will replace the old headlights with new ones from BMW.
The process will not take much time. Open the hood and, having completed the necessary steps, take out the old headlights. We try on the new headlight and drill the holes necessary for installation, after which we install it and tighten the fasteners. All that remains is to properly adjust the light, and the work is completed.
If you have not found spare parts for the VAZ 2106 from foreign brands, but still want to update the headlights, you will need to visit a car store and purchase several diodes that will diversify the appearance of the car.
Angel eyes give 2106 brutality to the domestic auto industry
Working with the dashboard
To shock others and give yourself pleasure, we will tune the instrument panel of the VAZ 2106 using LEDs.
A popular accessory is LED strip. It is not difficult to install it yourself, and the wide range of colors and brightness attracts car owners.
The backlight is connected in two ways: directly to the battery and to the wires leading to the car’s dashboard. The first method attracts with its reliability, while the second captivates with the ability to turn on the backlight immediately during ignition.
Instrument panel GAZ-3110
Make sure you have two wires, switches and a fuse
When installing the latter, please note that it should be close to the battery. After soldering the first wire, put a protective tube on it, then connect the second wire to the battery. But tuning the VAZ 2106 is not finished yet
But the tuning of the VAZ 2106 is not finished yet.
Installation of double glazing
Most car owners dream of installing double windows on their VAZs. Why dream if it’s easy to realize your idea?
Since the second glass is tinted. it is located from inside the car. We cut it from the bottom edge so that during installation the corner of the glass remains visible and there is a distance of about 1 mm between the two glasses, otherwise the surfaces will be scratched against each other. Do not forget that when installing the second glass, the weight of the door will increase.
Brave car enthusiasts will not forget about tuning the VAZ 2106 bumper; it allows you to realize all your ideas and express the character of the car owner with the help of all kinds of drawings or even entire scenes on the bumper. Painting it yourself is not easy, so it’s better to contact a service station.
Don't be afraid to experiment, and then the car will become the most noticeable on the road.
- Airbrush
- Painting defects
- Body repair
- Materials
- Equipment
- Spray booth
- Salon
- Painting theory
- Tuning
- Do you want to know how to remove dents on your car in different ways?
- You don’t know how much material is needed to paint a car: a painter’s secret
- How to remove corrosion and rust from a car
- Removing rust from a car body: a simple solution
- I made and adjusted the air pressure switch for the compressor myself: find out how
- July 2017
- March 2017
- August 2016
- July 2016
- June 2016
- May 2016
- March 2016
- February 2016
Tuning dashboard VAZ 2106
In the front part of the cabin of any car there is a dashboard, which includes an instrument panel, a stove and additional controls. The correct name for this part of the car is “dashboard”. Not only car enthusiasts, but also manufacturers pay great attention to it.
The torpedo on a VAZ is not a very expensive part of the body. Many drivers try to make its appearance more attractive. This is correct, because when sitting behind the wheel of your car, you first of all pay attention to the instrument panel, that is, to the dashboard of the VAZ 2106. If it is in poor condition, it is useful for the driver to know 3 effective ways out of the situation.
Transformation of the torpedo and interior of the “six”
- Instead of the old dashboard, install a new, modern one. The result will bring joy to the car owner, but the cost will most likely upset you. Such a procedure for replacing a dashboard on a VAZ will be quite expensive. And the latest generation dashboards are not reliable and safe, which characterizes old factory torpedoes.
- Puttying and painting. This is an interesting option for improving the instrument panel, but the result is unlikely to last long. After a certain period of time, all painting work will have to be done again.
- Dashboard upholstery with artificial leather. Not every driver will be able to perform this operation beautifully and competently. Craftsmen who do it well will charge a lot.
Changing the appearance of the torpedo
The next part that just needs to be modernized is the torpedo. The last one in the “six” looks too old-fashioned and does not perform many necessary functions. We offer several simple options for tuning it:
- purchasing a new panel that will provide more comfortable use of the machine;
- painting a torpedo using a material such as liquid rubber. Compared to the first option, this method will be much cheaper and will allow you to update the interior, but the procedure will have to be repeated every 6-8 months;
- panel reupholstery using natural (expensive option) or artificial leather. To carry out this operation, you will need relevant experience, but you can always use the services of specialized companies.
Interior reupholstery — Lada 2106, 1.6 l., 1988 on DRIVE2
The interior was disassembled for body repairs. At the same time I decided to cover everything with light leatherette. I re-upholstered it for the first time and it was my first experience working with leather. Accordingly, mistakes cannot be avoided, enough of them were made, folds were cut off incorrectly somewhere, and a lot of material was translated. Despite the shortcomings, I was pleased with the result.
The first thing that was reupholstered was the ceiling from 2107. After the ceiling, it seemed like a simple matter to me and I took hold of the dashboard and lit a cigarette. The shape of a six-piece torpedo is not so simple that it can be covered in one piece; folds are guaranteed. I came up with a little trick along the way. We take the torpedo and disassemble it. If there are cracks or other imperfections, you need to sand the protruding parts. We degrease everything.
Disassembled torpedo 2106.
It is wise to start gluing from the right side of the tidy, where the deepest recess is located.
Gradually coat it with glue, heat it with a hairdryer, pull it out and glue it. The same operations with the glove compartment and moldings. Glue used 88 Moment in jars. It took about 4 meters of leatherette material and 6 cans of glue, 750g each.
We disassemble the dashboard and paste it over according to the same principle.
Reupholstered dashboard.
It was not possible to pull the material onto the dashboard; I made a cut on the left side of the driver's side. It doesn't catch the eye. This is how it turned out when assembled.
Instrument panel in the dashboard.
The console ala GTI, the gear knob and the hazard warning panel were also reupholstered.
The steering column cover and steering wheel have not yet been retightened. Another problem: I didn’t take into account the thickness of the material; the dashboard and glove compartment needed to be sharpened around the perimeter before covering it. It's hard to get up, don't repeat my mistakes.
Radio tape recorder
No upgrade of the “six” is complete without installing a speaker system or at least a simple radio. A standard place for a radio receiver in the beard of a small-sized “six”. It should be trimmed to standard 1DIN. This can be done with a metal file. Then sand the edges with sandpaper.
Installing a radio
The radio tape recorder is attached to the beard using a metal case. Radio installation steps:
- Having bent all the tabs, use special spatulas to remove the radio from the case.
- The metal base is inserted into the prepared hole.
- We fix it using special tongues.
You can bend all the tabs or selectively - Then carefully insert the radio unit itself, which should snap into place.
Cables are included to connect the player. The most commonly used are:
- black - “earth”;
- red and yellow (often wound together) - ignition “+”;
- blue - power for the active antenna;
- white - front left (FL) speaker;
- gray - front right (FR) speaker;
- green - rear left (RL) speaker;
- purple - right rear (RR) speaker.
You can connect the radio to the ignition switch to the free INT terminal. Then it will only work when the engine is running and the ignition is on. This connection scheme will protect forgetful car owners from completely draining the battery.
If you twist the red and yellow wires together, the radio will no longer depend on the ignition. You can listen to music with the ignition off too.
The standard connection diagram is usually glued to the cassette player
Typically, a connection manual comes with the audio system. Following the instructions and color scheme, installing audio equipment in the “classic” will not be difficult.
Speaker installation
A good place to place the speakers would be the front door panels. If you choose the right size speakers, they will fit here very well. To install, perform the following steps:
- Remove the trim from the doors.
- On the casing we cut a hole for the speaker. A hole of the required size can be made using a template. To do this, trace the speaker on paper. You need to work carefully so as not to miss the size.
- We attach the column and screw it to the casing using the fastening that comes with the kit.
- We carefully lay the wires in the cavity of the doors so that they do not sag or fall out.
- We install the casing in place.
To give a finished look, the door cards are covered with leatherette, and a protective grille is installed on the speaker.
Additional speakers are placed on the dashboard or on the side pillars of the windshield.
For better sound distribution, high-frequency speakers are installed at the head level of the driver and passenger
If the car owner changes the entire beard, creating it himself to his own size, then he can place a 2DIN radio in it. A player with a large screen will add charm to the appearance of the car.
If the car has a 2DIN radio, then you can connect the rear view camera to it
Some craftsmen insert speakers instead of air ducts. But from personal experience I know that the standard “six” torpedo does not have side window blowing. In humid and cold weather, windows fog up and freeze. If you remove the air ducts for the windshield, the airflow will worsen even more. Therefore, I do not recommend this installation of speakers.
Video: installing speakers and Shumka
Antenna installation
The “six” did not have a standard antenna installed, but a place for it was provided on models before 1996. Adherents of original spare parts can find their original antenna on the car market. It is attached to the front fender of the car.
To do this, you will need to make a hole in the wing, install the antenna, tighten the bolts and connect the wires to the radio and ground. This installation method is quite complicated and not every car owner will decide to make holes in the body.
The “native” antenna of the VAZ 2106 works well only in the city
The ease of installation is distinguished by the interior active antenna, which is attached to the windshield. It is not exposed to precipitation, does not require additional care, and does not interfere with aerodynamics when the car is moving.
When purchasing an interior antenna, please note that the kit should include instructions, fasteners and stencils to simplify installation. There are two ways to install a radio antenna inside the cabin:
- The housing is attached to the glass behind the rear view mirror, and the whiskers are glued in opposite directions at the top of the glass.
- The antenna body is secured to the top of the windshield on the passenger side, and the poles are glued along the edges of the glass at right angles to each other.
The antenna installed in the upper corner of the windshield does not interfere with the view
Find 11 differences: how VAZ modernized the VAZ-2101
The Fiat 124, which has become a real long-liver in the form of numerous “reincarnations” of the Lada, was produced in Italy itself not so long ago - until 1974. However, over eight years, the Italians made several different modifications of the 124, which were noticeably different in appearance. But the VAZ team, who launched the 2101 in its image and likeness, also did not sit idly by.
In 1970, VAZ began production of the VAZ-2101 - essentially a “Russified version” of the 1966 Fiat 124 . Externally, the Soviet “kopek” was exactly like the early Fiat, except that the door handles were not installed for a natural grip, but were recessed into the plane of the door - just like on the 124 Special modification. By the way, exactly these parts can still be found on the 2016 Niva .
More beautiful outside
Having put the first model on the assembly line, VAZ actively began developing “prospects” - both those designed for the near future (VAZ-2103) and more distant ones, because work on front-wheel drive in Togliatti began already in 1971!
But, in addition, the designers wanted to somewhat modernize the appearance of the VAZ-2101. It was a novelty for the Soviet consumer, but the “kopek” market was treated as a passed stage. Moreover, before our eyes were the very modifications of Fiat, which, with minor changes, looked much fresher and more attractive.
Of course, the designers immediately wanted big changes - for example, different front optics, and not four-headlight round ones, as on the VAZ-2103 and Fiat "specials", but a more modern rectangular one, a new solution for the radiator grille, "hugging" headlights, more massive bumpers and so on. Subsequently, the ideas for a deeper modernization of the “classics” were embodied in the design of the VAZ-2105.
However, the VAZ team wanted to quickly refine the base model in order to increase the attractiveness of the Lada in foreign markets. At the same time, it was decided to limit the “quick” modernization to minor cosmetic modifications without touching the body panels. More precisely, without changing the bodywork as part of this modernization.
To begin with, we decided to abandon the massive fangs on the bumpers - an attribute of cars of the sixties. After all, more modern versions of the 124 no longer had them, and the upper and lower parts of the bumper were separated by a rubber strip. On the early “elevens” the same strip reached almost to the very end of the bumper, and a little later (since 1978) neat plastic trims appeared in the corners.
The headlights of the FG-140 did not change externally, but inside the optical element there were side lamps, which were combined in “sidelights” with turn indicators. In addition, the diffusers became orange and lost their V-shaped profile. Thus, the operation of the front turn signals when the lights are on has become more noticeable.
The radiator grille has also changed: the vertical bars have become more frequent (19 instead of 9 on the VAZ-2101), and the emblem body has received a rectangular shape. And that’s not all: four holes appeared in the front panel of the body, which improved engine ventilation and “revitalized” the appearance of the car. It is interesting that the later 124s also had slots in the front apron under the radiator grille, but not four small ones, like on a Soviet car, but a couple of larger ones - approximately like the VAZ-2106 or later “three-ruble cars”.
VAZ-21011/21013 is easy to distinguish from the front by the absence of fangs on the bumpers and four ventilation holes under the radiator grille
It would seem like mere little things, but the front part of the Zhiguli began to look truly more modern, becoming in some way “timeless”. In addition, one should not sneer at the inconspicuousness and insignificance of these improvements - each new part meant for the plant a new stamp and an increase in the range of components.
Isn’t it very similar to the “eleventh”? But this is a Fiat 124S!
The “Kopeyka” from the rear is easily identified by its fangs and reflectors under the rear lights. Please note that early VAZ-2101s did not have mudguards or a reversing light!
The eleventh model could not be confused with an ordinary “penny” even when viewed from the rear. Firstly, the reversing light “moved” from under the bumper to the rear panel - under the right light.
Secondly, the rear lights themselves have also changed, which, by analogy with the sidelights, have received a U-shaped glass profile. Since the reflectors were removed from the rear panel, placing in their place the reverse gear and the “Zhiguli 1300” nameplate, reflective elements were installed between the sections of the rear lights.
Again, a very similar solution can be seen in the Fiat 124 Special.
Pictured: Fiat 124S
Another noticeable innovation of the exterior is the exhaust ventilation grilles on the rear roof pillars. They were not a new product, since VAZ first had them on the three-ruble car, and Fiat also had them on modifications of the 124.
On early VAZ-2101 (before 1974), the outside mirror had a round body and was located on the left front wing. On the VAZ-21011 it became rectangular and was installed in the same way as on a three-ruble note, that is, on the driver’s door. Subsequently, the same solution was applied to the “unit” until the model was discontinued from production.
Early VAZ-2101. Pay attention to the round mirror, the “blank” front panel, the fangs on the bumper and the radiator grille with 19 vertical bars.
Improvements to the exterior of the “kopek”, of course, were carried out with an eye on Fiats - and the presence of Italian specialists at the plant until 1974 also had an effect.
But at the same time, all the work on modernizing the VAZ-2101 was carried out on its own - that is, VAZ began to independently facelift the Zhiguli. It is important that the interchangeability of parts was completely preserved - if necessary, you could use the bumper, grille or taillight that were at hand. For this reason, quite a few former VAZ-2101s with a “leaky” front panel were running on Soviet and subsequently Russian roads - it’s just that during body repairs a spare part from model 21011 was used. The only thing that suffered was the appearance of the car, but in times of total shortage the majority of Soviet car owners did not particularly bother with aesthetics issues. As they say, if I don’t care about fat, I wish I was alive.
More beautiful inside
Despite the apparent similarity of the interior with its predecessor, the VAZ-21011 now has a completely original interior. Yes, the changes were more of a cosmetic nature, but they were there. The modification received different seats and door trim, which were noticeably different in design from the “penny” ones. The instrument panel lost its “aluminum” finish and received a more respectable “wood” finish; the fittings also became more laconic and functional.