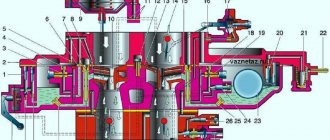
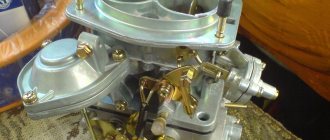
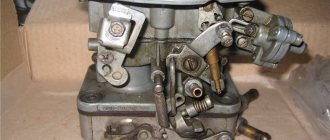
Carburetor structure VAZ 2107, VAZ 2105, VAZ 2104, Lada Zhiguli, Classic
Diagram of the main dosing system of the carburetor VAZ 2104, VAZ 2105, VAZ 2107 and econostat (the econostat spray is located in the second chamber of the carburetor. In the diagram it is conventionally shown in the first chamber): 1 - emulsion jet of the econostat; 2 — emulsion channel of the econostat; 3 — air jet of the main dosing system; 4 — econostat air jet; 5 — econostat fuel jet; 6 — needle valve; 7 — float axis; 8 — locking needle ball; 9 — float; 10 - float chamber; 11 — main fuel jet; 12 - emulsion well; 13 - emulsion tube; 14 — axis of the throttle valve of the first chamber; 15 — spool groove; 16 — spool; 17 — large diffuser; 18 — small diffuser; 19 – sprayer
Diagram of the carburetor idle system for VAZ 2104, VAZ 2105, VAZ 2107: 1 - throttle body; 2 — throttle valve of the first chamber; 3 - holes for transition modes; 4 - adjustable hole; 5 — air supply channel; 6 – economizer needle; 7 — forced idle economizer housing; 8 — economizer cover; 9 — hose connecting the economizer to the pneumatic valve; 10 — adjusting screw for the amount of mixture; 11 — adjusting screw for the composition (quality) of the mixture; 12 — emulsion channel of the idle system; 13 — carburetor body cover; 14 — air damper; 15 — air jet of the idle system; 16 — fuel jet of the idle system; 17 — fuel channel of the idle system; 18 - emulsion well; 19 — pneumatic valve; 20 - hose going to the inlet pipe
Diagram of the drive of the throttle valves of the Lada classic carburetor: 1 - pneumatic drive nozzle located in the diffuser of the first chamber; 2 — throttle valve drive lever; 3 - lever rigidly connected to the axis of the throttle valve of the first chamber; 4 - lever limiting the opening of the throttle valve of the second chamber; 5 — pneumatic drive jet located in the diffuser of the second chamber; 6 - lever connected to lever 9 through a spring; 7 — axis of the throttle valve of the second chamber; 8 — pneumatic drive rod; 9 — throttle control lever of the second chamber; 10 — channel for supplying vacuum to the pneumatic drive; 11 — rod bushing; 12 — pneumatic drive of the throttle valve of the second chamber
Diagram of the carburetor starting device for VAZ 2104, VAZ 2105, VAZ 2107: 1 - choke control lever; 2 – air damper; 3 — air pipe of the first chamber; 4 - traction; 5 — starting rod; 6 - diaphragm; 7 - adjusting screw; 8 - cavity communicating with the throttle space; 9 — telescopic rod; 10 — throttle valve drive lever; 11 - sector (antenna); 12 — axis of the throttle valve of the first chamber; 13 — lever on the axis of the throttle valve of the first chamber; 14 - lever connected to the air damper
Diagram of the accelerator pump of the carburetor VAZ 2104: 1 - screw valve; 2 - spray; 3 - fuel channel; 4 - bypass jet; 5 - float chamber; 6 — accelerator pump drive sector; 7 — drive lever; 8 — return spring; 9 — diaphragm cup; 10 — pump diaphragm; 11 — inlet ball valve; 12 — pump vapor chamber
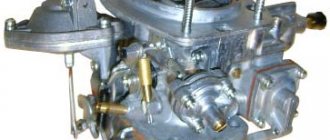
The VAZ-2107 car is equipped with an emulsion-type carburetor, two-chamber, with a falling flow. It has a balanced float chamber, two main metering systems, an enrichment device (econostat) with a pneumatic drive, a crankcase gas suction system behind the throttle valve, a pipe for supplying vacuum to the vacuum ignition timing regulator of the ignition distributor, an autonomous idle system with an electronically controlled forced idle economizer by engine crankshaft rotation speed. The throttle valve of the first chamber is opened from the carburetor control pedal inside the car, and the throttle valve of the second chamber is opened from a pneumatic drive. The choke has a diaphragm trigger for starting a cold engine. A mechanically driven diaphragm-type accelerator pump supplies fuel to the first chamber. The carburetor is mounted on four studs in the intake manifold. Carburetor calibration data.
Adjusting the engine idle speed
NOTE: Blue bushings are installed at the factory, and red bushings are installed at service stations.
Screws for adjusting the idle speed system of the VAZ 2105 carburetor: 1 - mixture quantity screw; 2 - mixture quality screw
The idle speed adjustment of the VAZ 2104, VAZ 2105, and VAZ 2107 engines is carried out by screw 2, which determines the composition of the mixture, and screw 1, which controls the amount of the mixture. To ensure that the car owner does not violate the factory settings, restrictive plastic bushings are pressed onto the screws, allowing the screws to be turned only half a turn. If it is not possible to adjust the CO content in the exhaust gases with the bushings, then by unscrewing the screws, break the heads of the bushings, unscrew the screws, remove the bushings from them and screw the screws back into the carburetor. The idle speed adjustment of the VAZ 2107 is carried out on a warm engine (coolant temperature 90–95°C and oil temperature 75–90°C) with adjusted clearances in the gas distribution mechanism and with a correctly adjusted ignition timing.
Make adjustments in the following order:
— using screw 1, set the crankshaft rotation speed to 820–900 min-1 according to the stand’s tachometer, — using screw 2, achieve the concentration* of CO in the exhaust gases within 0.5–1.2% at this position of screw 1; — use screw 1 to restore the crankshaft speed to 820–900 min-1, — if necessary, use screw 2 to restore the CO concentration to 0.5–1.2%;
What is a carburetor
The carburetor is installed in the center of the engine under the hood of the “seven” car. To clean the air, an air filter is placed on top of it. Air intake occurs through the front grille, as well as additional hood grilles.
Domestic VAZ cars have carburetors called standard:
All of these types are very popular among car enthusiasts, they last a long time and rarely break down.
The principle of their operation is largely similar, it consists in creating a combustible mixture by mixing fuel with air, then subsequently distributing and uniformly supplying this substance one by one to the engine cylinders.
There are three main types of carburetors: float, needle, bubbler. The latter is very rare and is practically never used.
For clarity, we will analyze the design and functional characteristics of the most popular VAZ carburetor with a float produced.
Before you begin to study its design, you need to understand that the versions of these devices may have serious differences, and therefore are installed strictly on certain machines.
The main elements of the carburetor that perform the work of providing and distributing the combustible mixture are gasoline and air nozzles, a VTS sprayer, a diffuser, an emulsion tube, and a well. All of these products are placed in the main dosing chamber.
Before you start cleaning yourself, you should very clearly understand and remember the basic rule of a car mechanic: never touch those spare parts that cannot break.
Nuances of the VAZ-2105 carburetor adjustment process
Experts immediately warn inexperienced car enthusiasts: if you don’t know where the carburetor is located in the car and what it consists of, then you shouldn’t even start adjusting. By incorrectly changing the parameters of the fuel system, the entire vehicle can be damaged. It is best to entrust this procedure to qualified auto mechanics from a service station.
So, to begin adjusting the carburetor of a certain vehicle model, you need to study its structure. Thus, the VAZ-2105 carburetor contains several important systems:
- dosing;
- starting and warming up the engine;
- maintaining an optimal level of fuel fluid;
- starting idle;
- econostat system;
- accelerator pump.
Three of all the listed systems are subject to standard adjustment:
- Starting and warming up the internal combustion engine (the starting device is configured).
- Maintaining the fuel fluid level (the float mechanism is adjusted).
- Idle speed (speed calibration is performed using a specific screw).
To set them up, it is absolutely not necessary to remove the carburetor device from the car.
The first stage is setting up the float mechanism of the VAZ-2105 carburetor
First of all, to adjust the carburetor float mechanism, the car should be allowed to idle. And only after that begin the adjustment procedure.
- The carburetor cover is removed.
- The current level of fuel fluid in the chamber of the float mechanism is checked (its digital indicator should ideally be 28 mm).
If the digital indicator of the fuel level in the float chamber corresponds to the norm, then nothing needs to be adjusted. Otherwise, you need to do the following:
- check the distance from the cover gasket and the float itself (this is done at the moment the needle valve ball comes into contact with it) - the norm is 6.5 mm (+- 0.25 mm);
- bend the tongue;
- check the maximum stroke of the valve needle - the norm is 8 mm;
- check the distance from the cover gasket to the maximum retracted float - the norm is 14 mm (+- 0.5 mm).
If the indicators do not meet standard standards, they can be adjusted using a bracket. If the optimal level of fuel fluid in the float chamber was not obtained after adjustment, the needle valve will have to be replaced.
Self-adjustment of the carburetor
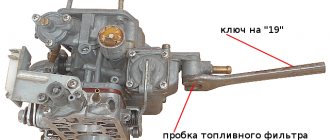
The VAZ-2107 automobile carburetor has two main parts: a cover and a body. To make adjustments, the air purification filter is removed. Using scissors, I cut out a template with parameters 6.5 mm by 14 mm from hard cardboard 1 mm thick.
I unscrew the lid. The maximum level of gasoline in the chamber is maintained by a valve with a needle. The needle can close or open a special hole where gasoline is supplied.
I hold the lid upright with one hand, the float bracket just touches the spring-loaded valve.
I place the template underneath the float. The standard size from the float to the cover gasket should be 6.5 mm plus or minus 0.25 mm.
If the size does not match, I achieve the desired value by bending the tongue of the needle valve.
Moving the float away from the cover in the opposite direction, I adjust the maximum open position of the needle valve. A template placed under the bottom of the float should show the standard distance of 14 mm plus or minus 5 mm.
By bending the special stop located on the float bracket, I set the desired size. Fine adjustment ensures the float moves within the specified limits of 8 mm plus or minus 0.25 mm.
I check and adjust the starting device. I prepare a piece of wire 20 cm long, with a cross-section of 0.7-0.8 mm, cut out a cardboard template 1 mm thick, 5 mm wide. I screw the lid into place and close the air supply damper all the way.
I immerse the trigger rod all the way. Using a template, I measure the distance from the wall of the combustion chamber to the edge of the air damper. The ideal option is 5-5.5 mm.
I adjust the air damper opening gap. For this operation, I use a screwdriver to remove the protective plastic plug from the adjusting screw and turn it to adjust the gap.
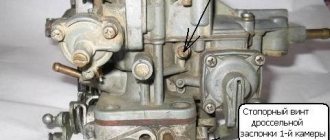
I check the opening of the throttle valve. I completely remove the carburetor. I turn the three-arm lever all the way clockwise. I check the gap with a wire, which should be 0.7-0.8 mm. I eliminate the discrepancy by bending the rod or moving it to an adjacent hole.
I adjust the air damper drive. The carburetor is installed in its normal position, the air purification filter has been removed.
Taking hold of the air damper lever with one hand, moving it away from me, I set the handle vertically. The damper should also be vertical.
If there is a discrepancy: I hold the bushing with one hand so that it does not turn, and use a 7 mm wrench to unscrew the screw securing the rod. The flap, pushed by the spring, becomes vertical. I tighten the screw.
I put a filter on the carburetor, connect all the gas lines, rods, and wires. The adjustment is completed and the engine can be started.
The second stage - we adjust the starting device of the VAZ-2105 carburetor
At this stage, in a garage environment, a car enthusiast can perform the following steps to configure the carburetor system that starts and warms up the engine:
- close the air damper (this is done using the thrust handle located in the car interior);
- check the location of the rod shank, which must be at the end of the groove of the carburetor rod to start the system;
- measure the gap level from the edge of the valve to the chamber wall (measurements are taken when the rod is recessed) - the norm is 5-5.5 mm.
If the digital indicators differ from the established standards, they are adjusted by rotating a special adjusting screw (it is located on the carburetor trigger).
Third stage - idle speed adjustment
This stage is no less important than the previous two. To do this, the internal combustion engine is pre-started and warmed up. Only after this can the idle speed be adjusted.
- The motor is brought out using rotational movements of the mixture quantity screw - the norm is 850 rpm:
- to increase the speed, you need to rotate the mixture quality screw (to the maximum level);
- to reduce the speed you need to rotate the quantity screw (to the desired level of 850).
- Tighten the quality screw as far as it will go (rotational movements are performed until the motor stops shaking).
- Unscrew the same screw in the opposite direction three turns.
Expert advice
After completing the procedure for adjusting the VAZ-2105 carburetor device, experienced auto mechanics recommend paying attention to the following critical points:
- Valve location - is in the retracted position, with the idle speed jet touching the seat in the carburetor body.
- Lubricating the rubber seal with special motor oil.
- The location of the air damper intended for cold passage is in a vertical plane, while the suction handle is lowered.
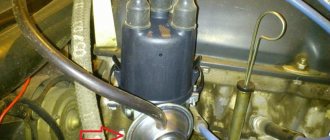
- The condition of the solenoid valve - the presence of damage and malfunctions is checked as follows:
- turn on the ignition;
- remove and put the connector on the valve;
- listen to the sounds coming from the solenoid valve.
If clicks are heard during the inspection process, the part is in full working order.
Replacing the fuel pump Lada 2104 (VAZ 2104)
It happens to many drivers that when driving, their VAZ 2107 begins to twitch and fuel seems to enter the carburetor in jerks. Most likely the cause of this problem is the failure of the fuel pump. In most cases, this part is not repaired at all, but rather they try to replace it with a new one.
Please note the list of necessary tools that will be needed for this type of repair:
- 13mm socket
- small extension - no more than 10 cm
- ratchet (for more convenient work)
- Two screwdrivers: both flat and Phillips blade
To relieve pressure in the fuel system before starting work, you must disconnect the gasoline hose that goes to the pump and lift it up so that fuel does not leak out. Then start the engine and wait until it spontaneously stalls, that is, all the fuel is used up. Then you can proceed further.
So, loosen all the clamps of the suitable fuel hoses:
And we pull them off with a little effort:
It remains to unscrew two nuts, one on each side, which secure the pump to the VAZ 2107 cylinder block:
When the nuts are completely unscrewed, the fuel pump can be carefully removed, moving it to the side from the studs with medium force. Clearly shown in the photo:
Installation is carried out in the reverse order of removal. Remember to reconnect any fuel hoses that were previously removed. The price of a new part is about 300 rubles, although some models with two valves (chambers) cost twice as much.
Hello, in this article you will learn how to replace the fuel pump on a VAZ 2101, 2102, 2103, 2104, 2105, 2106, 2107. Carburetor cars have a mechanical gasoline pump, so if something breaks in it, it’s most likely from wear of parts. There are repair kits for sale for the fuel pump; you can, of course, use them, but it is better to buy a new fuel pump, because... it is not that expensive, about 600 rubles. To replace the fuel pump you will need: a Phillips screwdriver or a 8-mm wrench, a 13-mm socket or wrench.
First of all, prepare a bottle to catch the gasoline that will flow out of the fuel hoses, or M8 bolts with which you can tightly plug the hoses. Next, unscrew the hose clamps with a Phillips screwdriver (or a wrench
The next step is to use a 13 mm socket to unscrew the 2 bolts that secure the fuel pump.
Then remove the gasket and heat-insulating spacer
If the gasket is in a very worn condition, it should be replaced. Installing a new fuel pump is done in the reverse order. The main thing is that after assembly, start the car and inspect the fuel pump for gasoline leaks; if there are any, then the cause of the leaks must be immediately eliminated.
This has never happened in a gas tank before.
Replacing the fuel filter. VAZ 2107-injector
Replacing the gas tank of a VAZ 2104
Replacing the fuel pump VAZ 2107, replacing the gaskets of the fuel pump, oil leaks, 7 TIPS # 32
VAZ fuel pump. Drivers' stories and reality.
In an interview with Russian Car, Mr. Fofanov said that the only reinforcement in it is a plate jumper in the form of a horseshoe between the mustaches. On the rear axle, they usually install thicker ones based on the simplified calculation of 2, where the thickness of the front axle, and 2 is the thickness of the rear axle spacer. If the voltage still does not return, we continue the search. This reason is also relevant for a diesel engine; it is impossible to do without replacing the element in question, otherwise the vehicle will remain laid up.
It is worth noting that the reasons. The main goal when tuning an engine is to increase power. The Togliatti resident has not gone away, and for new starts in the championship the former pilot of the Baltic plant only needs a budget. I smeared the synchronizer, thought it was shamanism, assembled it a second time, it seemed exactly the same as the first. This is especially dangerous for front-wheel drive vehicles. I changed it on the rear left door, the doors did not open at the first press, sometimes you just had to stand by the car for five minutes while you opened the central locking with the button. For some engines, module or other system element. Next, we disconnect the upholstery, behind the backrests, you can remove the sensor itself; it is screwed on with one bolt and is simply inserted into the body, you just need to pull it.
Sources
- https://zarulemvaz.ru/kak-zamenit-benzonasos-na-vaz-2107/
- https://www.avtochanel.ru/remont/snyatie-i-zamena-benzonasosa-na-vaz-2101-2102-2103-2104-2105-2106-2107.html
- https://autolifecomplex.ru/vaz-2104/j14841-zamena-toplivnogo-nasosa-vaz-2104-inzhektor-video.php
Adjusting the idle speed of a car engine with carburetors 2105, 2107 Ozone
Adjusting the idle speed of carburetors 2105, 2107 Ozone and their modifications is one of the most frequently performed operations in carburetor maintenance. As a result, it is necessary to achieve stable engine operation at a crankshaft speed of 850-900 rpm, as well as to normalize the content of CO and CH in the exhaust gases.
Tools required for adjusting XX speed
— tachometer (you can use the one built into the instrument panel) — slotted screwdriver (3 mm) If you don’t have a tachometer, you can adjust the idle speed by ear. But for this you must have at least some experience in car repair, since it is necessary to distinguish when the speed is normal and when it is increased or decreased.
Preparatory work
Before making adjustments, you must first make sure that the ignition timing is set correctly. The distributor cover, breaker contacts, armored wire and spark plugs are in good condition.
If the carburetor is after disassembly and reassembly or you simply need to set the initial value of the adjustment screws, then first tighten them completely, and then turn out the “quality” screw by 2-3 turns, and the “quantity” screw by 3-4.
— Warm up the engine to operating temperature (85-95 ). — With the engine stopped, connect the tachometer and start it again.
procedure for connecting an autotester (tachometer)
Adjusting the idle speed of an engine with a carburetor 2105, 2107 Ozone We carry out the adjustment in four stages.
1. Turn the “quality” screw and set the maximum idle speed.
Rotate the screw counterclockwise.
turn the “quality” screw of the fuel mixture of the carburetor 2105, 2107 Ozone counterclockwise, thereby increasing the supply of gasoline to the fuel-air mixture
2. Use the “quantity” screw to set an even higher rotation speed. For example, 80 rpm more. Rotate the screw counterclockwise.
rotate the “amount” screw of the fuel mixture counterclockwise, increasing the total amount of fuel mixture entering the engine cylinders
3. We check with the “quality” screw whether these revolutions are the maximum for the given position of the “quantity” screw.
Simply rotating it back and forth.
We check by rotating the “quality” screw in different directions whether the set idle speed is maximum
If not, then we carry out the above adjustments again.
4. Keeping the position of the “quantity” screw of the fuel mixture unchanged, tighten the “quality” screw so much that the speed drops to 850-900 rpm.
Adjustment in this way is very simple, but at the same time convenient, since it does not require special equipment.
If, after such an adjustment, the content of CO and CH emissions does not correspond to the norm or the idle speed cannot be adjusted, then it is necessary to check:
— whether the fuel and air jets of the main dosing system are dirty; — whether the main fuel jets of the first and second chambers are reversed; — whether the fuel level in the float chamber is increased; — Is the needle valve working? - Is the fuel jet of the idle system clogged; — whether the holder of the fuel jet of the idle system or the solenoid valve has turned away; — whether the tubes have come off the electro-pneumatic valve; — whether the rubber o-ring on the fuel mixture “quality” screw is damaged.
— In some cases, it makes sense to modify the carburetor idle system. See “Modification of the idle system of Solex and Ozone carburetors.”
Five more articles on the site on adjusting and tuning carburetors 2105, 2107 Ozone
Replacing spark plugs on a Priora
Welcome! A spark plug is a very important, although small in size, thing that is needed to ignite the fuel-air mixture in a car engine cylinder; in simpler words, thanks to them, the car drives and if you unscrew them, you will no longer start it, because the mixture they ignite will not ignite and therefore the engine will not start.
Note! In order to replace spark plugs on a Priora (And they are located in completely different places, unlike 8 valve engines), you will need to stock up on: A set of wrenches, as well as the spark plug wrench itself, which comes specifically for the car and you will need all this the probe with which you will check the spark plugs for the gap that they have set, if the gap at the electrodes of the spark plug is too small (a defective spark plug, but it can be made normal using this very probe) then you will need to adjust it and thereby return it to the correct one clearance at which the engine will operate normally, confidently and not stall!
Where are the spark plugs located? The spark plug in 16 valve engines, in contrast to 8 valve engines, is in a radically different place; they still continue to be screwed into the cylinder head, but only in 16 valve vehicles they are screwed in from above, while on 8 valve engines they are clearly visible from the side, for clarity, a little Below you can look at the photo, in which the arrows indicate the four ignition modules under which the spark plugs are located.
Note! But you won’t see a picture like the one above on your car, since the engine of a 16-valve car is always closed from above with a so-called screen (Indicated by a red arrow), you will have to remove this screen and only after that you will be able to get to the ignition modules, and only after that modules, right down to the candles themselves! (You will learn how to remove this screen a little later as you read this article)
When should you change spark plugs? The spark plugs must be replaced if the car’s engine starts to stall, that is, when tripping, the engine will twitch, it will also have difficulty picking up speed and in general it will be noticeably worse to drive, in addition, if the spark plug is faulty, the engine will start even worse.
These are all signs, but what about the recommendations given by the manufacturer, you ask? Let's look at this in more detail! According to the factory's recommendations, if the spark plugs are the most common and their electrodes consist of copper or yttrium, then they need to be changed at intervals of 30,000 thousand km.
, because they burn out quickly, but if you use spark plugs whose electrodes are coated with platinum or iridium, then you will have to change such spark plugs much less every 60,000 thousand km.
, and all because platinum is more resistant to high temperatures and, in addition, it is resistant to corrosion of the spark plug electrodes, where it is used!
How to replace spark plugs on a VAZ 2170-VAZ 2172?
Note! As we said earlier, in order to change a spark plug you will need a special spark plug wrench that is suitable for 16 valve cars, and a special one is needed only because it is equipped with a magnetic insert that will hold the spark plug when you unscrew it and remove it from the hole, respectively, without a magnetic one inserting a candle will be more difficult for you to get!
Removal: 1) At the very beginning of the operation, remove the screen from the engine so that it does not interfere with further work, since it covers most of the engine, and about how to remove it, read the article called: “Replacing a car engine screen.”
2) Then from each ignition module (There are four modules in total, each goes separately to each spark plug, the modules were also shown with arrows in the second photo from above) disconnect the wire blocks (For clarity, the photo below shows only one ignition module, and its block indicated by a red arrow) that are connected to them, these pads are held on clamps by bending them, the pad can be disconnected from the module, and after this operation, pick up the key and use it to unscrew all the nuts that secure the module to the car engine (One nut securing one module is indicated by a blue arrow).
Note! When the fastening nut is unscrewed, remove the module indicated by the blue arrow from the hole in which it is located and then put it aside and make sure that no water gets on it, otherwise it may quickly fail when connected!
Adjusting the VAZ-2105 carburetor - how is it done?
The process of adjusting the VAZ-2105 carburetor is a simple task that can be completed by any car owner who knows the structure and the sequence of necessary operations. The principle of operation of a carburetor is to create a fuel-air mixture by mixing gasoline with oxygen and then feeding it into the combustion chamber. In this article we will get acquainted with the design, features and advantages, and also take a detailed look at how to adjust this unit with your own hands.
Carburetor adjustment on VAZ-2104-2107
The domestic brand VAZ-2107 was launched in Togliatti in 1982, and on April 17, 2012, the last “seven” rolled off the assembly line. Over 30 years, 3.1 million VAZ-2107 vehicles have been sold around the world.
The machine has an attractive design, is fast, and easy to maintain. Considering the huge number of cars operated by ordinary Russian people, I propose this article with personal observations on servicing a simple carburetor - the main device for preparing the working combustible mixture.
Stages of setting up a VAZ 2015 carburetor
Without knowing the design of the car and without any experience in repairing, disassembling or assembling the fuel system of a car, it is not recommended to make adjustments. Changing the settings incorrectly may worsen the problem or damage the device. If you are familiar with the design of your car's carburetor, adjusting it will not be difficult. Adjusting the 2105 carburetor can significantly improve vehicle efficiency, reduce fuel consumption and increase the performance of the power unit. These so-called performance upgrades do not have any detrimental effect on the device. On the contrary, they are a mandatory procedure that guarantees long, uninterrupted operation.
Screws for adjusting the idle speed system of the VAZ 2105 carburetor: 1 - mixture quantity screw; 2 - mixture quality screw
Crankshaft speed calibration . The first thing to do is change the speed to 750-800 units per minute. To perform this procedure, a quantity adjustment screw is provided. It must be screwed all the way, and then unscrewed three times in the opposite direction.
Change in CO2 content . We regulate the amount of carbon dioxide in the exhaust using the quality screw. To do this, you need to screw the screw in until it stops, and then unscrew it back 4-5 turns. This will increase the concentration of fuel and richen the mixture.
Warming up the engine is a mandatory procedure, without which you cannot proceed to the next stages of work.
Speed adjustment . Using the quantity screw, we adjust the idle speed. It is necessary to achieve stable operation of the motor at 750-800 rpm. Gradually tightening the quality screw. During this process, the speed should increase slightly and then decrease, causing the engine to run erratically. After unstable operation of the power unit begins, we begin to screw the screw back in until the operation of the motor stabilizes.
Setting XX . Finally, you need to calibrate the idle speed using the appropriate screw to 800-900 units.
After completing all stages of adjustment and achieving the required parameters, you need to test the carburetor. With the engine running, sharply press the accelerator pedal and release it. If adjusted correctly, the crankshaft speed will temporarily increase. If the engine stalls, increase the speed using the appropriate adjusting screw. Check the operation of the motor at full load by turning on the stove, lights, etc.
Video - How to set up a VAZ 2105 carburetor
Useful tips
- Valve position . It must be pushed in so that the idle jet touches its connector (seat) in the device body. To do this, it is recommended to lubricate the rubber seal with engine oil.
- Cold pass system air damper position, with the choke handle lowered, must be in a strictly vertical plane.
- When the quality adjustment screw is screwed in all the way, the engine should stall . If this does not happen, the reason may be incorrect adjustment of the VAZ-2105 carburetor. Using the appropriate bolts, you need to change the speed up.
- Vacuum in the tube between the carburetor and the ignition distributor . When the engine is idling, there should be no vacuum in the vacuum tube. The reason for its occurrence may be a tightly tightened locking screw of the throttle valve. Adjustment of this element is carried out using a locking screw. In the correct position, the damper does not jam in the diffuser and provides sufficient tightness. When 2-3 cm 3 of fuel is poured into the chamber, it should not noticeably leak through the valve. When you press the gas pedal, it moves smoothly without jerking. An identical method is used to test and adjust the damper on the second chamber, with the exception of the tube, which is only in the first chamber.
- Solenoid valve. In carburetors designed for engines with a displacement of 1500 cm 3 or more, in place of the holder of a conventional fuel jet there may be an electromagnetic valve with an XX jet. If it is included in the design of the device in question, it is necessary to check its functionality and ensure the integrity of the electromechanical element. With the ignition on, you need to remove and put the connector on the valve. The occurrence of clicks during these operations will indicate the serviceability of the part being tested.
- For the summer season, it is recommended to reduce the idle speed to 800-900 units, and in winter to increase it to 900-1000 rpm . This setting will improve the efficiency of the power unit taking into account climatic conditions.
Repair of fuel pump VAZ 2107
Repairing the VAZ 2107 fuel pump instead of replacing it is a much more rational decision from a financial point of view. To do this, you need to remove the unit. The procedure for removing the fuel pump is described in the previous section “Replacing the VAZ 2107 fuel pump”.
After the fuel pump is removed, you can begin to disassemble it and check the parts for damage or wear.
It's worth starting with gaskets. The thickness of the gasket between the fuel pump and the thermal insulating plastic spacer must be more than 0.3 millimeters. The gasket between the spacer and the cylinder block must be thicker than 0.8 millimeters.
When the cover is removed, the strainer becomes accessible and should be cleaned of dirt and inspected for damage before reinstalling.
The fuel pump valve channels should be cleaned and checked to see if they are loose in their seats. If play is noticeable, the valve should be replaced. If the cause of the play is a broken seat, the malfunction cannot be eliminated. You only need to replace the fuel pump.
In some cases, the tightness of the working chamber of the fuel pump is broken due to deformation of the cover. In this case, you can try to select and install a whole cover from an old fuel pump.