April 20, 2017 Lada.Online 185 308 64
If, while operating a LADA car, you notice that during load (when the air conditioner is running, the heating is on, etc.) in a traffic jam, the engine begins to operate unstably (troits, pulls poorly, etc.), perhaps the reason lies in the ventilation system crankcase The article proposes to solve the problem by installing a PCV valve from a foreign car.
Lada 2114 1.5 (8 valves) › Logbook › Crankcase ventilation system
Igor' Nenashev, 28 years old I drive Lada Vesta euro69 (before: Lada 2114) Berezovka, Russia
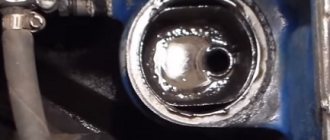
If you follow my blog, you know that I recently changed the oil dipstick. Everything would be fine, but after a short trip, looking under the hood, I discovered that the dipstick was not seated tightly, as if it had been squeezed out of the mounting hole.
Having pulled out the dipstick with the car running, I felt that there was a decent amount of air blowing from there. In principle, as far as I know, it should blow in any case, but there is a limit to everything. Upon closer inspection, the dipstick also turned out to be of poor quality (crooked, rubber too soft). I bought another dipstick in the store (it has stronger rubber and harder metal), it fit tightly and was no longer squeezed out. By the way, the new probe turned out to be a little shorter than the standard and low-quality probe, this one made by AVTOVAZ (so they said in a large store and the marking was appropriate).
Despite the fact that the new dipstick fit tightly, I decided for myself that it was time to clean the crankcase ventilation system and change the corresponding hoses.
So, I bought three hoses produced by BRT (BalakovoRezinaTekhnika): 1. A large thick one that goes directly from the crankcase to the valve cover; 2. A thinner hose that goes from the corrugation of the air filter housing to the valve cover (during disassembly it turned out that the old one was torn and there was air leakage through it); 3. The thinnest hose that goes from the valve cover to the throttle body. In addition, the original clamps, which, like the hoses, were 10 years old, were replaced with Norma clamps.
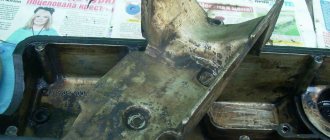
old and new hoses.
I bought oil separator screens (whose production I didn’t catch, and it doesn’t matter). I didn't want to clean the old ones.
Old and new oil separator screens. The new meshes, unlike the standard ones, do not have a fixing rivet in the middle (in other words, they can be separated one at a time, but the standard ones do not). This is rather a minus.
Due to the fact that replacing the oil separator screens involves removing the valve cover, we purchased fungi (two rubber bushings for the valve cover nuts BRT) and a valve cover gasket (VCT).
Device installation
The crankcase gas oil separator is installed depending on the engine type:
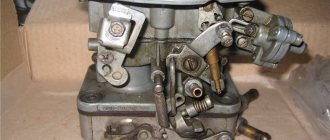
- carburetor;
- injector.
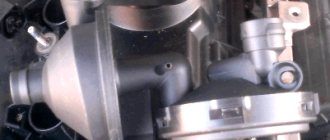
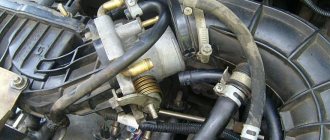
In carburetor engines, the device is mounted directly in front of the air filter, which regulates crankcase gases. If it is an injector, the device is connected to the inlet pipe located close to the throttle valve and cylinder block cover.
The system is now ready for use. However, for its high-quality and productive functioning, installation alone is not enough; it is necessary to inspect the device from time to time and carry out regular maintenance. To do this, the device must be disconnected from the system and rinsed thoroughly, completely getting rid of any remaining accumulated oil. In this case, treatment with a solvent will not interfere.
After the maintenance procedure, the crankcase gas oil separator device is put into place and can be used for further operation. There is no need for frequent inspection and maintenance; the frequency can be at least once every two months.
As is already known, oil leakage not only has a negative impact on the efficiency of the engine, but also significantly reduces its service life. A homemade device allows you to eliminate this problem to some extent. However, the lubricant itself also plays a key role. Therefore, you should not save on purchases; it is better to purchase only high-quality products. No engine will put up with cheap oils whose quality is questionable.
Read more: Car antenna triad 55 turbo long-range reviews
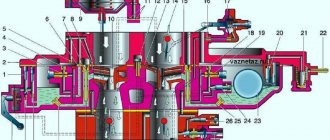
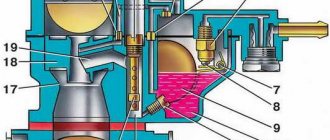
Diagram of the standard crankcase ventilation system
VAZ crankcase ventilation system (cable throttle 8 and 16 cl) VAZ crankcase ventilation system (E-GAZ 8 cl) VAZ crankcase ventilation system (E-GAZ 16 cl)
The crankcase ventilation system of VAZ engines consists of two circuits that operate at different load modes and speeds:
- The small ventilation circuit is connected to the valve cover and the intake manifold (behind the throttle body). This connection diagram provides intensive crankcase ventilation due to the vacuum that occurs in the intake manifold when the throttle is closed. To avoid an effect such as hyperventilation, the cross-section of the small circuit is limited by a jet in the cable throttle body with a diameter of 1.7 millimeters. This circuit operates in the region of 800-1500 rpm.
- A large ventilation circuit is connected to the valve cover and the air pipe (in the pre-throttle space). This scheme provides intensive crankcase ventilation at high speeds. The cross section of the large contour is 16-18 millimeters
Operating procedure
You don't need any special tools for assembly. Everything you need is available in every garage. The work is carried out in the following order:
- The tank is disassembled
. Contents are extracted from it. The filter and 2 springs (large and small) can be put aside; they will not be needed; - We insert a tube with a diameter of 14 mm into the body; it should go down to the very bottom. So the gases will pass through the entire jar without exception;
- We take sponges and, after fluffing them, fill the jar with them. After that, we put a washer and a cotter pin, in the end we get this kind of filter;
- We take the mesh that was in the tank and make a hole for the tube. Then we install it in place;
- The next step is optional. You can paint the jar any color (at your discretion). But this will not affect performance;
- While the reservoir is drying out, it makes sense to clean the throttle valve from dirt; for this you can use any available method;
- We install it under the hood. We connect the hose from the breather to the terminal with a long tube, and attach the hose going to the throttle to the main one.
Schemes for upgrading the crankcase ventilation system
Schemes for modifying the crankcase ventilation system, as well as a description, are provided by IgorRV.
For LADA cars with manual transmission and AMT (“robot”), scheme No. 1 “Crankcase ventilation scheme with PCV valve for E-GAS and cable throttle” is suitable:
installation of a PCV valve in the crankcase ventilation system of a VAZ installation of a PCV valve in the crankcase ventilation system of a VAZ (cable throttle) installation of a PCV valve in the crankcase ventilation system of a VAZ (E-GAZ)
It is necessary to install a PCV valve (article 94580183, price about 400 rubles) from a foreign car into the small crankcase ventilation circuit. When connecting the PCV valve to a small circuit on an E-GAS, use a new hose (petrol-oil-resistant 8 mm without fabric reinforcement). On a cable choke, connect to the receiver, not to the choke.
As a result, the valve will shut off the circuits in transient modes, which will allow:
- Accept the load without jerking or dropping engine speed (for example, when the compressor is running, heated windows, seats, etc.).
- Reduce vibration load at idle
- Increase traction from the bottom (noted by owners of automatic transmission with VAZ-21126 engine, manual transmission with VAZ-21227, 21126 and 11186 and AMT with VAZ-21127).
- Get a sharper response to the gas pedal and faster shifts (on AMT). Perhaps due to the fact that the valve does not allow the engine to slow down, maintaining a more optimal switching algorithm.
- Reduce oil consumption through ventilation.
The valve replacement period is 40,000 km.
For LADA cars with automatic transmission (Jatco) and AMT (“robot”), scheme No. 2 is suitable:
Description of scheme No. 2: The pressure reducing valve is connected in series to a large ventilation circle. Thus, it regulates the flow of crankcase gases at high speeds and during transient processes. This allows:
- Exercise full control over the flow of crankcase gases between the small and large circuits.
- Improve engine operating mode.
- Reduce vibration load.
- Reduce oil release into ventilation.
For LADA cars with automatic transmission (Jatco) and AMT (“robot”), scheme No. 3 is suitable:
ventilation diagram with PCV valve, pressure reducing valve and ejection pump
ventilation diagram with PCV valve, pressure reducing valve and ejection pump
Description of scheme No. 3: To improve the operation of the braking system and facilitate the process of holding the car on the brakes in mode “D”, an “Ejection Pump” was used. Due to the flow of crankcase gases from the small circuit, the vacuum in the tube leading to the vacuum booster increases. This happens at low speeds, which is very helpful when driving in traffic jams. Keeping your foot on the brake all the time is not very easy, but this pump makes the task easier.
- Getting rid of vibrations, failures, transmission shocks.
- The engine begins to operate more calmly and softly.
- The force on the brake pedal becomes less.
- The air conditioner turns on almost imperceptibly.
- ejection pump (article 10793 VIKA, price 546 rubles);
- pressure reducing valve (article 1117701500 JP GROUP, 422 rubles);
- PCV valve (article 94580183 GENERAL MOTORS, 400 rubles);
- clamps (about 10 pieces, 600 rubles);
- thin, petrol-resistant 8 mm hose 50 cm (100 rubles);
- standard ventilation pipe.
By the way, there are other ways to modify the crankcase ventilation system. Are you ready for such modernizations? Let us remind you that modification of the ignition system (installation of capacitors in the ignition coils in the harness) is also common among owners of LADA cars.
How to make an oil trap yourself
I decided to post my oil catcher, otherwise there is a lot of incomprehensible information on the internet
They show the finished version, but the most important thing is that it doesn’t show how it works inside. A more correct option is this
The exhaust gases must rise from below and pass completely through the scrapers. You can buy ready-made branded ones, but the cost is surprising.
They also put the tube outside, but you don’t want to breathe gases when the car is warming up, stuck in a traffic jam, or when you turn on the heater in winter.
I put it in my VAZ 2105, drove it 100 km and put it in for repairs, I need to do the engine. It is clear that oil was thrown into the carburetor before the oil sump was installed, now it will be interesting with the new engine how the oil catcher will work.
I created the diagram myself.
mesh so that the scrapers do not fall down into the emulsion
ordinary stainless steel scrapers
At the outlet of the oil catcher, I put a brush in the tube to make sure nothing gets into the carburetor.
The engine smokes
Usually a small amount of smoke comes out of the exhaust pipe. However, sometimes there come moments when thick smoke can literally pour out of your six
To understand what the problem is, you need to pay attention to its color
Transparent color. Transparent or slightly white smoke that is almost invisible. It's not even smoke, but rather steam. It occurs because the system has not yet warmed up. This is especially noticeable in winter after the car has been sitting in the yard all night. There's nothing wrong with that. After the system warms up, the steam will practically disappear.
Black color. This phenomenon looks quite scary. One of the reasons may be the usual overload of the motor with heavy weight. Try unloading the trunk if you have placed something particularly heavy in it. However, most often this problem does not arise for VAZ 2106 owners due to the small size of the vehicle
Therefore, also pay attention to how the mixture formation process proceeds. Most likely there is too much fuel entering the engine
The result is not only black smoke, but also increased fuel consumption. Try changing the air filter. You also need to measure the compression. Check the condition of the cylinders and whether the engine control sensors are working correctly. Check the spark plugs to see if they have a black coating on them, which may indicate the need to repair the engine.
White color. Unlike the clear smoke described above, this smoke has a thick white tint and does not disappear as the engine warms up. It indicates that there is a malfunction in the cooling system. This is a sure sign that urgent measures need to be taken, because a breakdown can lead to a major overhaul of the engine. Check the candles to see if they have developed a coating similar to what appears on a kettle due to scale. If this happens, it means water is getting into the cylinders.
Bluish color. The reasons for this phenomenon can be various breakdowns. For example, you can check the serviceability of the valve stem seals. If they are damaged, oil may leak and enter the idle engine. You will also have to check the oil rings. Due to their wear, excess oil may flow into the cylinders.
The engine is breathing
The breather is designed to relieve excess pressure from the crankcase, ventilate it and remove gases generated during its operation. If there is a malfunction, smoke begins to pour out of all engine openings. Oil consumption increases sharply.
There can be three reasons for this problem:
- The ventilation system is dirty. Due to the fact that a blockage has formed in the ventilation, the pressure is not released in time. Gradually, gases accumulate and when the pressure reaches a critical value, a sharp release of accumulated gases occurs. The tube that connects the breather to the manifold flies out. As a result, the driver hears a loud bang. Sometimes the gases can rupture the valve cover, break engine parts and even tear out the pan. To correct the situation, you need to flush the ventilation system using a special additive. You can also disassemble the breather yourself and clean the filter using gasoline.
- Occurrence of piston rings. Gases begin to penetrate into the crankcase, from where, due to increased pressure, they find outlets in various cracks. Oil begins to squeeze out through the dipstick or flows into the combustion chamber. The “check” lights up on the dashboard. In this case, you need to check the compression and diagnose the condition of the engine. If at least one “boiler” shows less than 11 points, it is necessary to disassemble the engine and look for damage.
- Damage to cylinder liners. If the two previous possible causes are not confirmed, look for the cause in the cylinder-piston group. If the liners are damaged, you need to grind the cylinders and install new pistons.
Tell me, doctor, is there any way to do without surgery?
First of all, you need to drain the oil from the bridge. To do this, we turn out both plugs - both the drain and the filler. Next, disconnect the driveshaft from the bridge. When separating the axle and cardan flanges, be careful - sometimes oil accumulates in the cavity between the flanges. If this happens, then check the axial play of the flange by rocking it along the axis with your hand. There shouldn't be any play. If there is noticeable movement (in fact, play of more than 0.05 mm is already very harmful for the bridge), it is worth once again carefully inspecting the traces of oil on the crankcase. Perhaps the oil leaked not through the cuff, but through the gaps in the splines of the loose flange? In this case, it is worth trying to eliminate the play and observe the bridge in operation. If the leak stops, then that was the reason.
Axial play of the flange is eliminated by tightening the nut. When handling a flange nut, you should always remember that it does more than just hold the flange. This is the most important element in adjusting the drive gear bearings, and improper tightening can have serious consequences, ranging from noise to axle jamming. Having inserted two bolts into the holes of the flange, we insert the mounting between them so that, holding it, we prevent the rotation of the flange when the nut rotates. Pull the nut just enough to select the gap. The thread pitch is 1.25 mm, which means that when you turn the nut one turn, it will move along the axis by the same 1.25 mm. If the flange play is minimal - 0.05 mm, then it is enough to turn the nut 1/25 of a turn, that is, only 15 degrees.
Overtightening the nut loads the drive gear bearings with a large axial force, as a result they overheat and may fail. To be sure that we did everything correctly, we need to measure the moment of resistance to rotation of the drive gear. To do this, you need to remove the rear wheels and brake drums, unscrew the axle shaft mounting bolts and pull off the axle shafts, disengaging them from the differential gears. Then we tightly wind the thread onto the flange shaft and pull its free end with a steelyard, measuring the force at which the flange rotates evenly without jerking or acceleration. A less accurate result is obtained by another method, when the steelyard is hooked to a hole in the flange and also pulled evenly. In this case, care must be taken to ensure that the force is directed perpendicular to the radius of the flange circumference. You can also use a torque wrench, evenly rotating the drive gear shaft by the nut, but with such a movement it is difficult to follow its readings. We multiply the measured force value by the radius value, thereby obtaining the moment of resistance to rotation. The torque value should be in the range of 6–9 kgf.cm.
You can try to do without removing the axle shafts and measuring the torque on the flange. Experienced mechanics can do this. To do this, tighten the nut exactly until the play is eliminated and a little more. After this, we put the driveshaft in place and make a test drive in a mode sufficient for the bridge to warm up to operating temperatures (several tens of kilometers along a country road). After this, we check by hand the heating of the axle housing in the area of the drive gear bearings. If the hand tolerates heat, then we assume that everything is in order. If the bearings have become so hot that a drop of water on the crankcase hisses, then we have overdone it and now we definitely cannot do without a good adjustment. You cannot reduce the moment of resistance to rotation of the drive gear simply by loosening the nut. The fact is that a deformable spacer sleeve is installed between the bearings, which, when the nut is tightened, gives the structure the necessary rigidity. By tightening the nut, we compressed the bushing more than necessary, and it will no longer be able to lengthen back. When we loosen the nut, the bushing will no longer be a “spacer”, so it must be replaced
You should also pay attention to the bearings. If a blue color appears on the rolling surfaces, it means they are overheated and also require replacement.
Way to solve the problem
When starting to clean the breather, first of all we look for a device under the hood and remove the air filter from it. Before doing this, de-energize the car by disconnecting the negative terminal from the battery and turning off the ignition. There is an intake manifold under the filter - we will also dismantle it. After this, you can see the prompter itself - as a rule, its cover is secured with two bolts, which will have to be unscrewed. After removing the cover, the oil bumper will become visible - it is secured with a pin.
Read more: Selling a car with LPG
It is necessary to unscrew the nut located on the stud, but there is no need to remove the stud itself, because it will be difficult to put it back without dismantling the pan. We make a cleaning rod out of wire, which we use to clean the tube. There is a brush on the breather cover to extinguish the flame - we clean that too.
All that remains is to check the device. We start the engine, remove the plug from the oil filler neck, and cover the neck itself with your palm. You can feel with your hand whether there is pressure. Then the assistant should press on the gas until the speed reaches 100-130 km/h and check the compression again by applying the palm of his hand. A little pressure should already be felt.
To avoid problems with the release of working fluid through the prompter, it is necessary to constantly monitor its level
It is also important to pay attention to checking the filter and gearbox
Owners of old domestic cars, after several years of ownership, can easily write a directory of “diseases” of a particular car model. One of these “sores” is an engine malfunction in which engine oil is squeezed out through the breather. This phenomenon is most often simply called by people: “oil is driven through the breather” or “oil is thrown out through the breather.”
The problem is quite unpleasant and is accompanied by a large number of engine-related problems. It is this problem, as you probably already guessed, that we will talk about in this article. You will learn why oil comes out of the breather and how to solve this problem. Go.
As a rule, the problem occurs with the onset of cold weather, the breather freezes and the oil is squeezed out. This manifests itself in the form of oil drips that are visible from the outside of the engine. Failure to respond to this phenomenon in a timely manner can lead to serious engine damage.
The engine gets very hot
It is worth noting that a carburetor engine encounters this problem much less often than an injection engine. Even on hot summer days it holds the temperature well and does not exceed 96 degrees. Why does the engine get hot?
- The thermostat malfunctions. As they say, the valve “caught the wedge.” This can be checked very simply: you need to touch the bottom of the thermostat with your hand. If it is cold, then the problem is in the thermostat valve. Another sign of a non-working thermostat: the radiator outlet is very overheated. As a result, this valve is kept closed, the liquid does not enter the radiator and boils. If in this state it penetrates into the piston part, as well as into the oil sump, this can lead to critical engine failure. Therefore, if a malfunction is detected, you need to turn off the engine and replace the thermostat with a working one.
The appearance of an air lock in the radiator pipes. To eliminate this problem you will have to bleed the entire system. The radiator is clogged. To avoid this problem, you need to clean the radiator regularly, especially during the hot summer season.
You also need to use only high-quality coolant to avoid clogging the radiator from the inside. You can also pay attention to whether the fan is broken. Another common reason that the VAZ 2106 engine may overheat is a breakdown of the water pump. The pump often leaks
You can check the operation of this part as follows: at engine operating temperature, sharply squeeze the inlet pipe on the radiator. In this case, the working pump produces a noticeable pulsation. It also doesn’t hurt to check the pump seal, which starts to leak from time to time.
Assembly process
There is no particular difficulty in assembly. The first step is to put a plug on one end of the coupling. The result will be something like a glass, but not for tea drinking. During operation of the most effective design of the crankcase gas oil separator, the plug will not have to be removed, and therefore for better reliability it is worth sealing it with a sealant. The next step is to place the metal sponge on the bottom of the cylinder. Just don't fill it out completely. In the upper part of the second plug, you need to drill two holes for the prepared plastic pipes. The edges of the tubes should be treated with silicone grease and installed in the prepared holes.
Looking at the inside of the plug, one of the pipes should be 1 centimeter shorter than the other. The longer one will be the intake one. Now all that remains is to fix the resulting cover in the rubber gasket. That's all - the homemade automotive gadget for catching crankcase gases is ready. If the owner has a delicate taste, then the product can be painted in the desired color and then allowed to dry thoroughly. Only after this can you proceed to further installation.
Engine troubles
Everyone has heard this word “triple”. But not everyone fully understands what this word means. But this term was coined precisely in our country to designate a common problem. The fact is that sometimes one of the cylinders in the engine begins to malfunction or completely stops working. The mixture of air and fuel in it either burns poorly or does not burn at all. As a result, only three working cylinders remain. Hence the word “triple”.
The driver understands that this problem has arisen by how much the engine begins to vibrate. There is a feeling that he is ready to break free of his fastenings. In this case, the car does not move. Sometimes you can hear fuel flashes that pop into the muffler.
If the VAZ 2106 is tripping, there may be three reasons for this:
Less or more air enters the cylinder than necessary. This may be due to loss of air tightness in the air system. We check whether the system is leaking air somewhere. To do this, use a compressor to pump air into the system to increase the pressure and listen to where it hisses. If there is no hissing, then the system is still sealed. You also need to check if the air filter is clogged. The air supply dampers may also be faulty.
Particular attention should be paid to the throttle valve. More or less fuel enters the cylinder than necessary. This is checked by measuring the pressure in the fuel system
If the pressure is low, you need to look for a problem in the fuel pump and in the pressure valve. If the pressure is normal, you need to diagnose the injectors for contamination or failure. Low compression. If this is the reason, then you need to prepare yourself for a long, expensive repair. Compression is reduced or reset if the piston burns out, the piston wheel wears out, or the valve malfunctions. To find out the true cause, you will have to completely disassemble the engine and troubleshoot it. Often you have to do major repairs.