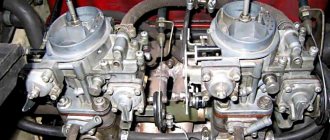
Engine performance depends on the quality and quantity of the fuel-air mixture, which is prepared by a special device - a carburetor. The carburetor creates the mixture and distributes it evenly to the cylinders. There are different ways to mix the fuel mixture with the air flow. For example, there are float carburetors and membrane-needle carburetors. Carburetors of the VAZ family, produced by the Dimitrovograd Plant (DAAZ), are classified as the first type - float-type.
Correct adjustment of the VAZ 2107 carburetor is, first of all, about the engine in working condition and fuel economy.
Carburetor Types
Before you begin adjusting the carburetor, determine what type of carburetor is installed on the engine. It's quite easy to do this:
- If there is a vacuum corrector on the ignition, this means that you have the latest type of engine 2106 or VAZ 2103, and a carburetor modification 2107 - 1107010-20.
- If your VAZ 2107 car has a six engine, but no vacuum corrector is installed, then this modification of the carburetor is 2107-1107010-10.
Carburetor components that need to be adjusted:
Before adjusting the carburetor, you need to determine the main signs of its malfunction. Since this engine unit is responsible for the vehicle’s acceleration dynamics and fuel consumption, these include the following:
- difficulty starting the engine, long “shots”;
- sluggish car acceleration;
- all kinds of “jerking”, “jerking”, “failures” when pressing the gas pedal;
- increased gasoline consumption.
So, if your seven has the corresponding signs, you need to start adjusting it.
Attention! It is better to make adjustments with the carburetor removed. When adjusting the VAZ 2107 carburetor, do not use woolen or fleecy fabrics, and do not clean the jets with a wire, just blow them out.
First of all, the float system is adjusted, it’s more convenient.
EPH sensor is faulty
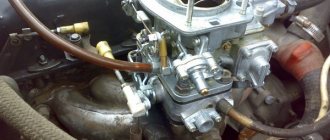
The idle speed economizer or idle speed sensor is located under the hood of the VAZ 2107 and is screwed to the side of the carburetor. It is a small cylindrical electromagnet screwed into the unit. On the back side of the valve there is a contact, the wire from which goes to the power circuit of the ignition switch.
EPHH control unit: 1 — block outputs; 2 - body; 3 - printed circuit board with microelectronic elements.
If the carburetor cannot be adjusted in any way or the VAZ 2107 does not idle, and the idle speed disappears very quickly or the engine is unstable, then it makes sense to start the engine and try to unscrew the valve a little. If the operation of the carburetor engine is restored, tighten the valve with a little force and try changing the amount of mixture. In 90% of cases, the carburetor starts working correctly again.
Another case is complete valve failure. To do this, you need to check it. You need to connect it directly to the battery. If clicks are heard, then the valve is working. Try screwing it into the carburetor and starting the engine. If successful, you need to look for a break in the electrical wiring and then you won’t need to adjust xx.
Adjusting the fuel level in the float chamber
The free play of the float should be 6.5 mm on one side and 14 on the other. This can be adjusted using a checking template by placing the camera vertically. In this position, the float slightly touches, but does not press on the valve ball.
If the distance does not correspond to the required 6.5 mm, then you need to slightly bend the tongue of the valve (needle-shaped), adjusting the size to the required one, indicated in the figure by the arrow under the letter “A”.
The next step is to adjust the degree of opening of the needle valve through which gasoline enters the float chamber. When the chamber is filled, the float rises and the flow of fuel decreases; when you sharply press the accelerator pedal and open the throttle, the fuel goes into the cylinders, the float drops and gasoline enters the float chamber.
Next, we adjust the deflection of the float in the opposite direction. To do this, move it away from the lid as much as possible and measure it with a template, the thickness of which should be 14 mm with a certain tolerance (Fig. above, picture on the right).
If the distance is greater or less, you need to bend the stop of the float mounting bracket and set it to no more than 14 mm.
Now, after the adjustments have been made, the free play of the float should be within 8 mm. Adjusting the VAZ 2107 carburetor also includes checking fuel filters and incoming screens to maintain a good supply of fuel.
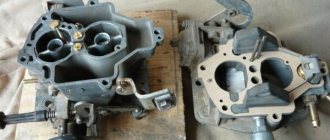
Complex and high-precision device
A carburetor is a complex device consisting of many different components. But the complete device is necessary only for those who professionally configure and adjust these devices.
However, despite all the difficulties and a large number of details, let’s take a closer look at how this device works.
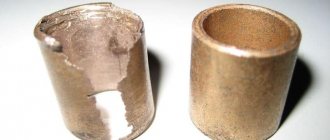
So, what kind of device does the DAAZ 2107 1107010 carburetor have? This device consists of a float chamber into which fuel flows in limited quantities. The access to gasoline is closed by a needle valve, as well as a float, which in appearance resembles a barrel. Gasoline is mixed in a special mixing chamber. The carburetor also consists of a throttle valve as well as an air valve. In addition to them, the device also includes jets. The fuel is atomized through a sprayer. One of the important components of a carburetor is diffusers. They work like nozzles and create an air flow configuration.
Adjusting the starter
When setting up the VAZ 2107 carburetor, you need to adjust the starting device yourself. It is designed to confidently start a cold engine. When properly adjusted, the mixture is twice as saturated with fuel as when normally feeding a hot engine.
The starting device for carburetors from the 1107010 family is triggered at a frequency of 1500 engine revolutions.
A little theory about the starting device
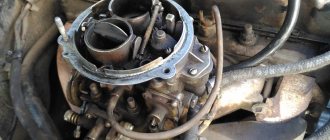
If we look at the carburetor from the side, we can clearly see the channel through which vacuum is supplied to the opener body:
With the carburetor removed, if you look at it from the top, you can see the air vacuum supply channel:
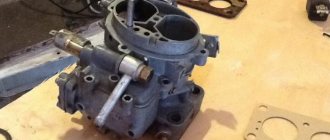
On the disassembled carburetor you can see all the details of this diaphragm starting device:
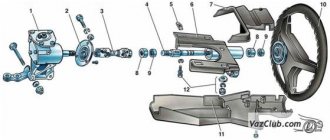
The picture below schematically shows the starting device of the carburetor of the 1107010 family:
Let's figure out how the trigger mechanism works. By pulling the choke lever, the driver brings the starting device into a cocked state. The following actions occur:
- The three-arm lever is “cocked” with a cable counterclockwise;
- The telescopic rod is activated;
- The rod turns the air damper.
- The second arm of the lever presses on the throttle valve axis of the first chamber.
- The air flow damper closes completely. The throttle valve of the first chamber is slightly open for starting, creating a starting gap
Let's start adjusting the starting device
To adjust the starting device yourself, the first step is to remove the carburetor. Further:
Turn the choke lever to the closed position. In this position the device is turned on.
Now turn the carburetor over and measure the gap between the wall and the edge of the throttle valve (chamber 1). For VAZ 2107 carburetors, this gap is 0.85-0.9 mm. The gap can be measured with a feeler gauge or calibrated wire:
To adjust the gap to this range, you need to bend the drive rod on the throttle valve.
After this, we establish a gap between the channel wall and the edge of the air damper from below (in Fig. 2 below it is designated “A”). To do this, close the damper again, i.e. “cock” the device. Create an imitation of rarefaction of air by recessing the starter rod:
Picture 1
Now the rod has pulled the rod along the slot, and as a result the damper opens. Gap “A” should be 5-5.4 mm.
Figure 2
To adjust this gap, you need to turn the adjustment screw with a screwdriver, but first remove the screw plug from it:
Do-it-yourself dismantling of the unit
To remove the DAAZ 2107 carburetor, auto mechanics recommend proceeding in the following sequence:
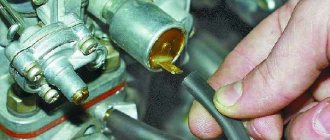
- The hood of the car is opened, the clamp on the warm air intake hose is loosened using a flat screwdriver, after which the hose is disconnected from the thermostat tube.
The air intake hose is disconnected from the thermostat
The mounting plate of the DAAZ 2107 carburetor is removed manually
The air filter from the VAZ 2107 is removed after removing the mounting plate
The choke cable of the DAAZ 2107 carburetor is disconnected using a screwdriver
The hose for removing crankcase gases from the DAAZ 2107 carburetor is removed manually
The wires of the economizer control system are disconnected from the DAAZ 2107 carburetor without much effort
The hose of the vacuum ignition timing regulator is removed from the DAAZ 2107 carburetor by unscrewing the screws
The solenoid valve control hose is manually removed from the DAAZ 2107 carburetor
The return spring of the solenoid valve of the DAAZ 2107 carburetor is manually removed from the socket
Fuel hoses from the DAAZ 2107 carburetor are removed manually after loosening the clamps
The DAAZ 2107 carburetor mounting nuts are unscrewed with a 14-mm open-end wrench
After unscrewing the fasteners, the DAAZ 2107 carburetor is removed manually
How to set idle speed
First, make sure that the ignition system is set correctly, all wires are in order and the engine is warmed up to operating temperature.
For this:
- Turn the “mixture quality” screw (counterclockwise) to maximum speed, this will enrich the mixture with fuel;
- Turn the “amount” counterclockwise, while the speed should still increase.
- Perform a quality check to see if you can still increase the speed.
The meaning of this operation is to tighten the “quality” screw with the “quantity” screw unscrewed to 850-900 rpm.
You can determine the revolutions by the tachometer on the dashboard, and if you are skilled, by ear.
Adjusting the air damper drive
If you don't take care of the drive, the car may stall. To do this, you will need a simple Phillips screwdriver and a 7 mm open-end wrench.
The positions of the damper are shown above with the “suction” extended and recessed.
To adjust the drive, do the following:
- drown the “suction”;
- Unscrew the rod fixing screw with a screwdriver (the spring will push it out vertically)
- Tighten the screw;
- Check the valve stroke.
Adjusting the throttle drive
If this drive is incorrectly configured, the car's engine response drops and acceleration dynamics deteriorate. The setup is done with an assistant.
You will need the following tools: a screwdriver, an 8-mm open-end wrench, a flashlight, a ruler or a caliper.
- Turn down the “choke” (air damper drive) completely.
- Have your assistant press the gas pedal all the way to the floor. The throttle valve will open completely, as shown in the picture below, you can shine a flashlight into the first chamber. When you release the pedal, the damper should completely close the first chamber without any gaps. If there are gaps, then proceed to the next step.
- Next, we measure the length of the rod with a caliper; it should be exactly 8 cm. To adjust the length of the rod to the required size, rotate the tips by unscrewing the lock nuts.
After all these operations have been completed, put the rod in place and repeat the check. Nowadays, rods are made of low-quality plastic, which shrinks over time. Therefore, you need to check the operation of the traction after a week or two.
We looked at all the ways to adjust the carburetor yourself. We hope this article helped you, if you have any questions, ask them in the comments and we will definitely answer.