The stable operation of the VAZ 2107 car engine depends on the serviceability and correct settings of its systems. Adjusting the idle speed is possible without the involvement of specialists, provided that all recommendations in the operating manual are followed. A serviceable carburetor with the correct ignition timing and gaps between the distributor contacts.
Adjustment of the mode according to the technical documentation must be carried out using a device that determines the level of CO in the exhaust gases. In garage conditions, the carburetor is usually adjusted by eye and using the built-in tachometer. The description prescribes a crankshaft speed ranging from 700 to 900 rpm. At lower values, the carburetor system is unable to ensure stable engine operation; at higher values, fuel consumption increases.
Symptoms of a device malfunction
Carburetor failure can look different. The most common situations in which the driver should pay attention to the condition of this unit:
- The car engine does not start even after several attempts. There may be two reasons for this: either there is no fuel-air mixture in the float chamber, or the proportions of this mixture are incorrect and it cannot ignite in time;
- the engine stalls at idle or its operation is unstable. The most common reason for this is a clogged nozzle. In addition, interruptions in the operation of the motor may occur due to damage to any o-ring or hose. Finally, such malfunctions can be caused by a malfunctioning solenoid valve in the carburetor;
- Engine idle speed is too high. This malfunction may occur due to incorrect carburetor adjustment or due to loose air dampers. It also occurs due to too high pressure in the float chamber, resulting from oxygen entering through damaged hoses or sealing joints.
Checking the idle air control circuit
Before moving on to diagnosing the regulator itself, it is necessary to check its circuit, because the reason that it stopped working could be a simple break in the wires or a malfunction of the electronic control unit. To diagnose the circuit, you only need a multimeter with the ability to measure voltage. The procedure is as follows:
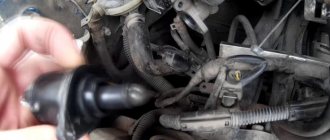
- Raise the hood and find the sensor wiring harness on the throttle assembly.
- Disconnect the wiring harness block.
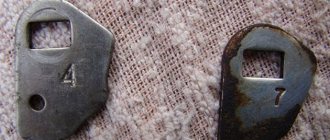
Each of the IAC pins is marked - Turn on the ignition.
- We turn the multimeter into voltmeter mode with a measurement range of 0–20 V.
- We connect the negative probe of the device to the ground of the car, and the positive one in turn to terminals “A” and “D” on the wiring harness block.
The voltage between ground and terminals A, D should be approximately 12 V
The voltage between ground and each of the terminals must correspond to the voltage of the on-board network, i.e. approximately 12 V. If it is less than this indicator, or is absent at all, you need to diagnose the wiring and electronic control unit.
Do-it-yourself dismantling of the unit
To remove the DAAZ 2107 carburetor, auto mechanics recommend proceeding in the following sequence:
- The hood of the car is opened, the clamp on the warm air intake hose is loosened using a flat screwdriver, after which the hose is disconnected from the thermostat tube.
The air intake hose is disconnected from the thermostat
The mounting plate of the DAAZ 2107 carburetor is removed manually
The air filter from the VAZ 2107 is removed after removing the mounting plate
The choke cable of the DAAZ 2107 carburetor is disconnected using a screwdriver
The hose for removing crankcase gases from the DAAZ 2107 carburetor is removed manually
The wires of the economizer control system are disconnected from the DAAZ 2107 carburetor without much effort
The hose of the vacuum ignition timing regulator is removed from the DAAZ 2107 carburetor by unscrewing the screws
The solenoid valve control hose is manually removed from the DAAZ 2107 carburetor
The return spring of the solenoid valve of the DAAZ 2107 carburetor is manually removed from the socket
Fuel hoses from the DAAZ 2107 carburetor are removed manually after loosening the clamps
The DAAZ 2107 carburetor mounting nuts are unscrewed with a 14-mm open-end wrench
After unscrewing the fasteners, the DAAZ 2107 carburetor is removed manually
How to adjust the carburetor
As a rule, after removal, all parts of the carburetor are thoroughly cleaned of dirt and deposits. Let's look at the main stages of cleaning.
Cleaning the jets
Jets are thin channels in the carburetor through which air and fuel are supplied. Mechanical cleaning of these channels is strictly prohibited, so the jets can only be cleaned with compressed air. To purge the channels, motorists use a tire pump. As a rule, this is enough.
Electric car pump, which is convenient for cleaning the jets in the DAAZ 2107 carburetor
But if the carburetor is very dirty, place it in a container with kerosene for half an hour. After soaking in kerosene, even the most stubborn stains are easily removed.
Cleaning the float chamber
The best tool for cleaning the carburetor float chamber is a rubber medical bulb, with the help of which all remaining fuel, along with accumulated contaminants, is carefully pulled out of the chamber. Do not wipe the float chamber with fluffy materials, as fluff may get into the jets.
It is convenient to clean the float chamber of the DAAZ 2107 carburetor with a rubber bulb
Flushing the throttle valve
The throttle valves in DAAZ 2107 carburetors are cleaned using various cleaning compounds purchased at auto stores (most often this product is WD40 liquid).
The damper itself and all adjacent structural elements are washed with liquid: small channels, valves, etc. And the crankcase ventilation channel should also be washed.
Video: cleaning the throttle valve on a VAZ 2107
Not enough air
Often the car starts up well and runs on choke, but as soon as the choke is turned off, the engine stalls. This indicates only one thing - lack of air. Most likely the air jets are clogged. They need to be unscrewed and cleaned. Then check that the car should not stall without suction.
There are an incredible number of reasons for poor performance of car components with similar symptoms, but only a specialist with a set of professional diagnostic tools can figure them out. But if you feel confident in yourself, go for it, VAZ service centers are already waiting for you.
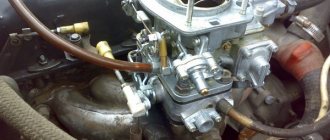
Self-adjustment of the carburetor
As a rule, when setting up a DAAZ 2107 carburetor, car enthusiasts adjust fuel consumption and idle speed. Let's look at these stages.
Idle speed adjustment steps
Setting up the carburetor in this mode is easy:
- A carburetor with a properly adjusted idle speed allows the car engine to operate stably even with very low CO levels. To do this, the car engine warms up for 10 minutes. After this, the fuel quality screw in the carburetor is turned out as much as possible.
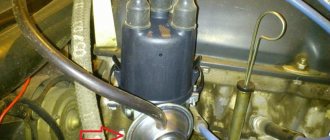
Preparing the carburetor for adjustment
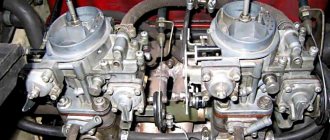
VAZ 2107 - in the photo - the car is carburetor and is sensitive to fuel quality, therefore sometimes it needs to correct the capacity of channels and gaps
If the engine starts and runs stably at any speed and under any load, fine adjustment is unlikely to be needed. As a rule, this must be done in cases where the engine's fuel consumption exceeds the nominal values, when the engine is difficult to start, and dips appear in transient operating modes during sudden acceleration. Absence or instability of idle speed can also be treated by adjusting or cleaning channels and cavities.
Sometimes there are situations and clear symptoms that it is necessary to adjust the ignition timing or adjust the valves of the VAZ 2107, but the carburetor may be quite serviceable. Therefore, it is worth adjusting it only when there is confidence in the serviceability of the ignition system, the accuracy of setting the thermal clearances of the valves, after checking the functionality of the fuel pump, and good compression in each of the cylinders.
Adjustment may not bring results if the carburetor is clogged or has obvious mechanical problems or leaks. Therefore, a thorough inspection and assessment of the external condition of the device is necessary. Adjustment and configuration begin only when all these conditions are met.
We go to the service station for service
Using low-quality fuel can also lead to serious engine damage. This may not only be problems with the fuel filter, but also general contamination of the injection system.
It should be said that such a breakdown can only be determined after computer diagnostics. Such diagnostics will allow you to identify existing problems with the injectors, after which it is necessary to replace failed spare parts under service conditions.
We would not recommend changing the injectors yourself. This kind of work is complex and can only be done by experienced workshop technicians on modern cars.
In some cases, the reason why the engine does not pick up speed and there are operational problems is the failure of the control unit. The engine's computer brains send the engine the wrong signals, causing the engine to shake and the engine to run rough.
Such a breakdown can also be determined only after computer diagnostics. Depending on the nature of the problem, it is necessary to either reprogram the control unit or replace it. In the latter case, the cost of repair work can be quite high, since such engine brains are expensive.
Retarded ignition is also a common reason why an engine runs rough. If the engine does not pick up speed, there is a pronounced shudder, the cause of the problem in this case may be late ignition. The fuel mixture entering the cylinders is simply not completely burned and continues to burn in the exhaust manifold.
As a result, the power unit operates unevenly, noticeable detonations appear, the engine runs intermittently, and the existing engine control unit begins to forcibly reduce engine speed.
Checking and adjusting the float chamber
Before checking and adjusting the carburetor on the VAZ 2107, you must remove the air filter along with the housing. And at the same time, check its condition, since a clogged dust filter greatly restricts air access to the engine, and this can also affect both the proportions of the working mixture and the operation of carburetor peripheral systems. Once the filter and housing are removed, unscrew the carburetor cap and gain access to most of the jets, the float chamber and the primary and secondary chamber diffusers. To begin, unscrew the plug of the filter mesh at the bottom of the lid near the fuel supply fitting. The mesh is carefully cleaned, washed, the internal cavity of the screw plug is washed, and the condition of the aluminum or bronze sealing gasket is checked.
When cleaning the internal cavities of the carburetor, you must follow important rules. Firstly, it is extremely undesirable to clean with fluffy or hard rags, since the fluff can easily clog the channels and jets. Secondly, when mechanically cleaning channels and jets, you should never use metal objects. They can irreversibly disrupt the throughput of the calibrated holes, then it will not be possible to correctly adjust the VAZ 2107 carburetor. The jets are cleaned only with wood chips, and ideally with compressed air or special cleaning liquids. The cone valve and its seat are cleaned using the same method.
Video tips for setting a stable idle
Before adjusting the fuel level in the carburetor, you need to make sure that the float is intact, has no mechanical damage and does not leak gasoline or sink in it. Otherwise, the brass float is replaced. The float is adjusted by changing the angle of the thrust tabs. The factory recommends maintaining the following clearances - with the needle valve closed, the distance from the float body to the carburetor cover gasket should be 6.5 mm. In this case, the maximum free play of the float body should be no more than 8 mm, and the distance to the gasket in the extreme position should be within 14-14.5 mm. These values are achieved by bending the persistent tabs. Check the operation of the float and cone valve by supplying gasoline with the cap installed, followed by monitoring the fuel level in the chamber.
Carrying out diagnostics
The simplest method is to measure the voltage at the block to which the regulator is connected. These are terminals D and A. When the ignition is turned on, a voltage of 12 V should be present on them. If the voltage is less than this value, it is worth looking at the battery and generator. It is quite possible that the battery is undercharged. In the same case, if there is no voltage at all, it is necessary to check the entire power circuit of the device and diagnose the ECU.
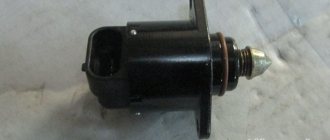
Set the multimeter to resistance measurement mode. Between pairs of terminals A and B, C and D, there should be a resistance of approximately 53 ohms. Remove the IAC and connect (with the ignition off) to the block. Then turn on the ignition and look at the behavior of the needle - it should extend completely when voltage is applied. If this does not happen, we can judge that the IAC is broken.
Sometimes simply cleaning the regulator helps. To do this, you can use sprays, of which there are sufficient quantities in stores. But in some cases, only replacing the device will help. Of course, this is not a DAAZ carburetor, the cost of the IAC will be many times lower, and there will be no problems with replacement. If, even after the replacement, the engine does not idle, it is necessary to fully diagnose the injector.
To check and replace the regulator itself, you will need to dismantle the throttle assembly and disconnect the device from it. The following tools and resources will be needed:
- screwdriver with Phillips bit;
- slotted screwdriver;
- round nose pliers;
- socket wrench or socket 13;
- multimeter with the ability to measure resistance;
- calipers (you can use a ruler);
- clean dry cloth;
- coolant for topping up (maximum 500 ml).
To remove the throttle assembly, you must:
- Raise the hood and disconnect the negative cable from the battery.
- Using a slotted screwdriver, hook the end of the throttle cable and remove it from the gas pedal pin.
- On the throttle block, use round pliers to disconnect the clamp on the throttle valve drive sector.
The fastener is detached using pliers or a screwdriver - Turn the sector counterclockwise and disconnect the cable end from it.
To disconnect the tip, you need to turn the drive sector counterclockwise - Remove the plastic cap from the cable end.
- Using two 13mm wrenches, loosen the cable fastening on the bracket.
To loosen the cable, you need to loosen both nuts - Pull the cable out of the bracket slot.
To remove the cable, it must be removed from the bracket slot - Disconnect the wire connectors from the IAC connectors and the throttle position sensor.
- Using a screwdriver with a cross-shaped bit or pliers (depending on the type of clamps), loosen the clamps on the coolant inlet and outlet fittings.
Remove the clamps. In this case, a small amount of liquid may leak out. Wipe off any spills with a dry, clean cloth. The clamps can be loosened with a screwdriver or pliers (round pliers) - In the same way, loosen the clamp and remove the hose from the crankcase ventilation fitting.
The crankcase ventilation fitting is located between the coolant inlet and outlet fittings - Using a Phillips-head screwdriver, loosen the clamp on the air supply pipe.
Remove the pipe from the throttle body. The air pipe is fixed with a worm clamp - Similarly, loosen the clamp and remove the hose for removing fuel vapors from the fitting on the throttle assembly.
To remove the fuel vapor exhaust hose, you need to loosen the clamp - Using a socket wrench or a 13mm socket, unscrew the nuts (2 pcs) securing the throttle assembly to the intake manifold.
The throttle assembly is attached to the manifold using two studs with nuts - Remove the throttle body along with the sealing gasket from the manifold studs.
A sealing gasket is installed between the throttle assembly and the manifold - Remove the plastic bushing that defines the air flow configuration from the manifold.
The plastic sleeve sets the air flow configuration inside the manifold - Using a Phillips-head screwdriver, remove the two screws securing the regulator to the throttle body.
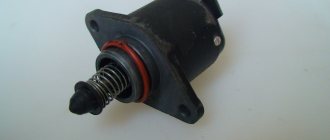
The regulator is attached to the throttle body with two screws - Carefully remove the regulator, being careful not to damage the rubber O-ring.
A rubber sealing ring is installed at the junction of the IAC with the throttle assembly
Setting up and checking the launch system
This system is used to start a cold engine and ensures its warming up by approximately 1.5-2.5 thousand revolutions. When the engine warms up, the system is turned off manually and the engine starts idling at a speed of about 800-900 rpm.
Maintenance and adjustment of the starting system comes down to cleaning the vacuum supply channel in the central part of the carburetor, checking the gaps and stroke of the air damper, checking the functionality of the vacuum reverse drive of the air damper, and the starting clearances of the primary chamber damper. With the air damper closed, the lever system should slightly open the fuel damper by 0.8-0.9 mm.
The second important gap is between the air damper and the wall of the primary chamber. When the damper is closed, this gap should be about 5-5.5 mm. It is adjusted by a screw, which is located under the brass threaded plug on the body of the vacuum air damper position regulator. The functionality of the starting system is checked with the air filter installed and the engine cold.