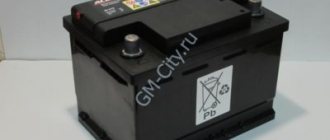
Every motorist knows that a generator is a fairly important element in the design of any car, thanks to which it is possible to set the engine in motion and provide all vehicle systems with the necessary energy.
The Russian-made Niva car in modifications 21214, 2121, 21213 are vehicles that almost every second car enthusiast in Russia has encountered.
Despite the release of several models, the contents of the Niva are practically no different. Thus, manufacturers used units with article numbers 9412.3701, 371.3701 as a generator in cars.
Device Description
On Niva 21214 cars there is a generator of type 9412.3701, on VAZ 21213 - type 371.3701, on Niva Chevrolet there is a generator 2123. All of them are alternating current electric machines with electromagnetic excitation, having a built-in rectifier unit with silicon diodes and an electronic voltage regulator. The maximum current produced by the generator unit type 9412.3701 is 80 A, voltage - 13.2 - 14.7 V, rotation - right.
Design of unit 21214
The unit covers are attached to the stator using 4 bolts. The covers have bearings installed. They rotate the rotor shaft. In the front bearing, the inner race is clamped with a nut along with a thrust ring and washer. The 2nd bearing is also pressed into the back cover.
The stator has a 3-phase winding, one of the ends of which is connected to a rectifier unit consisting of 6 diodes. Of these, 3 diodes are negative, 3 are positive. According to the polarity, they are pressed into the plates. The entire structure consists of a rectifier unit, which is located on the back cover of the generator unit covered with a protective casing.
The design of the unit also includes contact rings and brushes. On the back side of the back cover there is a brush holder, which is structurally connected to the voltage regulator. The rectifier contains a capacitor that protects the electrical network from power surges.
The “B” terminal of the generator set must be connected to the positive terminal of the battery, and the negative terminal of the battery to the vehicle ground. If the connection is incorrect, this will lead to breakdown of the diodes.
Generator Niva 21214
Niva Chevrolet - which generator is better - 80 ampere or amp? Advantages and disadvantages
Voltage sag. Niva Chevrolet.
The lamp should not be lit; if it lights up, it means there is a short circuit.
Chevrolet Niva Niva67 › Logbook › Generator A on a Chevrolet Niva. As I felt, I ordered KZATE...
The operation of the generator is controlled by a warning lamp in the instrument cluster.
A brightly lit lamp or glowing at full intensity indicates a malfunction.
I drove another kilometer and, according to the voltage readings in the network, it became absolutely clear that there was no charge, I was driving “on batteries,” and I urgently needed to decide where to go.
Basic malfunctions and ways to eliminate them
Checking the health of the unit is done using a multimeter. After the engine is started, the voltage at the battery terminals should be 13.6 V. If the value is higher or lower, this indicates a break or short circuit of the windings, oxidation of the slip rings, a malfunction in the brush assembly, or voltage regulator.
The generator unit may not work well due to weak belt tension or its breakage. In this case, you need to adjust the tension or replace the belt. Faulty voltage regulator, needs to be replaced. If a breakdown, short circuit, or damage to the rotor windings is detected, it should be replaced. If there is a break or short circuit in the stator windings, it requires replacement. If the diodes are damaged, the rectifier unit is replaced.
We install an 80A generator (from the 214th Niva) on a carburetor Niva.
We install an 80A generator (from the 214th Niva) on a carburetor Niva.
To provide yourself and your car with a good battery charge, as well as get rid of the “muffled” headlights at idle and give yourself the opportunity to install additional electrical equipment, you need a powerful generator! For a regular (carburetor) NIVA, there is a simple option to increase the power of the generator - this is to steal it from its brother VAZ-21214 (injector). On 214 Nivas they install generators with a capacity of 80A, because... there are more consumers there!
Installing an 80-amp generator, for example, in the 213th NIVU is not difficult at all! You just need to buy: the generator itself from the 214th Niva (ATTENTION: they come with different pulleys!), the lower bracket for mounting the generator and the upper tension bar, and of course a special bolt for attaching the generator to the lower bracket.
Brackets can be easily installed on the engine of ANY field! because the blocks are the same! As I understand it, you can even easily plug it into the “six” for the same reason. Remove the old brackets and install new ones! Everything is screwed into the same holes!
In the case of the 213th Niva, there are almost no alterations on the electrical side! It was only necessary to change the terminal on the excitation wire (on the 213rd there is a terminal for a bolt, and on the 214th there is a regular “mother”) I can’t say for sure about 2121, I don’t remember how they have a charging relay there, if it’s external, it’s necessary redo the circuit, because in the new generator it is built into the brush assembly!
This will not affect the battery in any way! The charging current remains the same, because these generators have a standard charging relay (pocket) - 5A power
For reference: the 214th Niva has a regular 55 a/h battery
If the M2141 is with a VAZ engine, then of course! no problem!
And if the M2141 is with UZAM, then IMHO in my opinion it should work, but with the fastening it will be a little difficult. but in general there shouldn't be any problems. At one time I even wanted to install it on one car, but I never found the time.
If you put it, please unsubscribe.
IMHO, I would not contact the Vologv (or Gazelle) ones because they have an external charging relay. And another connection diagram! Why fence the garden! It’s easier to plug in this generator - since it has a built-in charging relay (tablet) and the connection diagram is similar to the standard one on UZAM! I think there is no information about the installation of these generators at UZAM because they began to be made relatively recently. at least sell it! And of course there is little chance of finding such a “junk” generator. But finding some unnecessary Volgov is a piece of cake!
If we talk about buying a new generator, it’s better to buy this one and simply modify the bracket (similar to how they do it with Volgov generators) than to remake the bracket and some other electrical parts for a Volgov generator! Although, of course, there are also 90A Volgov ones! But in my opinion it's not worth it!
By the way, it’s true that the Volga generator is installed because it is more accessible.
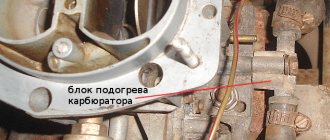
The native generator for the Ufa engine (58.3701) has categorically not suited me for a long time. So I decided to change it to something more decent.
Disadvantages of native generators: The original generator produced by ATE-1 (58.3701) has a power of 52A, is distinguished by crooked pulleys that fly apart from time to time (stamped welded ones - they fall apart right after welding), unreliable diode bridges and a flat current-speed characteristic - it gives too little current at idle . It also has rather weak bearings, although apparently only I encountered this problem due to the fact that I like to operate the engine often and for a long time at high speeds (5000-7000).
Recently, Ufa engines began to be supplied with generators 666.3701 produced by KZATE. Unlike the previous generator, this one has a normal, smooth, turned pulley and a more complex connection diagram - with a light bulb on the instrument panel instead of a voltmeter and a slightly higher power - 60A.
There were many replacement options - UZAM made the generator mounting in such a way that almost any generator can be installed in its original place. Therefore, a selection of replacement options was made (low-power ones were discarded immediately):
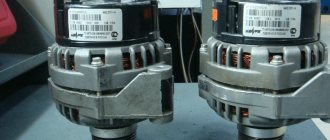
Generator from Bychka (or a converted original one). Power 90A. It is quite cheap, has a normal pulley, but is still rather weak at idle and has exactly the same diode bridge as the original one (Generator of the 94xx.3701 family. The most common ones are from the injection Niva 21214 (9412.3701) and the 16-valve ten (9402.3701) . There are rumors that they began to install the latter on all injection eights/tens. It pulls well at XX. The power is 80A. It’s not cheap. But you don’t have to worry about the bearings - they are powerful and with a reserve (since the version for 2112 has a pulley for a poly V-belt of a smaller diameter) .It also contains additional diodes in the bridge for powering the excitation winding (like the generator 37.3701, which is installed on the 2126 with a VAZ engine). As it turned out, there are 2 versions of generators 9412.3701 on sale - they differ in pulleys. Some have pulleys with a diameter of 80 mm, some - 70mm in outer size Naturally, you need to take a generator with a 70mm pulley, for which you should take a ruler with you to the store.
Generator from a foreign car (hypothetical). Their modern models are good, you can buy a suitable one quite cheaply at a disassembly site, but there will definitely be problems with spare parts for it somewhere in Mukhosransk at a roadside stall. In terms of characteristics, modern generators are usually close to option 2 (In the end, I settled on option 2. Having looked at the Nivovsky version of this generator, I came to the conclusion that this is what should be installed. The tenth one is also suitable, but:
The pulley on it needs to be changed from poly-V-ribbed to regular. A pulley from a figure-eight/classic generator 37.3701 is suitable. It has an upper ear under the bar in a slightly different place (closer to the engine), which means it will be less convenient to tighten the belt. As a rule, it costs a little more (100-300 rubles) than Nivovsky. Therefore, a Nivovsky generator was purchased. In the evening, a hole was already drilled in its lower one from 8mm to
11mm drill for 10.5, since the original mounting brackets for the generator have holes for bolts of 10. According to the drawing, the hole diameter in the original generator should be 10.2mm.
I also immediately changed the tablet in the new generator - instead of the native Kaluga one, I installed a Ukrainian one with a field-effect transistor. This will allow for less voltage sag - important at idle. (
In the morning I went outside (the car was parked at the entrance), shoveled away the snow, warmed it up a little (to make it warmer) and removed the old generator. Then I tried the new one in place. In general, as expected, it fits almost like a native one.
It is necessary to move the front bracket forward by about 5mm so that the pulley is in the same plane as the others (pump and crankshaft). I did not increase the pulley reach by moving it further along the generator shaft or sawing the lower ear of the generator: the load on the bearings increases. The original front bracket moves normally - it is screwed to the studs of the front engine cover - between the cover and the bracket, 8 washers of the required number are placed on the studs. You also need to change the studs to longer ones - I only changed one (the second one did not unscrew) - there I had to put a nut on the thread lock - it hangs down a little. Longer studs were found by chance. Unfortunately, I can’t tell you the exact length - you can unscrew one and take it to the store or to a box with fasteners - there you need literally 2mm longer. You need to buy a bolt 10 135 mm long. I bought 140 - it turned out to be a little long. But more is not less. It’s better to take a good, strong bolt with a 17mm head and 2 thick nuts (0.7-1 cm approximately) - also 17mm (to make it easier to unscrew without fear of tearing them off). The generator will be fixed by tightening the 1st nut, but not all the way, but only to move it to tension the belt. The 2nd nut counters the first. You need something to fill the gap between the rear end of the alternator bottom bracket and the rear alternator bracket on the engine. I put 4 thick 12mm nuts on the bolt (which is 10-140mm). And since the rear bracket moves (it is screwed with two nuts through the studs and can be moved back about 1cm), the gap is selected as follows - the rear bracket is loosened , a bolt is inserted in front, the generator is put on it, then 4 nuts by 12, then the rear bracket, then the nut is screwed onto the bolt, pulling the bracket to the nuts, then the bracket is screwed on. It’s a little inconvenient, but you can take the length of spacers made from nuts (or something else, maybe tubes) +-5mm and not be afraid of losing them. You also need to buy an 8mm bolt, 40mm long, with a nut (preferably Teflon so that it doesn’t come loose) to fix the generator to the bar through the upper ear. The plank remains original. There you also need to place washers in place. The original bolt is a bit short. Electrical part:
The plus is connected as usual to a thick stud with 6 nuts, but the excitation needs to be connected differently. Since the generator is self-excited, it only needs power at the time of startup. You can simply connect the standard wire, but then the engine will not stall when the ignition is turned off, because the generator will generate current through the additional one. diodes and power the ignition through the excitation wire
The standard circuit from the figure eight suggests powering this wire through a control light on the parting panel and two resistors + a diode in the FC parallel to it, but since it was too lazy to bother with searching for the required output in the FC, KRWW and I simply soldered a powerful diode in the standard wire from the excitation winding, soldered from a burnt board from a monitor, reasoning that the resistors were there only for safety net.
If the diode breaks down, you can do this: connect a standard wire to the excitation winding terminal and remove it before turning off the ignition so that the engine stalls.
Now a report on the sensations immediately after installation:
1. Charging appeared right from idle speed (which did not happen with the old glitchy generator even when it was working properly). 2. The voltage sags much less when consumers are turned on, but still sags a little. When absolutely all consumers are turned on, including the cooling fan, the generator reaches operating mode at 1200 rpm (that is, the voltage does not sags). 3. This generator is much less noisy! But I decided to make some more improvements and went to KRWW’s garage, where we unloaded the ignition switch with two additional switches (Although there is a different CY in the picture, the idea is actually the same for all CYs. As a result, the effect was amazing!
Now everything is fine already from 1000 rpm with absolutely ALL consumers turned on, and the voltmeter needle stands as if nailed down! When you turn on the turn signals, however, the voltmeter twitches a little (but much less than before, barely noticeable). Apparently the contacts in the dash are not the same.
At the same time, the wipers began to run faster and the heater began to blow more powerfully.
The voltage drops significantly at the ignition switch
Gena - 1960 RUB Field-effect transistor tablet - 100 RUB Fasteners - about 50-70 RUB 2 30A relays + pads + wires - I don’t remember Addition: I’ve driven more than 2 thousand km with the new generator - everything works fine, the belt does not wear out, there are no breakdowns.
Reader's note: Resistors are needed not for insurance, but to practically eliminate excitation at the moment of starting, which, firstly, saves electricity (and when starting with a starter, every ampere is precious!), and secondly, an unexcited generator does not resist rotation, which also makes it easier start. But I myself have completely excluded additional diodes from use, and supply the excitation through the technological output “D” using a relay. This way the voltage is maintained more accurately. Alexey Vasiliev
It's time to take a look at our SUV's electrical system. Namely, to an electric current generator. As you know, it charges the on-board battery and, accordingly, provides power to absolutely all devices - from the cigarette lighter to the “chandelier” or winch. Replacing a “gene” is not always dictated by its malfunction, so we will try to carefully study this issue from “A” to “Z”.
Content:
- Why do you need a generator?
- Each Niva has its own “gene”
- Why install a manufacturer with increased power?
- Why is the generator moved?
- What additional parts are associated with the generator?
Why do you need a generator?
The purpose of the device called “generator” is fully clarified by the decoding of its name, which is translated from Latin as “manufacturer”. The detailed name of the electric generator specifies that this component of the car structure converts mechanical, thermal or any other non-electric energy into electrical energy.
The Niva SUV, especially in capable hands, takes the owner and passengers to such distances, as in the famous song, where “you can’t really step.” Therefore, Lada 4×4 almost always has additional electrical equipment - from a harmless low-power standard music radio to quite serious consumers of electricity, such as a compressor, additional lights, etc. This is where discomfort arises - sometimes even the headlights barely shine on the Niva, sneaking through the fields for fishing or to the hunter’s night shelter.
Let's figure out how our fellow jeeppers are rectifying the situation! What do they use and what models of generators are not recommended for installation.
Each Niva has its own “gene”
To begin with, let us recall that the Niva car recently celebrated its 40th birthday and one should not think that all the cars that were assembled in Togliatti 20, 30, or even all 40 years ago are already in the dustbin of history or in museums. They quietly travel along the roads of vast Russia and other countries, and therefore we will try to take into account all the nuances associated with the generations of the legendary SUV.
As we previously found out using the example of the Niva’s ball joints, this car has conditionally survived three noticeable updates.
Generators for Niva 2101-3701010
Until about 2009, the good old VAZ-2121 was quite easily assembled with exactly the same components on which the classic model range of the Volzhsky Automobile Plant was built. The generator was installed there from a “penny” - 2101-3701010 (G221A) at 590 W with an almost symbolic maximum current of 42A. The owners of these cars were the first to encounter a power shortage due to the additional load on the car's electrical circuit. By the way, for this generation of car you can find generators ELDIX (ELD-A-2101-14V-50A at 50A and 700 W) or StartVOLT (LG 0101 already at 85A and 1200 W).
Generators for Niva 21213-3701010
Which generator is suitable for Niva 21213? Carburetor cars VAZ-21213, VAZ-2131 and VAZ-2120 (Nadezhda) were equipped with a different “geno” - 21213-3701010. Marking of the specified product is KZATE (371.3701-02). This is a 55 amp 770 watt unit.
Generators for Niva 21214-3701010
Finally, since about 2015, the injection models VAZ-21214 and VAZ-2131 and their variations have been equipped with a fairly extensive line of electrical energy producers from the same KZATE (9412.3701) 80-Amp generator for 1120 W, a couple of models from ELDIX (ELD-A- 21214-14V-90A and ELD-A-21214-14V-135A), respectively 100 and 135 Amperes and power 1400 and 1850 W.
Well, since we started a review of Chevrolet Niva generators, there is also PRAMO (5142.3771 and 5142.3771-10) for 80 and 100 Amperes, 1120 and 1400 W. And StartVOLT (LG 01214) at 135 Amps with a power of 1970 W. Accordingly, which Niva is the generator from 21214 suitable for? That's right, to the VAZ-2131!
Let’s make a reservation right away that numerous users on the Internet do not praise ELDIX products very much. Therefore, when solving puzzles: “Generator for a Chevrolet Niva: which one is better to install?”, perhaps it makes sense to focus specifically on the experience of fellow drivers. On Bulgarian Eldixes the diode bridge burns “at once”, and this is an unpleasant story.
From the point of view of the differences between early versions of the Niva generator and later ones, the fundamental design difference is in the remote voltage regulator on the former and the regulator built into the generator on the latter. Otherwise, any generator fits onto the Niva easily and almost without problems with just changing the brackets, since the power unit block is, in fact, the same for all these cars. And the “gene” is attached specifically to it. The pulleys on the Lada 4×4 are also made for the same mono-V belt, but for the model with power steering the belt is slightly wider and longer, and without power steering it is narrower and shorter.
In general, the generator should be selected carefully; it is even better to contact specialists so that you do not have to return a part that does not fit the design to the store.
By the way, in recent months many have been asking a reasonable question - what kind of generator is on Niva Travel? After all, this is a “new” model from AVTOVAZ and, perhaps, some solutions have been applied that are different from previous generations of Niva. Here we just remind you that the engine in the new product is the same as on the previous Shniva, and hence the answer - the location and name of the generator is identical.
What generator is on a regular Chevrolet Niva and which one should I buy? Let us remind you that on Chevrolet Niva cars the manufacturer installs a 55-Amp generator 37.3701. We will offer specific replacement options for more productive analogues below. First, let’s thoroughly examine the question: is it necessary to change the “gene” at all?
Why install a manufacturer with increased power?
As mentioned above, the Niva driver almost always has a lively mind, regularly solves non-standard problems, plows off-road roads and, in general, belongs to the category of people with both head and hands. That's why he lacks a factory electric generator.
There is not enough current from the standard device
Often an additional fan, numerous lighting fixtures and other attributes of a real conqueror of virgin lands are installed. Hence the banal lack of current.
Replacing the unit does not require Herculean efforts
Experienced Nivavods have many times left on the forums their recipes for resolving the issue of the lack of a native generator. The kit for installing a more modern “gena” on an old Niva contains a bar, a lower bracket, a bushing assembly, a nut and a bolt. If you have direct hands, installation does not take much time. All that remains is to resolve the issue with the wiring.
Later alternators have 2 pins, but the old alternator had 3 pins. The “extra” wire comes from the “chocolate bar” on the wing. It is recommended to simply isolate it and not connect it anywhere. If so, why not upgrade your favorite car?!
You have to cross the mud, fords, ravines
Finally, with regular extreme loads on the car, they prefer to protect it - the generator is moved from the lower plane of the engine compartment to the top. This way, the brushes will not wear out or “hang” due to accumulated dirt, which means, as a result, they will not burn.
Why is the generator moved?
Actually, we have already answered this question in the previous paragraph. Here we will try to briefly outline the options for changing the location of the generator for different models of a particular all-wheel drive vehicle.
So, the bracket and belt on the injection VAZ-21214 will allow your “gene” to serve longer without any problems:
Nuances of moving a generator
The disadvantage of domestic Niva SUVs is the location of the generator unit - at the bottom of the engine compartment. It constantly gets contaminated when driving off-road, and coolant constantly drips. The problem is solved by moving the generator upstairs (the author of the video is SARTANETS).
To transfer, you will need a set of keys, a bracket, mounting bolts, and a V-belt. You can make a generator transfer bracket with your own hands according to the drawing below.
Drawing of a homemade bracket
Sequence of actions during transfer:
- We dismantle the propeller, pump and remove the belt.
- By unscrewing the standard bracket, you can remove the generator.
- We cut off the bead around the side of the cylinder head and on the cylinder block.
- Then you should unscrew the two bolts and two studs.
- Next, the assembly is installed on a new bracket and final assembly is performed.
Thus, moving the generator unit upstairs is not difficult.
What will it take to improve?
First of all, of course, the generator itself and the VTN type voltage relay (9111.3702). Later you will feel the difference why we chose it.
In addition, you will need a fastening mechanism from a VAZ 21214, a bracket, a bracket and a bolt for the generator itself, but from a VAZ 2110. In terms of mechanical installation, there should be no problems. The old fasteners are removed and installed in their place from Niva - anyone can do it.
The most difficult thing is the connection.
Guide to removing and connecting the generator
To remove the unit, you need to prepare a set of tools: keys “10” and “19”, ratchets with heads, a hammer and a small extension.
The process consists of the following steps:
- First of all, remove the negative terminal from the battery.
- Next, you need to remove the engine protection and the right mudguard.
- Then, using a hammer, carefully knock out the mounting bolt and remove it.
- At the next stage, you need to disconnect all the wires going to the generator: the plug and the wires secured with a nut.
- Then the fastening on which the belt tensioner is located is unscrewed.
- By removing the belt, the assembly can be dismantled through the hole that was formed after removing the protection.
- After replacement or repair, install the unit in reverse order.
Repair and maintenance of the VAZ 2121 generator
The electrical equipment of a car is an interconnected complex. Generator, battery, starter, lighting, auxiliary equipment...
The entire circuit is built around a source of electricity. Therefore, breakdown and subsequent repair is a serious problem for the owner of a VAZ 2121.
The connection is the same as on other VAZ cars of those years of production. And the load is significantly higher. Modern motors add consumers such as electronic engine control modules. Electric cooling fans and additional comfort systems increase current consumption.
Electrical repair
First, the generator must be removed. Before disconnecting the wiring, carefully sketch or photograph the connection diagram. Place the unit on a clean surface so that no debris can get inside. How to connect a generator in the field:
Disconnect the voltage regulator and diode bridge board. Test the diodes and connecting buses with a tester.
Faulty radio components are usually visible without measurement. Their repair is impossible, only replacement.
Inspect the rotor current collector tracks. The copper surface must be free of oxide deposits, cracks and other damage.
If necessary, you can clean it with fine sandpaper.
Connect the tester to the stator and rotor windings, and check them for open circuit or short circuit. There is no need to replace the generator; the windings are easily restored. After troubleshooting, reassemble the case without damaging the internal parts.
Reinstall the assembly, tighten the drive belt, and crank the crankshaft without starting the engine. This will check that the installation is correct.
Then start the engine and check the charge voltage. If it exceeds 13.8 volts, the repair has been completed successfully.
What to do if the generator fails on the road
A breakdown entails not only loss of battery charge. If the alternator seizes, the timing belt may break. In this case, all attachments of the car will lose their functionality. Further movement will become impossible.
If repair in the field is not possible, try to wait until the nearest service center on the battery. During the daytime, all lights, including DRLs, must be turned off. The comfort units must be de-energized.
Turn off one of the radiator cooling fans (unless it's too hot outside). With economical use of ampere-hours, you can drive up to 3 hours on one battery.