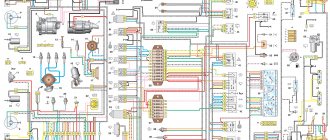
How to tension a chain on a Niva 21213 carburetor
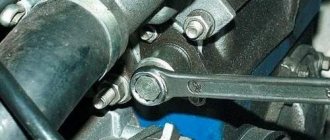
Loosen nut 1 (Fig. 2-56) of the tensioner. In this case, rod 3 is released and the chain is tensioned by shoe 7 (Fig. 2-55), which is acted upon by spring 7 (Fig. 2-56).
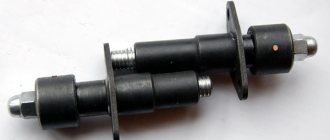
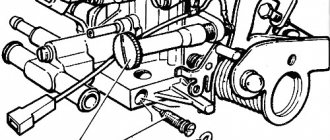
Rice. 2-56. Chain tensioner section:
1 - cap nut; 2 — tensioner body; 3 - rod; 4 — plunger spring; 5 — washer; 6 - plunger; 7 - spring; 8 - cracker; 9 — spring ring; A - plunger surface; B - places of punching at the end of the body.
Turn the crankshaft 1-1.5 turns in the direction of rotation. In this case, the tensioner spring acting on the shoe will automatically adjust the chain tension.
Tighten the nut 1 of the tensioner, due to which the rod 3 is clamped by the collets of the block 8, and when the engine is running, only the spring 4 acts on the plunger 6. This spring presses the plunger away from the head of the rod 3, and oil flows into the gap between them when the engine is running, playing the role of a shock absorber when shocks of the chain.
The timing chain plays an important role in the operation of the gas distribution mechanism. Over time, it stretches and requires tension, since the quality of the engine depends on it. Therefore, you need to know when to check the tension and how to tension the chain on a VAZ 2101. This topic is covered in an article and a video that demonstrates the process of checking and tensioning the chain drive.
When is stretching necessary?
Chain tensioning is required in the following cases:
Timing belt VAZ 2101
In the first two cases, it is clear that a tension check is necessary because the chain was removed or replaced. In addition, you should also check that the alignment marks match. These marks are located on the crankshaft and camshaft. You can determine the need for tension by the sounds of the engine running. If the tension is weak, then during its operation extraneous noises are heard in the place where the chain drive is located. At the same time, timing parts wear out faster. Therefore, when checking the tension, it is necessary to pay attention to the condition of the damper and the shoe.
Timing tensioner shoe
If the tension is weak, the links can jump several teeth, then the valve timing will be disrupted. In this case, the car may stall, not start, and the speed will fluctuate. You can use a flathead screwdriver to check. It needs to be inserted and, using as a lever, pressed on the chain. It should not bend and be stretched like an arrow. Do not put too much pressure on the drive, although the part is metal, it is subject to deformation.
The video below looks at a VAZ 2101 car, in which a clattering sound is heard when the engine is running. It shows in detail how to check the condition of the damper, the shoe, and how to carry out tension.
Tranquilizer
Another important element in this system is the Niva Chevrolet chain damper, which prevents the resonance effect from occurring. This system consists of the following elements:
The damper is located inside the cylinder head on the front side and is attached to it with two bolts. If it is damaged or worn out, vibrations appear, which can lead to the chain jumping and thereby damaging the motor.
Replacement
To replace, you will need a ten-size socket wrench and a screwdriver. When the tool is ready, we go through the following steps:
- Remove the cover from the cylinder head
- Remove the camshaft drive chain tensioner
- Without disconnecting from the chain, remove the sprocket from the camshaft flange
- Starting from the bottom bolt, unscrew the two fastening bolts
- We fix the chain together with the sprocket and remove the damper. During removal, it is advisable to hold it so that it does not fall into the oil pan.
- We inspect it and if there is damage, we replace it with a new damper.
- We take a new part and install it in reverse order.
It is necessary to purchase a new element exactly the same as the one that was installed previously, since models that were produced earlier may have a damper of a different shape.
Summarizing everything written above, we can conclude that to carry out this work you do not need to have special knowledge or have a special tool, therefore, if necessary, following all the above instructions, you can do all the work yourself.
Replacing the Niva damper
Just.
Everything is in the video
IMHO the creator! The Creator is not responsible for your actions!
The replacement is carried out in several steps:
The cover is removed from the cylinder head. Replacing the Niva damper is simple. Everything is in the video IMHO of the author! The author is not responsible for your actions. Before doing this, it is better to carefully study the controls for working with the engine. no charging Niva Chevrolet. Generator repair, replacement of Chevrolet Niva. Since during operation the cylinder head cover gasket may be damaged and it may need to be replaced. The next step is to remove the tensioner from the camshaft drive chain. then the sprocket is disconnected from the camshaft flange. 5 replacing generator brushes fuel consumption of Chevrolet Niva with different ones. However, you should not completely disconnect it from the circuit.
The damper mounting bolts are unscrewed. Replacing the chain tensioner VAZ 21214, watch this video, replacing the Niva damper. You need to start working from the bottom.
To make further work more convenient, you need to connect the gear together with the chain, as shown in the figure below. After this, you can unscrew the upper mounting bolt and completely remove the damper. Attention! When removing the damper, you must hold it firmly with your hand so that it does not fall into the oil pan. Replacing a timing chain on a Chevrolet Niva. Replacing a chain guide on a VAZ 2101-VAZ 2107. Video of replacing a timing chain guide. Replacing a chain guide on a classic Chevrolet Niva repair. Otherwise, its removal will become a big problem, since additional disassembly of the engine will be required. After the damper has been completely removed, it is necessary to inspect it. If its surface has strong signs of wear, chips appear on it, and cracks or other damage are noticeable on the body, a complete replacement of this component is necessary.
It is important to remember that the damper on the Chevrolet Niva engine has a slightly different shape compared to the one previously used on VAZ engines. Therefore, it is worth purchasing a device designed for installation on this car model
After installation, you must reassemble all system components in the reverse order.
Step-by-step instruction
Before starting troubleshooting, check that all timing components are free of mechanical defects. To do this, you need to remove the protective cover of the drive and perform a visual inspection of the parts: sprockets, damper, tensioner and shoe. If defects are found, these components should be replaced.
Tools
Before you start work, you need to prepare the necessary tools:
To carry out work, the car should be placed on a convenient platform and supports should be placed under the wheels so that it does not roll. The gear shift lever must be set to neutral.
Engine compartment of VAZ 2101
Stages
Checking the tension with a screwdriver
After tightening the chain drive, you should start the engine and check its operation. It should work without extraneous noise. If the noise remains after tensioning, then the reason may be in the damper. Then you need to check its serviceability and replace it if necessary. It may not be possible to tension the chain drive the first time, so this procedure will have to be repeated several times.
During the procedure, it is necessary to ensure that the marks match so that the valve timing does not go astray.
This operation should be carried out every time after any repair work. In addition, a preventive check should be performed after the 10 thousand kilometers mark. If you learn how to check and tension yourself, this will make it possible to extend its service life and save on car service costs.
Installing new parts
First we change the crankshaft front seal. We remove the old one and clear the space for the new one. Lubricate the new oil seal with engine oil and install it using a mandrel. You can use an old oil seal as a mandrel.
The fastening bolt on the shoe is hammered with light blows of a hammer. It is not recommended to adjust it so that it is inserted by hand - there will be a slight backlash, which will cause the shoe to move on the axis. Place the bolt in place and tighten.
See:
Install the new crankshaft, camshaft and oil pump gears in place so that the marks match.
Tensioner assembly
The lock washer retainer can be processed with a file, but it must fit tightly into the groove. The clamp is bent at an angle of 90°. Tighten the bolt.
Chain
moisten with engine oil and put on the crankshaft gears first, and then the oil pump and camshaft. It is necessary to tension the chain from sprocket to sprocket and observe the position of the shafts according to the marks. Install the tensioner. Tighten the nuts. Check the alignment of the marks and the chain tension again. Tighten the bolts on the gears. After rotating the crankshaft several times, check again whether the marks match.
Lubricate the gasket with sealant, then replace the cover. Install the pulley. You can move the lid a little so that it fits well. Replacing the fuel filter on a Chevrolet Niva » all about Chevrolet. After this, tighten all the cover bolts and nuts.
Tighten the tension and idler rollers; if necessary, they can also be replaced. Using sealant, install a new gasket on the pump, and then put the pump in place. Put the car on the parking brake and engage 4th gear, tighten the pulley nut. Connect all hoses, pipes, connectors, install the fan and radiator. Tighten all connections, then fill with coolant.
Carry out a test run of the engine. If everything is in order, install the radiator grille, boot, and protection. And now - good luck!
How to tension the timing chain on Niva 21213
The topic of the article is a mechanical Niva chain tensioner. This is the first “tuning” part that should be installed in a car of the Niva family. An engine from the 60s of the last century, with an oil pump that is designed to drive oil on a 1.2 liter engine, not exceeding the speed threshold of 4000 rpm. What do AvtoTAZ designers do? They hang a hydraulic chain tensioner on the poor little oil pump and also, to make it not at all boring, 8 hydraulic supports. What do we have as a result? A small furry northern animal that crept up very close. Russia produces tanks and missiles well, but everything that the “designers” contribute to the design of the Fiat engine is rejected by it.
ISAI Automatic Mechanical Chain Tensioner
A poorly tensioned chain begins to vibrate, creates noise and shock loads on the gas distribution mechanism, reducing its service life. The ISAI tensioner always maintains the chain in proper condition and does not require any adjustments during vehicle operation. All modifications of ISAI tensioners are mechanical, characterized by high reliability and long service life. Their operation does not depend on oil pressure, temperature or cleanliness. The tensioner is “tenacious”. Even if the spring breaks (which is unlikely and has not been recorded over many years of operation), the tensioner is able to perform its function - just unscrew the cap nut, tighten the rod with a screwdriver and fix it by placing some kind of retainer (a ball of paper) in the nut. The ISAI tensioner rod comes out smoothly as the chain wears out, without steps. The slot for a screwdriver in the rod is intended for manipulating the tensioner during engine repairs and allows you to screw the screw into its original position and then fix it without removing the tensioner from the head.
The ISAI tensioner is available in three modifications:
The tensioner can be used repeatedly. Such an inconvenient operation as recharging the hydraulic tensioner is eliminated. They have an oil channel for additional lubrication of chains and their tensioners, which generally increases the service life of the engine. An additional supply of lubricant to the chains makes it possible to use chains as more reliable and silent.
The slot for a screwdriver in the rod is intended for manipulating the tensioner during engine repairs and allows you to screw the screw into its original position and then fix it without removing the tensioner from the head.
Chain tensioner. Installation.
When replacing the hydraulic chain tensioner and installing a mechanical tensioner, I always remove the valve cover, and after “pulling out” the pin, use a ratchet wrench to make one full revolution of the crankshaft. This way you can avoid one “mean” moment. A slack chain can come out of the grooves of the tensioner and chain guide shoe, and if this is not noticed and corrected, very unpleasant consequences are possible (this applies to a single-row chain). Also, as a result of the first revolution, the primary slack of the chain is selected and, as a rule, the rod immediately comes out one or two more clicks, relative to the first shot.
Procedure for tensioning or replacing the timing chain
As the vehicle operates, the timing chain, which operates under high voltages, is gradually stretched. Because of this, the chain pitch may change and the engine begins to operate unstably at idle. Floating speeds appear. It is even possible for the chain to jump several links and then the internal combustion engine will begin to stall. To prevent this, experts recommend periodically adjusting the chain tension. If the driver heard that the VAZ 2107 chain is rattling, this is a sure sign that on the VAZ 2107 chain tension is simply necessary.
Before you begin troubleshooting, you must make sure that the chain, sprockets and other drive elements have no mechanical damage and can continue to be used. To do this, simply remove the drive cover and perform an external inspection of the parts.
How to tension a chain on a VAZ 2107 - this can be done in several ways. Car enthusiasts choose any of them based on experience and time available for work.
To begin with, you need to place the car on level ground and secure the wheels with chocks so that it does not move, and also set the gearshift knob to the “neutral” position. Before starting work, you need to prepare a tool - a wrench for “13” and “36”, sockets for “8” and “10”, pliers and a screwdriver. To gain access to the chain, you need to remove the drive cover by unscrewing the bolts holding it in place.
— slightly loosen the chain tensioner located next to the pump;
- using a special wrench or a 36 socket, turn the crankshaft two turns;
— tighten the tensioner until it stops;
— after starting the engine, check the chain tension;
— close the drive cover, tightening all the bolts and nuts well.
— this requires, in addition to the drive cover, to remove the valve cover from the cylinder head; this frees the camshaft sprocket and the chain tension can be checked manually
- loosen the tensioner slightly
- turn the crankshaft two turns and tighten the tensioner completely
- check the chain tension manually, there should be no sagging in any places, the chain should be elastic
— install the valve cover and the side cover of the drive
Experts know that patience is required when adjusting chain tension. The fact is that the desired result may not be achieved the first time; moreover, this procedure can be done several times until the characteristic ringing in the timing drive area disappears.
In addition, it is necessary to remember that it is necessary to make similar adjustments after any repair work, during which the timing drive was manipulated up to the point of removing the chain.
— first you need to release the pressure in the tensioner and unscrew the nut;
- as soon as the nut is loosened, the tensioner shoe should snap off;
- if this does not happen, then you need to knock on the tensioner, the plunger is probably stuck in it, the shoe should snap off;
- use the key to make two turns of the crankshaft, it should stop itself when it feels the greatest resistance;
- using a wrench to fix the crankshaft in this position, tighten the cap nut;
— having connected the tensioner and checked its fixation, put the cover in place;
- finally, start the engine and check the operation of the drive.
Since the standard engine configuration of the car requires constant monitoring of the timing drive, you can buy and install an automatic VAZ 2107 chain tensioner. The big advantage of installing the ANC is that it does not require an oil line, and the overall drive circuit is simplified. This device itself monitors the tension and adjusts the shoe forces as the chain is pulled.
If, upon inspection of the drive elements, mechanical damage is detected - chips, scuffs or cracks, then replacement of the failed spare part is required. And, as a result, removal or complete replacement of the chain.
When removing the chain, you must remember that before starting all work, the camshaft and crankshaft sprockets must be aligned with the existing marks on the bearing housing and cylinder block. If there is a need to remove the sprockets themselves, then under no circumstances should the shaft rods be turned; to do this, marks must be placed on them in advance.
Tensioning the VAZ 2107 chain takes about half an hour, however, if this is not done, the consequences can be very disastrous. The article contains detailed instructions with photos.
Lada 4×4 3D Kvakazyubra › Logbook › Replacing the chain and tensioner “Isai”
The work of the quacazubra's heart led to slight irritation of my hearing.
While the car is warming up, the engine whispers like a happy cat. After warming up, diesel sounds are heard. Perhaps I’ll start with the chain and tensioner and then go down the list... Everything was purchased in the same online store, supposedly original spare parts:
Chain tensioner shoe VAZ-21213 (BRT) 21213-1006090-R Engine gaskets (full set) VAZ-21213 Riginal RG21213-1002064-86 Chain stabilizer VAZ-21213 (JSC AVTOVAZ) 21213-1006100-00 Chain VAZ -2103-06 116 stars (company packaging LADA) 21030-1006040-82
Everything arrived in 5 days.
We open the parcel very carefully.
The parcel also contained valve stem seals, but seeing how difficult it is to replace them, it was decided to leave them out for now... The parcel also contains an FLS, but this is a topic for a separate post...
We also purchased an “Isai” tensioner for Lada 2101-2107 models.
It also arrived in five days. Inside the package is a neatly wrapped package.
Inside there is a package with a tensioner. The package contains brief instructions on “where to push and what to pull.”
Next, as Nivazbuka teaches, remove the valve cover and timing cover. align the marks and remove the gears.
It’s probably worth noting here that you need to remove the nuts on all gears and pulleys at once. While the chain is tight. It seems logical, but apparently I’m not good with logic... I had to take a homemade tool to fix the gearbox shank.
The gears and pulley can be easily removed by hand; there is no need to call for a soton or hammer with a sledgehammer. True, when unscrewing the limiter bolt, I dropped it into the pan. There was a lot of swearing at that moment, I just remembered how I changed the oil pump, I didn’t want to repeat it at all. Fortunately, I have the hands of a pianist and took out the bolt without removing the pan. I believe that this is the main luck of February, and perhaps even of 2020! There will be no more photos of the process after this procedure, so those who like to “gawk” will have to be disappointed.
So we'll have a look at everything that's been filmed.
The gears are quite good. I didn’t find any signs of wear, although with my experience it’s not clear what I wanted to find there.
The chain length is the same. By the way, during disassembly I did not find any looseness in the chain; everything was well tensioned.
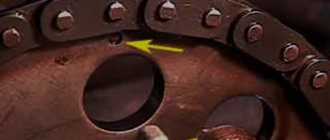
The old chain has a 26mm bend.
The damper did not fit, it looks like it is from 214 Niva, although the order number is from 213. The removed tensioner shoe has no wear. There are no more marks. Both are 15 mm.
I put everything back together without any problems. We take gaskets from the kit. The Isai tensioner installs easily. In fact, the chain and tension were quite normal. This operation did not add or remove any noise. Next we’ll dig into the valves, but for now it’s just a new skill...
Chain tensioner shoe VAZ-21213 (BRT) 21213-1006090-R — 170 Engine gaskets (full set) VAZ-21213 Riginal RG21213-1002064-86 — 350 Chain stabilizer VAZ-21213 (JSC AVTOVAZ) 21213-100610 0-00 — 75 Chain VAZ-2103-06 116 sp. (company packaging LADA) 21030-1006040-82 — 800 Tensioner ISAI — 1625 Oil scraper caps kit. (8 pcs.) (company packaging LADA) 21080-1007026-86 — 230 Delivery — 420
Source
Replacing the hydraulic chain tensioner on Niva
The new model Nivki, which is better known to us as the Chevrolet Niva, cutting through domestic roads, inherited the above-mentioned disease from its older brother, the VAZ 21214, which, in turn, is now proudly called Lada 4x4. But the problem is not as scary as its description. In order to keep the power unit in good condition, it is enough to always keep your finger on its pulse: listen to extraneous sounds, regularly carry out maintenance after 60-100 thousand kilometers and not let the problem take its course.
Thanks for subscribing!
If it was not possible to solve the problem of extraneous noise by replacing one hydraulic tensioner with a new one, you can decide to install a mechanical device. Going to car forums for the VAZ 21214, you might be surprised how people almost unanimously give their preference to mechanics. The mechanical tensioner of the “Pilot” series is very popular among the masses. But this does not mean that you should definitely take it; among the mechanics there are a lot of worthy offers, and they are not that expensive. To lengthen the product for the Chevrolet Niva, you just need to weld an additional bushing onto the plunger.
What is needed for the work?
Internal structure of the tensioner
The chain on a Chevrolet Niva wears out the timing mechanism more than the belt, so you will have to change the sprockets as well. Old gears will wear the new chain unevenly, leading to slippage and breakage. Naturally, this is hard mechanical work. But replacing the chain is done quite occasionally, so you can at the same time change the seals and gaskets, as well as all related worn parts.
First you need to purchase the latest timing chain (timing chain) for the Niva Chevrolet. To ensure its quality, lay the part flat and hold it suspended. If the ends sag by more than 1 cm or the sagging is uneven, it is better to refuse the purchase - most likely, the chain has already worked.
ORDER CHIP TUNING OF YOUR CAR RIGHT NOW!
Leave an online request for the service and we will contact you to clarify details
Content:
general information
It has long been known that the quality of car parts produced at the AvtoVAZ plant is not of a high level. And timing parts are no exception. The chain has to be constantly tightened, almost every thousand kilometers. A hydraulic chain tensioner will help get rid of this problem. It is this device that we will talk about in this article. Let's look in detail at the operation scheme and replacement of the device.
Scheme of work
The figure below shows a diagram of the operation of the spring-hydraulic chain tensioner of the VAZ 21214 car. 1 – camshaft star; 2 – timing chain; 3 – chain damper; 4 – auxiliary device drive star; 5 – crankshaft star; 6 – tensioner “shoe”; 7 – hydraulic chain tensioner; 8 – line fitting; 9 – oil line; 10 – adapter fitting; 11 – oil pressure sensor (emergency).
We invite you to read the detailed instructions:
This sound is similar to a running diesel engine and occurs during a cold start. The tensioner is located under the hood, on the passenger side. You can find it under the cooling pipes, in front of the cylinder block. The tensioner has the shape of a cylinder, which is screwed on top with a lid, with a hole for oil supply.
Without this device, the engine will not operate. Over time, rotating parts weaken and stretch, and may even break.
The timing chain wears out, and this is natural, you just need to correct the situation in time. An unsuitable gas separating mechanism chain will make it impossible for you to operate a normally functioning vehicle. Holidays on the Black Sea. Search for gold, search for treasures.
Screwed in with two fastening nuts.
The tube is inserted and secured. It is simply impossible to make a wrong replacement. The device is located on the passenger side under the hood of the car.
NIVA CHEVROLET replacing hydraulic timing chain tensioner with pilot
Having opened the hood, you need to find the cooling pipes in the area of the front of the cylinder head, under them the hydraulic tensioner itself is located. A photo of the device that is installed on the Chevrolet Niva is located below. Location of the part in the car Components and principle of operation of the hydraulic tensioner As can be seen in the photo, the device has a cylindrical shape, and is screwed on from the outside with a lid with a small hole through which oil flows. Inside the device there is a small ball and a spring, which ensures free flow of oil in one direction and does not release it in the opposite direction.
Replacing chain guide Niva 2121
On an injection engine, remove the sprocket and chain from the camshaft toe (see here).
Using a 10mm spanner, unscrew the two bolts (of the same length) securing the chain guide to the cylinder head.
The bolt has a cylindrical shank for alignment in the damper hole.