One of the main elements of the electrical system of your VAZ 2110 is fuses. They are responsible for preventing voltage surges and preventing the possibility of short circuits in electrical circuits.
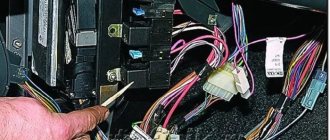
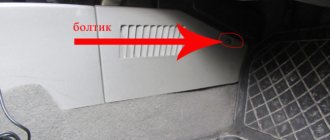
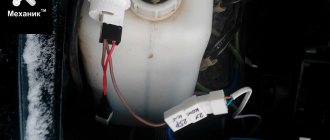
The main fuse box on the “ten” is located in the car’s interior, to the left of the steering column at the bottom. The photograph below shows the appearance of the safety block and symbols.
So, let's look at which parts of the electrical chain the devices located in the safety block are responsible for.
In addition to the fuses themselves, this housing also contains some relays responsible for the operation of electrical components.
- K1 – housing of the relay device that monitors the proper condition of the lighting lamps;
- K2 – housing of the relay device that regulates the operation of the wipers;
- K3 – housing of the relay device that interrupts the electric current going to the turn lamps;
- K4 – housing of the relay device, including low-beam headlights;
- K5 – housing of the relay device, which includes high-beam headlights;
- K6 – housing of an additional relay device;
- K7 – relay device housing, including a heating system for the rear windshield;
- K8 – housing of the backup relay device;
Under the designations F1 to F20 there is a system of fusible safety devices. A significant part of your car's electrical circuits is protected by safety components. Each of them is designed for a specific current. Without protection, the electrical circuits responsible for charging the battery, leading to the generator system, to the ignition and engine starting system remain unprotected.
In order to detect and replace a faulty fuse, we recommend that you use a special table. For replacement, we recommend using original safety elements. Some of the fuses presented in the table may not be present on your vehicle. This is due to the peculiarities of the configuration of electrical devices of a particular model.
So, let's consider the purpose of each of the elements of the VAZ 2110 safety block:
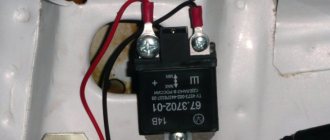
Hello, visitors to our site! I want to tell you a story that happened two weeks ago. Arriving from work one day, I, as usual, opened the hood to see if everything was in order and discovered that the peephole on the battery was white.
Of course, this “eye” shows the condition of only one battery bank, but still I decided to check the voltage with a multimeter. I have a new battery, a little over a month old, and this peephole “tells” me that the battery needs charging. Taking a regular multimeter, I measured the voltage at the battery terminals with the engine turned off. The voltage was 12.3V. Then I started the engine and measured 13.7 at idle without load, and with the low beams, heater and radio on, only 12.8, and this is not enough to charge the battery, and the battery charging light did not light up (it lights up when you turn the key in the first position). After thinking a little, I decided to check the condition of the generator brushes.
Voltage regulator - its main functions
On a VAZ 2110 car, the voltage potential in the generator is formed under the influence of alternating current. This phenomenon becomes possible due to the presence of silicon diodes in the generating device of the vehicle. The generator rotor (the rotating component of the mechanism) operates according to the following diagram:
- First, the crankshaft begins to function, which is affected by the current;
- the crankshaft sets the movement of the rotor;
- After this, the generating device itself begins to work.
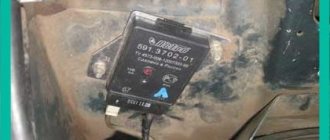
All stages of the sounded process are monitored by a voltage regulator, which is also often called a relay. It is this that is considered the main control unit of the generator.
Without a regulator, the current-generating mechanism of the VAZ 2110 will not perform its tasks, which are listed below:
- starting the generator;
- control (in offline mode) of current supply;
- “holding” in a certain voltage range.
The described relay cannot be repaired. In the event of a breakdown, the regulator must be replaced, which is done after checking the functionality of this unit.
How to check the relay on a VAZ 2110?
To analyze the condition of the regulator, you need to purchase a voltmeter, which has a measuring scale in the range of 15–30 volts. The check is performed as follows:
- start the car engine at medium speed and let it run for a quarter of an hour (the operation is carried out with the headlights on);
- A voltmeter is used to determine the voltage between the “ground” of the generating device and the “plus” on the battery.
If the measurement shows a voltage value from 13.5 to 14.2 volts, replacing the regulator is not necessary. But in situations where the voltage has a different value, indicating a constant overcharging or undercharging of the battery, the relay needs to be replaced.
You can also remove the voltage regulator and check it together with the generator brush holder. To do this, a 12-volt light bulb with a power of 1–3 watts is placed between the brushes, a power source is connected to the “ground” and the positive terminal of the battery, from which a voltage of 12 volts is first supplied, and then 16 volts.
If the light comes on at 12 volts and goes out at 16, replacing the regulator on a VAZ 2110 is not necessary. If the lamp does not light up, this indicates that there is no required power contact between the relay terminals and the brushes, or that a break has occurred. And the burning of the lamp at 12 and 16 volts indicates a breakdown of the regulator.
Malfunctions
There are two main reasons why an alternator stops charging properly.
| Cause | Peculiarities |
| Device overload | This happens to those who like to install numerous additional equipment that is powered by a generator, that is, it requires electricity. These could be speakers, electric pumps, video devices, etc. A standard generator is not designed for such loads, and therefore loses efficiency |
| Battery and alternator mismatch | To ensure the operation of electrical equipment additionally installed on the car, many decide to install a more powerful battery with a standard generator. A mismatch in power leads to the fact that the generator ceases to provide proper charging to the more powerful battery. So he simply does not have enough resources for this |
What charge does the generator produce?
Many people are interested in the question of how much a generator should produce for normal operation.
Here the parameters directly depend on the current state of the car.
- If the engine is cold and just turns on, then the voltage will normally be 14.1-14.4 Volts;
- If you check the voltage after long trips in traffic jams, then the generator will produce less, about 13.9-14.1V.
How to replace the generator voltage relay?
If you have some skills, removing and disassembling the mechanism described in the article does not cause difficulties for a person. The most difficult thing is to change it for the first time, and subsequent replacements, as a rule, take place quickly and without problems.
The regulator on a VAZ 2110 is dismantled according to the following scheme:
- disconnect the negative terminal from the battery;
- disconnect the drive block from the terminal marked “D+”;
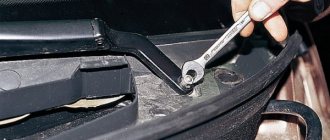
- unscrew the nut, which is located under the rubber boot (it needs to be moved a little to the side);
- disconnect all existing wires in the contact pin;
- unscrew the nut in the generating device circuit (this fastener secures the terminal) and remove it.
Then you will need to remove the generator casing by unscrewing the nuts (there are three of them) that hold it in place, as well as dismantle the relay housing and remove the screw securing the disassembled mechanism from the rectifier compartment. Now the VAZ 2110 voltage regulator can be easily removed. You can install a new device instead. After replacing the relay, all the described steps are performed in the reverse order.
Replacement and removal of the electric generator
The generator on a VAZ car is removed either for complete replacement in case of failure or to carry out repair work to replace faulty parts. To perform dismantling, prepare a standard set of tools; it is advisable to drive the car into the inspection hole.
- Disconnect the battery.
- Remove the protective rubber cap from terminal “30” and unscrew the nut and remove it from the wire stud.
- Disconnect the block with wires from the generator connector.
- We loosen the tightening of the generator to the adjusting bar, then lift it all the way up to the cylinder block and remove the belt from the pulleys.
- Completely unscrew the bolt securing the adjusting bar to the cylinder block, then from the bottom of the car unscrew the 2 bolts securing the lower bracket to the block and remove the generator, pulling it out of the engine compartment.
Three-level generator voltage regulator for the “ten”
When the heating system, headlights and other additional loads are turned on on the VAZ 2110, the car battery discharges very quickly. This phenomenon is observed even when the “native” generator relay is functioning normally. A three-level regulator allows you to get rid of this problem. You can purchase it at any auto store, equip yourself with a simple set of tools (terminal pliers, a knife, an S10 open-end wrench and a Phillips screwdriver) and install it on the car yourself.
The three-level mechanism is mounted as follows:
- first remove the old relay according to the algorithm given above;
- grind the ends of the spacer bushing using a file (this operation ensures more reliable contact with the diode bridge);
- a new element with a brush holder (sold as a set) is installed in place of the relay;
- Sealant is used to seal the cable entry point;
- put back the plastic casing;
- lay the cable along the standard wiring to the area where the relay is mounted, and secure the new wire tightly with small plastic clamps.
It is recommended to connect the housing of the installed voltage relay and the autogenerator using a reliable shunt. This ensures the necessary contact of the device with ground. However, you can do without a shunt.
The mounted three-level mechanism should be checked with a tester at full consumer load (window heating, stove, headlights, etc. are turned on). At maximum, the device should show 14.5 V, in normal mode - 14.1 V, at minimum - about 13.4 V.
Functionality check
There are several verification options. And when it comes to a newly purchased relay, and an old one, in any case it is very easy to test it:
- the multimeter is connected directly to the brushes;
- then a constant voltage is supplied to the relay, a battery will do in the field (ground is minus, contact B is plus);
- if the charging device is operational, then the measuring device will show how many volts are supplied (up to 14.8);
- in the absence of a multimeter, it is replaced with the most ordinary 12 V light bulb, the power of which, however, should not exceed 3 Watts.
Once you are sure that the device is fully functional, install it in its intended place. The procedure here is the reverse of the dismantling described earlier.
After completing all the manipulations, check whether you forgot to connect the negative wire to the battery.
Replacing the VAZ 2110 generator relay on your own
Relay regulator VAZ
Replacing the VAZ 2110 generator relay can be done in two ways: with removing the generator and without removing it. Both options can be done at home, although the second involves fewer manipulations with the car. But despite this, the first option may be simpler for some. Anyone can replace the VAZ 2110 generator regulator relay if they read and study the instructions below.
Checking the generator relay on a car
Replacing the VAZ 2110 generator regulator relay
However, before proceeding with the replacement, you need to check whether the problem is really with a faulty relay. In this case, it will be checked directly on the car. To do this you need:
- Take a voltmeter with a scale of 15-30.
- Turn on the engine.
- Turn on the headlights (see Replacing headlights on a VAZ 2110: do it yourself).
- The motor must run for at least 15 minutes.
Note: you can turn on speed 2, but it is best to turn on speed 3, since this will use a little less gasoline. And the result will be achieved much faster.
- The voltage must be measured between the “B+” terminal and the generator ground. However, it should not be less than or more than 13.2-14.7 V.
- Replacing the relay is necessary if both undercharging and overcharging are observed.
Checking the removed relay
Replacing the regulator relay on a VAZ 2110 generator
It is advisable to check the relay together with the brush holder, since in some cases problems arise due to poor contact between the relay and the brushes. To check the regulator after removing it, you must:
- Turn on a 12 V lamp between its brushes.
- First, connect a power source with a voltage of 12 V to the “D+” relay terminal. If the relay is faulty, the lamp will light up.
- Then you need to take a more powerful current source - 15-16 V. If the relay does not work correctly, the light will go out.
Note: The lamp may be on or off in both cases. If it lights up in both places, it means there are breakdowns in the regulator. At the same time, if the light does not light, then there is no contact between the brushes, which can result from a broken wire.
Capacitor check
Generator relay VAZ 2110
By the way, many people confuse a faulty relay with a faulty capacitor (see Changing the capacitor (VAZ 2110 generator)), since the “symptoms” are quite similar. Thus, if after checking the relay, it is clear that it is fully operational, but the voltage generator is not working well, then you need to check the capacitor. It protects all electronic equipment from voltage surges. To check its operation, you should:
- Turn on the radio. If there is interference in its operation, then all is not well with the capacitor. The engine must also be turned on.
- You can check its serviceability using a megger or tester. When connected to a capacitor, the needle should quickly move to the side and then slowly return to its original position.
Generator design
In any car, including the domestic “six”, the generator consists of the following components:
- The stator is a stationary part; it is attached using threaded connections to brackets on the engine block. The stator has a winding (power), consisting of three equal parts - an alternating three-phase voltage is generated on it.
- The rotor (armature) is a rotating element; it has a winding and two slip rings. Driven by a belt drive from the crankshaft.
- Covers are installed on the rotor at the front and rear. To ensure rotation is as smooth and free as possible, bearings are used.
- The pulley is designed to transmit rotation to the rotor. It is installed on it and is kept from turning by means of a key.
- Brushes allow voltage to be transferred to the winding of the rotating rotor. The VAZ-2106 charging relay circuit also contains a lamp located in the dashboard. Please note that when it burns out, the voltage supply to the excitation winding is stopped.
- Semiconductor diodes rectify three-phase alternating voltage. The output appears as a constant unipolar one.
The charging relay on the VAZ-2106, unlike most other cars, is installed on the body, and not in the generator housing. On many modern machines, the voltage regulator and brush assembly are combined in one housing.
How to find out that it is the relay that is broken and not the generator itself
Many people believe that if the battery does not hold a charge, then the problem is in the generator. However, sometimes this can be caused by a faulty relay regulator. To check what exactly is not working, you need to do the following:
- Open the hood of the car.
- Start the engine. Put 2 or 3 speed on the gearbox.
- Remove the battery terminal.
Note: this is necessary to ensure that a short circuit does not occur in the system.
- If after this the machine still works, then the relay is faulty. But if the car stalls, then the reason is still in the generator.
Advantages of a three-level relay
The voltage regulator is mounted on board the machine, while the generator brushes and panel are mounted directly into the generator. Thanks to these three levels, the battery will remain charged for a long time, and its service life will increase significantly. These levels are:
- Minimum level. It is necessary for the car to work even in the hottest conditions. That is, it will not stall even in areas where the air temperature exceeds +20 degrees. In addition, the car can withstand even the highest slopes.
Note: this level is required in the summer.
- Level "norm". Allows the machine to operate under normal conditions.
- Level "maximum". Necessary for using the machine even at sub-zero temperatures. At the same time, the car will be able to start even with a discharged battery.
What else could it be?
Often, the culprit for charging problems may not be the regulator itself, but its terminals; over time, like many on a car, they oxidize - which prevents the generator from working normally and recharging our battery, so first, before changing this unit, try to clean it, remove oxides and other deposits. By the way, this also applies to the battery terminals; they need to be cleaned and protected at least once a season.
Therefore, first of all, if the multimeter gives you 11 or slightly below 12V at the terminals of the machine, try cleaning the terminals and contacts first, then measure again. It is quite possible that this is the reason.
This is where I end the article, I think it was useful, read our AUTOBLOG.
(
45 votes, average: 4.36 out of 5)
Reasons for replacement
Relay replacement is needed in the following cases:
- The brushes are worn out. By the way, this is the main reason. The fact is that due to their wear, contact with the relay is lost, so due to lack of power, the generator will stop working.
- A breakdown is observed in the circuit, which leads to an increase in voltage in the system.
- Wire breaks causing loose contacts.
- Damage to the housing or fastenings. This is not something to joke about, as it can lead to an unwanted short circuit.
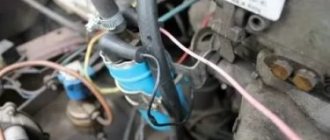
Relay replacement
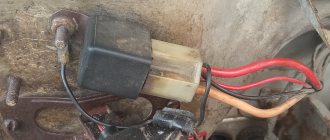
Note: It is usually black and is attached to the generator with a yellow wire.
- Disconnect the negative terminal of the battery.
- Unscrew the two bolts securing the generator.
- Remove the yellow wire going to the relay from the generator.
- Remove the relay. Examine it carefully. If the brushes are worn out, replacement cannot be avoided.
- If any of the wires are broken or there are holes on its surface, then you can only get by by replacing them.
Note: you can simply insulate them without even replacing them with new ones. Although the relay is inexpensive - only 70 rubles.
- Check the new voltage regulator, and then attach it to the generator.
- Reconnect the yellow wire and battery terminal.
As noted earlier, you can replace the relay with your own hands. The main thing is to familiarize yourself with the work process in advance so that questions do not arise later. To do this, you can find photos in various auto repair magazines. It’s much easier to use videos, of which there are many on the Internet. Our instructions will also help in this difficult matter. But the price of home repairs will not exceed 100 rubles.
Dismantling
To disassemble, remove and repair or replace the generator, you will need to do the following.
- Drive onto an inspection hole or overpass to have access to the bottom and engine compartment.
- Remove the battery, otherwise it will not allow you to get to the nut that holds the generator you are looking for.
- Next, the same nut and adjustment bar are removed. Here you will need a 17 mm wrench. Use an extension cord. This will make the task easier; you will have to apply less force to unscrew the fastener.
- In the engine compartment, remove the shield that performs dirt protection functions.
- Now the drive belt is removed and the wires are disconnected.
- Be sure to remove the protective cap and use a 10mm wrench to unscrew the nut that holds the tip and positive cable of your battery.
- There is another nut on the fixing bracket, which will also have to be unscrewed.
- That's it, you can remove the generator. Just remember to pull out the long bolt first.
- When removing, keep an eye on the buffer sleeve. It won't be good if you lose it.
Dismantling work
This completes the procedure for removing the generator. You can proceed with partial repairs or complete replacement of the unit.
Belt
Often, the solution to a poorly functioning alternator is simply adjusting the belt.
Belt
- For the device to work effectively, it is necessary to ensure normal deflection of the belt;
- The deflection size should be 6-10 millimeters with a force of 98 N or 10 kgf;
- To adjust or replace the belt, you need to move the generator slightly to the side, towards the cylinder block;
- By rotating the adjusting bolt, you can adjust the belt tension.
If this measure does not help, you will have to pay attention to the voltage regulator and brushes.
Brushes and regulator
It is not recommended to repair the generator brushes, as well as the voltage regulator if they are worn out.
Experienced specialists advise purchasing a complete unit that includes both elements. Replacement is completed in a matter of minutes.
Brushes
But we will definitely tell you how you can change the brushes on your car’s generator with your own hands.
- Disconnect the negative terminal from the battery and remove the battery.
- Remove the generator following the instructions above.
- You can replace the brushes without removing the generator, but this causes certain difficulties. It is much easier to remove the unit.
- Remove the cover, which is the protective casing of the generator.
- The wires and the generator itself are disconnected from the brushes. To do this, simply unscrew a couple of bolts.
- On the right side of the dismantled device there is a nut that can be unscrewed by 13 millimeters with a spanner.
- Now lift the voltage regulator lever, which will allow you to get to the brushes.
- Using new brushes, install them in place of the old ones and reassemble the assembly in reverse order.
When reassembling, proceed as carefully as possible so as not to damage the repaired generator with your own hands.
Quite often, the cause of failure is not the generator itself, but its relay.
There may be several reasons for replacing the relay.
Cause
Peculiarities
The most common reason. This is due to the fact that when the brushes wear out, the contact with the relay disappears, because the generator does not receive enough power, and the operation begins to fail
A breakdown appears in the circuit
As a result, the voltage in the system increases and the device fails.
Wires break
The contact loses its original adhesion quality
Broken fasteners or housing
It’s better not to let the situation come to this, otherwise a short circuit will occur, and then it’s not far from all the devices failing
If there are signs of a malfunctioning generator relay, be sure to replace it immediately.
Relay test
Many people, out of inexperience or ignorance, believe that when the battery cannot hold a charge, the culprit is solely the alternator. But in practice, the relay regulator is often the cause. To check it, you need to perform several operations:
- Raise the hood of your car.
- Start the engine and engage second, or even better, third gear.
- Remove the negative terminal from your battery. This way you will be able to avoid a short circuit.
- If the engine continues to run after disconnecting the terminal, the relay has failed.
- If the car turns off, then the problem should be looked for in the regulator itself.
Replacing the battery charging relay VAZ 2114 2110
Hello, visitors to our site! I want to tell you a story that happened two weeks ago. Arriving from work one day, I, as usual, opened the hood to see if everything was in order and discovered that the peephole on the battery was white.
Of course, this “eye” shows the condition of only one battery bank, but still I decided to check the voltage with a multimeter. I have a new battery, a little over a month old, and this peephole “tells” me that the battery needs charging. Taking a regular multimeter, I measured the voltage at the battery terminals with the engine turned off. The voltage was 12.3V. Then I started the engine and measured 13.7 at idle without load, and with the low beams, heater and radio on, only 12.8, and this is not enough to charge the battery, and the battery charging light did not light up (it lights up when you turn the key in the first position). After thinking a little, I decided to check the condition of the generator brushes.
Circuit breakers
Now let's see which fuses are responsible for what in the same mounting block. I will also give the main reasons for troubleshooting.
F1 (5 A) - license plate lighting lamps, dashboard lighting, side lights on the panel, trunk lamp, left side lights . If any of the listed lamps do not work, check this fuse, as well as the lamps themselves and their contacts. If everything is in order, check the headlight switch button.
F2 (7.5 A) - low beam in the left headlight . If both low beam headlights do not work, also check relay K4 and the lamps themselves. It could also be the light switch and its contacts.
Where is the charging relay located on a VAZ 2110 injector 16 valves?
How to increase the voltage of the on-board network in the VAZ-2107 generator?
One of the actively discussed methods is the following: almost any 10A silicon diode is soldered into the generator circuit. You can see how this is done, for example, here: https://www.youtube.com/watch?v=ZQVWDITkiG4
Many experienced drivers speak of this method as an effective means. Measurements of the voltage taken from the battery after installing such a diode show an increase to nominal values. The promotion of this method was facilitated by a positive assessment in the magazine “Behind the Wheel”.
However, this method has many critics. Some consider a slightly reduced voltage from the battery to be quite workable, another part predicts a quick failure of the battery, others call this method “collective farm tuning” and suggest buying a good imported battery to solve the problem.
What signs indicate a malfunction in the throttle position sensor on the VAZ-2114?
Throttle sensor VAZ 2114, signs of malfunction may be as follows:
- at idle high speeds are possible, this is the most characteristic sign;
- a noticeable decrease in engine power and deterioration in throttle response;
- when pressing the accelerator there are jerks, dips and twitches;
- floating idle speed;
- When changing gears the engine turns off spontaneously.
Of course, such signs can appear for other reasons, but they are very typical for TPD.
Where are the powerful fuses for the VAZ 2110?
In the “ten”, the mounting blocks are located inside the cabin. The main block with relays and fuses (there are 20 of them) to the left of the steering column; To access it, you need to press the built-in button near the headlight control. Additional block to the right of the center instrument console; to see it, you need to unscrew the screws and remove the plastic console cover. There are 3 15A fuses that protect the circuits of the ignition system, fuel supply, air flow system and car speed calculation.
What wire comes from the crankshaft position sensor?
This is not an ordinary wire, it is shielded and goes to the ECU. Such a link between the sensor and the car itself is needed to transmit information. I can recommend reading the article https://autodvig.com/electrika/datchik-kolenvala-84791/ It talks about the crankshaft sensor in detail and even gives advice on how to replace it yourself if the need arises.
VAZ 2112 the thermostat sometimes opens or does not open, reasons?
This problem is most often associated with a stuck valve in the thermostat. To check this version, it is better to remove the thermostat: first you need to completely drain the antifreeze from the system, and then loosen the clamps going to the thermostat, and, in fact, remove the thermostat itself.
Next you need to “cook” it in a pan of water)) In addition to the pan, you will also need a special thermometer (not room temperature for the air temperature). Fill the pan with water and place the thermostat so that it does not touch the walls. Place the pan on the fire and monitor the temperature of the water.
The valve should begin to open at a temperature of 85-87 degrees, and fully open at around 102 degrees. If this does not happen, then the thermostat needs to be replaced.
Before installation, it is also better to “boil” the new thermostat and make sure that it opens and closes as expected!
Operating principle of the regulator relay
Thanks to built-in resistors and special circuits, the relay is able to compare the amount of voltage generated by the generator. After which, too high a value leads to the relay being turned off, so as not to overcharge the battery and damage electrical appliances connected to the on-board network.
Any malfunctions lead to precisely these consequences: the battery becomes faulty or the operating budget increases sharply.
Summer/winter switch
Regardless of the season and air temperature, the operation of the generator is always stable. As soon as its pulley begins to rotate, electric current is generated by default. However, in winter the insides of the battery freeze, and it replenishes the charge much worse than in summer.
The summer/winter switches are either on the body of the voltage regulator, or the corresponding connectors are marked with this designation, which you need to find and connect the wiring to them depending on the season.
Rice. 19 Voltage regulator with winter and summer terminals
There is nothing unusual in this switch, these are just rough settings of the regulator relay, which allows you to increase the voltage at the battery terminals to 15 V.
Connection to the generator's on-board network
If, when replacing a generator, you connect a new device yourself, you need to take into account the following nuances:
- First you should check the integrity and reliability of the contact of the wire from the car body to the generator housing
- then you can connect terminal B of the regulator relay with the “+” of the generator
- Instead of “twists” that begin to heat up after 1–2 years of operation, it is better to use soldering of wires
- the factory wire must be replaced with a cable with a minimum cross-section of 6 mm2 if, instead of a standard generator, an electrical appliance rated for a current of more than 60 A is installed
- The ammeter in the generator/battery circuit shows which power source is currently higher in the on-board network
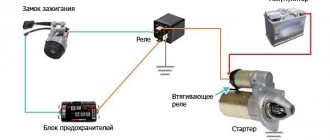
Rice. 20 Connecting a generator using the example of a VAZ
Ammeters are necessary devices with which you can determine the battery charge and the performance of the generator. It is not recommended to remove them from the scheme without special reasons.
Remote controller connection diagrams
An external generator voltage regulator relay is installed only after determining which wire it should be connected to. For example:
- on old RAFs, Gazelles and Bullheads, relays 13.3702 are used in a polymer or steel case with two contacts and two brushes, mounted in a “–” open circuit, the terminals are always marked, “+” is usually taken from the ignition coil (B-VK terminal) , contact Ш of the regulator is connected to the free terminal of the brush assembly
- in “Zhiguli” relay regulators 121.3702 of white and black colors are used, there are double modifications in which, if one device fails, the operation of the second device continues by simply switching to it, mounted in the “+” gap with terminal 15 to the terminal of the ignition coil B-VK, terminal 67 is attached to the brush assembly with a wire
Car enthusiasts call built-in relay regulators “chocolate bars”, labeled Y112. They are mounted in special brush holders, pressed with screws and additionally protected with a cover.
On VAZ cars, relays are usually built into the brush assembly, full marking Y212A11, connected to the ignition switch. If the owner replaces the standard generator on an old domestic VAZ with an AC device from a foreign car or a modern Lada, the connection is made according to a different scheme:
- The car owner decides on the issue of fastening the body independently.
- The analogue of the “plus” terminal here is contact B or B+; it is connected to the on-board network via an ammeter
- Remote relay regulators are usually not used here, but built-in ones are already integrated into the brush assembly, from them comes a single wire marked D or D+, which is connected to the ignition switch (to the coil terminal B-VK)
Rice. 21 Replacing the standard relay with a three-level regulator
For diesel internal combustion engines, generators may have a W terminal, which is connected to the tachometer; it is ignored when installed on a car with a gasoline engine.
Checking the connection
After installing a three-level or other relay regulator, a performance check is necessary:
- the engine starts
- The voltage in the on-board network is controlled at different speeds
After installing the alternator and connecting it according to the above diagram, the owner can expect a “surprise”:
- when the internal combustion engine is turned on, the generator starts, the voltage is measured at medium, high and low speeds
- after turning off the ignition with the key... the engine continues to run
In this case, you can turn off the internal combustion engine either by removing the excitation wire, or by releasing the clutch while simultaneously pressing the brake. It's all about the presence of residual magnetization and constant self-excitation of the generator winding. The problem is solved by installing the light bulb's exciting wire into the gap:
- it lights up when the generator is not running
- goes out after it starts
- the current passing through the lamp is insufficient to excite the generator winding
This lamp automatically becomes an indicator that the battery is charging.