Pioneer is a popular brand known all over the world. The radios serve their owners for a long time and are easy to set up.
Our tips are extremely simple and you will quickly understand the installation principles. There is a detailed wiring diagram for the Pioneer radio.
Preparatory work
- Remove the old car radio if it is installed in your car. Before doing this, you will need to disconnect the battery.
- Remove the trim.
- Use a screwdriver to unscrew the screws securing the air duct cover.
- Remove the device and turn off the on-board computer display, then remove the screen from the bracket.
Video: dismantling a radio in a car without tools
Which acoustics to choose
The main car audio device is the radio. The selection of other elements should be made based on the technical characteristics of the head unit.
Speakers are the second most important element of the system. They are responsible for sound reproduction and are installed in the front and rear parts of the cabin. In this case, you should pay attention to the fact that manufacturers offer front and rear speakers.
An amplifier is an optional component, but it is desirable if increased demands are placed on sound quality and power.
You can choose a device from an assortment in the middle price category. These models have good performance and do not require extra expenses.
Subwoofer. This device should complement car speakers for bass lovers. Making the bass more expressive is the only skill of a sub, so many music lovers can do without it.
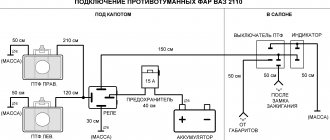
Wire marking
Before you connect the Pioneer radio, find out what functions each of the wiring performs. Included with the device is a pair of ISO connectors for connection, each of them consists of 8 pins. The 1st is for the power supply, the 2nd is for the sound reproduction system. It happens that the car does not have the required port. In this case, disconnect the ISO, then connect using mechanical twisting. Multi-colored electrical wires are easy to identify. Each of them performs its own functions.
Purpose and connection of wiring
- Yellow. For batteries, supplied through a fuse.
- Red. Connects to the ignition. Red and yellow cannot be connected to each other, as the battery will quickly discharge.
- Black. Negative, it is fixed to the car body.
- White and blue. They come from the antenna, subwoofer and amplifier.
- Gray. For the right column (positive terminal). The gray wire with a black stripe is connected to the same speaker (minus terminal).
- White. It is connected to the positive terminal of the front left speaker, and the white one with a black stripe is connected to the negative terminal.
- Green. It is connected to the positive terminal of the left rear speaker, green with a black stripe - to the negative terminal.
- Violet. For the rear right column (plus), with a strip - minus.
By connecting the wires according to the instructions, you will ensure proper operation of the player.
Description of the Pioneer car radio
Modern Pioneer tape recorders came to us from the last century. Constantly improving, this technology meets the requirements of modern formats. Can read information from memory cards, USB phones, etc.
Radio Pioneer
The popularity of the device is not lost, but on the contrary, it is gaining strength. Since the quality is excellent, and installation is not difficult. Reliability, durability and excellent sound level continue to delight audio connoisseurs.
Direct connection
There is a compartment for installation in the interior of each car. Sometimes the niche is hidden under the panel. Before installation, the panel is removed, leaving a small compartment in its place. The counter wiring is removed from the niche. Then the wires are connected (see photo). After this, the device is installed in the compartment. After connecting all the wiring, you will need to insulate them, otherwise breakdowns and short circuits may occur. You can securely secure the wiring with a plastic clamp.
Pinout
Today, as a rule, identical ISO connectors are installed. Therefore, replacing it will not be difficult: you just need to rearrange the plug. If a plug gets lost or broken, remember or label each wire to connect the device. The pinout is shown in detail in the schematic drawings. If you follow the instructions, you can easily do everything yourself, and then enjoy music on the road at any time.
Dimensions and connectors
This can be a single-block or double-block (1 and 2 din) device. The 2 din version is twice as high as 1 din, so it is worth calculating the size of the niche in advance. The connector found in the car may differ from the one installed in the radio. If it is missing, install an adapter. This method of connecting a new Pioneer car radio is very simple. We provide you with a complete list of recommendations to make things easier for you.
1 din connection
To carry out the work, you will need a screwdriver and plastic clamps.
If you use a standard pioneer car radio connection diagram with the appropriate ISO connectors, then there will be no difficulties.
If you don’t have them inside your car, connect the wires this way:
- dismantle the panel;
- remove the plugs from the wires, connect the wires as shown in the picture;
- insulate all wiring connections;
- secure the clamps.
2 din connection
It is better to connect a Pioneer brand car radio so that the power comes from the batteries.
This way the device can be turned on at full power. This will significantly reduce interference. Note:
- If your car does not have battery wiring, use stranded copper wire. Those sold together with a Pioneer brand car radio are not suitable. It is important that the wire is long enough to reach from the niche to the battery. Install a fuse (20 A) at a distance of half a meter from the battery.
- Do not twist the wiring from the 2 din device due to possible interference and low power.
- Insulate each wire.
Connection to multifunction steering wheel
To properly install the player in a car with a multifunction steering wheel, use an adapter. It can be universal or specialized. The video shows all the steps well, so it won’t be difficult for you to do this work in your car. Thanks to the adapter, you can easily connect the device.
Adapter connection:
- disconnect the battery from the car network;
- remove the radio;
- connect the adapter cable to the car radio, and the adapter to the ISO connector;
- configure the buttons on the multifunction steering wheel;
- connect the battery.
Pioneer DEN MVH-150UB
Basically, connecting the Pioneer DEN tape recorder is similar to the standard algorithm. MVH-150UB is a device adapted to any car that has a landing pocket.
Pioneer DEN has the same settings. The only difference here is in appearance - in the shade of the backlight. You can see the difference in the photo. Settings are saved even if the battery is disconnected. There is a connector for connecting a regular phone or Android.
Radio tape recorder Pioneer 150UB
Every car radio comes with instructions. In it you will find detailed information, photos and a diagram without mistakenly connecting the sound system. And with the right approach, connecting the car radio can be easily done independently.
Also included are two steel plates with eyelets. These are special devices that make it possible to remove the tape recorder from your pocket if necessary. The plates are mounted to the sides of the tape recorder. The lugs are bent with a screwdriver and the panel is closed.
How to set up your device
Before you start listening to your favorite artists in the car or catching up on the news on the radio, learn how Pioneer works. First, understand all the functions. Follow simple rules and you will quickly solve all difficulties.
Setting up your Pioneer radio will not take much time. Follow our simple recommendations:
- Connect the speakers and insert batteries into the remote control.
- Use the joystick located on the control panel. Set options.
- Select and adjust individual functions one by one in the “Menu” section.
Popular models of the manufacturer
When choosing a Pioneer car radio, the buyer should pay attention to the model range and technical characteristics of each device. First of all, you have to choose a standard. The size, set of functions and cost of the device depend on this indicator. There are 2 options:
- 1 din (single-block) - such models have smaller dimensions and a limited set of functions, but their cost is lower:
- 2 din (two-block) - you can recognize such tape recorders in cars by their wide screen and advanced capabilities.
The second option is in great demand, as it provides the car enthusiast with a high level of comfort.
In addition, there are standard and non-standard radios. A standard product should be understood as a model intended strictly for a particular brand of car. Such devices have an original housing and plug. This feature does not allow the installation of standard radios in cars of other brands.
Radio in the car
Stations in the radio can be tuned in three ways. Depending on the model, 18 or more stations can be memorized.
For convenience, we assume that the receiver is already turned on - switching to it is done by pressing the Band button once.
Method one is the easiest
- Knowing the frequency of the station, briefly press the left and right buttons to dial it on the display.
- Then hold one of the six buttons (1–6) below the display. The dialed station will be stored in memory, and a corresponding indication will appear on the screen in the form of a number repeating the button number.
- Dial the next frequency and press the next free button.
- Wait for indication on the display.
This is repeated 6 times - for six different stations.
Stations 7 to 12 and 13 to 18 are stored in the following memory banks. Switching between them is done by pressing Band once.
Method two
- While in receiver mode, hold down the right button for one second.
- The radio will begin searching for a station.
- Having found the first one, it will go into playback mode.
- If you are satisfied with the station, save it by pressing the buttons below the display.
- Then repeat steps 1–4 to select further stations
Storing the station and selecting banks is the same as in the first option.
Method three
- From the main menu you go to the functions menu.
- Scrolling through it, you find the BSM parameter.
- Select by pressing the up or right arrow.
- They wait for a while.
- The radio will check the entire range, find stations and arrange them according to signal strength.
- Then it will play the first one.
- You can save stations in the same way as in other methods.
You can scroll through the selected ones by single short presses of the buttons under the display. There is one thing about this method - not all domestic radio stations are included in the list of those found for various reasons. If you have gone through the entire list, but have not found the desired station, you can proceed as follows: - Exit to the main menu of the radio receiver (exit is carried out in the same way as to the main menu of the entire device - see above).
- Having looked through it with the volume knob, they find an inscription like FM:... Instead of dots there will be some numbers, usually 100.
- After playing with the left and right buttons, select FM:50 and confirm the choice.
- After exiting the menu, start the search again.
- Since the frequency step has just been halved, you need to be patient here.
- Maybe this option will find the right station.
You can experiment with the search step, but if there is still no station, it will be faster to select it using the first of the described methods.
A few words on the topic of memory banks - there is no need to overwrite any stations to free up cells. If you want to replace the selection, just write the new frequency in the selected cell. The old frequency will be deleted automatically.
Setting up a radio receiver for video
What can be improved
Speaking of settings, it is worth clarifying that Pioneer regards the concept of a radio tape recorder not just as a device for listening to radio or recordings. In this device you can see the date, time and much more if they are configured. Information can be presented in several languages - either Japanese (since the brand is Japanese in origin), or, more often, English.
Whether there will be Russian on the menu depends on many factors, but even the English menu is easier to understand than the Japanese one. Some additional features, such as USB ports, will also need to be enabled through the menu. Not to mention the above problem of connecting specific speakers.
Transmitters
Another way to connect a phone with a radio is through transmitters, that is, transmitters. There are many types of transmitters, but we will consider only a few.
FM transmitter for mobile phones
The FM transmitter is quite interesting in its essence and easy to use. The principle of its operation is simple: it transforms the data received from the phone into FM radio waves and transmits it to the radio receiver of the radio. Externally, the transmitter is a small device that plugs into the AUX connector of the phone.
After connecting, we launch the player on the phone, and on the transmitter we set the desired wave for broadcast. Then you just need to turn on the receiver on the radio and detect this FM wave - and now music from your mobile phone is already playing from your speakers.
This connection is wireless, and this is already convenient. The transmitter is capable of interacting with absolutely any radio that has a radio receiver. The disadvantage of such a transmitter is low sound quality (radio interference). This is noticeable in cases where the device is inexpensive. You can only manage tracks from your phone.
Bluetooth transmitter
To connect such a transmitter to a radio, you will need an AUX connector on the radio, since the transmitter will be connected to it. As soon as you connect to the radio, launch the player on your phone and set the music signal to be broadcast to a Bluetooth headset, the role of which is played by the transmitter.
Other types of such transmitters can even provide the opportunity to conduct negotiations. For these purposes they have a microphone. However, it is not recommended to use transmitters for communication, since the quality of their reception leaves much to be desired.
Bluetooth devices transmit sound in higher quality than FM transmitters, but they also drain the battery much faster. To prevent your phone from completely discharging, purchase a special charger that runs from the cigarette lighter.
Clicking noises when the engine is running
Many owners of standard radios are faced with the appearance of periodic clicks when the motor is running. To begin with, you need to understand the reason for the appearance of such a not entirely pleasant phenomenon. It's all about the car's energy system. When the power unit operates, small voltage surges regularly occur. This results in interference.
In principle, the radio tape recorder has protection against this. But the standard noise suppressor does not always cope with the problem. Sometimes this happens due to its failure, which is not a rare occurrence. You can fix the problem by simply connecting power to the radio through a noise filter. This is guaranteed to save you from clicking acoustics.
Shutdown
This is done in the following order:
- Press button 2 and enter MENU. Then select SISTEM, at the next stage press PW SAVE
, all that remains is to turn off the radio with the OFF button. This is how we switch to energy saving mode; - Turn off the radio with button 1. At the same time, a clock indication should appear;
- We press button 4, eventually the display goes out.
Having completed this procedure once, you can subsequently turn off and turn off the radio with the standard button 1. Sometimes, resetting the settings can occur after disconnecting the speaker system from the power supply. In this case, you should repeat the steps described above.
Video: an easy way to make AUX on any car radio with your own hands
Important: entering the function menu can be done by holding down another button, for example, SRC or SOURCE.
Turn on Bluetooth
In order to activate Bluetooth, you need to go to the main settings menu and find the BT AUDIO sub-item there and select ON. After that, turn on Bluetooth on your smartphone/tablet and look for the radio.
After the radio is found, we connect to it, which may require entering the security key - by default “0000”.
How to set the clock
To set the clock, you need to enter the main settings menu, which can be done by turning on the turned off radio by holding down the SRC button or holding down the center button of the joystick. After which we find the CLOCK SET block, where you can set the format and the time itself. There is also a CLOCK OFF block in the menu, by changing the indicator you can enable or disable the time display on the device.
Audio
Front speakers
Having configured the radio receiver, as well as connecting sound sources, you can focus on sound quality.
The recommended volume for proper settings is no more than 30 units.
- After adjusting the volume, press the knob to get to the settings menu.
- Here they look for the “Audio” item.
- By pressing the handle, you enter this menu.
- After looking through it, they find the Fader instruction.
Very often it is combined with the balance menu, then the desired menu will sound like Fader/Balance
- Click on the knob to get to this submenu.
In the factory setting, these indicators are zero.
- As usual, select the Fader menu (it should blink).
- Turn the knob and set the value to 15 units.
- Swing the knob to the left once to return to the “Audio” menu.
- Now you need to find a high-pass filter - HIGH PASS FILTER (HPF).
- Included in the menu.
- On the screen, most likely, the HPF is also zero.
- Twist the handle and set it to 50.
It has been empirically proven that here you can bet 100 - 125.
- Swing the handle to the left to exit the menu.
Rear speakers
The front speakers work cleanly, now it’s time to switch the rear speakers on the shelf into subwoofer mode - fortunately Pioneer can do this too.
- Turn off the radio.
- Press and hold the power button (as if you were going to set up the “demo” mode).
- Once in the menu, look for the inscription in the form of SW Kontrol.
- By pushing down the handle, you enter this menu.
- By rotating it, the parameter is set to SW.
- Confirm by pressing the handle again.
- Press the power button to save parameters and exit the menu.
- Then they return to the “Audio” menu (press the volume knob and rotate to select).
- By pressing the handle, you enter the menu.
- Here they look for the inscription SW SETTING1. Click on the handle to enter.
- Of the three options presented in the menu, you need to choose one of two - Normal or Rev.
In most cars, it is the second mode that will give the best sound.
- Having chosen, swing the knob to the left - return to “Audio”.
- Turning the knob clockwise will highlight the SW SETTING2 menu.
- They enter it by pressing the handle. The factory setting will show 80 HZ 0. Rotate the knob to decrease the first value.
The optimal solution would be to set 50 HZ.
- Having chosen what you want, swing the knob to the right to change the second parameter. This is the power level. The range here is from minus six to plus six. It will not be possible to give optimal parameters - it all depends on the quality of the speakers used.
- Press Band to exit the menu.
Before moving on to the next settings, check at different volumes how the selected settings work. If you don’t like something, repeat the steps described, trying other values.
Loudness compensation
This option is hidden in the same “Audio” menu.
- Enter the menu, find the Loudness parameter.
- Select by pressing the knob.
- There are three values available here - High, Middle, Low (respectively high, medium, low).
- This parameter is responsible for adjusting frequencies at low volume levels. It is also impossible to give optimal settings here - they are set experimentally.
- Swing the knob to the left to go to “Audio” or from settings by pressing Band.
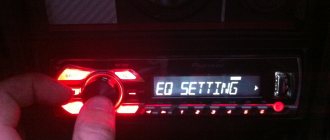
Equalizer settings
For advanced music lovers, here are a few more equalizer settings. They are hidden in the same “Audio” menu.
- Once in the menu, rotate the knob to select the EQ SETTING parameter.
- Enter this menu (depending on the model, you may need to enter another menu here). The three parameters offered in this menu are responsible separately for the settings of the low, mid, and high frequencies.
- Set according to your preferences. On some models, you can select several preset settings here. Depending on the speakers and your own preferences, adjust these parameters.
The settings here are no different from others - select by pressing, change by rotating, going to a higher level by swinging the knob to the left.
Subwoofer doesn't work
In standard installed stereo systems with a Pioneer head unit, the sound from the subwoofer sometimes disappears. The problem is an unsuccessful output to the low-frequency speaker. The problem is treated in 2 ways. If the radio is new and under warranty, you can try to exchange it. But this does not always happen; more often it is repaired and returned.
Another option is to re-solder the output yourself. Perhaps the second option is the most optimal. Self-made repairs are much more reliable than warranty repairs. Moreover, no difficulties should arise there.
bluetooth adapter
Designed only for radios that have a Bluetooth function, but do not have a standard adapter installed. It is required to be selected individually for each radio model and is a small unit connected to the audio system. Most models have a USB input, AUX, a memory card slot and built-in memory, which expands its functionality and allows you to use it not only for Bluetooth communications, but also as a storage for data and music.
Bottom line: to connect a smartphone on the Android or iOS operating system to a car audio system, no special knowledge is required - just pair it once, and in the future there will be no problems with the connection.
This will allow you to play music from your phone or use the hands-free system, which will provide additional safety for the driver and passengers.
Modern radios are able to communicate with a smartphone using wireless technology - Bluetooth. Moreover, this can be either a standard device or a separately purchased device. Thanks to the connection via Bluetooth, it is possible to receive incoming calls and also play music directly from the phone. Let's figure out how to connect a smartphone to the radio correctly.
Appearance with a smartphone
The simplicity suits the phone perfectly. The rectangular shape does not cause discomfort. At the moment of synchronization, the backlight is adjusted from 200 thousand shades. The remaining buttons, neither in a diagonal nor horizontal position, interfere with the use of equipment with a screen resolution of 5 inches. This is a standard smartphone. It fits easily in one hand. It will look like this:
After connecting directly on it, access to:
- Navigation;
- Voice commands;
- Phone book.
Don't forget about the possibility of voice playback. The perfect combination of shape and design will make it attractive. Even when the screen is locked, the main screen will be active. It displays the current track (when playback is on), clock, vehicle speed, clock, and calendar. A pleasant surprise occurs when it changes to an animated screensaver. The LEDs will even customize the labeling of the buttons. When there are incoming calls or messages, a corresponding signal will indicate this visually.
Installation of 1 din radio
Before highlighting the installation features of various car radios, let's take a short historical excursion. The fact is that in the mid-80s, leading companies producing car audio systems came to the conclusion that it was necessary to unify all radios.
In other words, standardize the sizes of the presented devices. Thus, after some time, the so-called DIN appeared, which received the status of an international standard.
The fundamental parameters of this standard are the width and height of the radio. Thus, the 1 din standard corresponds to dimensions of 178×50 mm. 2 din differs only in height, which is already 100 mm.