Modern engines are usually equipped with injection engines with an electronic control unit that controls the operation of the power unit. To do this, it relies on the readings of many sensors. Some of them are located in an accessible location, which greatly simplifies the replacement of a faulty part. However, it is not in every case rational to replace the sensor, and then you do the catalyst blende yourself, the diagram of which is not very difficult to understand.
We are talking about a lambda probe. In another way, it is also called an oxygen sensor, which is installed in the exhaust system. Read on to learn why this is done.
Problem
To prevent a car from spoiling the environment with its exhaust gases, an environmental standard was invented that regulates the content of harmful substances in the exhaust system. It has been operating in many European countries since 1988 (“Euro 0”). It is updated periodically, and outdated requirements are replaced with new ones. Euro 6 is currently in effect.
These requirements have forced car manufacturers to integrate additional devices, one of which is a catalyst. Its task is to reduce the amount of nitrogen and carbon in exhaust gases. In most cases, this is achieved by changing the chemical composition. In this case, a lambda probe must be present. You can make the catalyst blende yourself, the scheme is very simple.
Since a faulty catalyst is very expensive, one effective method was invented that can solve the problem to some extent at minimal cost.
What do spare parts manufacturers offer?
On the shelves of auto stores you can find all kinds of parts for tuning the exhaust system. The production of mechanical simulators of the normal operation of the catalytic converter is made of bronze or chrome-plated steel. The price of such devices ranges from 400 to 800 rubles, and a standard installation at a service station will cost about 500 rubles.
A spacer with a minicatalyst is offered much more expensive than its elementary counterpart, its cost is 1,500-4,000 rubles. Simple electronic emulators of industrial production are sold for 1,500-3,000 rubles. The range of prices for flashing ECU software is quite wide - from 1,000 to 30,000 rubles.
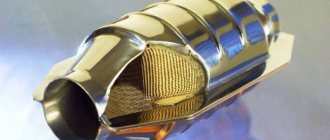
The catalytic converter is a purely environmentally friendly part. Platinum and palladium deposited on the surface of its honeycomb accelerate the oxidation of exhaust gases to harmless water vapor and carbon dioxide, which are absorbed by trees. And rhodium activates the reduction of pure nitrogen. All harmful substances interact with oxygen, which means that its share at the outlet of the catalyst should decrease. EURO 3 and higher standards strictly regulate exactly how much less it should be. Therefore, on any car that meets these standards, a second oxygen sensor is always installed behind the “can”. He is being deceived.
Oxygen sensor operation
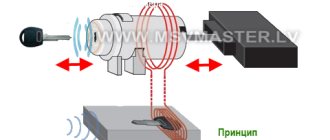
To understand the need for a snag, it doesn’t hurt to know how a lambda probe works. Many people install various simulating devices instead of this sensor, but in reality it is not always possible to achieve the desired result. For complete combustion of the air-fuel mixture, optimal proportions of fuel and air are required - 1:14.7. With the help of the MAF, the ECU (electronic control unit, otherwise known as the controller) “understands” how much air enters the cylinders and, depending on this, regulates the fuel supply through the injectors.
However, the controller is not aware of exactly how the fuel is burned, and therefore the lambda probe installed on the exhaust system is activated. In some cases, it is replaced by a catalyst sensor blende. The role of the sensor is to determine the amount of oxygen remaining after combustion of the fuel mixture and send data to the ECU.
The computer takes appropriate measures depending on the situation:
- A small volume of oxygen indicates a lean mixture, so the fuel supply is increased to equalize the norm.
- With a large volume of oxygen, which indicates a rich mixture, the controller, on the contrary, reduces the fuel supply.
- If the signals coming from the sensor are incorrect or absent, the system begins to operate in emergency mode, which is set by the program.
Since Euro 6 requirements have come into force at this point in time, most cars no longer have one, but two elements. One of them is installed in front of the catalyst, and the other after it. Often, it is on this sensor that a catalyst blende is installed with your own hands, the diagram of which will be given later in the text. The controller takes readings from both lambda probes, which allows you to more accurately regulate the fuel supply.
Why do you need to fool the oxygen sensor?
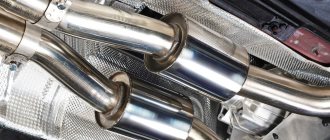
If you cut out the catalyst and leave everything as it is in the electronic engine management system, you will instantly get a lambda error. This will be indicated by the Check Engine icon, a “stifled” gas pedal and increased fuel consumption.
Why is only the second lambda cheated? Firstly, it controls the condition of the catalyst. But in some models, it increases the accuracy of dosing the components of the air-fuel mixture (often, when using the wrong blende, gasoline consumption increases sharply). Secondly, the first sensor performs an important function - it adjusts the content of gasoline and air in the cylinders, doing this for reasons of fuel economy and environmental concerns.
For your information. A lambda probe, located immediately behind the exhaust manifold, is found on all injection engines. The second sensor appeared on cars with EURO 3 class and higher.
There is only one alternative to emulation - flashing. Control programs under EURO 2 see only one oxygen sensor - the one that corrects mixture formation. “Sewing” the ECU just to disable the second sensor is expensive, and the reliability of non-original firmware can be poor.
Catalyst malfunction
There are a number of signs by which you can judge whether the catalyst is faulty and begin to draw appropriate conclusions. They may be:
- the car cannot start or immediately stalls;
- poor acceleration, with the engine gaining speed slowly;
- increased fuel consumption, but this symptom may indicate a malfunction of the injectors;
- the color of the exhaust acquires a bluish tint with an unpleasant odor;
- the presence of a metallic sound during acceleration;
- Check Engine indicator on the instrument panel.
In some cases, when the Check Engine light comes on on the dashboard, computer diagnostics may display error P0420. In many ways, this points to a catalyst, although the problem could be something else.
Asking price in the store and at the service station
The trick is positioned as a cheap alternative to flashing it for EURO 2. Indeed, they ask for at least 15,000 rubles to change the ECU software. Even the most expensive standalone emulator with installation costs a maximum of 8-10 thousand rubles. At the same time, the factory engine control program is preserved, and hence the reliability of the system as a whole. If you take the best option, a fake with a minicatalyst, then the problem with the ECU can be completely solved for 1,000-2,000 rubles. And for owners of cars with low-sensitive sensors (EURO 3) it will cost even less: 500-1,000 rubles.
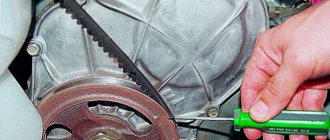
Mechanical method
The technique involves using a metal spacer, or bushing, that is placed between the oxygen sensor and the exhaust pipe. Anyone with some degree of turning skills can make their own blende. Bronze or heat-resistant steel is used to make the part. In addition, you will need a diagram of the decoy itself, which is easy to find, since many people have a computer. In his absence, you can use the help of friends or acquaintances.
At the end of the bushing there is a small hole with a diameter of 2 mm for the passage of exhaust gases. What’s interesting is that you can do it quite easily with your own hands. Its design provides for the presence of ceramic chips with a catalytic coating inside.
The whole point is this. Exhaust gases first enter the bushing and pass through the ceramic filler. As a result, a chemical reaction occurs, causing the concentration of carbon monoxide and hydrocarbons (CO and CH) to decrease. After this, the gases reach the oxygen sensor, which transmits normal readings to the ECU.
From a constructive point of view, blende is the same catalyst, only in a much smaller size. To install it, just follow these simple instructions:
- Remove the “-” terminal from the battery.
- Get to the location of the second oxygen sensor (which is after the catalyst), if necessary, carrying out partial disassembly.
- Disconnect the connector, use a 22mm wrench to unscrew the lambda probe and install the bushing.
- Screw the oxygen sensor into the blende and connect the connector.
As you can see, installing the blende on the catalyst is not as difficult as it might seem at first glance. It is more convenient to do all the work on a pit or a lift.
What are the consequences after installing decoys?
You need to understand that any deception is installed at the risk of the car owner. If the installation was carried out incorrectly, you may encounter the following problems:
- Due to the fact that the on-board computer cannot regulate fluid injection, engine malfunction may occur.
- If the circuit is not properly soldered, it may damage the wiring.
- In the process of installing the decoy, you can damage the oxygen sensors, after which you will not even know about their malfunction (since you will already have the decoy installed).
- After such interventions (not only during flashing), the on-board computer may fail.
Any inaccuracy will lead to disastrous consequences, so it is better to install a safer ready-made emulator. Unlike deception, it does not “deceive” the control unit, but only ensures its correct operation by converting the DC signal. A microprocessor is also installed inside the emulator (as in a homemade electronic decoy), which is capable of assessing exhaust gases and analyzing the situation.
Electronic method
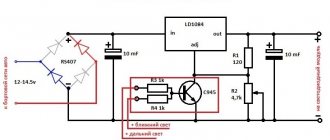
Electronic deception also gives a positive result, and anyone who is familiar with a soldering iron can assemble it. To make the simplest part you can’t do without:
- non-polar capacitor with a capacity of 1 µF;
- resistor with a resistance of 1 Mohm;
- soldering iron, knife, wire cutters;
- solder;
- rosin.
An electronic snag is mounted on the oxygen sensor wires. In some cars, the lambda probe connector is located in the passenger compartment between the front seats. For others it can be found in the engine compartment, and for others it is located again in the cabin under the dashboard.
Before installing the lambda probe emulator, you need to disconnect the negative terminal of the battery. Further actions can be performed according to the diagram:
- Remove some of the insulation from the area in front of the connector.
- Cut off the black wire and connect the gap with a resistor (solder in).
- Connect the capacitor with one contact to the gray wire, and the other to the black wire, but after the resistor (closer to the connector).
- Insulate the wires or do this after checking.
- Finally, all that remains is to start the engine and see if the Check Engine indicator lights up in any operating mode. You may need to drive around a bit.
As you can see, there is nothing complicated here either. There is just one caveat: this method may not work on some cars. Resistors and capacitors must be selected with a certain value. And if the oxygen sensor, which is located in front of the catalyst, is faulty, then there is no point in “misleading” the controller. In addition, the electronic catalyst blende can cause serious material damage to the car, since its design is being improved from year to year. Therefore, it is better to make do with standard parts to replace failed ones.
How long does the lambda probe snag last?
Mechanical oxygen sensor decoys without catalytic filler are the simplest and most durable, but not very effective. They operate without problems on Euro-3 environmental class engines equipped with low-sensitivity lambda probes. How long a lambda probe of this type lasts depends only on the quality of the material. When using bronze or heat-resistant steel, it can last forever, but sometimes (every 20-30 thousand km) it requires cleaning the hole from carbon deposits.
For newer cars, you need a blende with a mini-catalyst inside, which also has a limited resource. After the catalytic filler is exhausted (occurs after 50-100 thousand km), it ceases to cope with the assigned tasks and turns into a complete analogue of a simple screwdriver. In this case, the simulator must be changed or filled with fresh catalytic material.
Electronic decoys are theoretically not prone to breakdowns and wear, since they do not experience mechanical stress. But the resource of radio components (resistors, capacitors) is limited, over time they degrade and lose their properties. The emulator may fail prematurely if dust or moisture gets into the components due to a leak.
| LZ blende type | Car Compatibility | How to maintain LZ blende | How long does LZ blende last (how often to change) |
| Mechanical (screw-in) | 1999–2004 (EU production), until 2013 (Russian production), cars up to Euro-3 inclusive. | Periodically (every 20–30 thousand km) it may be necessary to clean the hole and cavity of the sensor from carbon deposits. | Theoretically, eternal (just a mechanical adapter, nothing to break). |
| Mechanical (mini-catalyst) | From 2005 (EU) or 2013 (Russia) to present. c., class Euro-3 and higher. | After completing its service life, it requires replacement or replacement of the catalytic filler. | 50–100 thousand km, depending on the quality of the filler. |
| Electronic board) | Independent emulators manufactured before 2005 (EU) or before 2013 (Russia), environmental class Euro-2 or Euro-3 (where it makes sense to install gas equipment of 2 and 3 generations). Emulators that use the readings of the first DC to deceive the second lambda probe - from 2005 (EU) or 2008 (Russia) to present. c., class Euro-3 and higher, but exceptions are possible, the correct selection of denominations is important. | Does not require maintenance if located in a dry, clean place and isolated from moisture and dirt. | Depends on the quality of the electronic components. It should be enough for the entire service life of the car, but it may be necessary to resolder electrolytes and/or resistors if low-quality components are used. |
| Electronic (resistor and capacitor) | Cars from 2005 (EU) or 2008 (Russia), class Euro-3 and higher. | It is worth periodically inspecting the integrity of the elements. | Depends on the quality of radio components and the correct selection of ratings. If the components are selected correctly, do not overheat and do not get wet, it may last for the entire service life of the car. |
Flashing the ECU
This method is a radical solution to the problem. The point is to program to exclude the oxygen sensor located after the catalyst from the “field of view” of the ECU. In this case, the computer will operate with data from the first lambda probe, and emergency mode will not be activated.
While mechanical deception of the catalyst can bear fruit, this method has a significant drawback: it is impossible to find the correct factory firmware. And you can use third-party tools only at your own peril, as there is a risk of ruining the performance of the engine. To solve this issue, you will have to look for an excellent specialist, and in terms of money the costs can be compared with the cost of the original spare part. So is it worth it?!
Do-it-yourself mechanical blende of an exhaust system catalyst
The table presented two types of “mechanics”. The scope of their application is different, the design and principle of operation are different.
Attention! When choosing/making a mechanical lambda probe with your own hands, evaluate the amount of space above the second oxygen sensor. If there is a deficiency, it is necessary to use a rotary sleeve.
Option No. 1: screwdriver with a small diameter hole
So-called “empty” mechanical emulators are suitable for a narrow series of cars with EURO 3. Tentatively, these are foreign cars produced before 2004 and domestic cars produced before 2011.
Principle of operation
The function of the bushing is to isolate the lambda from the direct flow of gases, which contains a lot of oxygen. Through the small hole, only a small part of it reaches the sensor, but enough for the sensor to respond to the ECU with a qualified signal.
How to do
The bushing is turned on a lathe according to the presented drawing. Take into account only the configuration and diameter of the hole connecting the sensor to the exhaust tract (1.5-2 mm). The remaining dimensions must be adjusted by removing the actual lengths of the lambda mounting on a particular car. For example, only the overall length can vary between 40-100 mm. The temperature at the place where the readings are recorded is about 300...400°C, so steel or brass will work as a material. The workpiece is a rod.
Where is it placed?
The part is screwed into the exhaust tract instead of the second lambda probe. The oxygen sensor is not thrown away, but is screwed into an already screwed-in bushing and connected to the block.
Option No. 2: bushing with minicatalyst
Suitable for cars of any EURO environmental class.
How does it work
The idea behind the solution is to clean the exhaust only for the oxygen sensor. Technically, it looks like this: a compact catalytic converter with platinum, palladium and rhodium is pressed into a bushing. When the structure is assembled, gases entering the threaded insert first pass through the honeycomb and then enter the oxygen sensor. It detects a decrease in oxygen content, and the ECU perceives the situation in the exhaust as normal.
Manufacturing technology
It is difficult to make on your own due to the inaccessibility of small-sized copies of catalysts. Otherwise, the technology is not much different from that specified in option No. 1. The work is carried out on a lathe; the dimensions are entered in the drawing after preliminary measurement of the sensor thread and the seat for it.
How to install
The installation technology is identical to the method described in option No. 1: unscrew the oxygen sensor and screw it into the adapter sleeve. Screw the assembly unit into the exhaust pipe.
Important! When using bushing spacers of any type, the lambda must be in good working order.
Note: why does the catalyst fail prematurely?
Low quality gasoline and careless dosing of cleaning additives can impair the permeability of the catalytic converter honeycombs. This is the main reason for the reduction in its service life. Therefore, ask which gas station is best to refuel in your region, and how to properly use additives to improve the quality of gasoline.
The catalyst also painfully endures strong vibrations, such as driving on a bad road at high speed, and sudden temperature changes. If you throw snow onto a hot surface, critical deformations are inevitable.
| Mechanical snag | ||
| European Union | 1997-2000 | 2001-present |
| USA | 1996-1999 | 2000-present |
| Japan | 1998-2003 | 2004-present |
| Russia | 2004-2005 | 2006-present |
| Belarus | 2006-present | 2007-present |
| Ukraine | 2007 | 2008-present |