If you are reading this article, then you are tormented by the question of how to solve the problem of bad light on the Nexia. Yes, the Daewoo Nexia car has a drawback - poor or dim low beam and there are several reasons for this. If your low beam headlights don't shine well, then this article will help you deal with this issue once and for all and you can improve the light on your Nexia yourself.
Daewoo Nexia headlight design
Early Nexias have block-type headlights, consisting of a lamp with two filaments for short-range and long-range. There is also a light indicator and turning lights. Generations of cars produced after 2008 are equipped with updated headlights with an improved design. In them, lamps of different range modes are installed separately.
The need to adjust the headlights of the car model in question arises mainly after repairs or any work has been carried out on them. As practice shows, even minor interference with the operation of lighting devices can disrupt their settings. Adjustment will also be required if the headlights on the Daewoo Nexia do not shine well when purchasing a used car. Having studied the main reasons for the poor performance of lighting fixtures and repair technology, it is quite possible to correct this problem yourself.
Daewoo Nexia › Logbook › Making the Nexia n150 light. Tyc or depo and is there a difference?
After buying Ksyukha I was horrified by the light. The car is 2008, but there is no light, not at all. Driving at night is torture.
I decided to figure out what was going on: 1) the left headlight is original, but with a burnt-out reflector. 2) right Chinese noname, which was installed after a small accident, for sale. The light was crooked and in no way worse than the original one.
It was decided to change. And then the torment of choice began, the toad strangled with all his might. What to take? TYC for 2700, depo for 6500 or GM for
10,000. On the drive, everyone speaks highly of the depo. My toad dismissed the original instantly and was left with the choice of saving money or taking what was proven? I am not a confrontational person, and so that the toad would not quarrel with common sense, and it was necessary to calm the inciting curiosity, it was decided to take both headlights of different brands.
Very similar to ams optics, which were installed in the original from GM. But the plastic is a little cheaper, the shutter is made into a step, like xenon lenses (a tick in the original). The lower ears of the fasteners are too large, after a little work with a file everything fell into place, the upper small ear turned out to be a little short, but it tightened with effort and the installation of the headlight was completed. The light is bright, spreads evenly, brighter towards the center, the cut-off line is clear. In general, there are no questions about the world.
Taking it in her hands, the toad began to look for the 5th corner, and curiosity and common sense mocked her as best they could. Terrible plastic, the turn signal socket goes straight to the trash, because... It is not possible to install a lamp. The lower ear, which is closer to the wing, had to be broken off, because... the stiletto heel was gone. The upper short ear is too short (about a centimeter, to the attachment point, is not enough). The shape is crooked, the headlight tries to look up. “With grief in half” and “and so it will do” the headlight is in place.
Lamps were installed in the headlights Lamp H7 12V- 55W (PX26d) Megalight Ultra +130% (pack of 2 pcs.) (GE) 58520XNU their cost
1000 rub. After installation, another disappointment awaited me... curiosity and common sense finish off the toad... the curtain turned out to be upside down, as for left-hand traffic, the light was not focused as it should, parasitic reflections of light, instead of a clear stg.
The photo shows: The depo (right) has a clear stg, correct light distribution and is focused. Everything is sad with tyc... stray rays of light, no focusing, the curtain is not installed correctly and there is only one. There is no top curtain that cuts off the light near the car.
Conclusions: 1) I liked the optics from depo. 2) Tyc is slag, nothing to do with depo. 3) The lamps shine amazingly, one of the brightest lamps, and at a reasonable cost. 4) I now have to assemble 1 normal headlight from ams and tyc. I hope the headlight glass and Tyc reflector will fit the ams body.
Source
Search
Many owners of this model are thinking about how to make Daewoo Nexia headlights better. The above article describes a simple, modern method that has been fact-checked several times. An inexperienced driver of a standard Nexia may not realize that the car’s lighting has objective disadvantages. The same cannot be said about experienced motorists. When driving different cars, they often complain about the insufficient power of the standard Daewoo Nexia headlights. The brightness of the n150 head optics is really not enough even in new cars that have recently rolled off the assembly line. What to say about the technique of used and tarnished lenses.
The root of this situation lies in the electricity settings. For some reason, Daewoo designers made the logic of the system somewhat unusual and incomprehensible. If the battery is 12.5V, only 11 bulbs go to the bulbs, in other words, noticeably fewer. In fact, 10 percent disappear, it is not clear where.
The troubleshooting process will take several hours. It is better, of course, to have a basic understanding of the structure of electricity and devices. Additionally, you will need the ability to solder and determine the voltage of the circuit. The time and energy spent will translate into a safer and more comfortable night ride.
To quickly understand whether you need to change the wiring of your Daewoo Nexia 150, you will need a regular sensitive multimeter. We measure the battery voltage and store (record) the data. When the low beam is flashing, measure the lamp cover at the connections. If, when comparing the 2 numbers obtained, you find a difference of 1.5 V, this is untapped potential that is easy to use. In this case, the operation described below has a positive effect on the efficiency of the optics.
You may also like
Daewoo Nexia N150, part 2, replaces conventional burnt lenses
To improve the Daewoo Nexia n150 headlight, you need to purchase accessories for you:
- two four-pin 30A relays;
- two gaskets under them;
- two 20A fuses in a sealed housing;
- 2.5kV Electronic Wire Typically the communication system uses a 2.5V connection, but in some places it will be narrow.
The approximate amount of necessary costs if you do the work yourself is 350 rubles.
Most of them at least remotely imagine working with a soldering iron; many have held it at least at one point. With the relay situation the opposite, the subject is familiar to the units. But mastery of the basic principles occurs instantly, enthusiasm and the desire to create miracles.
In a four-pin switch, the two main contacts are the positive and negative points, in other words, the power points for the device. You can bring it directly from the battery or try to find the "plus" in another place so that everything works with the ignition on. The third link is the manager. Voltage applied to it causes a corresponding click and redirects power from the main contacts to the fourth. On devices, contacts are usually labeled with standard numbers, so don't be upset when you see 87 or 30 in the annotation.
- First you need to find the pin marked 87 on the relay and connect it to the positive cable coming from the safety cable. A similar function is needed with the second one. Next, the fuse housings are connected by positive wires.
- We connect the dark colored cords coming from the relays, carefully attaching one to them. For the applied circuit it acts as a mass.
- Next, in the first block, find the point with number 86 (usually it is brown). Solder a wire long enough to reach the left lamp. It's better to leave a small margin in size. We do the same with the second block. These connections will be soldered to standard wiring so that the devices will turn on when the switch is activated.
- With both mechanisms, the 30s remain untouched. To these we attach two cables for the headlights, one for each. It is important to correctly calculate their length, the first should be shorter, the second longer. Make this feature required on both sites.
You must isolate the connection as carefully as possible, using whatever method you wish. The main thing is to check the full density of the conductor.
Foundation and reason
An inexperienced driver of a standard Nexia may not realize that the car’s lighting has objective shortcomings. The same cannot be said about experienced motorists. Those who have driven different cars often complain about the lack of power of standard Daewoo Nexia lighting devices. The brightness of the n150 head optics is really insufficient even for new cars that have recently rolled off the assembly line. What can we say about used equipment and tarnished lenses.
The root of the indicated situation lies in the electrical settings. For an unknown reason, Daewoo designers made the logic of the system a little strange and incomprehensible. If you have 12.5V available on your battery, only 11V reaches the optical bulbs, that is, noticeably less. Almost 10 percent is lost somewhere unknown.
The process of correcting the defect will take a few hours. It is, of course, advisable to have a basic understanding of the structure of electricity and electrical appliances. Additionally, you will need the ability to solder and measure circuit voltage. The effort and time spent will result in safety and more comfortable night driving.
Preparation for manipulations
To quickly understand whether it is necessary to modify the electrical wiring of the Daewoo Nexia 150, you will need an ordinary sensitive multimeter. We measure the battery voltage and remember (record) the data. With the low beam on, we take measurements at the connections of the lamp base chip. If, as a result of comparing the two obtained figures, you find a difference of 1.5 volts, then there is unspent potential that is easy to use. In this case, the operation described below will have a positive effect on the efficiency of the optics.
To improve the headlights on the Daewoo Nexia n150 you will need to purchase the following components:
- two four-contact relays 30A;
- two pads for them;
- two 20A fuses in a sealed housing;
- Electrical wire with a cross-section of 2.5 square meters. As a rule, a 2.5 section is used in the ligament system, but in some areas a thinner one is suitable.
The approximate amount of necessary costs if you do the work yourself is 350 rubles.
Most people at least vaguely imagine working with a soldering iron; many have held it at least once. With relays the situation is the opposite; the topic is familiar to only a few. But mastering the basic principles happens instantly, interest and desire work wonders.
Brief introduction to the design
In a four-pin switch, the two main contacts are “plus” and “minus”, that is, the points for powering the device. You can connect it either directly from the battery, or try to find the “plus” in another place so that everything works when the ignition is on. The third connection is the control one. The voltage supplied to it leads to a characteristic click and redirection of power from the main contacts to the fourth. On devices, the contacts are usually labeled with a standard numerical designation, so do not be alarmed when you see the number 87 or 30 in the instructions.
Start of the procedure
- The first thing you need to do is find a contact on the relay with the numerical designation 87 and connect it to the positive cable that comes from the safety one. A similar procedure must be carried out with the second one. Next, the fuse housings are connected to each other with positive wires.
- We connect the black cords coming from the relay to each other, carefully attaching another one to them. For the circuit used, it acts as a mass.
- Next, on the first block you need to find a point with number 86 (it is usually brown). We solder a wire to it that is long enough to reach the left lamp. It is better to leave a small margin in size. We perform the same operation with the second block. These connections will be soldered to the stock wiring so that the devices turn on as soon as we activate the switch under the steering wheel.
- On both mechanisms, the 30th contacts remain intact. We connect two cables for the headlights, one for each. It is important to correctly calculate their length, the first should be shorter, the second longer. You need to do this procedure on both pads.
Headlight adjustment
Are the headlights on your Daewoo Nexia bad? This means that immediate elimination of this deficiency is required, since good visibility on the night road is one of the keys to traffic safety. One of the reasons affecting the operation of automotive lighting elements is their correct adjustment.
On the Daewoo Nexia, this procedure is performed as follows:
- The tire pressure is adjusted to normal;
- The machine is placed opposite the wall at a distance of 5 meters;
- A load weighing 5 kg is placed in the luggage compartment, and the driver’s seat is made heavier by 75 kg;
- Then special markings are made on the wall or a screen is mounted to adjust the headlights;
- The axial longitudinal line of the car must be located according to the zero mark of the screen;
- The H value on the screen is equal to the height from the middle of the headlights to the floor;
- The corrector control on the instrument panel is set to “0” mode, which will be close to testing a car with one driver;
- The low beam turns on;
- The headlights are adjusted individually; the unused headlight should be covered with thick canvas or other light-proof material.
On Nexia, released before 2008
, adjustments are made using adjusting screws using a screwdriver until the optimal value is achieved. On models manufactured after this period, adjustment is made with a key set to “10” by rotating the screws located on the back side of the light element.
Headlight adjustment
Are the headlights on your Daewoo Nexia bad? This means that immediate elimination of this deficiency is required, since good visibility on the night road is one of the keys to traffic safety. One of the reasons affecting the operation of automotive lighting elements is their correct adjustment.
On Nexia, released before 2008
, adjustments are made using adjusting screws using a screwdriver until the optimal value is achieved. On models manufactured after this period, adjustment is made with a key set to “10” by rotating the screws located on the back side of the light element.
Replacing Daewoo Nexia headlights: instructions, photos, videos, process
Many owners of Korean automotive products notice that the headlights on the Daewoo Nexia do not shine well.
There are not many reasons for this shortcoming. Experts assure that it is possible to cope with this problem on your own, but this will require finding out the true factors of the deficiency, and then eliminating the identified malfunction. Novice drivers who do not have at least minimal experience and knowledge of the internal structure of individual components and assemblies are recommended to contact professionals at the nearest service center.
Other causes and solutions
One of the factors that the headlights on the model in question do not light well is weak wiring. To solve this problem, it is reasonable to power the lighting system through a separate relay.
The sequence of work in a specific example consists of the following operations:
- Check the voltage at the battery terminals after stopping the engine (12.6 V);
- A similar indicator is read at the headlight connector (10.4 V);
- There is an obvious difference of 2 volts (if you change it back to halogen headlights, the lighting will improve significantly).
To install separate wiring, you will need two copies of a 4-pin relay (30 A), 2 blocks, about 5 meters of wire with a diameter of 2.5 sq. mm. The power contact of the relay should be secured to the safety element using the soldering method. The remaining ends are soldered to the positive of the battery. The relay wires are connected to each other, the remaining parts are extended and attached to the low and high beam lighting system.
Daewoo Nexia headlight design
Early Nexias have block-type headlights, consisting of a lamp with two filaments for short-range and long-range. There is also a light indicator and turning lights. Generations of cars produced after 2008 are equipped with updated headlights with an improved design. In them, lamps of different range modes are installed separately.
The need to adjust the headlights of the car model in question arises mainly after repairs or any work has been carried out on them. As practice shows, even minor interference with the operation of lighting devices can disrupt their settings. Adjustment will also be required if the headlights on the Daewoo Nexia do not shine well when purchasing a used car. Having studied the main reasons for the poor performance of lighting fixtures and repair technology, it is quite possible to correct this problem yourself.
If you are reading this article, then you are tormented by the question of how to solve the problem of bad light on the Nexia. Yes, the Daewoo Nexia car has a drawback - poor or dim low beam and there are several reasons for this. If your low beam headlights don't shine well, then this article will help you deal with this issue once and for all and you can improve the light on your Nexia yourself.
The headlights shine very poorly
Nexia 2012. The headlights shine very poorly. how to improve the light? who can tell?
I decided to change the oil
by Adminrive · Published 12/23/2015
Does anyone drive a car without power steering?
by Adminrive · Published 09/11/2015
Please tell me Nexia N 100 1
by Adminrive · Published 02/15/2015
- Comments 13
- Pingbacks 0
Xenon 4300K. No other way. By the way, I’m ready to sell the set for 700 rubles)))
Xenon will not help, the lens itself has melted from the inside, you need to install another lens
Can I replace the lens or the whole headlight?
fine for xenon)))
Nikita, on my new one it was a lousy light. There was clearly nothing melted there. I installed xenon and I saw the light. I drove it for 4 years and was happy, then the other day I sold the car, the new owner was afraid to drive with it and I put the halogen back on him, and not even the standard one, but an all-weather Osram. I can’t fucking imagine how it’s possible to travel with him! After xenon, I just felt like I was using a flashlight from Fixprice, although the lamps were not the worst, but still halogen! And I threw out the regular ones right away on a new car the next day.
Fozil, 4 years of driving, no one asked. I was more afraid of running over people than of getting a fine, well, who cares.
Vyacheslav, I have xenon on the far side. driving along the highway with a distant driver stopped and took a ruble for xenon
Fozil, there is no point in installing it on the long-range one, since the long-range one is often needed instantly or for a short period of time, and it needs time to flare up. What temperature was the xenon? Maybe they were fined because they blinded me) On the contrary, I had xenon in the low beam and halogen in the high beam. Moreover, there is no lens on the far one, so they were fined.
Adjustment process
Many car enthusiasts do not know how to adjust headlights on a Daewoo Nexia, and turn to a car service center, where it is not so cheap. But, this process can be carried out at home, with a minimum amount of necessary materials and tools.
So, to complete the process you will need a garage or just a flat wall, chalk and a little time. In fact, the whole process can be completed in half an hour, if you don’t rush at all. For those who don’t want to go through the hassle of drawing lines, special canvas screens with already drawn lines are sold. Having settled in with everything you need, you can proceed directly to the process.
First you need to draw lines on the wall according to the diagram below:
Scheme for adjusting headlights on Nexia.
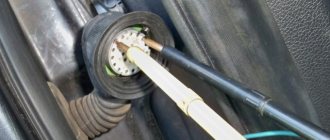
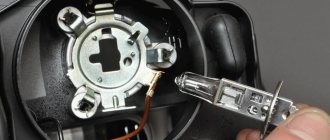
The next step is to find the light trigger regulators. These tools are located behind the headlamp on the engine compartment side.
For sedan and station wagon vehicles:
- Regulator of the horizontal plane of the light beam
Rotating this screw adjusts the headlights in the horizontal plane.
Other causes and solutions
One of the factors that the headlights on the model in question do not light well is weak wiring. To solve this problem, it is reasonable to power the lighting system through a separate relay.
The sequence of work in a specific example consists of the following operations:
- Check the voltage at the battery terminals after stopping the engine (12.6 V);
- A similar indicator is read at the headlight connector (10.4 V);
- There is an obvious difference of 2 volts (if you change it back to halogen headlights, the lighting will improve significantly).
To install separate wiring, you will need two copies of a 4-pin relay (30 A), 2 blocks, about 5 meters of wire with a diameter of 2.5 sq. mm. The power contact of the relay should be secured to the safety element using the soldering method. The remaining ends are soldered to the positive of the battery. The relay wires are connected to each other, the remaining parts are extended and attached to the low and high beam lighting system.
A bundle of 600 mm for the left headlight and 1800 mm for the right element is attached to the contacts of both relays by soldering. All connections are carefully insulated. Power comes directly from the battery. The ground is connected to any bolt, and the wiring is connected specifically to the lamp connectors. Installation is carried out using plastic ties to securely secure the wiring. For convenience of work, it is recommended to disconnect and remove the battery before starting work.
Also, car headlights may shine poorly if the contacts oxidize.
. In this case, cleaning the last elements with fine sandpaper and treating with a special compound will help. If the reason for the weak light of the lanterns lies in an incorrectly selected lamp, an alternative option should be installed according to the characteristics specified in the operating instructions.
What to do if the headlights don't shine well: the most effective ways
We have already outlined the reasons why headlights do not shine well. In this section, we will analyze effective ways to eliminate faults that cause loss of brightness.
Damaged contacts
If you have identified what exactly caused the poor performance of the device, then it’s time to start fixing the problem.
You can make sure that the contact has really come off by looking at the distinctive sign of this malfunction. The contact may periodically close back, at these moments the device shines brighter. This happens when you hit the hood, hit a bump, or simply shake on an uneven road. This happens due to a temporary displacement of the contact and restoration of communication, due to which the device begins to shine brighter again.
We emphasize that you cannot correct the situation by hitting the hood - this is only a sign of a malfunction. To solve the problem, you need to figure out what's wrong with the contacts.
The reason may be damage, dirt, or contacts may simply move away from each other. The fastest way to fix this problem is at a car service center.
However, you can fix headlights that don't shine well yourself.
If, after checking the contact coils, you find that they are moving away, then in this case they can be welded in place or use epoxy glue.
It is important to make sure that there is enough voltage supplied to the lamp for full operation. This problem can arise not only due to contact separation, but also due to generator malfunctions.
When solving a problem with contacts on your own, it is important to avoid making a serious mistake.
There is no need to change them to more powerful ones, because this will cause the mounting area to overheat.
To accurately set the voltage parameters in the contacts, you can use a multimeter. With its help, you will determine the section of the electrical circuit that caused the problem.
Problems with the lampshade
If both headlights shine poorly, then, oddly enough, banal contamination of the lampshade glass is most often the cause. Wash the glass. Once it becomes transparent, the brightness will return.
If the lampshade is cracked or any other mechanical damage occurs to the glass or reflective mirror surface, then the headlight does not shine well and must be replaced. It is no longer possible to repair it.
Problems with the lamp itself
Sometimes the reason that headlights don't shine well is obvious. First, it is better to act by analogy with the house: when the chandelier shines dimly in the apartment, the first thing to do is check the light bulb. It's the same with a car. If the problem is in the lamp, then you will need very little effort to fix it.
The lamp itself, which shines poorly, cannot be repaired, only replaced. The replacement algorithm is not standard for all cars, but depends on the make of the car. Let us only note that most often this procedure is very simple.
Lens clouding
Lensed headlights do not shine well over time: the older the lampshade, the more likely it is that its glass has become cloudy. This occurs due to sand and dust getting on its surface while driving. What appears to be a haze is actually a web of cracks and scratches. The initially transparent surface becomes cloudy, causing the headlight to shine poorly.
This unpleasant effect can be prevented. First, you need to know what material the lampshade is made of. This is important in order to understand exactly what actions are required from the car enthusiast. If you are lucky enough to own glass, then maintenance will be minimal. Polycarbonate, which in most cases is used for the production of lampshades, is lightweight and safe, but is susceptible to clouding, which is why the headlights begin to shine poorly.
There are special compounds on sale that are recommended to treat the surface of the lampshade. But the most effective way remains protective film. It protects the surface from scratches without interfering with the passage of light.
Bad low beam Nexia - What to do if the light is bad on Nexia N150
One of the sores on the Nexia, in addition to the weak ignition contact group, is, of course, the low beam. To be more precise, on Nexias, low beam is almost completely absent. What to do if there is bad light on the Nexia n150 we will answer in this article.
To overcome poorly luminous headlights, you can choose any of the listed options or combine them. Bad light on Nexia? Everything is solvable!
Try something from the list above and the headlights on your Nexia will shine better than before.
Install xenon . On the Nexia n150, installing xenon in the low beam is much easier, since the headlights already have lenses. Xenon will shine better, but there are disadvantages. Firstly, it is punishable; installing xenon in cars not specified by the factory is fraught with deprivation of rights. Secondly, xenon increases the load on the wires, which means the headlights will have to unload the relay anyway. Thirdly, the xenon you installed will most likely blind oncoming cars.
You may find the article useful on how to install xenon in Nexia.
Unloading the low beam and (or) high beam . This method of improving headlights on a Nexia is one of the most important and basic. The wiring on the car is very thin; when using high beams for a long time, the wires and contacts heat up, which leads to a deterioration in the brightness of the light. Since light bulbs lose their voltage due to poor contacts and heating of thin wires. Unloading the headlight relay will help relieve the load on the ignition switch contact group, as well as improve the light. It has been tested that the brightness of the light increases from 10 percent.
Read the article on how to unload headlights on a Nexia using a relay.
Replacing the headlight with a new one . Approximately every two years, some owners change their entire headlight units, and for good reason. After about two years of use, the internal reflector burns out, reflects less light, and the outer plastic glass becomes cloudy and scratches, causing the headlights to shine 10%-20% worse. After replacing the headlight you will feel the difference. To order new headlights, an article with article numbers for lights for Nexia .
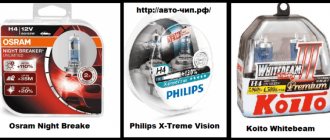
Another way to improve poor light on the Nexia n150 is to install more powerful light bulbs . Not an advertisement, but it is recommended to install more efficient Osram light bulbs. The light bulbs of this company are distinguished by their quality, and in terms of price-quality ratio they outperform similar Philips ones, so Osram night breaker lamps improve the light by approximately 10%.
Improve headlights on Nexia
Install new headlights. Installing new headlights is a good option if your headlights are completely damaged, for example, with a crack or the reflector has turned black. If everything is fine with them, then try unloading the headlights, that is, installing a relay on the Nexia headlights to improve the voltage on the bulbs, the result will be brighter.
Also, to make the light better, installing xenon in the Nexia will help, then the combination of a lens and xenon lamps will allow you to forget about poor road lighting. If you don’t want to break the law (installing xenon yourself is prohibited in the Russian Federation), then another option will help - install other light bulbs. Yes, there are light bulbs from osram or philips that really improve the light, usually they have special markings on them.
No matter how trivial it may sound, installing additional lighting will help improve lighting. Try installing fog lights if you don't have them or adding external lamps.
If your car is not that old, you can try polishing the headlights. At first, the light will improve and the road will become better visible.
If you know another way to improve the headlights on the Daewoo Nexia, then write in the comments below
Useful tips
You can adjust the fog light and the headlight according to the same scheme. After carefully studying the sequence of actions, you can complete the setup entirely on your own. It is inappropriate to neglect the need for regular work.
Important! If you correctly adjust the light on the Nexia, the comfort and safety of driving in the dark will increase.
To self-adjust, you must first prepare the car by placing it on a vertically located surface, a fairly flat area, and make the correct markings on the wall.
In Nexia, drivers often complain about poor night light, but this problem can be solved
Hi all. So I asked myself a question about improving the headlights on the Nexia, tell me if it’s possible to put lenses in my headlights like on the N 150, in my opinion, and they look better and shine better.
there's a guy selling it. but they shine worse than stock. I saw it from one, and took it off to another (I put it back to my relatives) https://www.nexia-club.ru/f/o-parts/9. s/#post2098406
do this https://www.nexia-club.ru/f/faq/93034. iya-golovnogo/ and put the light bulbs
I also added a washer to the headlights - it helps by 50 percent.
Whistle, what's your problem with the headlights, I'm talking about the N100. Lamp H4, I was familiar with it on a former car. Is the voltage to the lamp low? What is the reason? Did Koreans have this problem? I want to help a friend improve his lighting.
perchic1
, so
Alex04
, seems to have written everything down, is it popular? He'll figure it out, I hope
low. on both old and new Nexias. only for some to a greater extent, for others to a lesser extent.
Olga Nikolaeva | Topic Author: HOME
I want to buy a Daewoo Nexia and only that
SiSishka o̶n̶l̶i̶n̶e̶ ))) why?
Love (Yamama) The price matches! it's true! I also seem to be happy, but the drawback is the doors, winter has just begun and they are already freezing so much.
SiSishka o̶n̶l̶i̶n̶e̶))) I had the same problem. I broke the key even at first
SiSishka o̶n̶l̶i̶n̶e̶))) the car has excellent chassis. but it’s already become a bit cramped for me. two youngsters.
SiSishka o̶n̶l̶i̶n̶e̶ ))) kids
SiSishka o̶n̶l̶i̶n̶e̶ ))) I agree completely
airat (Hemacandra) neighbor recently bought a one-year-old Daewoo, first frost and no such problems. You probably have an older edition, they are cold and cool down quickly. the new model is warm, I had a blast driving it and the new body is absolutely classy
SiSishka o̶n̶l̶i̶n̶e̶ ))) I have 2008
Evgeniy (Dylan) Love, it’s probably not your doors, but your locks that freeze? This is Ksyukha’s disease.
Evgeniy (Dylan) Airat, Daewoo Nexia is only an Opel Kadett in appearance, but inside it is all Uzbek. The metal in Opel was galvanized and 0.5 mm thick, and in Ksyukha it was ordinary iron, 0.4 mm thick. The engine is Korean, but good!
How to improve the head light on Daewoo Nexia n150?
It is necessary to install new light bulbs, preferably original ones, and do not buy light bulbs more powerful than the original, otherwise they will quickly burn out!
You need to change the lenses since they burned out, there is no other option.
I also have a 2011 Nexia with a mileage of 60,000 km - the headlights shine normally. They say that when the headlights on a Nexia start to shine poorly, it means the reflective elements have burned out, perhaps even because there were non-standard bulbs of higher power! Tell me what you did in general? and was the lens replaced? what is the mileage on your swallow
Reflectors on lenses burn out within a couple of years. Or replace it with new ones (not Neksievsky ones) Or just install real fogs. Fog lights are both simpler and much cheaper. The first shot is low beam. The second plus of fogs. Just don’t put these useless strobe lights in the regular places, but put real fogs on the bumper. Unfortunately, it is not possible to show a photo here.
Characteristics of low beam lamps Daewoo Nexia
Headlight before restyling (2002–2008).
Headlights after restyling (since 2008).
Depending on the year of manufacture and modification, different low beam lamps were installed on the Nexia.
- To modify the N-100, it was planned to install one double-filament lamp for low and high beam with an H4 . Its power was 55 W.
- For Nexia N-150, low beam lamps with an H7 , and for high beam lamps - H1 . Their power is also 55 W.
Double-filament lamp H4 with three contact terminals.
Single-filament H7 lamps with two contacts.
Halogen and diode
Whether it is worth installing LEDs instead of standard halogens, everyone decides for themselves. However, the numbers speak for themselves. For example, a Philips BlueVision produces a light beam with a brightness of 900 Lumens, and not the cheapest lamp with 27 LEDs - no more than 400 Lumens.
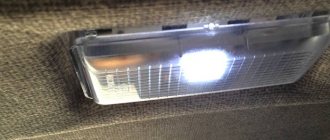
For running lights and dimensions, the LED light is quite suitable, but for the head light, given the features of the Nexia ceiling, it is a controversial issue.
Adjustment process
Many car enthusiasts do not know how to adjust headlights on a Daewoo Nexia, and turn to a car service center, where it is not so cheap. But, this process can be carried out at home, with a minimum amount of necessary materials and tools.
So, to complete the process you will need a garage or just a flat wall, chalk and a little time. In fact, the whole process can be completed in half an hour, if you don’t rush at all. For those who don’t want to go through the hassle of drawing lines, special canvas screens with already drawn lines are sold. Having settled in with everything you need, you can proceed directly to the process.
First you need to draw lines on the wall according to the diagram below:
Scheme for adjusting headlights on Nexia.
The next step is to find the light trigger regulators. These tools are located behind the headlamp on the engine compartment side.
For sedan and station wagon vehicles:
- Regulator of the horizontal plane of the light beam
Rotating this screw adjusts the headlights in the horizontal plane.
Regulator of the vertical plane of the light beam
The screws are accessible without removing the headlights. The indicated screw adjusts the headlights in the vertical plane.
In order to perform manipulations you will need a Phillips screwdriver. So, by moving the regulators, the light beams of the headlights are adjusted. The distance of the car from the wall or screen should be five meters. This indicator is mandatory, since it is in this case that the adjustment will be considered correct.
Adjusted headlights.
Other causes and solutions
One of the factors that the headlights on the model in question do not light well is weak wiring. To solve this problem, it is reasonable to power the lighting system through a separate relay.
The sequence of work in a specific example consists of the following operations:
- Check the voltage at the battery terminals after stopping the engine (12.6 V);
- A similar indicator is read at the headlight connector (10.4 V);
- There is an obvious difference of 2 volts (if you change it back to halogen headlights, the lighting will improve significantly).
To install separate wiring, you will need two copies of a 4-pin relay (30 A), 2 blocks, about 5 meters of wire with a diameter of 2.5 sq. mm. The power contact of the relay should be secured to the safety element using the soldering method. The remaining ends are soldered to the positive of the battery. The relay wires are connected to each other, the remaining parts are extended and attached to the low and high beam lighting system.
A bundle of 600 mm for the left headlight and 1800 mm for the right element is attached to the contacts of both relays by soldering. All connections are carefully insulated. Power comes directly from the battery. The ground is connected to any bolt, and the wiring is connected specifically to the lamp connectors. Installation is carried out using plastic ties to securely secure the wiring. For convenience of work, it is recommended to disconnect and remove the battery before starting work.
installing a relay to amplify the headlights
Everyone knows that the headlights on the Nexia leave much to be desired. This is partly due to the disgusting quality of the car's wiring and the ill-conceived relay and contact system. Plus, the KG begins to melt (this is especially felt on new ones, where the far one burns together with the near one). And the steering column switch becomes “eternal”; anyone who has had it melt will understand. video. look at how much brighter the light becomes (I filmed it on my phone, don’t scold me too much)
I have installed this system on more than a dozen cars, people have only positive impressions. I also helped the tubers more than once, for which I have several thanks. That's why I decided to combine the whole process in FAK.
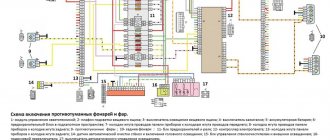
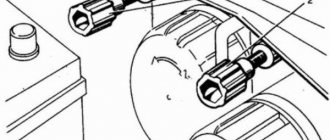
and so 1- scheme https://www.nexia-club.ru/attachments...eta-gorit-.jpg red wires 2.5 kV, blue and purple - 0.5. fuses 15A. relay from VAZ for 30A 2 - making a braid you need to buy 2 relays, blocks for them, 2 sockets for fuses, wires PV3 0.5 and 2.5 sq. We start soldering. fuses to the pads power + from the battery. (ring internal diameter 6 mm) for powering the relay coils: in the middle - on the car's mainframe, along the edges to + we will connect to the old wires; on the second end of the power wire of the block we solder the headlight power wires (60 and 180 cm) we insulate all soldering points and bundle them up, power supply to the battery - and two + power supply for the relay windings to the headlights 3-installation on the car; remove the battery for ease of installation. We attach the relay in a convenient place. this time the relays were without “ears” so I tied the wires to the braid https://s5.uploads.ru/t/IX6V5.jpg plus we connect the node nut on the battery terminal and unhook the connector from the headlight https://s4.uploads.ru/ t/CAhTP.jpg remove the insulating tape and cut 2 wires, white with brown and white with green. https://s4.uploads.ru/t/FPfgi.jpg we connect the power wires coming from the relay to the wires that go into the headlight block https://s5.uploads.ru/t/dSUTW.jpg and the relay control wires to the wires going We solder it from the braid, isolate it, connect it to the headlight https://s5.uploads.ru/t/b2rGT.jpg we get to the right headlight, or rather, pull out the connector, remove the electrical tape, cut the wires as on the left. We immediately isolate the 2 wires that come from the braid; we no longer need them. https://s4.uploads.ru/t/hLHui.jpg we connect the power wires from the relay as on the left headlight https://s4.uploads.ru/t/IAq4k.jpg we solder, isolate, connect and enjoy the good, bright light Well, we choose the RIGHT light bulbs
The plate corresponds to voltage and light brightness. I’ll update the photo report a little. Here is the assembly process directly on the machine. plus I changed the connection points a little. 1. I connect two relays with blocks with electrical tape 2. I hook the ground on the relay to the ear of the relay 3. I hook the relay to the support pin. it will also become a mass 4. we hook the fuse blocks on the side 5. we connect to the battery positive 6. we solder the wires that will go to the headlights (blue low, green high) 7. here you can see the length of the wires for the left headlight 8. the length of the wires to the right headlight 9 . I solder the control wires (for clarity, the same color) 10. We make the control wires the same length as on the left headlight 11. We bundle all 6 wires together to the corner and then separate them. 4 short ones to the left headlight, 2 long ones to the right one 12. strip the wires at the left headlight. 2 power ones are 1.5-2 cm longer than the control ones 13. At the left headlight, disconnect the connector and remove the electrical tape from the wires. out of 5 wires we need 2 - white with green and brown stripes. 14. cut the wires, as in the photo 15. solder the power wires to the wires coming from the headlight connector (blue to white with a short stripe; green to be-green), connect the wires end-to-end 16. hook the control wires to the wires coming from the harness, hook them up just like in photo 17. naturally we insulate everything 18. we lay 2 long wires along the TV 19. for the right headlight we use only a piece of wire coming from the connector 20. we connect the wires according to the color scheme, as on the left. I hope that many of the questions asked earlier in this thread have gone away.