A rear view camera is not standardly installed on the Lada Granta, but the manufacturer has made the installation procedure for this option as convenient, simple and cheap as possible.
There is an opinion that a rear view camera is necessary exclusively for beginners who do not yet know how to properly park in reverse. In fact, even experienced drivers cause collisions when reversing, simply because there are areas behind them that are not visible through any car mirror.
Today, installing a rear view camera is quite simple, and the price of the equipment and the installation itself will pleasantly surprise you. Moreover, you can save on work by installing the camera yourself.
Installing a rear view camera
First of all, we collect all the necessary components:
- Rear view camera (Chinese stores offer a wide range, costing from 500 rubles and above);
- mini ISO connector (with blue block and tulip);
- Several meters of wire.
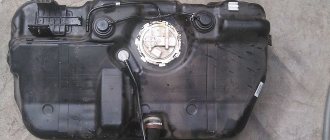
Next, you need to select a location to install the camera. Much will depend on what type of mount the camera itself will have, but on a Grant, the camera is most often installed in the bumper (above the license plate), if it is an old-style sedan, or in the “saber” (also above the license plate), if it is a liftback, 2022 wagon, hatchback or sedan. In all cases, the fastening scheme is identical.
Let's consider installing the camera in the trim above the license plate (saber), since in this case the camera is located quite high, it gets dirty less, gives a better overview, and the installation process is as simple as possible, because you do not need to remove the rear bumper.
1) Remove the trunk trim;
2) Remove the “saber”, it is held on by 6 M8 screws;
3) Mark the most favorable place for the camera and drill a hole;
4) Place the camera in place and secure it with a lock nut;
5) We first lay the cable from the camera to the MMC through the standard corrugation of the trunk door (the extra wire fits there with great difficulty), and then we lead it through the cabin.
There are options here, since the cable can be routed along the floor or over the doors. In the first case, it can be passed past the instrument panel, in the second case through the right front pillar. As a result, the wires should reach the back of the multimedia system. But before connecting, you will need to dismantle the cladding, and then the MMC itself, in order to make connecting the cable as easy as possible.
Required accessories and installation sequence
On Lada Kalina 2, the camera is most often installed above the license plate. Usually, the standard design of Russian cars does not require a camera to view the space behind the car. However, you can install the device not only at a branded service station, but also yourself. This can be done especially easily on cars such as the Lada Kalina and its second-generation model of the same name.
You can notice it when you zoom in
To install a rear view camera, you need to strictly follow the instructions and prepare the necessary accessories, as well as remove the tailgate trim in advance.
Tools you will need to install a video device yourself:
- crosshead screwdriver;
- a set of open-end wrenches or sockets;
- suitable diameter drill bit, drill or screwdriver;
- The device itself - the rear view camera - is universal and, depending on the configuration, can be installed in any vehicle.
The rear fifth door trim is the most preferred place for mounting and fixing a rear view camera (duplicate name “saber”). To remove the saber, you will need to unscrew six nuts using the key set to “8”. The process of performing sequential operations is as follows: we mark on the saber the area where the camera will be mounted, then we drill a hole of the required diameter and pull the wiring for the video device through it.
To route the wiring harness without drilling extra holes in the tailgate, you can use any of the six holes for the saber clip. To do this, lift the elastic band and move it to the side. We cut the plug in place. Then we install the door trim on the remaining 5 nuts. Now the wiring for the camera is ready.
The device itself is attached to the outside of the fifth door trim using 2 strong self-tapping screws. To connect the camera to the video playback device, we stretch the wiring around the cabin. There are two options here:
- hiding it under plastic sills and trim of the door pillars;
- laying under the roof lining of the car.
As a result, the wire should appear behind the radio. If the kit you purchased does not include a monitor, then you can connect the device to a regular standard radio with a multimedia function.
Many motorists install video devices for viewing the road situation to simplify parking in places with a large concentration of cars. The presence of a standard parking sensor complements the system and reserves elements when one of them fails. Installing a rear view camera on Kalina 2 is desirable, since it does not have any other standard parking system.
Connecting a rear view camera
For Grant, Kalina and Priora cars, the rear view camera connection diagram is as follows:
Explanation. In the trunk:
- Black wire to ground;
- We connect the red wire to the +12V green reversing light.
We connect the miniISO connector to the radio, but we must first connect our “tulip” to it:
- Ground (outer tulip contact) of the connector to pin 16;
- The positive (inner pin) of the connector to pin 19.
If your car was purchased with a standard MMC, then no additional actions will be required at this stage. But for those who independently equipped their car with a multimedia system (it is not available in the “Standard” and “Norma” trim levels), it is necessary to additionally supply +12V from reverse to pin No. 1 of connector A1 of the radio.
Options
Based on the car’s configuration, the following standard radios are used as an audio system:
- 2 DIN device: it does not have a CD drive, TouchScreen;
- Multimedia radio: there is also no CD drive, but there is a 7-inch display (MMC).
Car radio 2DIN
The standard MMC-2190 radios are distinguished by an excellent touch screen. As a rule, they are suitable for Lada car models (Granta, Kalina, Priora).
Setting up MMS Lada for rear view camera
Standard MMC does not require additional firmware for the reverse camera. It is enough to activate this function using a special CAM on/off .
1) We write the program to a flash drive using a computer and connect it to the MMC; 2) On the radio screen, hold down the “Settings” button, then click “Exit” and “Desktop”. After this you are taken to the desktop of the WinCE operating system; 3) Go to the “My Device” folder, then “USB disk” and go to the folder with the program; 4) Launch the CamOnOff program file, allow the camera to be used by clicking on the corresponding button; 5) Close the program and desktop;
Cam on off for MMS Kalina 2
Download:
Description:
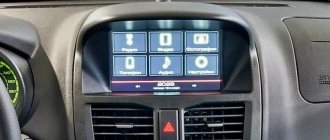
Alternative menu (shell) for MMC cars Lada Granta, Kalina, Priora. In NewMenu 9, all functionality is divided into separate applications. The main applications - radio, video player, audio player, BT player, AUX, phone and navigation - are located on the main menu screen. The remaining additional functions of MMC are divided into corresponding applications. For example, application options: Trip computer, Car (displaying a car with doors, indicators, etc.), Climate (for displaying climate status), Motor (for reading and decoding errors, controlling fans), an application for measuring dynamics, an application for street racers (red flash), etc.. You can come up with many applications. Applications can be uninstalled and installed through the Application Manager. Those. You can create your own MMS functionality. Installed applications are displayed and launched in the Applications window. Some applications can be launched as a screensaver (Trip Computer application). Applications can be launched either by a hot button (the Trip Computer is launched by clicking on the Fuel icon in the Kan-panel) or by an event (for example, when check the Motor application is launched).
Possibilities:
- Listening to radio, audio files; watching videos.
- Connection with phone via Bluetooth protocol; Speakerphone; the ability to receive and make calls; phone book with quick contact search; listening to music from your phone via Bluetooth (via BTPlayer).
- Launch a navigation program, simultaneous use with all audio applications.
- Playing navigation prompts when listening to the radio, AUX, music from the phone, during a telephone conversation on the front or rear speakers (mixing).
- AUX input support (hardware modification required).
- Sound settings (balance, equalizer, advanced hardware equalizer settings); screen settings, automatic day/night mode switching; turning on the parking camera.
- Setting up sound alerts, mixing direction and volume, and the ability to immediately do a mixing test.
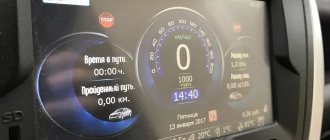
- Kan-panel with vehicle data readings, voice prompts about the vehicle’s condition.
- Automatic volume adjustment depending on the current speed (auto volume).
- Support for navigation programs, support for USB GPS receivers, support for standard GPS receiver.
- Trip computer application: display of trip data (speed, revolutions, gear, mileage, time, consumption, cost, remaining range, etc.), recording trip data in the log, log viewer with data grouping, adjusting the accuracy of mileage and fuel level in the tank, and etc.
- Motor application: reading, displaying, decoding engine errors, resetting ABS automatic transmission SRS errors, manual and automatic control of engine fans, idle speed control when the car is stationary.
- Other applications: file manager, text viewers, calculator, browser and many others.
- Switch between all running applications using the Mode (Menu) button.
- Ability to change the design style, preview the changes made.
- All main menu settings in one window with tabs.
- Saving all user settings (including design) when switching to a new version.
- Steering column switch support.
Installation, update, removal, disaster recovery:
Installation
1. Unpack the archive into the root of a USB flash drive or SD card (Install folder). 2. Exit to the MMS desktop. Run the file InstallInstall.exe (white label) from a USB flash drive (SD card). When installing on a clean MMC, there will be a reboot, then the installation will continue. 3. To install the MMC to the internal memory, click Install. To install to an SD card, click Cancel, then click Install. 4. Select drivers for the USB devices you are using and click Install. If there is nothing, click Cancel. 5. Select the MMC type. 2190 - MMS standard installed on Granta, 2192 - MMS standard installed on Kalina / Priora. For MMC with standard navigation, select the type with navigation.
Video
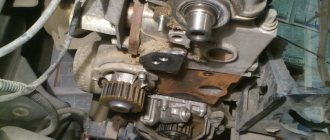
Another option for installing a rear view camera in the Lada Granta bumper, with wiring on the floor and through the instrument panel:
Did you find the article useful and interesting? Be sure to share it on social networks and join our groups to be the first to receive even more information.
Other useful articles on Grant are already on our website in a special section.
The article uses photos from the Lada Granta Liftback White Cloud logbook.
Whether or not to install a reversing camera is up to each driver to decide for himself. In this article we will tell you how to connect a rear view camera, and it’s up to you to decide whether you need it or not. Connecting a rear view camera requires some knowledge and skills, so not everyone can do it themselves. But if you still decide that installing a standard rear view camera is necessary for you, then use the tips from this article. With a small set of tools and basic removal skills, you can easily figure out how to connect a rear view camera.
Side mirrors, and even your head turned 180°, will not give the desired effect; you may still not notice some little things, or maybe not little things. And then a showdown with the owner of the scratched car may begin, and this can cost you tens of times more than connecting a reverse camera. Later in the article we will look at which camera you can choose, whether a Chinese manufacturer is right for you, or whether you prefer something more solid. We will also discuss whether it is possible to install a rear view camera yourself, and how to properly connect the device you have chosen.
That's actually the whole process of preparing for the firmware!
After the firmware on the MMS Lada Granta is completed, a new desktop will appear, and in particular the Wince desktop. It is those four files that were copied separately to the root directory of the SD card that are responsible for displaying the interface of this desktop.
The next step is to configure the new software on the standard multimedia Lada Granta. To do this, you need to click the Start button, and then proceed based on this path: StartSettingControl Panel.
In some cases, at this stage, delays were noticed in opening the control panel, which disappeared after a forced reboot of the mms.
In the panel that opens, click on the Stylus/Calibration icon. Thus, the user of the new software is given the opportunity to calibrate the response accuracy of the touch display.
This procedure is best carried out using a stylus. At the end of calibration, a timer will appear on the monitor; without waiting for the countdown to complete, you must click on the screen.
Now the time has come for the forced reboot mentioned above. Long pressing the volume key (at least 10 seconds) will force the mms to reboot. At the time of reboot, the removable media with the new software must remain in MMS Lada Granta.
After the reboot, the standard menu will be displayed, followed by the altmenu, as it was in the process of preparing for the firmware procedure. You can get to the standard menu by pressing the “standard” key.
The reboot must take place with the Globalsat BU-353S4 GPS receiver connected via the DNS ATH-08 USB splitter. If it is not connected, after the software reboot is complete, the standard menu will load.
User settings, and in particular radio, sound and video settings, are an integral part of any multimedia system. NewMenu V7.391Nitro requires manual installation of the module for setting these parameters, and for this you need:
• Go to the soft/radio folder; • Run the start.exe file.
This procedure will allow you to associate the files located there, namely files with extensions like .exe and .ahk. This step in setting up the firmware MMS is very important for achieving stable operation with multimedia files, as well as setting the equalizer when listening to the radio.
How to choose a camera
The modern electronics market, and especially China, is overcrowded with a variety of cameras, and this makes choosing the right thing more complicated. In order to make your work easier, decide on your priorities, what worries you more – price or quality. Not everyone needs high-definition cameras, or cameras that can show even in low light. For some drivers, an inexpensive rear view camera for the radio is enough.
What parameters should you pay attention to if you decide to purchase a higher quality product, then in this case there are at least five points that need to be taken into account when purchasing:
- What resolution does the camera record in? The higher the video resolution, the better the recording quality. And high image clarity is not always needed.
- The next point is the camera’s sensitivity to lighting. With cheaper models, low-light recording quality can be very poor. Therefore, if, due to circumstances, you often use a car in the dark, then this point is worth paying attention to.
- If, before purchasing, you have already decided where to install the rear view camera, then you need to pay attention to the installation method of this particular model.
- The next point is this viewing angle that the camera lens captures. Usually it is in the range from 120 to 180 degrees. It is better to take something in between these two indicators, so that you have a good view of the rear view, but do not have a panorama, because it distorts reality.
- Selecting the monitor on which the camera will display the image. But if you already have a radio with a screen in your car, then you just need to think about how to connect the rear view camera to the radio.
How to set up "GPS" on the firmware version of the multimedia?
Carrying out this action will not take much effort. The procedure involves preliminary switching with the GPS module and consists of the following algorithm of actions:
- go to the corresponding “Tools” menu;
- activating the display keyboard;
- direct module switching;
- route instructions: “\staticstore\dll\232usb.dll”;
- continuously pressing the “OK” key after the prompt regarding driver selection is displayed on the screen.
If the indicated steps are completed correctly, then we proceed to the manipulations of setting up the navigation software. In the program, we select the “COM 5” port and the corresponding speed – 4800 bps.
Upon completion of the entire list of manipulations, we observe the operation of the system. Please pay attention to the presence of the configured Navitel program.
How and where should it be installed
Later in the article we will look at how to install a rear view camera. There is more than enough space in the car to install a video camera, but we need the most advantageous position. The camera eye must have a good view, which is not limited to any parts of the machine. Any camera will reveal its full potential if it is installed in the most advantageous location.
In our case, such a place is a niche above the rear bumper of the car; the camera should be placed in its upper part above the license plate number of the car. What this gives is viewing angles, your car radio will only show the road and not parts of your car. But it must be positioned so that it is not too recessed, but also does not stick out.
The procedure and diagram for connecting the rear view camera
And now in more detail about how to install and connect a rear view camera to a Pioneer radio. Why go to this model, because it is the most common. If we take into account the unsafety of our video camera, and the best view, then its place should still be above the number, outside.
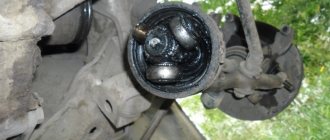
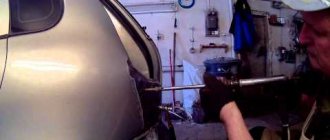
It should be installed closer to the edge to improve visibility, but not so that it is exposed. The installation of the camera itself is not complicated. The camera has the bracket necessary for installation; you only need to drill a couple of holes for the mounting bolts and one hole for the cable.
And then comes the inclusion of the rear view camera in the general electrical network of the car. If you are not strong in electrics, then it is better to turn to car service specialists, but if you have at least basic knowledge, then you will be able to figure it out on your own. So, the order of connection in stages:
- Any camera has two wires, one for transmitting the video signal from the camera to the monitor, and the second wire for power. Since the camera itself has short wires, you will need to extend them so that they are enough from the front panel to the end of the trunk (as a rule, an extension cord for the video signal is included in the kit).
- Where can I get power for my video camera? Usually the camera is connected to the rear lights. Therefore, immediately after reverse gear is engaged, the rear view camera also turns on.
- All wires running throughout the cabin and in the trunk must be secured and hidden. This will help avoid unexpected network breaks while driving.
- If you use a monitor instead of a radio, you will need to find a power source for it as well. If you have a Pioneer multimedia radio, this issue is resolved automatically.
Connecting a reversing camera to a Pioneer radio
Now we will talk specifically about how to configure and connect the reverse camera to the Pioneer radio. There are small nuances here that mislead everyone. We connect the camera to the reversing light, all the power is on the camera, then the wire through which the video signal will go. In Pioneer this is a brown tulip not to be confused with a yellow one. Go to the settings, find the section in the rear view camera menu, set the item to on, and switch the polarity to battery mode.
Our camera is working, you can check this by going to the main menu and selecting the camera icon, but it will not turn on automatically. This can be fixed by connecting the purple wire to the rear light (where the camera is). As a result, when reverse gear is engaged, the light comes on, power is supplied to the camera, and the radio understands that it is necessary to switch to reverse gear.
The entire connection diagram for a rear view video camera is quite simple, and therefore most drivers often cope with installing it themselves. In cars equipped with an automatic transmission, random activation of the rear view camera may occur.
To eliminate this problem, you need to install an additional camera turn-on delay sensor. In each car model, the camera installation may differ, but in small details, the connection principles are similar. The connection process is more complicated for video cameras that transmit a signal via radio, but they have the advantage that several of these cameras can be connected. There are more and more cars on city streets, so a rear view camera is already a necessity. It will not only help you park correctly, but will also preserve evidence of your innocence in the event of a collision.
Often, a reversing camera is installed after purchasing a new radio; for this case, we have an article “how to connect a radio” in which you will learn about adapters, adapter frames and much more.
Device selection
When choosing a view camera for the Lada Liftback, you need to consider the following characteristics:
Where and how to install
The video system installation procedure includes the following steps:
- Choosing a place to fix the monitor. If the owner does not want to display information on the radio, use a folded monitor installed in a random area. The head unit is mounted in the trunk.
- Preparing tools. To install the camera you will need screwdrivers with different heads, sockets with cables and standard adapters.
- Dismantling works. Before installing the camera on the Lada sedan, remove the door sills on the left side, fold the rear seats and remove the trunk trim.
- Wiring. Cables from the central part of the console to the trunk are pulled through the standard place of the radio, the lower part of the dashboard, sills and rear door pillars.
- Parking sensor fixation. You can install the camera on the spoiler; this is done by drilling a hole. The video sensor can also be installed on the license plate.
How to connect
After the camera is installed on the Lada Liftback, you need to make a connection. This is done like this:
- the black cable in the trunk is connected to ground;
- the red wire is connected to the reversing light;
- a standard ISO connector is connected to the radio (a “tulip” is pre-installed on the connector);
- The outer contact of the connector is connected to pin 16, the inner one to terminal 19.
If the car has a built-in multimedia system, no auxiliary work needs to be performed at the connection stage. If the MMC is not included in the package, you need to additionally connect the wire from reverse to the first contact of the car radio connector.
How is the firmware for MMC 2190 performed on a Lada Granta?
How is the firmware installed for the MMC 2190 Grant? This question is asked by many car enthusiasts. Lada Granta is a modern domestically produced car; it differs significantly from previous models offered to VAZ car owners. This is a reliable car that belongs to the budget class. The interior equipment deserves attention. Unlike previous VAZ models, the Lada Granta Lux is equipped with a multimedia system that is not inferior to foreign cars. There are several models of MMC Lada, so you can purchase the most suitable option. The multimedia system is equipped with TouchScreen. Much attention should be paid to catalog numbers. The Lada Granta MMC runs under the Windows CE 6 operating system, which is designed for devices that have maximum memory. But the operation of a multimedia system is not always ideal. In this case, the firmware for MMC 2190 Grant will eliminate some problems.
Settings
The standard multimedia system does not require firmware. It is enough to launch the rear video review function using a special program. If the car owner installed the view camera with his own hands, you will have to perform the following steps:
- The CAM on/off program is downloaded to a USB flash drive by connecting to a computer. The drive is inserted into the USB connector of the radio.
- On the car radio screen, press the “Settings” button, and then go to the desktop. This provides the user with access to the WinCE operating system.
- Going to the “My devices” folder, find the “USB drive” item. By pressing the select button you go to the folder with the program.
- Run the installation file, allowing the use of the camera. The settings menu is closed.
- Engage reverse gear and check that the video system is installed correctly. Using the appropriate controls, adjust the required parameters.
If the machine is under warranty, the installation of the video system should be entrusted to specialists.
Cam on off for MMS Kalina 2
Posts: 22 On the forum since: 11/18/15
After all sorts of experiments, it also stopped turning on for me, CAM_ON_OFF did not help. launched the menu from CrazyDron and turned on the camera through the menu - it turned on
Do you continue to use the menu from CrazyDron or did you just turn on the camera using it and return to the standard one?
I just heard that in order for the Russian language to be displayed normally in these altmenus (SingleMenu and NewMenu), you need to flash the version with the Russian locale. and the on-board vehicle will not work without the CAN firmware / It’s not yet ready to change it somehow (there are doubts about the absence of defects in the MMC, for example, for the first 2-3 seconds of a telephone conversation I cannot hear the interlocutor and there is often an ear-piercing squeak when I pick up the phone).
Beginning
Posts: 30 On the forum since: 10/02/15
EA-EKB , Just turned on the camera. I use the regular menu. I once matured into firmware, but then matured back. I really didn't find anything useful. Essentially the same functions. I don’t need a speedometer on the MMC; it’s in the instrument panel. Read errors? Convenient, yes, but you need to flash the channel. And if you sew on the cable, the standard navigation will stop working, and in general you need to buy a GPS antenna. Cityguide is shit, that's why I wanted a different menu so that Navitel would be available. But I found a map of my city that is accurate, and things seemed to be normal.
And there was some problem with Bluetooth on SingleMenu, an error window appears. But NewMenu is not installed at all.
And finally I caught a glitch, flashed the firmware so that the desktop would fall out after a reboot, tried to install NewMenu, and that’s it, since then the desktop has not fallen out :) the firmware no longer helps :) strange firmware. By the way, after this the cam_on_off utility stopped working.
Maybe later I’ll mature again. But for now, everything you need is in stock, and even more, I soldered a light sensor, the reverse gear now does not reset the brightness to maximum.