Setting up sound in a car is a complicated process. Only an experienced acoustics specialist can quickly achieve ideal sound quality. However, with the desire and enough time, even a beginner can cope. Correct tuning implies a balance in which it is impossible to determine the location of the speakers. The sound completely fills the car, appearing as if out of thin air.
Simply put, setting up music in a car involves uniform sound from the front and rear speakers. If there are speakers on the sides of the machine, they should also participate in the final balance. The customizer adjusts the equalizer options, achieving ideal correction with filters and additional parameters. At the same time, the sound setting depends on whether there is a subwoofer in the car.
A subwoofer, or simply subwoofer, is an acoustic system whose task is to convert low-frequency sound waves. The sub gives them sufficient volume and specific resonance. Those same “tut-tut-tut” sounds from the windows of passing cars, which make the alarms go off and the glass rattle, form subwoofers. With their help, heavy bass and powerful special effects appear in all their glory. True, even from particularly zealous neighbors you can quickly get an answer to the question: “Is it possible to listen to music loudly in a car” in particularly colorful terms and more. But that's not what this is about.
With a subwoofer, setting up music in the car involves additional steps to install it. Without a subwoofer, the task becomes a little easier. It is also possible to adjust the sound in the car using a smartphone. We invite you to look at all three options!
Features and differences depending on the manufacturer
Correct setting of the car radio is necessary so that a clear and loud melody is heard from the speakers, the speakers do not distort the sound and no additional noise is heard.
All Pioneer DEH and other 3100 and above models are configurable by changing the position of the joystick. The handle of this part of the device can rotate in all directions and go deeper into the body. This device helps you set up car radios from most companies, use the menu and find the necessary parameters in it.
Setting up the standard radio can be done in other ways. For example, in the Japanese device Clarion CP435L1 there is a hidden menu, which is called up by simultaneously pressing button 6 and turning Tune 10 clicks with the ignition on.
Setting the parameters of each model is prescribed in the instructions, which also describe the device of the radio and the functions of the various buttons.
Demo mode
After purchasing the long-awaited device, the user needs to find out how to reset the settings on the radio from demo mode. In general, it is intended to preview the operation of the device in a store, but this mode is in no way suitable for stable operation. It can, of course, be used, but a constantly blanking screen and scrolling information are unlikely to be enjoyable.
The mode is turned off using the following technology:
- you need to go to the hidden menu and turn off the radio while simultaneously pressing a special button called SRC.
- Move the joystick to the DEMO item and move the arrow to the shutdown mode.
Step-by-step setup
Setting up the radio is described in detail in the 2022 Pioneer DEH-1900UB instruction manual. It will be carried out in this way also when changing the factory settings of other similar devices. The exception will be processor devices, the configuration of which is more difficult.
When changing sound settings, it is important to pay attention to the following indicators:
- low frequency sounds;
- balance of front and rear speakers;
- distribution of the sound signal between the speakers on the right and left sides.
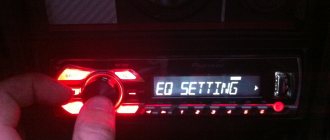
Equalizer
Setting the equalizer on the radio helps improve sound quality, even when using a low-quality speaker system. This device helps regulate the frequency of sound.
The equalizer (EQ) can be found in the menu section called "Audio". At this point, it is not the entire sound range that is regulated, but the required frequency bands (in Pioneer radios there are 5 of them: 8 kHz, 2.5 kHz, 800 Hz, 250 Hz, 80 Hz). The frequency at which the filter gain changes is called the speaker cutoff threshold.
Pioneer car radios provide several options for standard equalizer settings and 2 sets of custom settings that the owner can create himself. Switching between these versions is done from the menu or with the EQ key.
To configure the radio yourself, you need to confirm the selection of the “Equalizer” item in the “Audio” section by pressing the joystick. By turning it, you can select the desired frequency and press the center of the knob again, setting the position in the range from -6 to +6. This will change the volume of the selected frequencies.
The consumer himself determines which sound parameters to set. There are several recommendations that will allow you to make the right choice of characteristics:
- to play rock music, it is better to increase the bass volume (80 Hz) to +2;
- percussion instruments sound good at a frequency of 250 Hz;
- voice transmission parameters are adjustable to 250-800 Hz;
- frequencies for electronic music - 2.5-5 kHz.
After completing the parameter changes, swing the knob to the left to access the main menu.
High pass filter
After this, the music is configured in the HPF menu item, the full name of which is High Pass Filter. It stops sound from the speakers that is higher than the set value to reduce the amount of melody distortion.
If the system does not have a subwoofer, it is better to set the HPF threshold at frequencies of 50-63 Hz. It is recommended to check the result at a volume of 30.
If you have a subwoofer, you can raise the lower threshold to 80-120 Hz and higher without degrading the sound quality.
This will cause the music playback volume to increase.
When adjusting the frequency attenuation rate, it is recommended to select 24 dB per 1 octave.
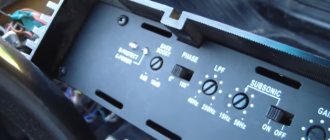
Low pass filter
Using a low-pass filter, you can configure the car radio for a subwoofer in the corresponding menu section.
It provides 3 subwoofer mode values:
- The cutoff frequency of the subwoofer, which can be set at the owner’s request, in the range of 63-100 Hz.
- Speaker volume on a scale from -6 to +6. It is recommended to set the parameter to the same value as when setting the equalizer.
- Slope of frequency attenuation. It is better to choose the value selected in the HPF item (12 or 24 dB).
If the settings are consistent, the high and low frequencies in the melody will be balanced, and the person using the speaker system will not experience discomfort when listening to it.
Radio setup
To set up a radio in a Pioneer radio, you need to select a band, find and save the desired radio stations. This can be done in several ways:
- Automatic search for radio stations. In the main menu you should find the BSM section; in it you can start a search for stations with the highest frequency in the radio range. After this, you need to save it, assigning the button value from 1 to 6 to it. Then the search for stations will continue. In the hidden menu, you can change the search step from 100 kHz to 50 kHz to expand the range of the operation.
- Semi-automatic search for radio stations. If you press the Right key in radio mode, a search for stations will start.
- Manual radio tuning. Pressing the “Right” button on the control panel several times while in radio mode will switch to a frequency. The found station is saved in the device memory.
Equalizer
You might be interested in: If you don’t turn off the iron, what will happen, what are the consequences?
The first thing I would like to consider is the equalizer. It smoothes out music, boosts and lowers bass frequencies, and helps regulate mid-range or high-pitched radio waves. But when adjusting the sound on the radio, an important condition is that at first it is not the entire range that is adjusted, but only some frequency bands. Radio tape recorders differ from each other in these characteristics and can be of five types: 80, 250, 800, 2500, 8000 Hz.
Principle of correspondence
There is no single sound system that would be ideal for every car. The explanation for this fact lies in the need to select a system in accordance with the volume of the cabin. To do this, you need to select speakers not only by size, but also by type. There are two types of speakers: coaxial and full-range. The first type of speakers is more popular due to the division of the playback range into a number of parts. This feature allows you to achieve surround sound. Accordingly, their price is higher than that of their broadband counterparts. It’s not for nothing that these types of speakers are installed in crossovers. The secret to perfect sound inside a car is hidden in such expensive speakers.
What factors affect the sound of a car radio?
Taken together, the quality, volume and clarity of the sound of car acoustics are influenced by many factors:
- The quality and power of the radio.
- Quality and power of speakers.
- The speakers are connected correctly to the radio.
- Interior sound insulation level.
- Tightness of the speaker installation location.
- On-board network voltage.
- Availability of an additional amplifier.
- The presence of a subbuffer.
- Vehicle operating mode.
- The car radio settings are correct.
Since the last point is the main topic of the article, we will return to it later. In the meantime, let’s at least briefly go over other factors that, along with the radio settings, have a direct impact on the sound of the acoustics.
It is unlikely that anyone doubts the statement that the better and more powerful the car radio, the better it will sound. Unlike budget models, which give off the characteristic smell of China, high-quality branded devices are equipped with a more powerful audio frequency amplification chip. The wiring of this microcircuit is also improved, effective cooling, filters, and so on are implemented.
If you suddenly don’t know what the characteristic smell of China is, take any insulated wire and hold it a little over a lit lighter. The smell that you smell is it. Cheap equipment smells almost the same. And this happens because they saved a lot on the filling (the wiring is thinner, the radiator is smaller, there are cheap capacitors, some parts are not on the board at all, although holes and tracks are provided for them), and as a result, everything overheats and stinks.
The quality of the speakers is the same, so there’s no point in describing them. When selecting speakers, you should take into account their rated power and compare it with the power of the radio. At the same time, do not rush to rejoice if the box says that speakers for three kopecks can produce from three hundred to infinity watts. This is a classic marketing ploy. The speakers can and can produce such power, but only for a short time. That’s why it’s called peak. You need to select speakers based on rated power and resistance. The total power of all speakers must be no lower than the power of the radio.
By the way, the cunning Chinese also attribute watts to radio tape recorders, which cannot be there at all. Want to make sure? Carefully open the casing of the car radio and look at the model of the audio amplifier microcircuit (it is usually the largest, on the radiator, and is called the letters TDA). Enter the model into the search and see what power it is capable of at 14 volts.
A very important point is that the speakers are connected correctly to the radio. If they are connected haphazardly, it is almost useless to configure anything.
The better the sound insulation of the cabin, the cleaner, louder and richer the sound of the acoustics. Even simple soundproofing of the front doors can significantly improve sound quality.
Tightness. To understand what we are talking about, we need, for example, a car with reclining rear seats, in which the rear speakers are installed in the shelf, and the rear side faces into the luggage compartment. Turn on music in such a car, and then fold down the rear seats to depressurize the trunk. The sound won't just change. It will become nothing - no bass, no volume, no depth.
And this happens because the speaker “pushes” the sound both forward and backward. And when the front space is not isolated from the back, the same sound frequencies meet and cancel each other out. Therefore, speakers should be installed so that the space behind them is as isolated as possible from the space in front of them.
The power and sound quality of a car radio directly depends on the voltage of the on-board network. If it is underestimated or sags under load, the sound will deteriorate, distortion, wheezing, clipping, and so on may appear.
An additional amplifier greatly improves the car's sound system. One well-known car blogger even once proved that it is better to buy an inexpensive amplifier on a flash drive than a not-so-cheap radio. Together they will work even better (if all other factors contribute to this).
A subbuffer allows you to enhance the sounds of low frequencies, that is, bass. However, it should be understood that for its operation you will need an additional amplifier, a low-pass filter and sufficient on-board voltage without sags.
The sound of the radio is greatly influenced by the operating mode of the car. Now we will list them in the order in which they make the sound worse and worse. The acoustics sound best when the car is stationary, with the engine turned off, the windows closed, and no people in the cabin.
Sound deteriorates due to:
- Engine running.
- Noisy tires and suspension while driving.
- Open windows.
- People in the cabin absorbing sound waves (the more passengers, the worse the sound).
If all the described factors contribute to the high-quality sound of the acoustics in the car, then all that remains is to configure the radio correctly. This is what we will do next.
Principle of correspondence
There is no single sound system that would be ideal for every car. The explanation for this fact lies in the need to select a system in accordance with the volume of the cabin. To do this, you need to select speakers not only by size, but also by type. There are two types of speakers: coaxial and full-range. The first type of speakers is more popular due to the division of the playback range into a number of parts. This feature allows you to achieve surround sound. Accordingly, their price is higher than that of their broadband counterparts. It’s not for nothing that these types of speakers are installed in crossovers. The secret to perfect sound inside a car is hidden in such expensive speakers.
Front and rear speakers
The next step is setting up the rear speakers. This must be done so that they work synchronously with the front ones.
Considering that the driver sits in the front of the car, the car radio equalizer should be adjusted so that the rear speakers work with a slight delay.
Ideally, this should be done by an audio system installer. If you installed the radio yourself, you can achieve clear sound by adjusting the parameters experimentally.
Level three. Upgrade without replacing the standard head unit
If all these “flowers” with speakers seem frivolous to you, it’s time to move on to the “berries” - touching on the amplification part of the system. The main problem that has to be solved in this case is where to get the original uncorrected linear signal from which to start building a new audio system.
In fact, you won't find it anywhere just like that. And there is simply no single recipe for all cars; in any case, you will have to turn to professionals who specialize in “voicing” cars. By and large, it all comes down to four options.
The first option is to “pull out” the linear signal from the electronic bowels of the head unit. For many models, this process, by the way, is well established, and for a relatively small amount your standard head unit will acquire a tail with RCA connectors on the rear side.
In many head units it is not difficult to get a line signal. Sometimes, however, its level is low, and in order not to pick up interference on the way to the amplifier, you have to add a small output buffer. But for an experienced master this does not cause any particular difficulties.
The second option has to be used when it is not possible to display “linear lines”. In this case, we leave the standard amplifier in the system, decisively disconnect the standard speakers from it and connect its outputs to the inputs of the new amplifier. The only requirement for the latter is the presence of so-called high-level inputs.
High-level inputs are a feature exclusively of car audio equipment; at home, it would hardly occur to anyone to connect one amplifier after another. In a car this is a necessary measure, and although technically it is not very elegant, it still makes sense. After all, it is no longer low-impedance speakers that will be connected to the standard amplifier. Its output stages will operate in a completely different mode, with lower currents, so the signal quality will be somewhat different. In any case, you will get better sound than in the state.
But this option is also not always applicable. A little higher, I already said that many systems introduce intentional signal correction. In this case, there is no point in simply passing the “crooked” signal from the standard amplifier to a new one. And if the standard system has channel-by-channel amplification, then you won’t even find a curved signal - only frequency “cuts”.
For such cases, there is a third option, using a digital processor like Audison bit One, Audison bit Ten, Helix DSP, etc. The trick of these devices is that they can combine the original audio signal from these separate frequency pieces, remove the correction (or rather , adjust the signal “in the opposite direction”) and send such a restored signal to a new amplifier. In the right hands, by the way, it’s quite an effective thing.
Typically, automotive processors are configured from a laptop or tablet
Well, the fourth option is applicable in cars in which the standard system is built using the MOST bus (Media Oriented Systems Transport). By the way, there are quite a few of them these days. The peculiarity of the MOST structure is that all devices (source, amplifiers, monitors, changers, etc.) are united by a single digital bus through which data circulates around the ring. It is impossible to take and remove anything from such a system; the data transfer is interrupted and everything simply stops working.
Despite the apparent complexity at first glance, this option is actually one of the most convenient for installing a new system. All you need is a MOST adapter. It is included in the MOST ring as another device, pulls the digital audio signal out of the bus and gives it to us “on a silver platter” - in the form of the usual SPDIF.
If the standard audio system uses a MOST bus, then using an adapter allows you to get SPDIF without surgical intervention in the head unit or wiring
And then we can do whatever our heart desires with it - from an economical “processor + amplifier in one package” solution (MD.Lab AM-60.6DSP, Audison Prima AP8.9 bit, Helix P SIX DSP, etc.) and to extravagant systems with an external DAC and other audiophile tricks.
Subwoofer
This device allows you to enjoy low frequencies. If this element of the audio system is missing or is of low quality, then you can forget about high-quality car audio.
The selection of the device in question should be based on:
- overall dimensions;
- design features;
- Frequency response of the integrated speaker.
Experts call the optimal location for a subwoofer in the car interior to be in the center front. However, in small car models such positioning is impossible for a number of reasons. Therefore, this equipment is mounted where the design features of the car body allow.
The most common option is to place the subwoofer in the trunk of a car with the device facing forward. However, in such a situation, bass sounds may suffer, especially if there is a significant distance from the speaker to the wall of the luggage compartment. So, in a coupe or sedan with such a subwoofer arrangement, the sound wave often reverses phase as soon as it reaches the partition.
There is a similar placement of the “woofer”, only with the speaker directed backwards
Such positioning of such an important component of the audio system is justified only in cases where you own a vehicle in the back of a hatchback or van. As for sedans and coupes, the effect described earlier will be present.
Placing the subwoofer flush with the floor of the cabin has its advantages. In this situation, the bottom of the luggage compartment functions as an acoustic screen, and therefore low frequencies receive additional energy and sound very decent. In addition, this positioning of the subwoofer is suitable for absolutely all vehicles.
A subwoofer mounted on the rear parcel shelf is well suited for the sound system of a sedan and coupe. However, the strength of the device’s deck is very important here, since it must withstand not only the pressure of sound waves, but also the weight of the equipment.
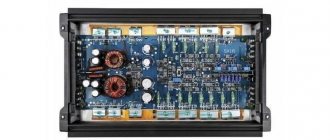
Amplifier
High-quality car sound tuning is impossible without a powerful amplifier. Therefore, when purchasing equipment, you need to consider the following nuances.
The power reserve ensures good sound quality, as it eliminates background noise and nonlinear sound distortion that occurs due to overloads. There is no such thing as too much power, but this parameter should not be confused with sound strength, especially considering that high-quality sound does not mean high volume.
Peak drive voltage or same volume. In this case, it seems that the higher the indicator, the better. But many people forget that vibrations of over a hundred decibels create severe pressure on the eardrums, causing migraines and headaches, as well as partial hearing loss. Therefore, experts recommend choosing models whose characteristics vary between 90-95 dB.
The amplitude-frequency response throughout the entire audio range (20 - 20,000 Hz) should remain linear, completely eliminating noticeable rises and/or dips. In this regard, a technique with a range extended to 32 kHz is more preferable. However, the linearity of the frequency response is still more critical, since the human ear can rarely perceive above 18 kHz.
Soundproofing issue
Having finally decided on the location for the car audio system, you need to address the issue of noise and vibration insulation. This work will be long, painstaking and exhausting, but without it, the car audio will not be good enough and all your costs for purchasing expensive equipment will be reduced to zero. The point of sound insulation is to remove the interior covering and replace it with a material with sound insulation properties. The thoroughness and completeness of the work determines the sound quality.
When this work is finished, you can install car audio
Particular attention should be paid to carefully attaching the speaker to the body to eliminate the possibility of additional resonance.
Nobody says that it will be easy and inexpensive. Still, making good car audio is a big job, with which even an experienced specialist will spend a long time fiddling around. But the person who really wants something and does everything possible and in his power to achieve it, will definitely be able to achieve what he wants. Your hard work will be fully rewarded, and your car will have the best car audio imaginable.
Third stage
After all the preparatory steps, you can proceed directly to the installation of the system itself. The head unit must be connected to the standard location. As a rule, the power wire is taken from the cigarette lighter or from the ignition switch. It is necessary to install a fuse so that in the event of a power drop, the radio remains intact. The mass of the radio must be in contact with the car body. After this, you need to lay all the speaker cables.
Now, as for the installation locations of the acoustics. As already mentioned, there is only one option from the front - into the door podium. At the rear, you can go into the podium of the rear doors, or you can go into the rear acoustic shelf. Tweeters are usually installed in the windshield pillars. Subwoofer - in the luggage compartment. After the audio system has been completely installed, let's move on to the last stage.
Possible problems
Let's look at the likely problems that may arise during playback. What are the most common reasons why you cannot turn on music in your car via USB, why does it not play?
- The cord is damaged. Examine it carefully, look for mechanical flaws - creases, cracks, torn areas. If the latter are present, the cable will have to be replaced;
- Fault in the columns. To test this point, turn on the radio in the usual way. For example, try turning on the radio. If there is sound, the problem is not with the speakers; if not, the problem is not with USB;
- The car's audio system does not read the flash drive and does not recognize the connected media at all. Check if the flash drive is working.
- The capacity of the flash drive is too large, so the radio is not able to read it, and therefore refuses to turn it on. Try turning on a less capacious flash drive;
- Audio files are not recorded in FAT32 format (for example, in NTFS). The media needs to be formatted and the music recorded again in the required format;
- There are viruses on the flash drive. Connect it to your computer and check it with an antivirus program;
- The car radio is faulty: the USB connector is broken, a wiring or contact has come loose inside, the processor responsible for reading information from storage devices has broken down, etc. In this case, you will need the help of professionals.
We hope our article helped you learn how to play music in your car via USB, and that the information from the last block was not useful. By the way, problems rarely occur with such a connection, and most of them are easily solved. We wish you pleasant trips in the company of your favorite music!