Music for setup and testing
Regardless of what style of music will most often be listened to through the car's audio system, the subwoofer must be configured optimally for all areas that are characterized by a low frequency spectrum. It is divided into two types of low frequencies:
- useful lows - add richness;
- Parasitic lows are not perceptible to the human ear, but are felt on a physical level in the form of mild discomfort.
The setting involves precisely getting rid of or reducing parasitic lows, the frequency of which is from 30 to 40 Hz. They are mainly used in electronic music compositions and are a characteristic feature that should not be removed. Therefore, it is not advisable to use electronic music for tuning. The optimal material for testing would be to use compositions with classical instruments. This will allow you to compare the sound of familiar instruments and determine spurious sound frequencies, since bass lower than 30 Hz is rarely found in classical music.
There are also special programs for tuning speaker systems, tone generators that help configure a car subwoofer as accurately as possible by playing sound in a user-specified frequency range.
Why do you need to set up a subwoofer?
First of all, tuning the acoustics is necessary to enhance the required frequencies and increase the “drive” of the music. Theoretically, this process can be avoided by using factory presets (i.e. settings). However, not everyone is satisfied with their quality. Firstly, the factory does not take into account the features of your car's interior. Secondly, equipment manufacturers are completely unaware of your musical preferences.
Many car owners believe that having a large and powerful subwoofer guarantees excellent music sound quality.
First step: turning on the LPF filter
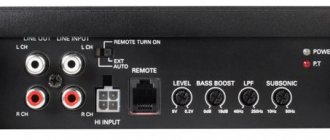
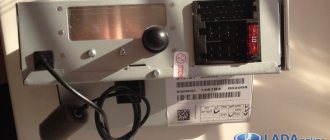
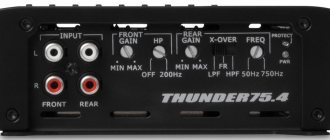
LPF (Low Pass Filter) is a low-pass filter that allows the speakers to play the bass specified during setup, while attenuating the presence of high sound frequencies. It can be located on the car's head unit or amplifier and is designated LPF or LP.
It must be turned on in the low frequency range 50-63 Hz. This parameter will be further adjusted after the settings of the remaining filters have been set. If the LPF filter is located both on the car radio panel and on the subwoofer amplifier, you only need to turn it on on one device. It would be rational to choose a radio, since adjustments on the amplifier are a little more difficult.
Laying wires
Fixing the power cables and supplying audio signals becomes the initial plank during the adjustments made. Before starting installation, you should decide on the initial location for setting up the amplifier: according to the standard rule, the cable should be laid under 300 mm (including the spare part), and the laying itself should be left under the interior trim. At the same time, the wire can be connected to the battery terminals or to the power cable of standard electrical wiring (as an additional option).
A protective fuse must be fixed in the circuit: the installation point must guarantee free access for careful examination or replacement. If, when trying to connect a capacitor, the gasket needs to be directed through the body partition, then it should be routed to non-standard channels. If they are missing, it is recommended to create holes protected with special plastic clips.
Subwoofer wires should not come into direct contact with sharp metal edges, be pinched by sheathing, or be located in areas susceptible to condensation damage.
Grounding
Correctly connecting the ground or negative power wire can be done in parallel with the positive wire setting. To install the cable in question, it is recommended to use special bolts that are in the car (on the body).
The edge of the wire must be supplemented with a special terminal, which is secured as tightly as possible with a nut.
Second step: adjusting the subwoofer speaker frequency
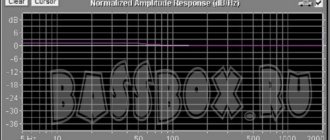
The frequency filter controls the subwoofer's playback frequency. It looks like a gear (phase shifter) with a hole for adjustment with a screwdriver in the center and is designated Subsonic. Adjusting this filter will remove low frequencies that are beyond the audibility range of the human ear and increase the service life of the subwoofer cone by preventing oscillations beyond the limits of capabilities. It is optimal to adjust the frequency five parameters lower than the standard bass reflex frequency of the subwoofer, which is indicated in its technical documents.
How to connect a subwoofer to the car's on-board network
First of all, I would like to clarify the issue of active and passive subwoofers. They connect almost identically, i.e. The amplifier is supplied with power from the battery and a signal from the head unit. How to connect an active subwoofer will be discussed below.
To install a passive subwoofer, you will have to do a little more work, namely, connect the speaker to the amplifier.
To complete the work you will need the following materials and tools:
- wires and other small things (we talked about the requirements for them above);
- nippers and pliers;
- screwdrivers of the required sizes;
- insulating tape;
- clamps for tying and fixing.
Connecting the power wire
First we lay the power wire. It is connected to the battery, but must be disconnected during installation. The positive power cable must be protected with a fuse, placing it as close to the battery as possible.
The power wires from the battery to the amplifier must be laid in such a way as to prevent the possibility of accidental damage. Inside the cabin, the wires are pulled along the threshold or, if the wire has a large cross-section, under the rug. In the engine compartment, find a suitable routing route and secure the wires by fastening them with clamps to the electrical wiring harnesses and body parts. After completing this stage, we should have two wires in the trunk: power, which is protected by a fuse, and ground from the body.
If you install the tips for connecting to the battery and amplifier yourself, do it as follows. Carefully strip the insulation from the wire to the length of the ferrule sleeve. Carefully clean the exposed end of the conductor until it shines. If the wires are not tinned, tin them with a soldering iron. Next, insert the wire into the ferrule sleeve and crimp it carefully. You can heat the tip with a gas or alcohol burner. This will ensure that the wire is soldered to the sleeve (due to the solder that we applied to the wire) for more reliable electrical contact. After this, a cambric or heat-shrinkable tube is put on the sleeve. This is done before installing the tip.
Connecting the subwoofer to the radio
Power is supplied to the amplifier through separate wires. In order for it to turn on together with the radio, a special input is provided for the control plus. Usually this is a blue wire in the harness, labeled remote or ant. This can be seen more clearly by studying.
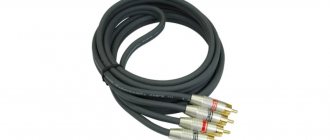
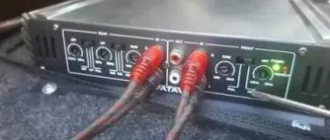
To connect interconnect wires, the radio usually has two “tulips” marked SW.
If we have a passive subwoofer, the last thing we need to do is connect it to an amplifier.
Below is a diagram illustrating the connection procedure.
Connecting an active subwoofer
As we have already said in the comparison of active and passive subwoofers, an active one combines an amplifier and a passive subwoofer. Installing such a system is even easier - you don’t need to think about how to connect the subwoofer to the amplifier, it is already connected to the speaker inside the active subwoofer’s housing. Otherwise, the installation process is no different from the “amplifier - passive subwoofer” system.
When purchasing an active sub, check the standard wires that are included in the kit. They may not meet the requirements for cross-section and material from which they are made. By replacing them in accordance with the recommendations outlined above, you can significantly improve the quality and volume of playback.
If you are not going to change the wires from the kit, or you already have them laid throughout the car interior, install a capacitor for the subwoofer, it will neutralize power losses, which will have a positive effect on the sound quality.
Active subwoofer connection diagram
How to improve bass quality? – You probably know that an installed subwoofer, if configured correctly, will play many times better. But for this you need to know which adjustments are responsible for what, for this we advise you to read the article on how to set up a subwoofer in a car, in it you will find specific recommendations for improving the quality of the bass
Third step: adjust output sensitivity
The output sensitivity adjustment filter also looks like a wheel for scrolling with a screwdriver and is designated “GAIN” or “LEVEL”.
There is a misconception that this parameter is responsible for the volume of the subwoofer, in fact this is not the case, even though when set to the upper positions the volume does increase. This filter is responsible for the coordinated operation of the head unit and subwoofer, and is configured using a specific method that has four simple steps:
- set the controls on the radio and amplifier to minimum and the sound signal will sound to check;
- the volume gradually increases until the first distortions in the sound appear, after which it returns to the last position at which there was a clear sound;
- then the regulator on the amplifier rotates upward until the first sound distortions appear;
- as soon as distortions appear, the regulator returns to the extreme position at which they did not exist.
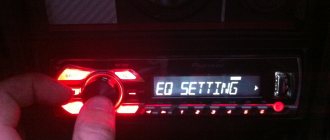
Equalizer
An equalizer allows you to make the sound more even - raise or lower the bass, mid and high frequencies. This is a rather fine adjustment of the audio system. It is not the entire sound range that is regulated at once, as in other menu items, but specific frequency bands. Different models have different numbers of them, depending on the class of equipment. There are five of them in Pioneer radios: 80 Hz, 250 Hz, 800 Hz, 2.5 kHz and 8 kHz.
The equalizer is located in the “Audio” section of the settings menu, EQ item. In it you can select one of the preset standard settings. For those who are not satisfied with these options, there are two sets of user settings (Custom). You can switch between them both from the menu and the EQ button next to the joystick. To make changes to frequency parameters in a custom setting, you need to select it with the wheel and press the joystick. Then turn the wheel to select one of the equalizer frequency bands. Press the joystick again and set the position from -6 (attenuate frequency) to +6 (increase). By doing this you can make some frequencies louder and others quieter.
There is no universal recipe for setting the equalizer on the radio. It is performed by ear depending on the preferences of the consumer. In addition, different adjustment options are selected for a specific genre of music.
We can only give rough recommendations:
- if heavy music is played, it is worth increasing the bass - 80 Hz (but not too much, +2–+3 is enough). Percussion instruments sound around 250 Hz;
- for music with vocals, frequencies of approximately 250-800+ Hz are needed (male voices are lower, female voices are higher);
- for electronic music you will need high frequencies - 2.5-5 kHz.
Setting the equalizer is a very important step. Using this tool, you can improve the sound quality many times over. Even if the acoustics are not very expensive and of high quality.
Fourth step: adjusting the acoustic phase
In order for the bass to sound in harmony with the other frequencies protruding from the front speakers and at the same time there is no perceived separation on the sides of the car, you need to correctly adjust the acoustic phase. This parameter is adjusted according to the driver’s personal feelings and is regulated by the Acoustic phase phase shifter, which is located on the front panel of the amplifier. You should gradually rotate the filter adjustment phase shifter clockwise until the front speakers and subwoofer begin to play in the same plane/acoustic phase (there will be no sensation of separate bass output from the rear). To check compositions, you need to listen to them in the driver's seat, where the sound separation is always more noticeable.
Watch the setup video:
Audio system differences
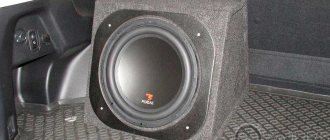
As you may have guessed, a subwoofer is a dynamic head that emits low-frequency sound vibrations. In simple terms – a sub-bass speaker. I now propose to dwell in more detail on the acoustic design. All 4 types of speaker installations are found in a car.
- Closed box. Gives the most dense bass, requires significant amplifier power.
- Bass reflex. It has a fairly high output due to the presence of a bass reflex tunnel. That is, oscillations from the rear side at a certain frequency become in-phase oscillations from the front of the speaker, helping it put pressure on our exhausted ears. Bass is softer.
- A strip-type box, or bandpass. It is convenient because it has minimal dimensions and maximum sound pressure. It is quite difficult to make on your own; the sound can turn out somewhat mumbling and “smeared”. But the speaker is not visible from the outside and cannot be damaged when using the trunk for its intended purpose.
- Endless acoustic screen, or free air. Considering the impressive size of the car’s trunk (we’re not talking about the Daewoo Matiz, are we?), the volume of the luggage compartment for the speaker can be considered free, that is, infinite. This installation method allows you to get the most natural bass and is suitable for sedans with a rigid rear parcel shelf. Aesthetes can even mount the sub with the basket facing up so that the full power of the sound installation can be seen under the glass. Audiobahn and Native American products look especially beautiful when turned upside down.
From this video you will learn how to set up a subbuffer in your car. Enjoy your viewing!
Fifth step: adjusting the frequency junction
The final stage of setup is to adjust the sound of the midbass and subwoofer to a harmonious, comprehensive sound of music. During the preliminary setup, the LPF parameters were already set, which may have a difference with the low frequencies of the front speakers. Because of this, noticeable gaps may occur during playback. For example, if the LPF was set to 50 Hz, and the front speakers are running at 100 Hz, the sound will occur with a frequency dip in the range from 51 to 99 Hz. This does not mean that the filter will cut them off completely. It only smoothly reduces the sound of frequencies lying outside the specified parameter, and does not cut them out completely, but it is still too noticeable to the ear. To eliminate this effect, additional correction should be made using the LPF filter parameter. To do this you need:
- Play music rich in low frequencies through the speaker system.
- Turn the filter phase shifter several positions counterclockwise. This adjustment evens out the sound.
- If the dips are still noticeable. then the filter phase shifter rotates three phases in a clockwise direction.
Setting delays
The next step in setting up a subwoofer in a car is setting the delays. But this is only possible on a processor head unit or with an external processor. Some acoustic designs, such as FI, do not always have good impulse response, so the bass may be a little late. This is not always pleasant to hear.
For example, the front speakers played a note, and a split second later the sub played. To prevent this, the delays are adjusted, which allows the front speakers and subwoofer to play simultaneously.
Tips for setting up a subwoofer
- Haste and proper setup of the speaker system are incompatible things. You should set aside several hours of free time for high-quality setup.
- It is best to check the sound on known or favorite tracks, where you can definitely distinguish the correct sound from the distorted one.
- To check the tracks, you should listen to them with the doors and windows closed in the driver's seat, this way you can catch the slightest defects.
- Do not limit yourself to checking on one track; it would be best to carefully listen to several compositions of different genres and with a different set of sound frequencies.
- There are no specific parameters to which filter metrics need to be set. This article provides only the optimal and most popular parameter settings. It is necessary to configure based on personal taste preferences, monitoring the harmonious sound of the front midbass and subwoofer head.
By adjusting all the filters in this manner, you can achieve a loud subwoofer sound, while it will work harmoniously, without blocking the overall musical tone. This setting is suitable for all musical genres and will help expand the range of their sound.
Turning off Demo mode
Immediately after purchasing and connecting the radio, you should figure out how to disable the demo mode, intended for displaying the device in the store. It is possible to use the radio in this mode, but it is inconvenient, since when you turn it off, the backlight does not go out, and inscriptions with various information run across the display.
Disabling demo mode is very simple:
- We go to the hidden menu by turning off the radio and holding down the SRC button.
- In the menu, turn the wheel to reach the DEMO item.
- Switch demo mode from ON to OFF.
- Exit the menu using the BAND button.
You can also set the date and time in the hidden menu by going to the System section. The time display is switched here (12/24 hour mode). Then open the “Clock Settings” item and turn the wheel to set the time. In the System section there is also a language setting (English/Russian).
Thus, after purchasing a modern Pioneer model, you can easily set up the radio yourself. By correctly adjusting the audio parameters, you can achieve very high-quality sound even from a simple audio system and get a good sound picture at minimal cost.
Bassboost
Bassboost - increases the volume at a certain frequency, usually 40-45 Hz.
When using a bass boost, the chance of burning the subwoofer increases sharply, since clipping occurs much earlier. In most cases, bassboost is not needed and if you are a beginner, then just accept the rule “Don’t touch bassboost!”
Experienced people can use it to increase the frequency response shelf in order to draw out dips in certain frequencies, but these are already deep settings and the effect does not always justify the risk.