Tuning and auto gadgets / From Sergey Vasilenkov
- What can and should be configured in the equipment of this company
- How to setup
Setting up for a subwoofer
- How to set up the radio
- Setting up the equalizer
- Turn on Bluetooth
- How to change language
- Turn off the demo
There is probably no car owner who, after purchasing a new car or a new radio, would not be faced with the need to configure it to obtain better and deeper sound. To do this, it is enough to perform a number of simple manipulations, which we will consider using the example of setting up a radio from Pioneer, which is very popular in Russia.
Why is it necessary to set up a Pioneer radio?
Before moving on to the process of setting up your Pioneer audio recorder, it’s worth understanding why you need to do this:
- This is done in order to maximize the audio capabilities of the head unit and the acoustics installed in the car.
- Knowing the settings will allow you to easily connect various external devices, eliminate wheezing and distortion of the audio composition, as well as change the interface language and other everyday characteristics, the correct configuration of which will make using the device more comfortable and understandable.
Incorrect adjustment of the radio can nullify the sound of even the most expensive and high-quality professional-level acoustics.
What can and should be configured in the equipment of this company
Depending on the model of the audio recorder, the user has the ability to independently adjust parameters such as:
- equalizer;
- radio stations;
- menu language;
- time;
- enable or disable the Bluetooth wireless protocol (if available) and AUX;
- activation/deactivation of demo mode, etc.
Among all that has been said, special attention should be paid to setting the equalizer, as well as the radio, where the first is useful for those who like to listen to their own music, and the second for car owners who prefer radio stations to music from a disk/flash drive. Special adjustments are also required for the subwoofer.
Video: creating a budget combination of car radio + subwoofer for a car
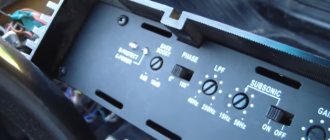
Next, using the twist wheel or the movement arrows (depending on the model), we look for and go to the SW Kontrol item. After this, we find ourselves in the sub-item EAR SP FUL, which must be changed to SW using the arrow or knob, after which we turn off the radio.
After this, it is necessary to further configure the subwoofer, for which we turn on the radio again and go to the preset menu, where we look for and enter the SW SETTING1 item. Once in this submenu, you need to select one of three types of settings: NORMAL, REV and OFF. As practice shows, most users choose REV.
Next, you need to go back to the preset menu and select the SW SETTING2 sub-item, where we first indicate the frequency (recommended value 50 HZ), and then the power level (ranging from -6 to +6). In this case, you should choose the ranges based on the characteristics of the installed speakers and your hearing perception.
The last action in this paragraph is to regulate the loudness of the radio, for which we go to the menu and look for the LOUDNESS item, where we select the HIGH value.
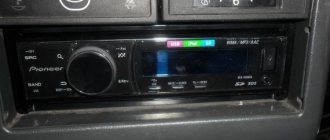
How to set up the radio
There are three types of radio settings in Pioneer radios:
- Press or look for the FUNC button/menu in the menu, and then look for the BSM sub-item, which is responsible for automatically searching for radio stations. The search is activated by pressing the up or right key, after which the first station found will automatically turn on.
- While in receiver mode, which can be accessed by pressing the BAND button, hold down the right key and hold it for several seconds, then release it, thereby starting the process of scanning radio stations. After the station is found, scanning will be paused, after which the user can remember the radio station by pressing and holding the corresponding key - for example, 1. If the station is not needed, press the button to the right again, and the scanning process will continue.
- While in the radio station menu, briefly press the key/joystick to the right or left until the required wave of the radio station is found, then press the button (1–6) to memorize it.
Setting up the subwoofer in the main menu
Now we need the SW SETTING2 menu item - we look for it by rotating the joystick until we see the inscription SW 80 HZ 0. By rotating the control panel knob, we set the frequency value at 50 Hz or another, depending on your personal preferences for quality sound. Having made your choice, rotate the knob further until the number 0 flashes to set the power of the mode (it is set in the range -6 +6), and set it to an acceptable sound power without distortion. Exit the menu using the Band button.
Next, you need to configure the loudness of the radio. To do this, rotate the joystick again until the inscription LOUDNESS lights up with three possible values - low, medium and high. We need the HIGT value - set it and go back to the menu again.
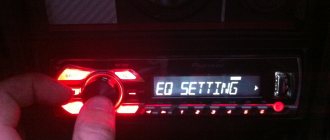
Setting the equalizer on the Pioneer radio
The final touch in setting up the radio is choosing the power and adjusting the equalizer. To do this, look for the EQ SETTING1 menu item and find it along with three status levels: low, medium and high frequency. You can adjust the equalizer settings at your discretion, but it is advisable that the level of low frequencies does not exceed 0-1. By choosing the appropriate frequency sound quality, you get a powerful and rich sound from the audio system in your car.
Setting up the Pioneer MVH 150UB series radio and other Pioneer radio models has similar principles; there may be differences in the number of selectable settings items. Most users of these devices note the great opportunities for individual customization of sound quality and power, high sound quality after setup, as well as an intuitive and easy-to-use control menu. Wide possibilities for playing files of any format are also among the advantages of this brand of radio.
Video: finding radio stations on Pioneer tape recorders
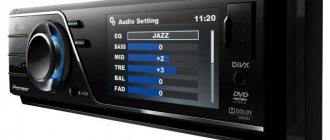
Setting up the equalizer
To configure the equalizer, go to the EQ SETTING1 menu item, where you can set the signal amplitude level for mid, high and low frequencies. In the EQ SETTING2 item, which is also located in the main settings menu, the user can select the center frequency of the signal correction, as well as the width of the adjusted range. All this is available for HF, MF and LF.
To configure the equalizer, go to the corresponding menu
It is necessary to select settings based on the capabilities of the speakers and the personal preferences of the listener.
How to enable AUX
To activate the AUX mode, which is not active by default, you need to turn off the radio, and then turn it on by long pressing the FUNC button, after which we look for the inscription AUX: OFF and use the up/down buttons to select the AUX: ON item.
Equalizer
An equalizer allows you to make the sound more even - raise or lower the bass, mid and high frequencies. This is a rather fine adjustment of the audio system. It is not the entire sound range that is regulated at once, as in other menu items, but specific frequency bands. Different models have different numbers of them, depending on the class of equipment. There are five of them in Pioneer radios: 80 Hz, 250 Hz, 800 Hz, 2.5 kHz and 8 kHz.
The equalizer is located in the “Audio” section of the settings menu, EQ item. In it you can select one of the preset standard settings. For those who are not satisfied with these options, there are two sets of user settings (Custom). You can switch between them both from the menu and the EQ button next to the joystick.
To make changes to frequency parameters in a custom setting, you need to select it with the wheel and press the joystick. Then turn the wheel to select one of the equalizer frequency bands. Press the joystick again and set the position from -6 (attenuate frequency) to +6 (increase). By doing this you can make some frequencies louder and others quieter.
There is no universal recipe for setting the equalizer on the radio. It is performed by ear depending on the preferences of the consumer. In addition, different adjustment options are selected for a specific genre of music.
We can only give rough recommendations:
- if heavy music is played, it is worth increasing the bass - 80 Hz (but not too much, +2–+3 is enough). Percussion instruments sound around 250 Hz;
- for music with vocals, frequencies of approximately 250-800+ Hz are needed (male voices are lower, female voices are higher);
- for electronic music you will need high frequencies - 2.5-5 kHz.
Setting the equalizer is a very important step. Using this tool, you can improve the sound quality many times over. Even if the acoustics are not very expensive and of high quality.
Video: an easy way to make AUX on any car radio with your own hands
https://youtube.com/watch?v=z5MZmJoJimc
Important: entering the function menu can be done by holding down another button, for example, SRC or SOURCE.
Turn on Bluetooth
In order to activate Bluetooth, you need to go to the main settings menu and find the BT AUDIO sub-item there and select ON. After that, turn on Bluetooth on your smartphone/tablet and look for the radio.
After the radio is found, we connect to it, which may require entering the security key - by default “0000”.
How to set the clock
To set the clock, you need to enter the main settings menu, which can be done by turning on the turned off radio by holding down the SRC button or holding down the center button of the joystick. After which we find the CLOCK SET block, where you can set the format and the time itself. There is also a CLOCK OFF block in the menu, by changing the indicator you can enable or disable the time display on the device.
Video: pioneer 4019 clock setting
Also, in some Pioneer radios, you can call up the clock settings menu by simultaneously pressing the CLOCK + FUNC keys or by going to the SYSTEM item and finding the corresponding sub-items CLOCK SET/CLOCK OFF, which is located in the main settings block.
How to change language
To change the settings language, go to the system settings (SYSTEM), located in the main settings block, which may require holding down the SRC or SOURCE buttons. After this, we find the LANGUAGE sub-item, where we select the language we need.
Video: “deep” settings menu + disabling DEMO mode + disabling time
Turn off the demo
To disable the demo mode, turn off the car radio, and then turn it on again by long pressing the SRC button (maybe the SOURCE button), after which we get to the start settings menu, where using the joystick or the right-left buttons we find the DEMO ON sub-item, and then change it parameter to OFF.
How to adjust the bass
To adjust the bass level, you need to switch the rear speakers to subwoofer mode, which is described in detail in subparagraph 1. Also, to obtain richer bass, correct adjustment of low frequencies through the equalizer, as well as activation of the BASS BOOST function, which is disabled by default, can help. To do this, turn off and then turn on the radio using the SRC (SOURCE) button, and go to the preset menu, where we look for the BASS BOOST sub-item, after which we activate it.
Depending on the Pioneer audio recorder used in the car, there may be other parameters, which you can familiarize yourself with by carefully reading the instructions for the device, which is included in the kit or can be downloaded via the Internet.
Low pass filter (subwoofer)
After we have dealt with the speakers, we will configure the radio for the subwoofer. For this we need a low pass filter. With its help, we match the frequencies of the speakers and subwoofer.
The situation looks like this. When we removed the bass from the speakers (set HPF to 80+), we got loud and high-quality sound. The next step is to “dock” the subwoofer to our speakers. To do this, go to the menu, select the audio item, and in it we find the subwoofer control section.
How to turn off
The radio is turned off by pressing the SRC or SOURCE button (but it is worth remembering that another button, for example, FUNC, can be programmed for this function, which directly depends on the model of the radio being used).
Once the radio is fully configured, you can safely enjoy the high-quality and rich sound of the car’s audio system, which will make even long trips more comfortable and enjoyable.
Secrets of automotive alchemy: recipes for creating your own anti-freeze
We independently connect the LED strip in the car
How to connect a subwoofer to a car radio - creating powerful sound
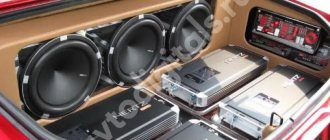
Installing and connecting a subwoofer or subwoofer is not an easy process. Firstly, the subwoofer takes its rightful place due to its large size, and secondly, the connection process itself requires certain skills and knowledge from an auto electrician.
1 Subwoofer - device types
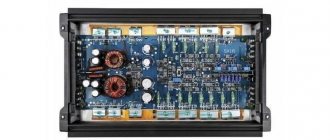
Modern subwoofers are divided into two types. The first is called passive and is a powerful speaker housed in a wooden case. There are no additional devices or systems in this very wooden case, so it is impossible to directly connect the speaker to the standard speaker system, as this will cause a short circuit and destroy the entire system.
Therefore, to install and connect the subwoofer to the main unit, you need to use an additional amplifier, which will receive part of the signal. However, the design features and electronic circuits of some modern car radios require a standard amplifier to which a passive subwoofer can be connected. However, in this case, you need to make sure that the power of the speaker is less than the power of the integrated amplifier.
As for the second type of subwoofers, they have a built-in amplifier, but their price on the market is many times higher. An inexpensive, but also more labor-intensive process is installing and connecting a passive subwoofer.
2 Installation and preparation for connection
Before attempting to connect the subwoofer, it must be installed correctly in the vehicle. To install it yourself, you will need a set of tools, the subwoofer itself and, of course, time. The tools you will need are: zip ties, amplifier, electrical tape, knife, pliers, a set of screwdrivers and wrenches, as well as cables of various sections. Before starting installation, you need to cut off the terminal from the battery.
Installation begins with the installation of the power cable, which is located in the front of the car. As a rule, subwoofers are installed in the trunk so as not to waste space in the cabin. The power cable must be carefully routed from under the hood into the trunk. On some car models this can be done through the access hole in the glove box. Otherwise, it makes sense to drill the hole yourself. On many car models, the positive terminal is red.
Next, you need to install an additional fuse, which will be located next to the battery terminal.
In addition, the part of the positive wire that is located in the engine compartment must be additionally insulated with electrical tape or corrugated tape. For smooth operation, it is recommended to install a special capacitor to avoid voltage surges in the car after connecting the subwoofer to the car stereo system. However, the capacitor connection can be omitted if the amplifier power is less than 350 W. As for the negative wire, it is usually connected to a piece of steel housing secured with a nut or bolt.
3 Connecting a subwoofer to a standard car radio
Every motorist should have a universal device for diagnosing his car.
You can read, reset, analyze all sensors and configure the car’s on-board computer yourself using a special scanner.
Next, you need to disassemble the radio: carefully examine all the outputs and look for red or yellow ones with the inscription SW. Next, the outputs need to be connected to the cables coming from the amplifier, not forgetting to connect the SRC cable separately - a thin subwoofer power cable (most often blue). After connecting the RCA cables - “tulips” - you need to connect them to the corresponding connectors on the amplifier, not forgetting the subwoofer power cord.
Some car owners prefer to connect the cables from the amplifier directly to the battery, in which case the amplifier will receive a constant voltage of 12 volts, but this will lead to premature failure of the battery pack. If your amplifier is a two-channel amplifier, you will need to connect cables from the subwoofer to both channels for optimal power distribution. During the installation process, it is also necessary to correctly position the cables in the cabin, hiding them under the side trim, without pinching or damaging the connections.
There is no need to remove the cover; in some places it is enough to peel it off and secure it in place. Finally, you can connect the removed terminal to the battery and test the system. If you doubt the possibility of connecting the subwoofer to the radio yourself, then it is better to entrust this process to professional auto electricians, who will also help you configure the necessary parameters for the quality operation of the subwoofer and amplifier.
Do you still think that diagnosing a car is a difficult task?
If you're reading this, then you're interested in doing something in the car yourself and really saving money, because you already know that:
- I spend a lot of money on simple computer diagnostics
- To find out the error, you need to contact a specialist
- Simple keys work in the services, but you can’t find a good specialist
And of course you are tired of throwing away money, and the point is not to constantly go to the gas station, then you need a simple CAR SCANNER ELM327, which connects to any car and through a regular smartphone you will always find the problem, pay CHECK and save a lot.
We tested this scanner ourselves on different machines, and it showed excellent results, now we recommend it to EVERYONE! To avoid falling for a Chinese counterfeit, we provide a link to the official AutoScanner website here.