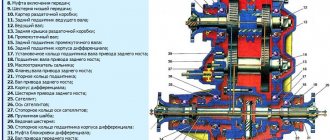
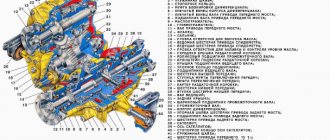
Niva Chevrolet transfer case design: 1 – driven gear; 2 – differential bearings; 3 – spring washer; 4 – retaining ring; 5 – differential lock clutch; 6 – gear ring of the differential housing; 7 – gear ring of the front axle drive shaft; 8 – front axle drive shaft bearing; 9 – oil deflector; 10 – dirt deflector; 11 – front axle drive shaft; 12 – flange; 13 – oil seal; 14 – oil drain plug; 15 – driven gear of the speedometer drive; 16 – speedometer drive drive gear; 17 – hole plug for filling and checking the oil level; 18 – front cover of the transfer case; 19 – roller bearing of the intermediate shaft; 20 – transfer case suspension bracket; 21 – drive shaft bearing cover; 22 – thrust ring of the bearing; 23 – drive shaft bearings; 24 – overdrive gear; 25 – gearshift clutch hub; 26 – gear shift clutch; 27 – transfer case housing; 28 – reduction gear; 29 – low gear bushing; 30 – drive shaft; 31 – back cover; 32 – ball bearing of the intermediate shaft; 33 – intermediate shaft; 34 – differential housing; 35 – thrust washer of the rear axle drive gear; 36 – rear axle drive shaft bearing; 37 – rear axle drive gear; 38 – satellite; 39 – satellite axis; 40 – retaining ring of the satellite axis; 41 – transfer case suspension axis; 42 – spring washer; 43 – front axle drive gear.
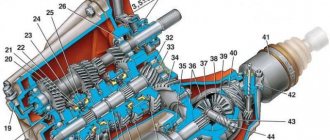
Niva Chevrolet transfer case drive:
1 – differential lock clutch fork; 2 – differential lock clutch; 3 – fork locking bolt; 4 – rod protective cover; 5 – lever spring; 6 – differential lock fork rod; 7 – front axle drive housing cover; 8 – lock washer; 9 – bushing of the lever axis; 10 – lever axis; 11 – differential lock lever; 12 – gear shift fork rod; 13 – control lever fork; 14 – control lever; 15 – differential lock lever rod; 16 – gear shift clutch; 17 – gear clutch fork; 18 – spacer sleeve; 19 – locking ball; 20 – retainer spring bushing; 21 – clamp spring; 22 – switch for the differential lock warning lamp; 23 – axis of the control lever fork; 24 – fork mounting bolt.
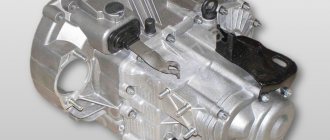
The Chevy Niva transfer case is designed to vary the torque in magnitude and distribute it between the front and rear drive axles. The car is equipped with a two-speed transfer case with a center differential lock. The transfer case is controlled (selecting a higher or lower gear, turning on/off the differential lock) with one lever through a mechanical lever drive.
https://www.youtube.com/watch?v=Vw3kZ3igAZ0
Changing the oil in Niva Chevrolet transfer case
According to the service book, the oil in the transfer case must be replaced every 45,000 km. To change or add oil to the transfer case, you will need a 12mm hexagon, a syringe for filling transmission units, and a container for used oil.
Unscrew the drain plug and drain the oil, then tighten the drain plug and turn out the filler
Using a syringe, fill in fresh oil to the level of the lower edge of the filler hole and tighten the filler plug. This completes the oil change in the Chevrolet Niva transfer case.
Types of reduction gears
As you know, the main purpose of the transmission is to transmit torque from the engine to the drive wheels. At the same time, the transmission not only transmits, but also converts torque. Most drivers know that a manual transmission has low and high gears. Conventionally, 1,2 and 3 can be considered reduced, 4 is considered to be direct transmission, while 5 and 6 are increased.
https://www.youtube.com/watch?v=https:accounts.google.comServiceLogin
Let us immediately note that in relation to SUVs, trucks and various types of equipment, such a conditional division is not enough. The fact is that the gearboxes on such cars have not only “low” and “high” gears, but also so-called downshifts. Next, we'll look at why downshifting is needed, what it is and how it works, and how to use downshifting.
Read in this article
So, let's look at the example of an SUV. In this case, a reduction gear can significantly increase the vehicle's cross-country ability. In simple words, the presence of a downshift allows such a car to drive where cars with a conventional gearbox are not able to overcome the obstacle and continue driving.
To make it clearer, you need to pay attention to the following. Typically, a power unit produces maximum power at a certain number of revolutions. Also, at certain speeds, different from the speed of maximum power, the maximum torque is achieved, which is transmitted through the transmission to the drive wheels.
So, usually gearboxes are designed so that the engine delivers maximum torque and power fairly evenly at different speeds. The first gear allows you to move away, and in this gear the “emphasis” is on maximum torque, while in the 5th gear the car can move at high speed at maximum power speed.
The result is that when you press the gas pedal, the car “buries” its wheels in snow or mud, slips and cannot continue moving. If you switch to second speed or higher, the engine will simply stall, since it does not have enough revolutions and power to overcome the difficult section.
It turns out that in a situation where you need high engine power (high speeds), but also need a smooth ride at low speeds and low wheel speeds, a conventional gearbox is powerless. It is with these features in mind that SUVs receive a transfer case with a low gear.
So, active low gear has a high gear ratio. This allows you to reduce the wheel speed and at the same time spin the engine to maximum power speed. As a result, the car is able to move at low speeds at maximum power speeds. This feature is indispensable on off-road terrain, when driving uphill, on steep descents, etc.
Worm, less often cylindrical and planetary gears are used as reduction gears. The worm gear is one of the gearing gears with intersecting shaft axes. Movement in them is carried out according to the principle of a screw pair. Its main properties are low noise level due to the characteristics of the gearing, relatively low efficiency, small dimensions and large gear ratio.
Compared to a helical gearbox, a worm gear provides better running smoothness. This type of transmission has a much greater potential for increasing torque and reducing rotation speed than gearboxes with other types of gears. Spur gears are used in mechanisms with parallel shafts. This type requires increased accuracy due to design features.
Gear drives are distinguished by their reliability and durability while maintaining the permissible load level; the disadvantages include the fact that at high rotation speeds such a mechanism has a high noise level and also cannot flexibly respond to changing loads. Planetary gears are also a type of gear.
They have gears with movable axles. Such gears are lightweight, easy to assemble, produce less noise compared to conventional gears, and also have the ability to obtain large gear ratios. Disadvantages include a large number of parts, increased requirements for installation and manufacturing accuracy.
https://www.youtube.com/watch?v=ytdeven-GB
It is necessary to stop the car, after which the main gearbox lever is moved to the neutral position, and the additional gearbox lever is moved to the “low gear” position. Then we depress the clutch. Not all transmissions have a separate transfer case. In this case, a regular gearbox has a special lever with which this gear is engaged.
Replacing transfer case shaft seals for Niva Chevrolet
To install new shaft seals for the Chevy Niva, you will need a 24mm wrench, a 12mm hexagon, a syringe for filling transmission units, and a container for used oil.
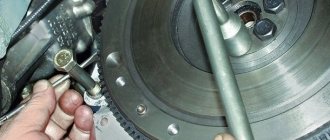
Drain the oil from the transfer case and disconnect the corresponding driveshaft from the transfer case
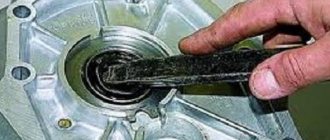
Unscrew the self-locking flange nut, having previously locked the transfer case differential and engaged the gear
Remove the nut and washer and the flange from the shaft
Remove the oil seal using a screwdriver. Apply sealant to the seating surface of the seat in the crankcase under the oil seal, lubricate the working edge of the oil seal with oil and press the oil seal in with a suitable mandrel. Replacement of the Niva Chevrolet transfer case drive oil seal has been completed.
Replacing the suspension cushions of the Niva Chevrolet transfer case
To replace the transfer case cushions on a Chevy Niva, you will need a key 13 and 17. Before starting work, install a support under the transfer case.
Unscrew the nuts securing the cross member of the transfer case rear support to the body
Unscrew the nut and remove the bolt
Remove the cross member (popularly called a helicopter) assembled with the support pad
To replace the cushion, unscrew the two nuts that secure it and, if necessary, also replace the rubber bushings of the cross member
To replace the transfer case side mounting cushion, unscrew the nut of the box mounting axis and the two nuts securing the cushion to the body
Remove the pillow. The second pillow is removed in the same way. Installation of Niva Chevrolet transfer case cushions is carried out in the reverse order of removal.
Lada 4×4 3D 21219 battle panda raptor › Logbook › And so about centering the VAZ-2121 transfer case (3)
Yesterday, a nivavod from our city had a note that after replacing the clutch, the transfer case was not installed correctly for him, I have the same problem, because the transfer case was unscrewed and its fastenings were welded.
I was very interested in this topic, but really, how is it presented? And with the help of Tyrnet, I dug up the information I needed and now, I’m presenting it to you, because the topic is really useful! The method of dynamic centering (balancing) of the VAZ-2121(3) transfer case is described here. The success of the operation (i.e., elimination of vibration and noise) depends not only on the transfer case itself, but also on the condition of the intermediate shaft and universal joints (and their crosspieces), since the complex of all of these components is balanced. It is recommended to carefully check and inject the splines and crosspieces of the universal joints. It also doesn't hurt to pre-balance the wheels. Centering is performed by two people—let’s call the participants “driver” and “mechanic.” The car with the driver rises on a lift. Transfer case lever position: lock off, gear up. The gearbox engages fourth or fifth gear (see below about speed). The mechanic loosens the transfer case (4 nuts). The driver accelerates and, having reached the required speed, gives the go-ahead to the mechanic. Then the driver maintains speed until the mechanic commands. The mechanic, having received the signal, “on the fly” tightens the transfer case fastening and gives the command to complete the operation. That's all in general terms.
And the subtleties of the process are as follows.
1. The speed at which centering is performed may vary. One service recommended that I keep 60 km/h in fourth gear. This makes sense if the machine is used only in the city. In another - 90 km/h in fifth gear. I drive fast, so I prefer 100-110 km/h in fifth.
2. Loosening of the transfer case should be minimal, but sufficient for its mobility. The point of this subtlety is that the transfer case, when centered, is practically in the same horizontal plane as during operation.
3. Before centering, you need to place the transfer case supports so that the studs initially stand in the middle of the oval holes of the supports. This is possible due to the mobility of the splined joints of the cardan shafts. This installation provides maximum freedom for the transfer case to find the optimal position.
4. After gaining speed, the mechanic must push the transfer case several times from the side to the front, from the side to the back, or just from the side - to make it easier for it to find the optimum. But not forward or backward. This can be done, for example, with the handle of a hammer.
Advice - if centering is done at a service center in front of you, it is better not to get behind the wheel yourself, but to control the process from below, that is, to be, according to the role indicated at the beginning of the article, not a driver, but a mechanic or simply an “observer”.
Naturally, it is not at all necessary to have a lift. You can do this in a pit or just a flat area. The best result is obtained by exclusive centering - on stands under the suspension arms with the wheels removed. With this centering, the cardan shafts have the same angles as when the car is moving. Of course, the machine must be securely secured to avoid unnecessary risk. I know of a case where during centering they used stands made from stacks of bricks from which the car simply fell...
For the VAZ-2121, before dynamic centering, it is necessary to set the height of the transfer case by installing spacers under the transfer case supports. Gaskets are rectangular plates of different thicknesses. Their size corresponds to the dimensions of the transfer case supports, and instead of holes there are side cutouts so that the plates can be inserted under the supports without removing them from the studs. The use of washers instead of gaskets is strictly not recommended.
In the intermediate shaft of the VAZ-21213, a CV joint is used instead of a cardan, which allowed the plant to refuse to adjust the position of the transfer case in height. However, if there is noticeable deformation of the bottom in the area where the gearbox and/or transfer case is mounted, and also if the dynamic centering method does not give the desired result, you can try to adjust the position of the transfer case in height, and then repeat the dynamic centering.
Source
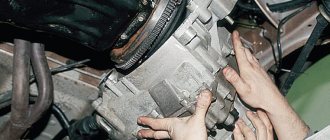
Removal and installation of transfer case Niva Chevrolet
To remove the transfer case from a Chevy Niva you will need a key for 13 and 17, disconnect all driveshafts from the transfer case
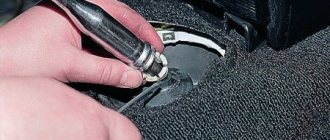
Inside the car, disconnect the transfer case lever cover from the floor tunnel casing and remove the cover together with the lever handle
Remove the rubber cover of the Niva Chevrolet drive shift lever
Unscrew the nuts securing the left side cushion of the box suspension to the body and loosen the nuts securing the remaining cushions
Disconnect the wires from the differential lock warning lamp switch
Place a support under the transfer case, unscrew the remaining nuts securing the cushions and remove the transfer case. Installing the transfer case on a Chevy Niva is performed in the reverse order of removal.