Removing the gearbox from a VAZ 2113, VAZ 2114, VAZ 2115
How to remove the gearbox from a VAZ 2113, VAZ 2114, VAZ 2115?
This question may arise in a number of cases, whether it is replacing a clutch disc , clutch basket , release bearing , or replacing a flywheel crown. And there are many other reasons for the need to remove the gearbox. In this regard, this procedure is included in a separate article. Removing the gearbox is a thorough process and you need to prepare for it properly. You will need: a lift or pit, a set of socket wrenches (sizes: 30, 19, 17, 13, 10), a flat-head screwdriver, a mount…………..
After preparing all of the above, you can proceed directly to removing the gearbox. First of all, remove the terminal from the battery. The air filter will interfere with us, so use a 10mm wrench to unscrew the air filter mount. We disconnect the mass air flow sensor and move the filter to the side, along with the pipe.
It would be enough. Using keys 13 and 17, disconnect the power supply to the starter and unscrew one bolt (indicated by the upper right arrow (the rest will be more convenient to turn from below) securing the starter itself.
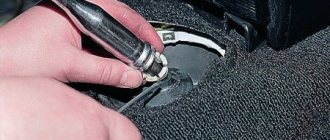
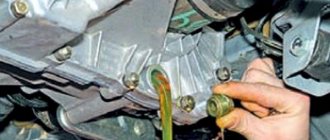
Unscrew the two nuts securing the gearbox to the engine. Use a 17 key to disconnect the clutch cable.
Next, we hang up the car and take off the front wheels. Use a 30mm wrench to unscrew the hub nut, having previously loosened it.
At the same time, it is necessary to keep the brake pedal depressed. And not weakly, because as a rule the hub nuts are tightly tightened. Further actions will take place under the car. The next step is to remove all the protection available under the engine compartment.
If you need to remove the drive, in order to protect against possible leaks, you need to drain the oil, for which you unscrew the bolt-plug with a 17mm wrench. Here we will consider the option without removing the drives from the gearbox. After the engine protection is removed, you need to use a 17mm wrench to unscrew the three bolts securing the crabs.
Using the key again at 17, unscrew the stabilizer mounts.
Using the same key, unscrew the two bolts securing the ball joints.
After carrying out these procedures, you can pull out the drive. To do this, it is necessary to remove the drive from the hubs on each side by simply moving the hub to the side.
Disconnect the reverse switch. Disconnect the speedometer terminal.
Now we remove the starter by unscrewing the remaining two bolts (let me remind you that one bolt on top has already been unscrewed) securing it.
From the rear, on the interior side, a rod approaches the gearbox (the rod comes from the gear shift lever). This rod will be connected to the gearbox rod through a clamp tightened with a bolt and nut size 13. We loosen this clamp and pull the rod off the splines of the rod.
So, using a 10mm wrench, unscrew the three bolts securing the flywheel protection, the so-called crescent.
Unscrew the side airbag fastening. And the rear cushion is attached to two studs. And finally, we unscrew the remaining two bolts (the first bolts, let me remind you, we unscrewed them from the top) securing the gearbox to the engine. After the work has been done, the gearbox can be removed, first by hooking it with a pry bar.
The box must be removed carefully, especially without damaging the petals on the clutch basket with the input shaft. The box has been removed. Its installation is carried out in the reverse order of removal. When the process as a whole is clear, the sequence of some steps can be changed, depending on what is convenient for you. In addition, it should be noted that after installing the box in place, it will be necessary to adjust the travel of the clutch pedal by moving the clutch cable to a certain position using the corresponding nuts.
Source
VESKO-TRANS.RU
AutoNews / Reviews / Tests
VAZ 2115 Replacing the Clutch Without Removing the Box
replacement Clutch VAZ-2115 Do it yourself: detailed notes and repair methods
On a VAZ-2115 car, replacing the clutch is usually carried out if the box is removed. Much easier. work comfortably, nothing interferes. The article describes in detail the process of removing and replacing the secondary gearbox oil seal on a VAZ 2121 and Niva 2131. Replacing the clutch master cylinder on a VAZ 2101-VAZ 2107. But the repair can be performed without removing the gearbox. However, you should try it. the jewelry work remains to be done. But before repairing, make sure that the coupling has failed. Very often a particular gearbox breaks down, and drivers make mistakes with the clutch.
Symptoms of Failure
If the clutch is engaged, this is a clear sign of wear on the friction linings on the disc. This leads to the fact that when the engine speed increases sharply, the speed slows down, as if not all the movements are transmitted to the wheels. The only correct decision. replace clutch . Replacing 2114 VAZ clutches without removing the box. And you can do this without outside help, without resorting to an expensive car service.
Repair tool
You will need the following tools and accessories:
- Clutch kit. disc, output bearing, basket, bolts. Be sure to change the driven disk. The leader (basket) changes less frequently and has a much larger resource.
- Set of wrenches, winding keys, sockets.
- Screwdrivers, pliers, chisels.
- Drain pan out of the box. This will be required in any case, regardless of the replacement method you choose.
- Two nests are better. When removing a drawer, place a second drawer under the tray to keep it level and prevent it from falling.
- Car mounts and wheel covers.
- The presence of an overpass, pit or lift is welcome.
With all these devices you can start repairing. If you are experienced, the entire procedure should take an hour or two. But if you are doing it for the first time, it will take longer.
What to do before removing the gearbox
remove the gearbox for In order to replace the VAZ-2115 clutch yourself, you need to do the following:
- Drain the oil completely. it will destroy the descent of 2 birds with one stone. Firstly, the weight of the box will be less. Secondly, you will not lose lubrication during operation. Pay attention to the mileage of the car that was filled with oil. If it has developed its own resource, change it after installation.
- Remove the left wheel by lifting its side up towards the jack.
- Remove the two ball mounting bolts.
- Remove the pin and unscrew the nut from the tie rod. Replace the clutch slave cylinder from VAZ 2101-VAZ 2107. Remove the tip using a puller.
- Carefully remove the inner left hinge from the hole in the box. To do this, use a chisel and a small hammer.
- Leave the correct disc in place and it should be removed as soon as you begin to remove the box.
- Hang the left handlebar so it doesn't get dirty and get in your way.
- Remove the starter by first disconnecting the negative terminal from the battery.
Replacing the clutch on a VAZ 2114 without a hole
In this video we will look at how to change the clutch
on
VAS
2108. 15
without
a pit, how to set it up, what to pay for.
Removing and installing the gearbox (Part I)
1. Place the vehicle on a lift or inspection ditch. Raise the engine hood and lock it in this position.
2. Disconnect the wire from the “–” terminal of the battery, drain the oil from the gearbox by unscrewing the plug and unscrew the bolt securing the ignition module to the clutch housing.
3. Unscrew the fastening bolts and remove the crankcase protection (see “Removing and installing the engine”).
4. Remove the bolt and disconnect the ground wire from the clutch housing.
5. Loosen the nuts on the end of the clutch cable.
6. Remove the cable end from the clutch lever.
7. Disconnect the block with the wire from the starter traction relay terminal.
8. Unscrew the fastening nut and disconnect the wire from the contact bolt of the starter traction relay.
9. Unscrew the three nuts (the third on the other side of the starter) securing the starter and remove the starter.
10. Loosen the clamp and disconnect the gear shift rod from the joint tip.
11. Disconnect the wiring harness connector from the speed sensor mounted on the top of the transmission housing.
12. Disconnect the wiring harness connector from the reverse light switch.
13. Loosen the nuts securing the braces to the suspension arms.
14. Unscrew the nuts securing the braces to the brackets or remove three bolts each securing the brackets to the body and move the left and right braces apart.
15. Remove the cotter pin from the tie rod ball joint nut to the swing arm.
16. Unscrew the nut securing the steering rod ball joint.
17. Using a puller, press the steering rod ball joint pin out of the strut swing arm. Similarly, disconnect the second steering rod.
18. Remove two bolts and disconnect the ball joints of the suspension arms from the steering knuckles.
19. Using a pry bar, press the shank of one of the internal joints of the front wheel drive out of the gearbox and move the drive to the side.
Source
VAZ 2115 gearbox - how to remove and install
In order to repair a VAZ gearbox, you simply need to remove it. This must be done correctly and carefully, otherwise you can break it completely. Let's talk about how to repair a gearbox.
We remove the VAZ 2115 gearbox
1. We go onto a lift or pit. 2. Raise the hood. 3. Disconnect the battery wires from the starter. 4. Remove the mass from the clutch. 5. Disconnect the lower part of the clutch cable. 6. Unscrew the bolts securing the clutch housing to the engine block. 7. We do the same with the starter mounting nuts. 8. Screw the bracket onto the exhaust manifold mounting stud. 9. Place a cross member on the gutters to hold the engine. 10. We hook it to the bracket. 11. We hang the unit.
12. Remove the mudguard and clutch housing cover. 13. Drain the oil from the gearbox. 14. Remove the reverse light wires.
15. Loosen the clamps and disconnect the frame from the gear shift rod hinge. 16. Unscrew the nut responsible for attaching the gearbox to the engine. 17. Disconnect the ball joints from the steering knuckles. 18. Knock out the hinge from the gear. 19. Fix the gear with a mandrel. 20. Knock out the second hinge. 21. Move the wheel drive shafts to the sides. 22. Unscrew the bolts of the rear suspension support of the power unit. 23. Remove the starter by unscrewing the nut. 24. Place a stand under the gearbox. 25. Release the engine a little and unscrew the lower bolt securing the crankcase to the engine block. 26. Move the gearbox along with the clutch housing away from the engine. 27. Remove the gearbox.
How to remove the gearbox?
The VAZ 2114 and other models of the LADA SAMARA family range are equipped with a five-speed gearbox combined with a differential and final drive. In principle, the box from the VAZ 2114 is no different from the VAZ 2108. The only thing is that the VAZ 2108 does not have a dipstick, and acceleration on it will be faster.
You will need to remove the box to replace the clutch, clutch bearings, and repair the box.
How to remove the gearbox?
To remove the gearbox we will need:
First of all, remove the terminals from the battery and take it out. We drain the oil from the gearbox (How to drain the oil from a gearbox?) and remove the starter (How to remove the starter on a VAZ 2114?). As you work, if you can’t unscrew any fastening or bolt, then don’t forget to use wd-40.
1. Place the car on the overpass (pit) and remove the crankcase protection by unscrewing 3 fasteners.
2. Next we need to remove the clutch cable from the clutch release fork. Then we pull it out of the bracket on the box.
For the purpose of complete understanding for the reader, the slides refer to points 3-19 in order except point 14, where you need to hang the engine.
3. Next you need to remove the wire block from the speed sensor (DS). The block is secured by a spring, so to remove it, compress the spring.
4. Unscrew bolt 1 securing the ignition module bracket to our gearbox. And bolt numbers 2 and 3 shown in the picture.
5. We climb under the car and find the wiring block for the reverse sensor. Let's disconnect it.
6. Then unscrew the 2 bolts securing the torque arm to the box.
7. Loosen the clamp of the transmission gear shift rod. We remove the rod from the gear selection rod hinge by moving it back.
8. Remove the wheel drives. Tie the plug inserted in place of one of the drives with a rope or wire so that it does not fall out when removing the box. The right drive does not need to be completely removed. We disconnect it from the box and hang it in the body, first moving it to the side.
9. So that the box can be removed without additional difficulties, unscrew the two bolts of the left ball joint from the steering knuckle.
10. Unscrew the lower right mount of the gearbox to the engine (number 1 in the figure). The support bracket (number 2 in the figure) is needed from the stud.
11. If necessary, just loosen the fastening of the bracket.
12. Unscrew the 3 fastening bolts, remove the cover (number 1) of the clutch housing (number 2).
13. Unscrew the bolt of the lower left gearbox mounting
14. Hanging the engine using a board or other device
15. Unscrew the nut securing the left power unit support (from the bottom of the car)
16. Unscrew the 2 nuts securing the rear support of the power unit to the body.
17. Unscrew the 2 bolts securing the rear support of the power unit to the gearbox, holding the nuts from turning with a second wrench, and remove the support.
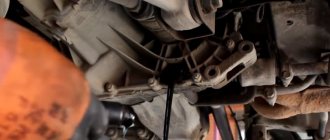
18. Inserting a screwdriver between the clutch housing and the cylinder block, slide the gearbox off the guide bushings. Be sure to hold it while doing this.
19. Move the gearbox as far back as possible, passing the rear cover of the box over the front suspension brace (the input shaft should disengage from the clutch). If the input shaft cannot be disengaged from the clutch, push the engine to the side. Lower the front end of the box and remove it from under the car.
How to install the gearbox?
The gearbox must be installed in the reverse order. After installation, you need to adjust the clutch drive (How to adjust the clutch drive?) and the gearbox lever, and fill in the transmission oil.
How to remove the gearbox on a VAZ 2114?
While operating a car, some car enthusiasts are faced with the same important question, namely: how to remove the box on a VAZ 2114 or on another car of this AvtoVAZ line. The VAZ 2114 gearbox is the same as on the VAZ G8. The only difference is that the VAZ 2108 does not have a dipstick, and it accelerates faster.
The gearbox may need to be removed in a variety of cases, for example, in order to replace the clutch or something in its system, as well as to repair the gearbox itself.
Box removal process
Removing the VAZ 2114 box is quite simple, although there are some peculiarities, so it is still advisable to have an experienced partner next to you for the first time.
Tools
- a set of keys;
- Screwdriver Set;
- WD-40 fluid in case you can’t unscrew some part;
Rust converter WD-40
- container for draining old transmission oil;
- new oil (if the replacement was carried out a long time ago);
- rags;
- board.
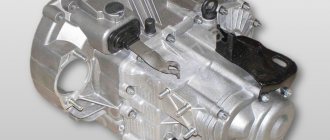
Gearbox VAZ 2114 disassembled
Stages
Since you will have to work under the car, it is better to place the VAZ 2114 car on a pit or overpass; a car lift would be a good solution, otherwise you will have to resort to jacks.
- First you need to remove the terminals and remove the battery.
- Drain the oil from the gearbox into a prepared container by unscrewing the drain plug.
- We remove the starter.
- Remove the clutch cable.
- We disconnect the block with wires from the speed sensor, after compressing the spring.
- We unscrew the bolt attaching the ignition bracket to the gearbox. Then unscrew the remaining bolts.
- Under the car we find and disconnect the block of wires leading to the reverse sensor.
- Unscrew the bolts securing the linkage bracket to the gearbox.
- Having first loosened the gear shift rod clamp, we pull it out, pushing it back.
- We dismantle the wheel drives. You can leave the right one.
- In order for the gearbox to be removed without any complications, unscrew the bolts with which the left ball joint is attached to the steering knuckle.
- We disconnect the lower mount of the gearbox to the engine - sometimes you can get by by simply loosening the tightening of the bracket.
- After unscrewing the bolts, remove the transmission housing cover.
- Unscrew the bolt on the left of the gearbox.
- We carefully and carefully hang the engine using a board or other device.
- At the bottom of the car, unscrew the nut securing the left motor mount.
- We unscrew the two nuts with which the rear motor mount is attached to the body.
- We unscrew the two bolts with which the rear engine support is attached to the transmission (the second key is used to keep the nuts from turning), and remove the support.
- We move the box along the guides.
- This completes the process of removing the box; after completing all the necessary tasks, assembly occurs in the reverse order.
- When you put the box in place, do not forget to adjust the clutch and fill it with new oil.
Removing the gearbox on a VAZ 2115.
It is better to do this work on an inspection ditch or on a lift.
SEQUENCE OF WORK.
First of all, you need to drain the oil from the gearbox. Then remove the engine splash guard and disconnect the drive rod from the gearbox. Disconnect the clutch cable from the gearbox. Disconnect the negative cable terminal from the battery and remove the starter. Disconnect the wiring harness from the reverse light switch. Disconnect the ground wire from the power unit. On vehicles with a 21083 instrument panel, disconnect the speedometer cable from the transmission. On cars with a VAZ-2111 engine, it is also necessary to remove the speed sensor and unscrew the bolt securing the ignition module bracket to the clutch housing with a “13” key. Raise the front of the car and remove the ball joints from the steering knuckles. We remove the internal joint of one of the front wheel drives from the gearbox. To secure the semi-axial gears from falling into the gearbox housing, we insert a technological plug, a piece of hose or a wooden mandrel simulating the internal joint shaft into the gear hole. Then we remove the internal joint of the second drive from the gearbox. And after that we move the wheel drive shafts to the sides.
Using a 10mm wrench, unscrew the three bolts securing the lower cover of the clutch housing...
...and remove the cover. We place a support under the engine and disconnect the left and rear mounts of the power unit.
Then use a 19mm wrench to unscrew the three bolts...
and one nut securing the clutch housing to the cylinder block.
We move the gearbox away from the engine and remove it (this work is best done together with an assistant).
Be careful and remember.
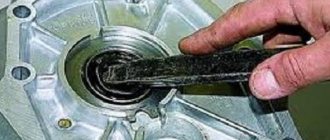
When removing or installing the gearbox, do not rest the input shaft of the gearbox on the clutch pressure spring petals, so as not to damage them.
Before installing the gearbox, apply a thin layer of CV joint-4 lubricant to the splined end of the input shaft.
Install the gearbox in the reverse order of removal operations.
After installing the gearbox, adjust the clutch pedal travel.
Published by alex1950 January 15, 2013, 15:32:46
Source
VoFFsK › Blog › Replacing the clutch of a VAZ 2115 without a pit and a lift.
Good day to all! I’ll tell you about how I changed the clutch on my 15x. I’ve been driving with a dead clutch for about half a year. I’m pretty fed up with the fact that at 3rd speed, if you go to overtake, the car doesn’t listen. starts to accelerate. However, if you accelerate smoothly, 130 goes easily. Closer to the point: Repaired in the village, 2000 rubles. The toad made me give it to the guys at the service center. I changed everything at once, it’s calmer! )) I have an article about the release lever, and KraftTech bought the clutch for 3000 wooden ones. The release lever was included in the kit, but it didn’t inspire confidence. That’s why someone else installed it. I parked the car on level ground, with the handbrake on. I secured it with bricks under the rear wheels. INSTRUCTIONS: Ask your friends about the alignment or input shaft of the gearbox, you can even center the clutch disc from the “classics”. It’s better to do the work in 2m, especially after you throw off the box. I’ve already seen someone like this. Unscrew the hub nut (head 30, knob and pipe). There's a puck there, don't lose it! Let's jack it up. We unscrew the left wheel and remove it. We unscrew the ball joint (part 13). On the right side we unscrew only the hub nut, but not completely. We remove the engine protection, if there is also the left side of the engine boot (k-ch8). We remove the air filter, the battery. We jack up the car higher, put hemp, bricks or SCC blocks under the side members or sills, whichever is given what. I had these blocks. By 2 On each side. This height is enough to completely move under the car. Place a beam or piece of wood on a block or brick so as not to crush the box. We take a jack and a beam, jack up the engine. (This is how it should be!) Lay out an old blanket, climb under the car. Unscrew the rocker clamp (key 13), the gearbox cushion (17). There is also a stretcher from the engine, we also unscrew it. The key is 19. It took us a ton of effort, because it was apparently tightened with great force and without the right drive, but it will interfere. There is also a box boot, from the end of the pallet. There are 3 bolts per 10. Found it? Removed it? Let's continue. We disconnect the speed sensor on the top of the box and another one on the left. We unscrew the clutch cable with a key of 17. We remove it from the fork. We move it to the side. We unscrew the bracket for the front box cushion, on the left. There are 3 nuts. Remove the starter, wire + and red (3 nuts k-ch13). The left drive pulls out of the hub. We unscrew (k-ch13) the fastening of the ignition coil from the box. I removed the coil, for convenience. And one by one we twist the remaining bolts of the box itself, there are only 4, with a 19 head. Next, with an assistant, one from the side of the arch towards you, one from above using a mounting tool or a powerful Use a flat screwdriver to disconnect the box from the engine. It should hang on the drives. You can completely remove the gearbox because The clutch disc will still need to be centered. If you are working on asphalt, place boards and a rag so as not to damage the gearbox. When the box was detached, it hung on the drives and the left tripwire from the crab. To access the basket, pull the box and secure it with an assistant) or something. We see the basket (there are different bolts). Mine was 8. I twisted it with a cap and licked off the heads of 3. I unscrewed it with a hammer, a mat and a chisel. Then I replaced it with an M8 13x15 bolt. We take out the clutch. There should be no sagging petals on the basket, and there should be no severe abrasion in the center from the release bearing. The pressure part should not have chips, scratches, grooves and signs of overheating in the form of a purple-dark blue color. If there is one of these signs, the basket better for replacement. We look at the disk itself. It is very worn if the rivets have already begun to shine on the surface, as was the case with me, or there are no springs. Next, we check the release bearing. It is installed on the input shaft and is held by a spring. You need to bend the whiskers towards yourself and remove it. Check for torsion and play. Let’s not allow too much play in the bearing on the housing. Play in the bearing race is unacceptable! If it is not possible to replace it with a new one, put lithol-type lubricant in it, but do not overdo it. It is better to remove the excess. We put the release lever back. Check the clutch fork boot! Next, we install the disk with the basket, lean everything against the flywheel, place it on the guides and insert the centering device. We attach the basket. It is advisable to tighten it crosswise, but not critically. We screw it to the flywheel with force. Next, with an assistant, we lift the box and guide it, be careful, the gearbox is quite weighty. If the shaft does not immediately fit into the splines, turn the box a little. When the shaft is in, insert the box all the way and tighten the top bolt.
Determining the malfunction and how to fix it
There can be many reasons for the malfunction, but the main ones can be identified independently. You can find out what happened to the box by the following factors:
The reason for the constant noise while driving may be wear of the gears or failure of the bearings. The problem is solved by replacing them. But before the box is removed for further repairs, make sure there is oil. There are times when it just needs to be topped up or replaced.
Inadvertently shifting gears while driving can cause wear on the synchronizer teeth or severe vibration due to damaged rear bearings. Damaged support seals and synchronizers can always be replaced with new ones.
The reason for the gear not engaging may be the following:
A cracking noise when turned on can be caused by an unpressed clutch and a broken synchronizer ring of the VAZ 2115. If a leak is detected, it must be repaired immediately. Typically, oil begins to leak from the drain plug or from a crankcase mount weakened by constant vibration.
VESKO-TRANS.RU
replacement Clutch VAZ-2115 Do it yourself: detailed notes and repair methods
On a VAZ-2115 car, replacing the clutch is usually carried out if the box is removed. Much easier. work comfortably, nothing interferes. The article describes in detail the process of removing and replacing the secondary gearbox oil seal on a VAZ 2121 and Niva 2131. Replacing the clutch master cylinder on a VAZ 2101-VAZ 2107. But the repair can be performed without removing the gearbox. However, you should try it. the jewelry work remains to be done. But before repairing, make sure that the coupling has failed. Very often a particular gearbox breaks down, and drivers make mistakes with the clutch.
Symptoms of Failure
If the clutch is engaged, this is a clear sign of wear on the friction linings on the disc. This leads to the fact that when the engine speed increases sharply, the speed slows down, as if not all the movements are transmitted to the wheels. The only correct decision. replace clutch . Replacing 2114 VAZ clutches without removing the box. And you can do this without outside help, without resorting to an expensive car service.
Repair tool
You will need the following tools and accessories:
- Clutch kit. disc, output bearing, basket, bolts. Be sure to change the driven disk. The leader (basket) changes less frequently and has a much larger resource.
- Set of wrenches, winding keys, sockets.
- Screwdrivers, pliers, chisels.
- Drain pan out of the box. This will be required in any case, regardless of the replacement method you choose.
- Two nests are better. When removing a drawer, place a second drawer under the tray to keep it level and prevent it from falling.
- Car mounts and wheel covers.
- The presence of an overpass, pit or lift is welcome.
How is the box constructed?
All VAZ 2115 cars are equipped with a five-speed manual gearbox, which is paired with a differential. The input shaft consists of a set of 1st-4th gear drive gears and one removable 5th gear gear. All of them are connected to drive gears, which are located on the secondary shaft. They are intended for forward gears only.
Gearbox for VAZ 21115
The control device includes: a shift lever, a ball joint, a set of rods, a mechanism for selecting the gear to be switched for a VAZ 2115 car. This is a separate mechanism located on the clutch housing. Two axles for switching are built into the housing and are connected to a three-arm lever.
Removal and Installation Guide
To conveniently dismantle the box from the car, you need to use a lift or inspection pit. It is extremely inconvenient to carry out work on a flat surface.
Having fixed the VAZ 2115 on the lift, you need to open the hood, remove the terminal from the battery and starter, disconnect the ground and the clutch cable. Next, having unscrewed the clutch and starter mounting bolts, we fix the exhaust manifold of the VAZ 2115 engine with a lifting mechanism bracket.
After installing the engine support safety crossbar, we move on to the bottom of the car. We remove the protection, then dismantle the clutch housing after draining all the oil. We disconnect the reverse sensor, loosen the clamps and remove the rod from the rod joint intended for changing gears. We unscrew the stud mounting the VAZ 2115 engine with the gearbox.
Then we disconnect the steering knuckles from the ball knuckles and carefully remove the axle gear to avoid it getting into the crankcase. Having completed this operation, we knock out the second hinge, while moving the wheels in different directions. If it is not possible to disconnect the wheel drive from the axle shafts, the box is removed as an assembly. Using special equipment, press the hinge out of the axle gear.
When you have everything in a suspended state, unscrew the remaining mounting bolts, having first positioned the hydraulic lift. Lower the engine slightly on the safety cross member and the gearbox will easily come down.
Removing the primary and secondary shafts
It is better to leave it to a specialist to disassemble the box itself and replace worn gears. If you have never done this before, it is better to refrain from experimenting. It is not difficult to disassemble it, but not everyone can assemble it without certain skills. Even experts sometimes make mistakes because of which they have to disassemble everything again.
When the box is repaired, do not forget to fill in special gear oil before installing it on the car. It is much more convenient to pour it on the ground. Oil must be filled strictly according to the level. High-quality oil will ensure uninterrupted operation of the box, while extending its service life for many years.
Installation occurs in complete reverse order. The main thing is not to forget to replace all the old retaining rings and before starting installation, lubricate the outer surface of the clutch sleeve of the bearing that disengages the clutch. After the installation is completed, all that remains is to adjust the clutch pedal travel and the drive that controls the gear shift mechanism.
Always change gears smoothly, fill in high-quality oil and your gearbox will serve trouble-free for many years.
Do-it-yourself repair of VAZ 2108-099, 2110-2112, 2113-2115 gearboxes for the first time (brief instructions)
Problems with the gearbox began last summer, the 2nd speed was difficult to engage, in the spring the gear selector rod seal leaked, then the 3rd speed finally began to crunch when turned on. But the real juice was when you urgently need to go somewhere, and the reverse speed is not ALE!, and when you can go slowly, then with the reverse - everything is fine! Since I do the repairs myself, I decided to do everything myself this time (in the sense of not contacting service stations and other garage technicians), it’s not all that difficult))) We remove and disassemble the box (there are plenty of video instructions on the Internet)
If you take it apart, you need to change all the consumables at once, so you don’t have to go through it again later.
We press out all the bearings and seals from the gearbox housings, remove the satellites, disassemble the secondary shaft, in short, throw everything into the trash. We carry out troubleshooting and find the reasons why our gearbox did not want to work properly. We take old spare parts with us as an example, because VAZs also had parts of different sizes. Don’t forget to take a friend with you and let’s go with him for new parts. We buy everything we need and don’t need, spend all the money we had in our pocket, borrow money from a friend and spend it too. Satisfied, we go to the garage.
What was purchased and replaced:
1. Front bearing of the input shaft 6-42205 A1E1USH1 2. Front bearing of the secondary shaft 6-42305 A1E1USH1 3. Rear bearing of the primary and secondary shaft 4. Differential bearings 5. All 3 BRT engine mounts 6. All 5 oil seals 7. Reverse gear 8 . Sliding clutch for synchronizer 1-2 gears 9. Axle of satellites and satellites 10. Synchronizers 1-4 gears 11. Shift forks 1-2 and 3-4 gears 12. Spring in the gear selection mechanism, which either allowed the reverse gear to be engaged or no 13. Bolts with washers for the rear cover of the 4th gear (for glasses) 14. Locking nuts of the shafts 15. Retaining rings for the 1st-2nd gear synchronizer and the bearing of the first gear gear 16. Gasket for the crankcase and the rear cover of the gearbox 17. Nuts for the speed-locking balls - 2 pcs. 18. Copper washers for these nuts - 4 pcs. 19. Sealant and thread sealant 20. Oil Lukoil TM-4 80W-90 GL-4 (recommended by VAZ)
Before disassembling the gearbox, I watched several videos. Everything is easy and simple, I took it apart, changed it, installed it and went. BUT, there was a small problem during assembly! It turned out that everything was not entirely simple.
So, if the bearings are good, then it’s better not to touch them, since I started looking all over Kharkov for these rings, not every store has them, and if they do, then, as always, they don’t have the required thickness!
A small manual from the encyclopedia for assembling the gearbox:
1. When assembling the gear selector lever and the joint with the gear selector rod, first degrease the threaded holes in the joint body and the lever hub, as well as the mounting mounting bolts. 2. Apply thread sealant to the bolt threads. 3. We press the oil seals of the input shaft, drives and gear selection rod using mandrels or suitable pipe sections. 4. Lubricate the working surface of the oil seals with a thin layer of Litol-24 lubricant. 5. We install an oil seal with a right notch in the clutch housing (for right-hand drive), and an oil seal with a left notch in the gearbox housing (for left-hand drive). The arrows on the oil seal housings must coincide with the direction of rotation of the drives when the vehicle moves forward. 6. When assembling the secondary shaft, we replace the retaining rings of the synchronizer hubs with new ones. We press the outer and inner rings of roller bearings, ball bearings, gears and synchronizer hubs with mandrels or suitable pipe sections. 7. When assembling the hub with the synchronizer sliding clutch, before installing the retainer, apply a little grease to it and put it in the cracker. 8. Using a screwdriver, press the installed synchronizer spring towards the hub and put the block with the lock in place. In this case, the deepest socket should be located opposite the latch in the sliding coupling. 9. When assembling the differential, lubricate the satellites and drive gears with oil. 10. We mount the differential bearings with a preload of 0.25 mm. The tension is ensured by selecting the thickness of the adjusting ring installed in the gearbox housing socket under the outer ring of the differential bearing. 11. Selecting the thickness of the adjusting ring is necessary if replacing one of the following parts: differential box, differential bearing, clutch housing and/or gearbox housing. 12. After installing the differential into the clutch housing, it is necessary to secure one of the drive gears with a mandrel (plug) so that they do not move from their seats during further assembly. 13. Before assembling the gearbox housing with the clutch housing and the rear cover, apply a layer of sealant around the perimeter of the mating surfaces.
Is it true that the box from the VAZ 2115 fits in the VAZ 2109?
Photo source: youtube.com/watch?v=IJDTUwSivHE
Even the best cars sometimes break down, and our beloved “nines” are not immune from this.
A breakdown of the gearbox especially hurts the pocket of a car enthusiast, because a good option for replacing it costs far from a penny. But sometimes it happens that there is money, but there is no good replacement.
There is an opinion that a gearbox from Samara could be a good option for replacing a broken part from a 9, but is this true?
Difference in characteristics
Sometimes it happens that the required part is not on sale, or the quality of those presented does not satisfy the driver’s needs. In the case of replacing a gearbox, you can often hear that VAZ gearboxes are completely interchangeable, you just need to change a few parts, and that’s it – you can install it.
But will the box from 2115 to 2109 actually fit? Before answering this question, you need to compare the characteristics of these boxes. The first thing that catches your eye when considering this option is the difference in torque, namely 120 versus 125, and the amount of lubricant - 3.5 versus 3.4.
Both indicators are higher in Samara, but it seems not critical. Another important aspect is the gear ratios, here you can also see a small difference, especially noticeable when considering the final drive: 3.937 on the nine and 3.7 on the Samara.
In general, the difference when driving is unlikely to be noticeable, even at low speeds.
Disassembling the VAZ 2115 gearbox
Wash the gearbox, preventing water from entering the crankcase, and place it on a disassembly stand. Remove the power unit suspension bracket and the clutch release cable mounting bracket.
Remove the primary and secondary shafts at the same time (
| Rice. 3.13. Removing the gear selector mechanism |
Unscrew the gear selector mounting bolts (
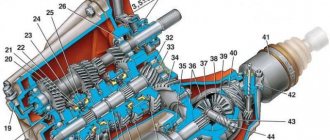
| Rice. 3.14. Secondary shaft parts: 1 – nut; 2 – thrust plate; 3 – sliding clutch of the 5th gear synchronizer; 4 – sliding coupling hub; 5 – synchronizer blocking ring; 6 – 5th gear gear; 7 – distance ring of the needle bearing; 8 – needle bearing; 9 – 5th gear gear bushing; 10 – thrust washer; 11 – ball bearing; 12 – thrust washer; 13 – 4th gear gear bushing; 14 – 4th gear gear; 15 – sliding clutch for synchronizer of 3rd and 4th gears; 16 – sliding clutch hub; 17 – third gear gear; 18 – retaining ring; 19 – thrust half-rings of the secondary shaft; 20 – 2nd gear gear; 21 – sliding clutch for synchronizer of 1st and 2nd gears with reverse gear; 22 – retaining ring of the synchronizer hub; 23 – hub of the sliding clutch for the synchronizer of 1st and 2nd gears; 24 – synchronizer spring; 25 – cracker; 26 – retainer; 27 – 1st gear gear; 28 – roller bearing |
If it is necessary to disassemble the secondary shaft, clamp it in a vice with soft pads and use a universal puller to press the ball bearing from the shaft. The bearing is pressed off the input shaft in the same way. Then remove the driven gears of IV, III, II and I gears and synchronizers assemblies from the secondary shaft in the order indicated on
| Rice. 3.15. Differential assembly: 1 – satellite axis; 2 – retaining ring; 3 – semi-axial gears; 4 – speedometer drive drive gear; 5 – differential box; 6 – satellite; 7 – driven gear of the main drive |
– if it is necessary to replace the driven gear, unscrew the bolts securing it and compress gear 7 (
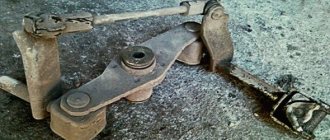
| Rice. 3.16. Details of the gear selection mechanism: 1 – gear selection rod; 2 – gear selection rod lever; 3 – housing of the gear selection mechanism; 4 – three-arm gear selection lever; 5 – blocking brackets; 6 – axis of the gear selection lever; 7 – guide axis of locking brackets; 8 – reverse fork; 9 – clamp; 10 – thrust washer; 11 – spring |
If necessary, disassemble the gear selection mechanism by unscrewing the nut securing axle 6 (Fig. 3.16) of the gear selection lever and remove the retaining rings from the reverse fork axle and from the axle 7 of the locking brackets, remove the reverse fork 8, gear selection lever 4 assembly with a locking bracket 5, a lever axis 6 and a spring 11 with a thrust washer 10.
If necessary, remove the speedometer drive by unscrewing the nut securing it and, supporting the driven gear shaft, remove the speedometer drive.