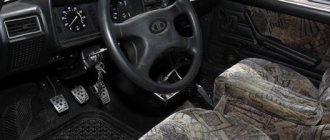
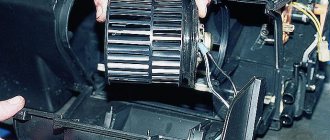
Hi all. The cold weather has arrived, the long-awaited snow will soon fall in our region, and since last winter the stove has not suited me at all. Now you have the opportunity to drive your car into a spacious garage, time and desire, and what else do you need? Straight arms - available! Breaking is not building, so I dismantled this miracle of Russian engineering. The only problem arose when I started to pull out the torpedo - the iron cross member, which gives rigidity to the structure and holds the central frame, did not work:
For ease of installation and so as not to unscrew the steering column, I recommend using a chisel to separate this structure, as I showed in the photo above. Then there will be no problems with installation afterwards. At the spot welding joint there is a hole into which you can easily screw a bolt.
I washed it simply - I took it apart, raked out the centuries-old leaves, picked up laundry soap and a sponge and off I went. Be sure to dry it afterwards. While our plastic is drying, we pick up the element with the adjustments and disassemble it completely (don’t forget how it was initially, otherwise there is a chance of assembling it incorrectly). We clean it, then lubricate it with SILICONE grease (other grease hardens in the cold):
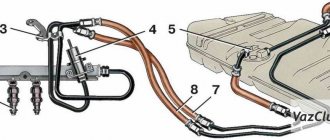
To optimize vehicle production and reduce their cost, AvtoVAZ uses the same components for models of different families. An example of such an assembly is the stove of the VAZ-2114 car, which belongs to the Samara-2 family. When designing this car, the interior heating system was borrowed from the models of the first Samara family - VAZ-2108-21099.
The VAZ-2114 stove is integrated, with heat intake from the engine cooling system and forced air circulation. Structurally, the interior heater of this car is simple, which has a positive effect on the reliability of the system.
The principle of operation of the heater cables on the VAZ 2114
The operation of a car's heating system is to transfer and redirect the heat that is released as a result of engine operation. Heat is removed by the cooling system and supplied, among other things, to the heater radiator. Then, when the switch is turned on (turned on), the heating system starts a motor that blows out hot air and passes it through the car panel deflectors. Air redirection to a particular area is carried out directly by the driver by switching the airflow positions.
When clicked, the picture enlarges
Most cases of stove malfunctions are associated with just one reason and this is the VAZ 2114 stove cable. The fact is that over time the tension of the cable weakens. This occurs as a result of its constant tension, weakening when moving the lever for adjusting the heating mode (cold and hot). There are also cases when the cable completely flies off the stove tap. As a result, the stove valve does not open completely, thereby you do not receive significant portions of hot air from the heating system.
What to do? To change or not to change? Here are the most common questions from car enthusiasts. Let's answer this: before replacing anything, you should find the cause of the malfunction and try to eliminate it.
Diagnosis of heating system faults
Heating system malfunctions are accompanied by the following symptoms:
- the fan does not work;
- cold air enters the cabin;
- the damper does not work;
- there is a coolant leak;
- the stove begins to make uncharacteristic sounds (whistles, hums, gurgles);
- Steam or smoke appears from the heater ducts.
Why the stove does not work or does not heat the air
If the stove fails, it either does not work at all, or it works but does not heat the air. In the first case, first check the fan wiring, starting with fuse F7. If the fuse is blown, replace it. Then they check the relay, which may not turn on the first time or only when the engine is warm. In this case, the relay is replaced with a new one.
Then the serviceability of the electric motor is assessed. To do this, power is directly supplied to its contacts from the battery. If the electric motor starts to operate at maximum speed, then it is in good condition. Otherwise, it will need to be repaired or replaced.
The intensity of the air flow is adjusted using a resistor having two spirals with resistances of 0.82 Ohm and 0.23 Ohm. In the first mode, the current flows through both spirals, in the second - only through a spiral with a resistance of 0.23 Ohms, in the third - bypassing the spirals, that is, without resistance at all. If the resistor is faulty, the fan will only operate in the third mode at maximum speed (handle in the extreme right position). The problem is solved by replacing the resistor, which is located on the driver's side above the accelerator pedal.
If the resistor is faulty, the heater fan will only be able to operate at maximum speed.
If cold air enters the cabin, this may be due to:
- Airlock. It could have formed when replacing the coolant, when the system was depressurized, or because there was insufficient amount of coolant in the system. To remove the plug, remove the heater radiator pipe, use a watering can to add antifreeze to the maximum and put the hose back in place. After starting the engine, coolant under pressure will displace the remaining air from the system.
- Stove tap jammed. This happens if the tap was not initially opened all the way, and during operation, oxide and scale formed on the inner surface, preventing the normal circulation of the liquid. You can try to open the tap using pliers or immediately replace it with a new one.
- The stove radiator is clogged. When using low-quality coolant, the radiator honeycombs may become clogged. The problem is solved by flushing or replacing the heat exchanger. The feasibility of washing is determined by the scale of contamination.
- Installation of a low-quality radiator. In a defective product, the honeycomb may be incorrectly soldered. The radiator should be replaced.
- Low pressure in the cooling system. If heat transfer increases at higher speeds, the pump needs to be replaced.
- Low coolant level. It is necessary to check the level and add antifreeze if necessary.
- Damage to the heater fan impeller. The impeller is carefully inspected and replaced if mechanical damage is detected.
- Cabin filter dirty. If it is heavily polluted, the power of the electric motor will not be enough to pump warm air into the cabin. The filter is replaced with a new one.
- Damage to the cylinder head gasket. If the cylinder head gasket is blown, white smoke will come out of the exhaust pipe. The problem is solved by replacing the gasket and dismantling the cylinder head.
Heater dampers don't work
The distribution of air flows throughout the cabin is carried out by dampers, which, in turn, are controlled using cables. When these cables fail, problems arise with directing the air flow to the windshield or to the foot area. In addition, the damper that blocks the flow of air from the street begins to work incorrectly. In this case, adjustment of the damper drives is required.
Such situations can arise even on a new car. Slightly warm air begins to flow from the lower, upper and side deflectors, and hot air begins to flow from the center console. This is due to the poor build quality. There are gaps between the joints of the air ducts and the dampers, which leads to warm air entering only from the center console and heating the panel from the inside.
The drive cable is always taut. Therefore, over time it bends, breaks off or stretches. In this case, it is necessary to adjust the damper drive, which is performed in the following order:
- In the stove, we look for a bracket with which the cable sheath is held on the heater body.
- A galvanized metal lever located on the left side is pulled back. This position corresponds to the maximum opening of the damper.
- The length of the cable is tightened and adjusted. The long lever on the lever block in the extreme right position should open the damper completely.
- After adjustment, the cable is securely fixed.
Video: stove repair using the example of a VAZ 2114
Why is antifreeze leaking from the stove?
A coolant leak in the heating system can occur from:
- stove radiator;
- stove tap;
- stove pipes.
If a coolant leak occurs from the radiator, it is usually replaced with a new one. Repairs to restore tightness are usually complex and labor-intensive. In addition, if the radiator has been in use for a long time, its tubes become clogged with deposits and dirt, and, as a result, heat transfer decreases.
The valve opens and closes the coolant supply to the radiator, thereby regulating the heat in the cabin. Over time, it may begin to leak, as evidenced by the characteristic smell of antifreeze in the cabin, a puddle on the floor on the passenger side and a decrease in the coolant level in the expansion tank. The faucet cannot be repaired and in such cases is replaced entirely.
Diagnostics of the operation of the VAZ 2114 stove cables
In order to inspect the valve cable of the VAZ 2114 stove, you need to dismantle the side panel trim on the driver's side (to the right of the gas pedal). Further details:
- Start and warm up the car engine thoroughly.
- Unscrew the three side trim mounting bolts.
- Turn your gaze towards the heater valve.
- Check to see if the cable has come loose from the faucet.
- Move the heater lever on the instrument panel to maximum heating mode.
- Pull the cable towards you and hold it in this position
- Check if hot air is coming from the deflectors.
Now that the source of the problem has been identified. It is required to fix, give constant tension and thereby ensure good operation and correct throughput.
One of the options for increasing the tension is a method in which a part (0.5-1 centimeter) of the cable is bent at the point of direct connection to the heater lever. To do this you will need:
- Remove the second trim, only from the passenger seat side.
- Take pliers and pull the cable towards you (at this moment, the temperature switch should be at maximum heating mode).
- Bend the additional amount of cable formed (its amount is selected experimentally, and in each specific case it differs and, as a rule, amounts to 0.5 centimeters).
- We hook it up to the temperature switch of the stove.
Repair work
Knowing the structure of the stove, it is easy to repair. Before starting repairs, it is necessary to remove the wire from ground and drain the coolant.
Repair consists of the following steps:
- First you need to remove the instrument panel and carefully disconnect the air pipe through which air enters the cabin.
- Next, you should check the electrical system: resistor wires, electric motor, fan. In addition, you need to check the outlet and inlet hoses of the faucet.
- Next, you should unscrew the two nuts from the shield that secure the faucet.
- Then you need to remove the seal from the tap pipes.
- Next, the nuts are unscrewed, with which the stove is attached to the body.
- Now you can remove the stove.
- Having completed the necessary repairs and adjustments, the heater is reinstalled in the reverse order.
After repairs, you should check the operation of the heating system. It should turn on as soon as the engine starts.
Heater repair at VAZ
Replacing heater cables on a VAZ 2114
Sometimes situations occur when, for one reason or another, the product becomes bent or even breaks off. Such cases require removing the device and replacing it with a new one. Recommendations for analysis are as follows:
- The metal clips that hold the cable in place must be disconnected.
- One end of the cable is connected to the tap, the other side to the lever for adjusting the air temperature in the cabin. Any sequence of disconnection can be followed. But it will be most convenient to first disconnect the end from the stove tap, unfasten all the clips and, last of all, disconnect it from the lever.
- Now the product should be carefully removed from the case.
- When reinstalling the new part, start by attaching it to the tap.
There are a lot of different models on the auto goods market that differ in length, thickness, various types, and shapes of both ends. In order not to make a mistake when purchasing a new product, we advise you to take it with you to the store. Usually cables are sold in one set of several pieces at once.
So we learned how to change the heater cables on a VAZ 2114. The most important thing when carrying out work is not to rush, to understand the principle of operation of the hot and cold air supply mechanism. We wish you warm heaters!)
A car uses many systems and mechanisms. One of them is the interior heating system. The VAZ-2114 is also equipped with it. Unlike an air conditioner, a stove is required in cars. After all, in the heat you can open the windows. But in winter you won’t be able to cope with the cold in the cabin without a stove. What does this element represent? How does the heating system of the VAZ-2114 work? The diagram, principle of operation and malfunctions are further in our article.
Why is antifreeze leaking from the stove?
A coolant leak in the heating system can occur from:
- stove radiator;
- stove tap;
- stove pipes.
If a coolant leak occurs from the radiator, it is usually replaced with a new one. Repairs to restore tightness are usually complex and labor-intensive. In addition, if the radiator has been in use for a long time, its tubes become clogged with deposits and dirt, and, as a result, heat transfer decreases.
The valve opens and closes the coolant supply to the radiator, thereby regulating the heat in the cabin. Over time, it may begin to leak, as evidenced by the characteristic smell of antifreeze in the cabin, a puddle on the floor on the passenger side and a decrease in the coolant level in the expansion tank. The faucet cannot be repaired and in such cases is replaced entirely.
If the heater radiator starts to leak, it is usually replaced with a new one.
The cause of coolant leakage from the pipes is usually their wear - the rubber ages and cracks over time. When diagnosing a problem, you need to wipe the suspected leak areas with a rag and observe the outlet and inlet pipes on a warm engine. Worn hoses are always replaced with new ones.
The stove makes a hum, whistle, murmur
The cause of uncharacteristic sounds (whistle, hum, murmur, etc.) from the heater is usually a faulty electric motor. Lack of lubrication, contamination, wear of bearings and bushings - all this leads to the fact that the motor begins to whistle. It is removed, disassembled and cleaned, and the rubbing elements are lubricated. If the bearings are heavily worn, the motor will not make a whistle, but a hum. In such a situation, lubricant may not help, and the electric motor will need to be replaced.
Steam is coming from the stove
Sometimes steam starts coming out of the stove. The reason for this is a leak in the heater core. The leaking coolant hits the hot radiator housing and begins to quickly evaporate, and the smell of antifreeze appears in the cabin. To fix the problem, you will need to disassemble the stove and replace the heat exchanger.
Sometimes white steam comes from under the hood and enters the cabin. This happens when antifreeze gets on the hot manifold or exhaust system pants. In this case, you will need to find the location of the leak and fix it. The most common cause is damaged pipes.
Characteristics and device
The main purpose of this system is to maintain optimal temperature in the cabin during the winter season. In addition to comfort, the stove is needed to prevent the windows, especially the windshield, from sweating. To prevent condensation from forming on it, special nozzles are provided at the top of the panel. However, first things first. Below is a diagram of the interior heating system:
- Water deflector shield.
- Windshield heating nozzle assembled with air ducts.
- Side nozzle designed for heating and ventilation of the interior.
- Central deflector.
- The heater is assembled with an electric motor.
- Interior ventilation nozzle.
- Stove tap seal.
- Rear heater pipe of VAZ-2114.
- Stove supply pipe.
Page 34
AND INTERIOR HEATING
System controls
ventilation and heating of the cabin are shown in Fig. 28 and fig. 29.
By moving lever 2 (see.
rice. 28) you can direct the air flow both to the driver’s and passengers’ feet area, and through the central 4 (see Fig. 29) and 3 side nozzles into the car interior. When turning the guide vanes of the central and side nozzles using levers 5 and 7, the direction of the air flow changes. To heat the incoming air, move lever 3 to the right (see Fig. 28), which controls the operation of the heater valve. If necessary, you can increase the amount of incoming air by turning on the electric fan to the corresponding mode using switch 1.
By moving lever 4, adjust
The intensity of blowing of the windshield through the upper slots on the instrument panel and the front door windows through nozzles 1 is determined (see Fig. 29). To achieve maximum air flow, close the side and central nozzle flaps using levers 6 and 8 and then move lever 2 (see Fig.
rice. 28) to the right, and lever 4 to the left. To protect the windshield and front door windows from fogging, it is enough to direct cold air at them, and to prevent freezing, additionally move lever 3 to the right.
To protect the rear
to prevent the glass from fogging and freezing, turn on its electric heating using switch 2 (see Fig. 29).
In the system air intake
For heating and ventilation of vehicles of the 2115 family, an air filter is installed.
When driving in conditions
intense rainfall with the heater fan on
The filter may become wet, which will lead to the supply of humidified air into the cabin and fogging of the windows. If you need to continue driving in a downpour, you should wipe the windows, reduce the fan speed and drive only when the windows are clear.
Typically when it rains
medium intensity, typical for the territory of the Russian Federation, there are no problems with glass fogging.
After the rain stops
The filter dries out under natural conditions in 2-3 hours, with the fan running – in 30-40 minutes. When dry, the filter fully restores its functionality.
Rice. 28. Control panel for interior ventilation and heating system
The heating system of any car is designed to create and maintain a comfortable microclimate in the cabin. The VAZ 2114/15 stove is considered quite reliable. However, it requires periodic maintenance and repair. You can do all this yourself.
How does it work
The principle of operation of the system is quite simple. It is based on the transfer of heat from a liquid. So, the heater radiator is connected to the main terminals of the engine cooling system. Inside the heat exchanger there is antifreeze or antifreeze. So, when the engine heats up, hot liquid flows in a “large” circle to the heater radiator. When the ACS (control unit) is turned on, the heater motor is activated. Warm air begins to move through the nozzles. The direction can be different - on the windshield, side, in the center of the cabin. One or more deflectors are activated, depending on the position of the stove lever.
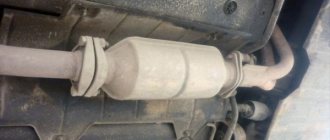
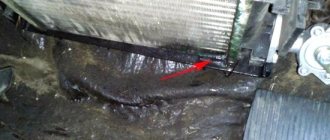
That is, heat exchange occurs - hot antifreeze is cooled not only in the main radiator (which stands in front of the engine and is shown in the photo below), but also in the heat exchanger of the heating system.
Causes of insufficient heat
The ability to understand and feel a car means a lot. Some possible problems noticed in time can be easily eliminated by tuning. What can cause poor heating?
Firstly, the fan is not working. It's three speed. And if the fan does not work at any speed, then it should be replaced. The resistor could also be the culprit. When the fan starts working only at speed 3, replace the additional resistor.
Secondly, the thermostat. When the engine is running, the connecting pipe (thermostat - radiator) remains cold. Otherwise, you need another thermostat.
Thirdly, the filter is clogged. On older VAZ 2114 models there is no such filter. On new ones it is located under the heater casing. If he is the culprit, we need to install another one.
Don't let your filter get into this state.
Also, the cause of poor interior heating can be an air lock, insufficient or absent coolant in the expansion tank, the inability to fully open the heater tap, or a dirty radiator.
The heater blows poorly into the legs and side windows
The heating system of the VAZ-2114 is not reliable. Over time, the stove stops heating the legs and side windows normally. Moreover, the problem is not in the temperature of the air (on the contrary, it can be hot), but in the strength of the flow with which it comes from the nozzles. In this case, you will have to modify the air flow channels. To do this, remove the front panel so that there is access to the nozzles.
Replacement instructions
The radiator is a replaceable unit, so if it is faulty, it needs to be replaced.
The replacement procedure consists of the following steps:
- First of all, you need to drain the coolant.
- Next you need to dismantle the dashboard. You can remove not the entire tidy, but only part of it to get to the radiator. How to remove the panel is described in the operating instructions.
- Before replacing, it is necessary to disconnect all wires and hoses that go to the radiator.
- Then you need to unscrew the fasteners and dismantle the unit.
- The removed radiator must be cleaned if it is clogged. If it leaks, it needs to be changed. Assembly should be carried out in the reverse order (video author - VChSLV).
After the repair, the microclimate in the cabin will be restored and no frost will be scary.
Radiator tuning
Approximately 30% of uneven heating of the interior is a clogged VAZ 2114 heater radiator. To clean it, you need to perform the following steps:
- 1. Remove the radiator and rinse with strong water pressure. In this case, disconnect the pipes and connect hoses instead. Water must be supplied to the outlet. Then the dirt will be “squeezed out”;
- 2. Use any sewer pipe cleaner for flushing.
Pour it into the system and drain it after 20 minutes. After repeating this procedure three times, complete the rinsing with clean water.
- 3. Attach the pipes in place and fill in antifreeze or antifreeze;
- 4. When installing the radiator, seal it.
It is also important which heater radiator is installed on the VAZ 2114 - aluminum or copper. In the first case, it heats up quickly and also cools down instantly. But it has a larger number of fins and channel width, which gives better heat transfer at idle speed. Minus - cannot be repaired.
Copper heats up more slowly, but also cools down much longer. It has fewer ribs and narrower channels. At idle speed the air flow is cold. But if a leak occurs, it can be easily repaired.
A painted radiator is not suitable for tuning. It has little heat transfer and an unpleasant odor.
Heater control cable problem
Greetings. Let me remind you that I decided to replace the original “Low” torpedo with a “High” one. I know about the problems of creaking and “poor heating”. These problems are completely solvable. But, along the way, a problem emerged. The article is actually about her.
One of the four cables is not the right size for the windshield defroster. At least shoot at it. The cable is short, and when you install it, the angle is too large and not only does the cable not move, but the place where the cable is attached to the block is also broken. Although, according to the manual and the clever book (or rather, the pictures from them), the cable on the left and on the right, to the dampers, should be coils, and two straight ones, one from the tap, the other from the third dampers. I spent a long time running around the market and shops with a tape measure, measured and measured the length. The sets are the same everywhere. I still don’t understand what’s wrong.
But this is my hypothesis. I didn’t spend a long time delving into the theory, because I understood that there was no information on the Internet about this. And there is especially no explanation why this is so. And I couldn't find the length of the cables.
Therefore, by running around the shops and the market with a tape measure, I measured the length of a set of cables to a high panel, maybe it will be useful to someone:
But this did not give me peace. And there was no solution. I went to the Lada Auto store. There were heater control cables for classics, Niva and Ladas. But there are kits everywhere. I didn't want to take another set. And I realized that in one set for 21083 there is one extra, fifth cable. Just as long as I need 87cm. According to my calculations, this second cable would be just enough. It took me a long time to convince the seller that there were four of them in the set, not five. In the end, he was convinced that I was right and, looking at my pressure, agreed to redesign and sell me this cable for 15 UAH. I was happy. I took the cable and rushed to try it on in joy.
He was almost there. I had to shorten the cable cover by 1 cm. So that the damper would close completely. With this, my suffering with the cables is finally over, everything is according to Feng Shui and everything works, and it works perfectly, which for me, a perfectionist, is no less important!
I’ll also post photos of the engine compartment assembly at the same time. I poured water in to check for leaks in the pipes, and for good reason, I fixed it in some places by replacing the clamps with new ones. Also, the wiring is almost ready (the only thing left to do is to finish it, nice and neat, on the rear lyada, but this is when the lyada itself will be on the car.
I decided to clean the locks and latches due to the “laziness” of the previous Painters, since they are all painted, Ruby color, which does not suit my Port wine at all)
I got busy with the headlights, went through the two headlights I bought in advance to experiment with the lenses (since the original ones were ideal, it was a pity to spoil them, you never know). As a result, I had to buy one more third to donate the plastic pieces that attach and adjust the reflector. The headlights are ready, waiting to be painted, as I did and lensed them, washed off the chrome, I’ll post them in a separate article when I’m done.
I finished with the brakes, bled all the wheels, but I couldn’t figure out how to adjust the sorcerer. But I decided, I’ll assemble the car, it will be loaded with the weight of its own spare parts, and then I’ll adjust it more finely.
I washed the carb by soaking it in citric acid (concentrated) for a day, and it became newer than new. I recut the threads for the repair pins of the pan, since everything was screwed in through tow. Well, this weekend I want to fill up with gasoline and do the first test run)
So it goes. Good luck to everyone and thank you for reading to the end (who made it))))
Source
Design of the VAZ-21099 heater
And here everything is simple: the created flow passes through the radiator honeycombs, where heat exchange occurs, therefore, heat is transferred to the air, which then blows through the air ducts to the desired areas.
The design of the VAZ-21099 stove includes several main components:
- stove body made of plastic;
- heating system radiator (connected to the cooling system);
- electric fan;
- air channel;
- heater control mechanism.
This car used heaters of two modifications (old and new), which differed slightly in design, but their components are completely identical.
Housing, radiator, dampers
The shroud provides the necessary heat reorientation because the movement generated by the fan motor is directly introduced into the fan motor rather than being dissipated. The body of the VAZ 2109 stove itself consists of two halves connected to each other by special brackets. To reduce flow losses, a gasket is placed between its halves. Partitions are made inside both halves to ensure correct direction.
In addition, inside this case there is a niche in which the radiator is installed. The radiator was originally made of brass, but is now almost always made of aluminum. The design of the stove radiator 2109 is identical to the main one (consists of two tanks, pipes through which the coolant circulates and plates forming a honeycomb), but much smaller in size.
Video: The stove in the VAZ 2108, 2109, 21099, 2110, 2111, 2112, 2113, 2114, 2115 HEATS poorly
Air is blown out thanks to the stove shock absorbers, which are also installed inside the housing. These elements are movable, making it possible to close some air ducts and open others. There are three of them in total: the main one (heating control), an air duct that redirects between the foot area and the power source into the cabin, and a flow damper to the windshield.
Additional shock absorbers are installed on the side and central deflectors. It turns out that by default, air from the body constantly blows onto the deflectors and this is done so that the flow always has an exit. Thanks to the presence of blinds, it is possible to supply hot air to several zones simultaneously (interior space and windshield or windshield and foot area).
The main heater damper supplies air flow to the radiator or bypasses it. This is because the heater also plays the role of a cabin ventilation system. This allows for fresh air to be provided in summer. And to do this, you only need to redirect the movement around the heat exchanger, and the heated coolant will stop supplying the radiator itself. To disconnect the heat exchanger from the cooling system, use the stove valve, which is located on the supply pipe in front of the radiator.
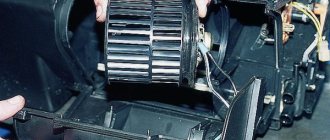
Fan
The air flow is created by a squirrel-cage fan driven by an electric motor. These two elements are enclosed in a separate housing mounted above the heater body. In addition, it is designed to provide the easiest access to the electric motor, since it is considered one of the weakest components of the system.
There are three fan operating modes. This allows you to select optimal air supply conditions (cold or hot).
Control mechanism
Video: Useful tips for cars. Why does the VAZ stove not work?
To control the heater and redirect air flow and open and close the coolant supply valve, a control mechanism displayed on the center console is used. This is a three-movement mechanism and a fan operating mode switch.
The lower slider is the main one, as it changes the operating mode of the system (heating or ventilation). Control two elements simultaneously: the main damper and the tap. When this slider is switched to the “ventilation” mode, the valve and damper close simultaneously, which ensures air movement bypasses the heat exchanger. And everything is exactly the opposite: when switching to the “heating” mode.
The other two sliders control the other two flaps: windshield power and footwell power. For example, when you move them to the center (left slider all the way to the right and right slider all the way to the left), the footwell duct will close and the duct leading to the windshield will be open. When these sliders are moved apart at the edges, hot air blows into the legs (and its supply to the central dampers will also be blocked).
The carriage is connected to the shock absorbers and the crane by cables. In addition, the main slider accommodates two cables at the same time as it opens and closes the damper and faucet at the same time.
Refinement of the pipe
When the air flow from the left deflector is too small, you can force its intensity. To do this, you need to insert a small (about 50 mm) fan into the pipe. A cooler used in computers is suitable for tuning.
First remove the deflector. Make a hole for the cooler and install it. Seal. Put the branch pipe with the fan in place. Restore electrical. An alternative is to connect the cooler directly to the heater contacts. In this case, it will only work when the ignition is on.
Properly carried out modernization will add warmth to the interior and save the owner of the VAZ 2114 from many problems.
Main stove malfunctions
As we have already mentioned, the stove is connected to the internal combustion engine cooling system. Accordingly, heating problems may arise for the following reasons:
- Insufficient amount of coolant in the system.
- Clogging of radiator tubes.
- There are air pockets in the system. To eliminate them, you will need to unscrew the cap of the radiator or expansion tank and let the engine idle for a while.
There are a number of cooling system malfunctions that can also affect the performance of the VAZ-2109 heating system. We look at the most common ones.
The weak point of the heating system is the valve through which antifreeze enters the heater radiator. This unit may leak. In this case, it must be replaced with a new one.
Poor quality coolant causes damage to rubber pipes due to its aggressive chemical composition.
Check the condition of the pump, which is responsible for pumping antifreeze and circulating it in the cooling system.
Poor operation of the stove can be caused by incorrect operation of the electric motor that drives the heating system fan.
If you notice extraneous sounds in the operation of this motor, this is a signal for a number of problems:
- Possible overheating due to fuse failure.
- When operating at low speeds, warm air does not flow - the electric motor has failed or there has been a break in the electrical circuit of the heating system.
Check the condition of the heater core regularly. It can become clogged during operation, and this provokes an insufficient supply of antifreeze. To carry out preventive work, you need to dismantle this element and wash it. If the part cannot be cleaned, then it is better to buy a new one and replace it.
Experienced car enthusiasts claim that the problem of poor operation of the stove may be a loose fit of the damper. Because of this, cold air from the street enters the cabin, and warm air goes to the feet. To solve this problem, just adjust the damper using a special control lever. It is located next to the gas pedal. Use pliers to tighten the cable that goes to the damper. Make two turns around the head of the bolt that secures the cable to the control arm.
If these steps do not help solve the problem, then inspect the joints of the pieces of foam rubber or plastic. Perhaps cracks and gaps have formed there. You can solve the problem with the help of sealant or simply change the insulation.
Repair and replacement of the heater control unit VAZ 21083 and 21093
The control unit for the internal heater VAZ 21083 or 21093 (models with a “high” instrument panel) must be removed and checked for malfunctions in cases where:
- Too much force is required to operate the lever
- when the respective levers are switched, there is no change in the direction of the air and/or change in the temperature of the air supplied to the passenger compartment.
The cause of the above malfunctions may be a breakdown of the sealing bracket on the control unit housing, or deformation of the bracket, or its absence for any reason. To understand what action needs to be taken: reinstall the brackets or replace the heater control unit, the latter will need to be disassembled.
To do this, you need to unscrew the two bolts securing the bottom of the front panel
and shoot him down.
We unscrew the two screws that secure the control unit to the panel body.
Press the control unit and remove it. But it will not be possible to remove it completely, because it is held in place by the damper control cables and terminal cables.
visual inspection required. If there are no brackets at the installation location,
but the mounting locations of the brackets are not damaged, so we simply install the bracket. In the event of a failure at the installation site, the heater control unit must be replaced.
Replacing the control unit must begin with its proper disassembly. To do this, remove the terminal from the heater fan speed regulator and two backlight terminals (in the following figure, respectively, numbered 1, 2 and 3). After removing the terminals, remove the brackets for fixing the cables (the direction of the applied force is indicated in the figure):
Before removing the cables, you need to remember which lever they belong to (or rather, sign). We pull out the cable from the holes in the levers:
We remove the control unit itself. It is necessary to remove the indicator from the removed control unit
and the fan speed controller itself, as well as the backlight.
To remove the controller relay, unscrew the plastic nut. To do this, insert a flat-head screwdriver into the grooves of the nut and unscrew it
The backlight is removed by turning counterclockwise:
Install in reverse order. We install the backlight lamp along the grooves and turn it clockwise until it stops. The relay must be installed in the groove before tightening the nut.
Tighten the nut. We connect the terminal to the relay and two terminals to the backlight. Let's start installing the cables. Before securing the cable with the bracket, install it in such a way that the end of the casing rests against the protrusions on the case and the cable passes between them:
Install the bracket so that the “nose”
and click on it.
Do the same operations with the remaining cables. Before installing the panel cover, you must make sure that all levers are working properly, that the backlight and fan speed control are working properly.
Having checked everything and made sure that it is working correctly, we install the control unit in place and fix it with two self-tapping screws,
There would be no problems with comfort when driving a VAZ-21099 car if the interior of this sedan were not equipped with a heating system. In addition, ensuring a comfortable temperature in the cabin can be considered a secondary task, the main one being heating the windows (front and front side doors) to ensure visibility in cold weather.
The VAZ-21099 uses a heating system that is classic for all cars, in which the air is heated using an additional radiator of the cooling system installed in the passenger compartment under the dashboard. Thanks to this position, it is possible to provide heating to several zones: blowing through the front and side windows, under your feet and directly inside yourself.
To ensure the operability of the furnace, it is necessary that the flow movement is not unauthorized (due to temperature changes), but forced. And for this purpose, the heating system is additionally equipped with an electric fan.
Replacing the faucet
Tuning is also possible for the standard stove tap. It must be removed and a curved tube installed that will lead into the engine compartment. Thus, we get two positive points:
- Improving the level of coolant circulation;
- Preventing possible antifreeze leaks.
To replace the tap, first of all you need to turn off or disconnect the hose and drain the remaining liquid from the heating system. Next, a curved tube is installed and connected to the cylinder head pipe using a hose.