The manufacturer recommends replacing the front crankshaft oil seal of VAZ 2101-2107 engines every 150,000 km. However, in practice such replacement has to be performed more often. Accelerated wear of the sealing element and the appearance of engine oil leaks are caused by:
- skewed oil seal during installation;
- loss of elasticity due to engine overheating;
- increased radial runout of the drive pulley of mounted units;
- use of low-quality motor oil;
- wear on the crankshaft pulley hub.
In addition, we cannot rule out hardening of the cuff due to natural aging and the possibility of a manufacturing defect - unfortunately, the quality of parts for rear-wheel drive VAZ models leaves much to be desired.
Which way to unscrew the crankshaft pulley?
This question is asked by many car enthusiasts. To prevent the thread from breaking or, even worse, the bolt head from twisting, it will not prevent the driver from figuring out which way to unscrew the crankshaft pulley bolt.
Since the pulley fixing element and flange have a normal right-hand thread, it can be unscrewed in the same way as the rest of the car’s nuts (counterclockwise).
What thread is on the gur pulley?
Ikim @ 23.8.2015, 21:35
I couldn’t unscrew the nut, did I understand correctly? You can try local heating, but this is unless the seal is critically damaged. You can try to cut or at least loosen the nut with blows.
Thanks for the advice, there’s simply nothing to cut it with. And I don’t want to knock on the pump. Apparently we need to invent or look for some kind of puller. I also found in one of the instructions on the Internet that the thread on the nut is left-handed, tell me, in which direction should it be unscrewed? )) Until I take off the belt, I will drive without power steering, how long do you think you can drive like this?
Romec @ 23.8.2015, 20:52
Thanks for the advice, there’s simply nothing to cut it with. And I don’t want to knock on the pump. Apparently we need to invent or look for some kind of puller. I also found in one of the instructions on the Internet that the thread on the nut is left-handed, tell me, in which direction should it be unscrewed? )) Until I take off the belt, I will drive without power steering, how long do you think you can drive like this?
Ikim @ 23.8.2015, 23:23
You should not knock on the pump, but on the nut! rest the nut on a metal plate or vice, and mark it along the opposite edge with a chisel. then along the opposite side in the same way. The nut loosens and unscrews easily. You can ride without a belt, it’s just not comfortable. The steering wheel will be a bit heavy. what's the problem with the power steering?
Oh, I need to try it, thanks, I’ve already forgotten what repairing on my own is (the last time I repaired my Minsk was 13-14 years ago). The pump is knocking, I wanted to replace the bearing.
Oleg22 @ 25.8.2015, 15:42
You can unscrew it with a pneumatic impact wrench, this is how I unscrewed it myself.
Romec @ 25.8.2015, 21:09
Which direction should I turn anyway? ))
I confirm. The carving is normal. Unscrews counterclockwise.
I unscrew it with a wrench without any problems.
Gromozeka @ 4.9.2015, 18:20
I confirm. The carving is normal. Unscrews counterclockwise.
I unscrew it with a wrench without any problems.
O_O that means I was also turning it in the wrong direction (Thank you, friends, for the advice. I’ll try this this weekend.
Romec @ 5.9.2015, 1:42
O_O that means I was also turning it in the wrong direction (Thank you, friends, for the advice. I’ll try this this weekend.
Source
Features of work
At first glance, there is nothing difficult in simply removing the bolt securing the pulley to the engine crankshaft flange. However, this is not quite true. The crankshaft pulley bolt very rarely unscrews and always sticks. Therefore, there is a risk of breaking it. First we need to get to this pulley. To do this, unscrew the bolt securing the generator to the tension bar. The latter is attached to the engine cylinder block.
The generator is moved towards the engine, and the drive belt is removed from the pulleys. It can be rivulet type or serrated. Now, having reached the desired element, proceed to further actions.
Step-by-step instruction
Due to the limited space between the front of the engine and the radiator, it is difficult to press in a new oil seal without distortion. For this reason, experts recommend replacing the sealing element with the front engine cover removed. Of course, doing this on a mechanic’s workbench is much more convenient, but there are also pitfalls here. As practice shows, after such dismantling it is difficult to restore the tightness along the junction line of the oil pan, and in addition, there is a danger of breaking the internal threads in a rather delicate duralumin cover.
Source
Tools for work
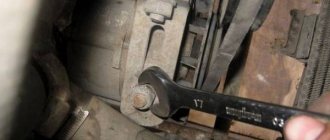
In the case of a manual gearbox, the crankshaft pulley bolt can be unscrewed using a spanner or socket. It's better to take a regular wrench. In most cases, the ratchet cannot withstand such a load (even if it is the strongest) and as a result falls apart. It is not recommended to use an open-end or gas wrench when dismantling the crankshaft pulley.
The first tool may break, but the second will only damage the edges of the bolt, and next time it will be even more difficult to unscrew it. In case of severe damage to the edges, it will have to be drilled out and removed in parts, which will be unpleasant for the car owner. This will increase the time it takes to replace the element.
Why might difficulties arise?
Removing a pulley is a difficulty in itself, even for a specialist, let alone a beginner. Difficulty may arise when removing the bolt or nut connecting the pulley and crankshaft. The fact is that the direction of the thread when unscrewing it coincides with the direction of the torque during engine operation. Thus, while the engine is running, the bolt is constantly tightened, which results in a serious problem when removing the bolt. Difficulty can also arise if you do not have the right tool.
How to unscrew the crankshaft pulley of a VAZ
On domestic cars of the VAZ “Classic” family, as well as on other cars, the element is removed in the same way. The only difference will be what kind of gearbox is installed on the car in which such work is being done. Which direction should I unscrew the crankshaft pulley bolt? Definitely counterclockwise.
To simplify the task, you can call an assistant, who must engage direct gear (3 or 4) and keep the brake pedal depressed. At the same time, you will unscrew the pulley bolt. If the car is rear-wheel drive, then you can do without an assistant. Just put the car on the handbrake and unscrew the bolt in the same way. The work can be done from the side of the hood or below in the inspection ditch. The main thing is that it is convenient to work. You can also jack up the car and remove the front right wheel.
This will provide good direct access to the crankshaft pulley, which is unscrewed with an extension socket. The mechanism bolt rarely “gives in” immediately and is constantly stuck with threads to the inner hole of the crankshaft flange. Therefore, it is always very difficult to rip it off. If you cannot unscrew the pulley mounting bolt, then a long wrench or pipe can come to the rescue. The element is put on the key. Grasping the very edge of the collar, gathering, as they say, all your strength into a fist, you should try to remove it again. Actually, the longer the lever, the easier it is to work.
Removal instructions
With the clutch disengaged, the crankshaft can be easily turned with a wrench.
To carry out the removal procedure, it is necessary to secure the shaft from turning.
Removal and Installation
On a VAZ 2107, the injector crankshaft pulley is held in place by a fastening nut. Another name for it is ratchet. To remove the crankshaft pulley, you will need to unscrew this nut. It is better to carry out work on an inspection ditch or overpass. The tools you need to prepare are:
Preparing tools for unscrewing
If the threaded connection is difficult to unscrew, there are special products, after application of which you can easily unscrew the fasteners. These products include WD oil. You can also use vinegar essence or brake fluid.
Work on dismantling and installing the crankshaft pulley on a VAZ 2107 injector consists of the following steps:
Unscrewing the nut using the starter Move the pulley away from the front cover
After completing work on the VAZ 2107 injector, you need to start the engine and check its performance.
For owners of cars with automatic transmission
How to unscrew the crankshaft pulley on an automatic machine? If an automatic gearbox is installed, then on a rear-wheel drive vehicle the “Parking” gear is set. The handbrake is turned on and then the element is unscrewed in the same way as on a manual gearbox. It is more difficult if the car is front-wheel drive. In this case, it will not be possible to remove the element as if it were a manual transmission (with the gear engaged and the brake pressed).
There is a high risk of damaging the gearbox. In this case, you need to lock the crankshaft so that it cannot rotate in any other way. Insert the assembly between the teeth of the engine flywheel ring gear through the hole in the gearbox bell. It is supported so that it cannot jump off and damage the teeth on the flywheel. In some cases, to get to the flywheel, you need to unscrew the engine starter. To do this, you will need an inspection hole, a lift or an overpass.
Second dismantling method
There is another tricky way to unscrew the crankshaft pulley. It is done independently without the presence of an assistant. Having previously removed the generator drive belt, put a head or a spanner on the bolt of the mechanism, the handle of which rests on some surface.
You should not rest it against the body or other parts of the engine compartment. When unscrewing, the key can damage units with rubber pipes, scratch and even damage the body. In the future it will become clear why. It is best to rest the key handle on the ground or floor, placing a wooden board under it. The main thing is that there is a hard and smooth surface. If the key does not reach the stop, then by moving the head or rotating the crankshaft, rest it against a hard surface.
Now, turning on the ignition, you need to crank the engine with the starter. Its force is more than enough to break the pulley fixing bolt. The main thing is not to overdo it and properly rest the key so that it stands firmly in place and does not wobble. Even a slight displacement will cause it to jump off the bolt head and damage the engine compartment. Under no circumstances should you start the engine, and if you do manage to do so, turn it off immediately.
To prevent the engine from starting, you can remove the fuel supply hose from the fuel pump to the carburetor if it is a carburetor engine, or the hose entering the fuel rail if the engine is injection.
When and why to change the front oil seal
It is impossible not to notice damage to the sealing element - the rotating pulley scatters oil in the front of the engine and throughout the engine compartment. However, do not think that such a malfunction only leads to oiling of the units and a decrease in the lubricant level. If engine oil gets on the generator belt and other rubber parts, it can quickly render them unusable.
Keep in mind that the appearance of a leak through the engine seals is provoked by another factor - increased crankcase gas pressure. For this reason, be sure to check the cleanliness of the engine ventilation system.
Step-by-step instruction
Due to the limited space between the front of the engine and the radiator, it is difficult to press in a new oil seal without distortion. For this reason, experts recommend replacing the sealing element with the front engine cover removed.
Of course, doing this on a mechanic’s workbench is much more convenient, but there are also pitfalls here.
As practice shows, after such dismantling it is difficult to restore the tightness along the junction line of the oil pan, and in addition, there is a danger of breaking the internal threads in a rather delicate duralumin cover.
Car battery heater
For this reason, we recommend using the more common and less labor-intensive method, in which the damaged oil seal is replaced directly on the engine. This work will require your attention and accuracy. It is more convenient to perform all manipulations on a lift, overpass or inspection pit.
To replace the crankshaft oil seal, you do not need any special knowledge or expensive tools. The work can be done with your own hands, spending 1-2 hours on it. By being careful in your work, you will forget about oil leaks for a long time and will be able to easily keep the engine compartment clean.
Good night everybody! Share your experience on how to unscrew the crankshaft pulley nut on a classic. I hit the key with a hammer, and with a sledgehammer too, the ratchet key just bends. I even tried using the starter, the starter just wouldn’t turn. How to unscrew the crankshaft pulley of a VAZ 2107.
Location Features
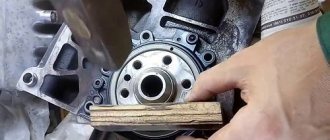
To begin with, it must be said that in most cars the motors are located in the same position, due to which they spin correctly. And, the order of work will be general. To prevent the generator pulley from turning, many recommend using improvised metal means that are inserted into the hole of the pulley and the oil pump.
But it may also happen that the specified pump is placed in such a way that certain parts may be damaged during the process of dismantling the pulley.
Sometimes a crowbar or screwdriver is used
In addition, it is made of aluminum and has very small dimensions, but significant effort must be made in the work. So, you need to be very careful not to break the pulley.
Step-by-step instruction
Due to the limited space between the front of the engine and the radiator, it is difficult to install a new oil seal without distortion. For this reason, experts recommend replacing the sealing element with the front engine cover removed. Of course, doing this on a blacksmith’s workbench is much more convenient, but there are pitfalls here too. As practice shows, after such disassembly it is difficult to restore the tightness along the oil pan seam, and there is also a danger of breaking the internal thread in the rather delicate duralumin cover.
For this reason, it is recommended to use the more common and less labor-intensive method, in which the damaged oil seal is replaced directly on the engine. This work will require your attention and precision. It is more convenient to carry out all manipulations on an elevator, overpass or inspection pit.
Replacing the crankshaft oil seal does not require special knowledge or expensive tools. The work can be done with your own hands, spending 1-2 hours on it. By being careful in your work, you will forget about oil leaks for a long time and will easily be able to keep the engine compartment clean.
Video: Replacing the front crankshaft oil seal on a VAZ 2101 - 2107
Source
Classic methods
Essentially, standard dismantling methods involve two main methods.
You will need:
- jack to remove the wheel
- tool kit
- hydraulic jack to lift the engine, or replacing it with a “stump”
First way
In the first case, we will have to make significant physical efforts, therefore, you need to clearly focus on your own strength. We are talking about the need to put stones or special stops under the wheels that would not allow them to move during operation. The gearbox should, if possible, be set to maximum gear. The higher it is, the easier it will be for you to cope with the task. In third and lower gears, it will be almost impossible to make a turn with your hands. But everything is unscrewed by hand. To make this task easier for yourself, it is appropriate to use a lever that will reduce the necessary effort. In some cases, the length of the lever can reach one and a half meters.
Getting to the bolt is not always easy
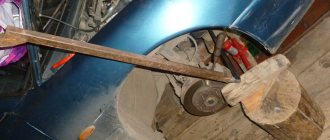
Second way
As for the second method, it involves placing the vehicle in neutral gear. Next, you need to install a suitable sized head on the bolt with a piece of pipe, which, in turn, rests on asphalt or concrete. Ordinary soil will not be able to hold it. But the bolt itself is already loosened by the starter.
This saves a lot of effort and makes it possible to complete the task the first time. The main thing is to take into account the reliable fixation of the pipe so that it does not jump out and damage anything around it.
Be careful not to lose the pulley key
But, in any case, the threads in this nut are correct, so you need to unscrew it counterclockwise, with some exceptions, which we will now look at.
Replacing the front crankshaft oil seal
In my case, everything was simple, since the engine was removed from the car and replacement was not difficult. I used the same puller to pry it from the inside of the oil seal and carefully pulled it out:
Now you can install the pulley in place, making sure it is correctly installed on the key. You can consider the procedure complete, and the VAZ 2106 ready for use!
I forgot to mention the price of the seal. For VAZ “classics” it is about 100 rubles. Good luck with the renovation!
Reverse motion can significantly complicate the dismantling process
But it also happens that the engine works, as they say, “in the other direction.”
We are talking about the fact that the motors are installed with belts to the right. So, they will spin in the opposite direction, that is, counterclockwise. This difference may seem insignificant, but it greatly complicates the search for an answer to the question of how to unscrew the crankshaft pulley.
Moreover, such a procedure may be required every hundred thousand kilometers. We are talking about the need to replace the timing belt. And this does not apply to emergency situations, such as replacing the oil seal or other repair work.
For example, a seventeen bolt can be tightened to a torque of up to one hundred and eighty-five Nm, which can be considered simply a huge indicator.
And to unscrew it you will need even more force. The second method described above will not work, since the starter will spin the motor in the other direction, only tightening the bolt more . Pressing the brake pedal will lead to a similar result, since the transmission will spring back, but the bolt itself will remain in place.
Some modifications of the car may have a window opposite the flywheel crown, through which many try to stop the system using a mounting tool or a regular crowbar with a thin tip. But this risks causing you to turn the crankcase or be very seriously injured.
In the pulley itself there is a special cutout for a proprietary hexagonal key. But such keys are quite expensive, since they need to be ordered, and not just purchased on the market.
After this, you can begin further work, for example, replacing the timing belt
More information about replacing belts for Lifan car models:
Reverse actions
After removing the pulley, you can carefully examine it and put it aside for garage scrap metal. Take the new part in your hands and lubricate the key seat well with grease. Slightly tilting the key towards the hub, we slowly push the pulley onto the shaft. For this purpose, you should have a hammer in one hand, and in the other a piece of soft rubber, which is placed between the hammer and the body and prevents the hammer from damaging the crankshaft pulley.
Once the hub is in place, you need to tighten the fixing bolt. This must be done without any tricks: a wrench and a pipe will help tighten this bolt until it stops. To avoid turning the crankshaft when you begin to apply significant force to tighten the bolt, you need to lock it using a metal pin (large screwdriver), inserting the latter between the teeth of the flywheel ring. To do this, you need to open the clutch housing ventilation plug.
It is not recommended to tighten the bolt to the limit; you may miscalculate the effort and break it, and this is almost a disaster. To do this job correctly, you will need a torque wrench. As soon as the sensor shows a tightening torque of 400 N/meter, no further force is allowed.
After this, put the belt on the crankshaft pulley and tighten it using the tension bolt on the generator. Don't forget to tighten the generator mounting bolts and reconnect the connector on the ignition coil.
If you followed everything described above, then you now not only know how to remove the crankshaft pulley, but also know how to do it yourself.
Tool making
But nothing is impossible, and you can make the appropriate tool yourself. You need to purchase a 54 heating lock nut so that the internal thread diameter is thirty-nine millimeters and the width does not exceed ten millimeters. Now it is important to grind off its edges by one and a half millimeters, and then weld a flat handle, the length of which is near the twenty-centimeter mark. That's all, the tool is completely ready for work.
This is how garage Kulibins do it to save money on buying original keys
Some pulleys have corners that have slightly rounded edges, so that the parts on the nut that are mating can be cut off a little.
Many drivers weld a pre-ground workpiece to a VAZ crankshaft nut wrench to obtain a universal tool suitable for most modern cars. In addition, such a handle is quite convenient to rest on the drive shaft of the front axle wheel.
Having unscrewed the bolt with a standard seventeenth head with an extension and a strong wrench, we continue to work. Don't forget about basic safety rules. So, to prevent the key from jumping off, you need to support the extension cord on a stand that will not jump out and break. Sometimes, even the wheel does not need to be dismantled for such work. Exceptions appear only when the car has tires with a large diameter (as indicated by the inscriptions on the tires) that exceed the standard dimensions. Then they take up more space in the arches. And, you will have to remove them, or use a wrench with a universal joint.
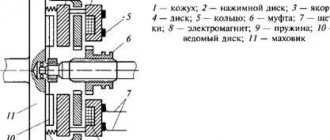
Purpose of the crankshaft pulley
The design serves as a transmission from the drive to the attachment and consists of a massive disc-shaped cast iron part that is located on the axis. In addition, it contributes to cushioning during changes in rotation, balancing of the rotating device, and cooling of belts.
The design has a gap, with the help of which the disc is mounted on the camshaft in the front part, which comes from the carburetor or from the valve injector. The fasteners will be placed on it. And on top there are holes for attaching V-belts and poly-V-belts. The structure itself is quite heavy, so during manufacturing at the factory holes are made to reduce weight.
The part comes in two types - a crankshaft damper pulley and a regular one. Unlike the damperless part, the part has massive rings. There is a gasket on the outside, which is located separately from the base. The gasket reduces vibrations. In addition, the part is equipped with an outer disk and periphery connected by durable rubber. The rubber gasket protects against temperature changes and other influences. With prolonged use of the vehicle, the gasket wears out. Therefore, it needs to be changed from time to time in order to keep intact the more important part - the massive disk. External aluminum car part with irregularities. The toothed coating facilitates the operation of the part position sensor.
When and why to change the front oil seal
The manufacturer recommends replacing the front crankshaft oil seal of VAZ 2101-2107 engines every 150,000 km. However, in practice this replacement needs to be done more often. Accelerated wear of the sealing element and the appearance of engine oil leaks are caused by:
We also do not rule out hardening of the bracelet due to natural aging and the possibility of manufacturing defects - unfortunately, the quality of parts for rear-wheel drive VAZ models leaves much to be desired.
It is impossible not to notice damage to the sealing element - the rotating pulley disperses the oil in the front of the engine and throughout the engine compartment. However, you should not think that such a malfunction only leads to lubrication of the units and a decrease in the lubrication level. If engine oil gets on the alternator belt or other rubber parts, it can quickly damage them.
Please note that the appearance of a leak through the engine seals is caused by another factor - an increase in crankcase gas pressure. For this reason, be sure to check the cleanliness of the engine ventilation system.
Something else useful for you:
Possible faults
Part designed to last for 10 years.
List of possible problems:
- a burst rubber layer, which causes noise when the engine is running (a sign is the characteristic hum and timing noise);
- spontaneous unscrewing by cut parts;
- worn grooves, which affect premature belt wear;
- when beating during an accident, part of the part may break off, which leads to further breakdowns (therefore, after an accident, it is important to check the technical serviceability of the AvtoVAZ);
Dismantling and replacement
Regardless of the design, where the part is located, it is important to remove and install it in the same order. Depending on the location of the motor, the part is located in the front part behind the cooling radiator. But if the motor is placed across the engine compartment, then your hand will not reach the part. Because to remove the crankshaft pulley, you need to remove the right wheel. If it is difficult to change, it makes sense to pay attention to the drawing, the work will speed up.
The vehicle is rolled onto the inspection hole and secured so that the car does not move from its place. To get there and remove the structure, you need to unscrew all the parts that impede access (air filter, mud flaps, etc.). Remove the generator belt. Next, open the clutch block plug and insert a pry bar into the hole to lock the flywheel.
The elements of the part are characterized by strong fixation, so they are not easy to remove. To turn a part, it is necessary to make a lot of effort. If dismantling is performed for the first time, it will be difficult to unscrew the crankshaft pulley. The reason is that factory production is characterized by strong tightening of the component parts.
Important! The right screw pattern means that the unscrewing process occurs counterclockwise. The car part spins in the other direction, so if it has oxidized, it is not so easy to disassemble it; it is useful to use additional means.
How to unscrew the crankshaft pulley nut
When turning fasteners, it is important to follow the recommendations, then the process will take at least 15 minutes. The effort should be applied as close to the camshaft as possible:
- use a pry bar to pry it up from all sides;
- If necessary, use a special universal crankshaft pulley puller for this part.
The device is presented in the form of a hairpin with 2-3 grips. The end of the gripper is secured to the edges of the part, and the end of the pin is placed in the middle of the shaft.
Scroll clockwise. But not all brands of cars turn clockwise; in some cars, the work must be done in the opposite direction. In this case, it is important to put your gear lever in 4th speed and turn on the handbrake.
If you can’t turn it, the lever should be in the neutral position. The next step is to remove the candlesticks. The key is placed on the floor or on the rear side member and turned in the direction of movement of the device.
All maneuvers make it easier to scroll, so further actions must be performed manually; if necessary, lubricate with brake fluid or WD grease. In addition, tapping the edges of the head can make your work easier.
How to remove the crankshaft pulley bolt
To do the job efficiently, the disassembled machine is placed on a stump. The pin holds the part together and is usually found in front-wheel drive automatic cars. The thread is designed in such a way that it is tightened during the torque when moving.
It is necessary to perform actions that open access to the base. To do this, it is important to stop the rotation well. A mount is used as a fixation. The tool is inserted into the flywheel gears. It must be adjusted securely so that it does not fall out during the turning process. Therefore, it is better to do the work with an assistant. Next, put a socket head of the same diameter as the pin onto the pin, attach a lever and an extension (a piece of durable pipe). After this they begin to slowly unscrew it.
Important! The longer the extension, the easier it is to unwind.
People's automobile experience
The difficulty of dismantling lies in the specially selected strong connection, without play. The fasteners are tightly screwed. They practice using a pry bar, while slowly pressing on the back surface of the part.
When purchasing a part, you must have new fasteners. You will need a front oil seal and suspension belts. When purchasing, you need to pay attention to the grooves and marks. They must be free of defects. Otherwise, after a while you need to replace everything with a new one.
Important! When performing work, you need to pay attention to the crankcase ventilation system. If contaminated, under the influence of excess pressure, the oil seal will leak lubricant. When screwing, you need patience and, as a rule, you can achieve results after 3-4 attempts.
Installing the pulley on the crankshaft
To properly install the crankshaft pulley, it is necessary to lubricate it with grease or other viscous agent. This will make the fastener installation process easier. To put it on, tilt the washer slightly to the side and pull it onto the base. Next, you can use a tapping motion with a hammer to process the hub through a soft rubber gasket. Then, in the reverse order, you need to tighten the other parts of the car.
Important! If you do not fit it tightly into the groove, then everything will hang out, so you will need to replace it with a new one soon.
A little materiel
Before you twist anything, you need to know where this part is located and what functions it performs. So, in very simple words, the crankshaft pulley is a special wheel that is located outside the engine.
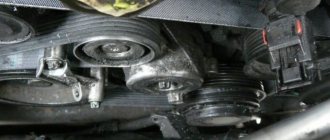
Without a pulley, the operation of the internal combustion engine and the movement of the car is impossible, since the torque from the crankshaft itself will not be transmitted to other engine components. When looking for this part under the hood of a car, you should focus on the generator. The object you are looking for will be below.
It fits onto the protruding part of the crankshaft and is held from turning by a key. It is secured with a nut (less commonly, fastening is done with a bolt). How to unscrew the crankshaft pulley bolt is the main problem.
There are several types of crankshaft pulley:
- Pulley for V-belt. This type is present in any Soviet-made car (including trucks and buses). It has an all-welded or solid-cast design with a groove that completely follows the profile of the V-belt.
- Toothed pulley. It is used on many modern engines after the timing chain has been replaced with a timing belt in order to lighten the entire structure. This belt has teeth on its inner surface. Accordingly, teeth are also made on the outer rim of the pulley.
- Damper pulley. Found on many light-duty vehicles, as well as minibuses. This pulley consists of two parts: an outer working disk and an inner race. A rubber damper pad is placed between them.
This is done in order to reduce the impulse mechanical impact experienced by the gas distribution mechanism and timing belt during engine starting and sudden changes in crankshaft speed. The side effect in this case is the relatively short life of the pulley, and also the fact that the part requires increased attention from the driver or mechanic.
After getting acquainted with the part itself, you can consider situations in which you will have to unscrew the crankshaft pulley nut or the bolt securing it.