Sometimes it is not so easy to remove a damaged or damaged pulley, as it oxidizes and sticks tightly to the generator. The question arises: how to unscrew the generator pulley? In order for the removal to go smoothly, it is necessary to use a special key, which you need to stock up on before carrying out work, and it is called a key with a fine-slotted profile. But, if you do not have such a device, you can use a special fluid such as VD-40 or brake fluid. You need to drop a few drops onto the problem area. Please note that spilling brake fluid on exposed areas of the body can cause burns. Therefore, adhere to safety measures. After completing these steps, it can be easily removed from the generator. The generator pulley is replaced only in cases where it is completely worn out. In all other cases it can be repaired.
Repair is only appropriate if it has minor damage. Next, I will talk about minor pulley failures and how to fix them.
If there is a slight play, it can be corrected. If the pulley is loose, then it is definitely faulty. To get rid of the play, you need to tighten the mounting bolts to the generator. If there is a small crack on the surface, it can be fixed by soldering. If the service life of the protective cover has expired, it can be replaced. But it is forbidden to use it more than once. Installing it is quite simple. Use without a protective cover is strictly prohibited, as you will deprive this element of any protection.
To carry out removal, replacement or repair it is not necessary to have special skills. You can actually do this process yourself, but replacing the generator pulley is easier when you have a generator pulley puller on hand, since it not only makes the whole process easier, but also speeds it up.
It is important, if you have already started repairing one part of the generator, to check the others at the same time, at least make a visual diagnosis. This will allow you not to waste time on car repairs so often.
Location Features
To begin with, it must be said that in most cars the motors are located in the same position, due to which they spin correctly. And, the order of work will be general. To prevent the generator pulley from turning, many recommend using improvised metal means that are inserted into the hole of the pulley and the oil pump.
But it may also happen that the specified pump is placed in such a way that certain parts may be damaged during the process of dismantling the pulley.
Sometimes a crowbar or screwdriver is used
In addition, it is made of aluminum and has very small dimensions, but significant effort must be made in the work. So, you need to be very careful not to break the pulley.
Connection diagram
The connection diagram for the VAZ 2107 generator is shown in the photo:
Wiring diagram for VAZ 2107 generator circuits
On the generator connection diagram 37.3701: 1 – battery, 2,3,5 – rectifier diodes, 4 – generator assembly, 6 – stator winding, 7 – charge relay, 8 – rotor winding, 9 – capacitor, 10 – fuses, 11 - indicator lamp, 12 - voltage meter, 13 - relay, 14 - lock.
Classic methods
Essentially, standard dismantling methods involve two main methods.
You will need:
- jack to remove the wheel
- tool kit
- hydraulic jack to lift the engine, or replacing it with a “stump”
First way
In the first case, we will have to make significant physical efforts, therefore, you need to clearly focus on your own strength. We are talking about the need to put stones or special stops under the wheels that would not allow them to move during operation. The gearbox should, if possible, be set to maximum gear. The higher it is, the easier it will be for you to cope with the task. In third and lower gears, it will be almost impossible to make a turn with your hands. But everything is unscrewed by hand. To make this task easier for yourself, it is appropriate to use a lever that will reduce the necessary effort. In some cases, the length of the lever can reach one and a half meters.
Getting to the bolt is not always easy
Second way
As for the second method, it involves placing the vehicle in neutral gear. Next, you need to install a suitable sized head on the bolt with a piece of pipe, which, in turn, rests on asphalt or concrete. Ordinary soil will not be able to hold it. But the bolt itself is already loosened by the starter.
This saves a lot of effort and makes it possible to complete the task the first time. The main thing is to take into account the reliable fixation of the pipe so that it does not jump out and damage anything around it.
Be careful not to lose the pulley key
But, in any case, the threads in this nut are correct, so you need to unscrew it counterclockwise, with some exceptions, which we will now look at.
conclusions
After the pulley has been removed, you can begin installing a new part, before installing which the seat will need to be lubricated with grease. At this point, the work can be considered completed.
How to change (remove and install) a car's electric generator belt pulley. Detailed instructions. Subtleties and features. Personal experience (10+)
Replacing a car alternator pulley
Replacing a car generator pulley in a home workshop is quite possible. To do this, you only need an available tool.
The generator pulley should not be clamped in a vice, as it can easily be deformed. You will need a special (rather simple) homemade device.
After installing the pulley, you need to take care to securely fix the nut so that it does not unscrew.
In the previous article, I wrote how to choose a suitable analogue of the original generator. In particular, it often happens that the generator as a whole fits, but the pulley
designed for a different belt. The pulley can be narrower (designed for a poly V-belt with fewer ribs), wider (designed for a poly V-belt with a larger number of ribs), or even designed for a belt of a different design.
Reverse motion can significantly complicate the dismantling process
But it also happens that the engine works, as they say, “in the other direction.”
We are talking about the fact that the motors are installed with belts to the right. So, they will spin in the opposite direction, that is, counterclockwise. This difference may seem insignificant, but it greatly complicates the search for an answer to the question of how to unscrew the crankshaft pulley.
Moreover, such a procedure may be required every hundred thousand kilometers. We are talking about the need to replace the timing belt. And this does not apply to emergency situations, such as replacing the oil seal or other repair work.
For example, a seventeen bolt can be tightened to a torque of up to one hundred and eighty-five Nm, which can be considered simply a huge indicator.
And to unscrew it you will need even more force. The second method described above will not work, since the starter will spin the motor in the other direction, only tightening the bolt more . Pressing the brake pedal will lead to a similar result, since the transmission will spring back, but the bolt itself will remain in place.
We install a new one
There are usually no problems with installation. It is only important to remove all traces of VDeshka (rinse with gasoline or acetone) and securely fix the nut so that it does not unscrew. You should not rivet it, as at home you can bend or damage something. I wrap it around paint or varnish. Read also about other ways to fix a threaded connection. When we tighten the nut, we fix the pulley in the same way as when unscrewing.
Unfortunately, errors are periodically found in articles; they are corrected, articles are supplemented, developed, and new ones are prepared. Subscribe to the news to stay informed.
If something is unclear, be sure to ask! Ask a Question. Discussion of the article.
Carburetor. Device. Operating principle. Advantages. Advantages. N. Design and principle of operation of the carburetor of an internal combustion engine.
Do-it-yourself electrical installation work. Tool, wire stripping, . Carrying out electrical, electrical, electrical installation work with your own.
Explanatory notes - examples, templates, samples. Explanatory letter. Sample. Correct structure, instructions, explanations.
How to hammer a nail into a knot. You really need to hammer a nail into a knot, how to do this.
Reasons for the flame going out, the stove burning weakly or too hotly. Review of kitchen gas stove malfunctions. Weak or too strong combustion.
Hydraulic level - choosing the right one when purchasing. How to choose a proper building level. There are a lot of defects on sale. How not.
Gas stove. Conversion to natural / liquefied, bottled gas. Stop. How to convert a kitchen gas stove to another gas, swap burners, for.
How to ensure electrical wiring safety? How to install machines and... How to ensure electrical wiring safety? Automation. Electric automatic machine, .
Tool making
But nothing is impossible, and you can make the appropriate tool yourself. You need to purchase a 54 heating lock nut so that the internal thread diameter is thirty-nine millimeters and the width does not exceed ten millimeters. Now it is important to grind off its edges by one and a half millimeters, and then weld a flat handle, the length of which is near the twenty-centimeter mark. That's all, the tool is completely ready for work.
This is how garage Kulibins do it to save money on buying original keys
Some pulleys have corners that have slightly rounded edges, so that the parts on the nut that are mating can be cut off a little.
Many drivers weld a pre-ground workpiece to a VAZ crankshaft nut wrench to obtain a universal tool suitable for most modern cars. In addition, such a handle is quite convenient to rest on the drive shaft of the front axle wheel.
Having unscrewed the bolt with a standard seventeenth head with an extension and a strong wrench, we continue to work. Don't forget about basic safety rules. So, to prevent the key from jumping off, you need to support the extension cord on a stand that will not jump out and break. Sometimes, even the wheel does not need to be dismantled for such work. Exceptions appear only when the car has tires with a large diameter (as indicated by the inscriptions on the tires) that exceed the standard dimensions. Then they take up more space in the arches. And, you will have to remove them, or use a wrench with a universal joint.
What is a standard product?
It is a standard voltage regulator - an additional conductor, through which the required voltage at the generator output is analyzed and maintained. After all, the voltage drop at the output is an eternal problem not only on the UAZ Patriot SUV, but on all cars. In the absence of a regulator, this drop can be eliminated by replacing the generator with a new one or by rewinding the stator winding. But this process is quite labor-intensive and expensive. Thus, if the design of the generator does not provide for the installation of a standard voltage regulator, then an additional three-level one is installed. The presence of a standard product allows you to replace it with a new one in case of failure. Due to the fact that this product maintains a constant voltage at the generator output, this ensures optimal operating conditions for all electricity consumers. This increases the reliability of all electrical equipment of the UAZ Patriot, as well as the long service life of the battery.
But to make sure that the unit produces the required voltage to the battery, testing should be carried out.
Checking the correct operation of the device
It is not difficult to check the serviceability of the device on a UAZ Patriot SUV. To do this, perform the following steps:
- First, you need to turn off all power consumption devices on the SUV, leaving only the side lights.
- Attach the tester probes to the battery terminals to which power is supplied from the unit.
- Start the engine and at idle speed with the tachometer reading 1000-1200 min-1, the potential difference should be measured. The value should be between 13.5 and 14.2 V.
You can also connect a test lamp to the brushes of the device, and apply a voltage of 12 V to the contacts. The lamp should light up, and if not, then the product is faulty and needs to be replaced. The voltage regulator is replaced by removing the unit itself from the generator if the output voltage is less than 13 V.
Replacement
Replacing the voltage regulator on a UAZ Patriot SUV goes like this:
- Initially, you should disconnect the car from the battery power in order to avoid a short circuit.
- The wires are disconnected from the terminals of the unit, after which the plug is removed.
- The alternator drive belt is removed, it is unscrewed and removed from the car.
- Using a 10mm wrench, you need to unscrew the nut on the device.
- The capacitor wire ends are removed from the positive terminal.
- Using a size 8 wrench, you need to unscrew the nut that secures the capacitor.
- After unscrewing, you can remove the capacitor.
After removing the product, a new one is installed in its place. The sequence of installation of the regulator on the UAZ Patriot is similar to removal.
After replacing the device, you must similarly check its serviceability.
Checking the serviceability of the brushes
The standard regulator has brushes that wear out over time and require replacement. But it is necessary to replace not only the brushes, but also the entire regulator assembly, since the device is non-separable. If the length of the brushes extending from the brush holder is less than 4.5 mm, then the product should be replaced. Instead of a standard device, you can install regular brushes with brush holders, and then install a three-level regulator. To check the serviceability of the brushes, perform the following steps:
- Disconnect the block from the brush holder.
- Using a screwdriver, unscrew the two screws that secure the brush holder.
- The brush holder is removed and the length of the brushes is checked. If it is less than 8 mm, then the product requires replacement. Installation is carried out in the reverse order of removal.
Main product parameters
Voltage regulators are available in different types and types, but they all have an almost identical design, the housing of which is fixed to the generator with two screws.
The photo above shows a regulator whose parameters are as follows:
- Adjustable voltage in the range of loads and rotor speed is 14.4 V.
- Permissible pulse overvoltage is 200 V.
- Rated current - 5-8 A.
Such devices are often used in cars where the electrical circuits are of poor quality. Therefore, these days it can be found on cars that are more than 10 years old.
To summarize, it should be concluded that the regulator is a necessary device, without which, first of all, the battery suffers. It is the health of the battery that determines whether the car will start or not.
And to start the UAZ Patriot SUV you need a considerable starting current, so pay special attention to such a small but important detail located in the design of the generator
Gallery of Lifan car pulleys
The appearance of the pulleys of Lifan cars is useful during dismantling and installation.
Work related to replacing the engine timing belt, crankshaft and camshaft toothed pulleys, the engine front oil seal, as well as the generator drive itself requires dismantling the crankshaft pulley. This element is found on both domestic cars and foreign cars. Actually, most motorists have a question: how to unscrew the crankshaft pulley? And to be even more precise, the fixing bolt on the crankshaft flange, and in which direction to turn the key. Let's consider.
Repair
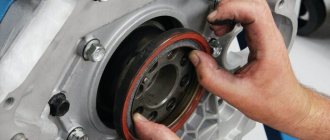
In order to repair it, you must first figure out how to remove the pulley from the generator. To remove this element, you need to do a series of sequential actions:
- Open the hood, remove the terminal from the battery;
- We remove the belt and take out the generator;
- Sometimes it is not so easy to remove a damaged or damaged pulley, as it oxidizes and sticks tightly to the generator. The question arises: how to unscrew the generator pulley? In order for the removal to go smoothly, it is necessary to use a special key, which you need to stock up on before carrying out work, and it is called a key with a fine-slotted profile. But, if you do not have such a device, you can use a special fluid such as VD-40 or brake fluid. You need to drop a few drops onto the problem area. Please note that spilling brake fluid on exposed areas of the body can cause burns. Therefore, adhere to safety measures. After completing these steps, it can be easily removed from the generator. The generator pulley is replaced only in cases where it is completely worn out. In all other cases it can be repaired.
Repair is only appropriate if it has minor damage. Next, I will talk about minor pulley failures and how to fix them.
If there is a slight play, it can be corrected. If the pulley is loose, then it is definitely faulty. To get rid of the play, you need to tighten the mounting bolts to the generator. If there is a small crack on the surface, it can be fixed by soldering. If the service life of the protective cover has expired, it can be replaced. But it is forbidden to use it more than once. Installing it is quite simple. Use without a protective cover is strictly prohibited, as you will deprive this element of any protection.
To carry out removal, replacement or repair it is not necessary to have special skills. You can actually do this process yourself, but replacing the generator pulley is easier when you have a generator pulley puller on hand, since it not only makes the whole process easier, but also speeds it up.
It is important, if you have already started repairing one part of the generator, to check the others at the same time, at least make a visual diagnosis. This will allow you not to waste time on car repairs so often.
Which way to unscrew the crankshaft pulley?
This question is asked by many car enthusiasts. To prevent the thread from breaking or, even worse, the bolt head from twisting, it will not prevent the driver from figuring out which way to unscrew the crankshaft pulley bolt.
Since the pulley fixing element and flange have a normal right-hand thread, it can be unscrewed in the same way as the rest of the car’s nuts (counterclockwise).
What bearings are on the VAZ 2110 generator?
To the question: “What bearings are on the VAZ 2110 generator?” you can answer knowing the following characteristics of the car:
- What year is the car?
- 16 valves?
- Injector?
- Front or rear bearing?
In the “Ten” generator of a late production year, components of a different standard size and marking are installed, since the diameter of the rotor axis is different.
Bearing by number in GOST (front and rear):
- 6-180302 and 6-202 (according to ISO: 6302-2RS, 6202-2RS) - late models;
- 6-180303 and 6-203 (according to ISO: 6303-2RS, 6203-2RS) are new models.
To accurately determine the markings of parts, before buying bearings you should take measurements of the overall dimensions of the products, measure the rotor, and compare the data obtained in the table.
Features of work
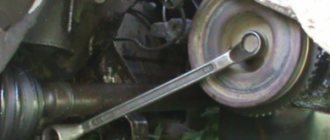
At first glance, there is nothing difficult in simply removing the bolt securing the pulley to the engine crankshaft flange. However, this is not quite true. The crankshaft pulley bolt very rarely unscrews and always sticks. Therefore, there is a risk of breaking it. First we need to get to this pulley. To do this, unscrew the bolt securing the generator to the tension bar. The latter is attached to the engine cylinder block.
The generator is moved towards the engine, and the drive belt is removed from the pulleys. It can be rivulet type or serrated. Now, having reached the desired element, proceed to further actions.
Removing and installing the generator - step-by-step procedure:
1. As always, first of all, remove the wire from the “–” terminal from the battery.
3. Disconnect the plug with wires from the connector on the generator marked “D”.
4. Next, you need to move the rubber cap, unscrew the nut and remove the wires with the terminal from the contact bolt (marked “B+”).
5. Remove the tension bolt securing the electric generator from the front.
6. Completely remove the nut that is attached to the top.
7. Remove the threaded tension sleeve.
8. Now proceed to the lower mounting of the generator - completely unscrew the nut with a wrench.
9. Now you can remove the spacer sleeve.
10. Next, carefully holding the electrical equipment with one hand and with the other, remove the last mounting bolt and remove the car generator.
How to unscrew the crankshaft pulley of a VAZ
On domestic cars of the VAZ “Classic” family, as well as on other cars, the element is removed in the same way. The only difference will be what kind of gearbox is installed on the car in which such work is being done. Which direction should I unscrew the crankshaft pulley bolt? Definitely counterclockwise.
To simplify the task, you can call an assistant, who must engage direct gear (3 or 4) and keep the brake pedal depressed. At the same time, you will unscrew the pulley bolt. If the car is rear-wheel drive, then you can do without an assistant. Just put the car on the handbrake and unscrew the bolt in the same way. The work can be done from the side of the hood or below in the inspection ditch. The main thing is that it is convenient to work. You can also jack up the car and remove the front right wheel.
This will provide good direct access to the crankshaft pulley, which is unscrewed with an extension socket. The mechanism bolt rarely “gives in” immediately and is constantly stuck with threads to the inner hole of the crankshaft flange. Therefore, it is always very difficult to rip it off. If you cannot unscrew the pulley mounting bolt, then a long wrench or pipe can come to the rescue. The element is put on the key. Grasping the very edge of the collar, gathering, as they say, all your strength into a fist, you should try to remove it again. Actually, the longer the lever, the easier it is to work.
Varieties of design
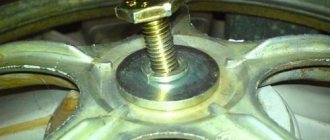
Classic pulleys are secured to the shafts with keys. However, this type of fastening is practically unsuitable for frequently changing and alternating loads - the key is cut off or the seating groove is broken, backlash appears, so the generator pulley is put on the shaft without tension, Morse tapers and keys, and is pressed with a nut.
Fastening the pulley with a clamping nut
This method ensures no spinning even at maximum speed, taking into account that the shaft diameter is 17 mm, the nut thread is M16, and the steel/steel friction coefficient is 0.15 units.
The nut must be tightened with a force of 40 - 50 Nm in two stages - up to 20 Nm, then tightened to an angle of 70 degrees.
Attention: The threaded connection of this unit is self-tightening, therefore engraving washers, nuts with polymer liners and capping of ordinary nuts are prohibited. When using these techniques, the pulleys, on the contrary, are unscrewed and rotated on the shaft.
The problems are completely solved by the inertial pulley of the generator - an overrunning clutch of the following design:
- the outer race copies the pulley, has grooves for V-belt or poly-V-belt transmission, the same outer diameter as a regular pulley;
- the inner race is a bushing that fits onto the generator shaft;
- A damper rubber layer, a spring and a roller bearing of a special design are installed between the clips.
Overrunning clutch design
This scheme makes it possible to smooth out the crankshaft rotation pulses due to the inconsistent coupling of the races with each other. During sharp acceleration, the outer race smoothly catches up with the inner sleeve. When braking, on the contrary, the inner race equalizes the angular velocity relative to the outer pulley.
A special tool has been created for installing and dismantling overrunning clutches, analogues of which can be made on your own much cheaper.
For owners of cars with automatic transmission
How to unscrew the crankshaft pulley on an automatic machine? If an automatic gearbox is installed, then on a rear-wheel drive vehicle the “Parking” gear is set. The handbrake is turned on and then the element is unscrewed in the same way as on a manual gearbox. It is more difficult if the car is front-wheel drive. In this case, it will not be possible to remove the element as if it were a manual transmission (with the gear engaged and the brake pressed).
There is a high risk of damaging the gearbox. In this case, you need to lock the crankshaft so that it cannot rotate in any other way. Insert the assembly between the teeth of the engine flywheel ring gear through the hole in the gearbox bell. It is supported so that it cannot jump off and damage the teeth on the flywheel. In some cases, to get to the flywheel, you need to unscrew the engine starter. To do this, you will need an inspection hole, a lift or an overpass.
We put a narrower belt
In the first two cases, this solution can be applied. A narrower belt is installed. If the generator pulley is designed for, say, 6 wedges, and the engine shaft pulley is designed for 5, then we take a five-ribbed belt; if the generator pulley is designed for 4 wedges, and the engine pulley for 5, then we take a four-ribbed belt. In general, we take the smaller number of clients on the generator and on the engine shaft. Then part of the larger pulley (or pulleys, since there may be several of them, for example, a pump pulley) will remain free. Nothing wrong with that. Based on my experience, I can say that such a belt runs normally. You just have to change it more often.
Second dismantling method
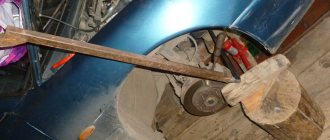
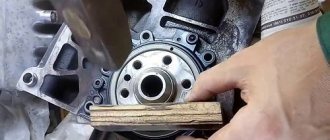
There is another tricky way to unscrew the crankshaft pulley. It is done independently without the presence of an assistant. Having previously removed the generator drive belt, put a head or a spanner on the bolt of the mechanism, the handle of which rests on some surface.
You should not rest it against the body or other parts of the engine compartment. When unscrewing, the key can damage units with rubber pipes, scratch and even damage the body. In the future it will become clear why. It is best to rest the key handle on the ground or floor, placing a wooden board under it. The main thing is that there is a hard and smooth surface. If the key does not reach the stop, then by moving the head or rotating the crankshaft, rest it against a hard surface.
Now, turning on the ignition, you need to crank the engine with the starter. Its force is more than enough to break the pulley fixing bolt. The main thing is not to overdo it and properly rest the key so that it stands firmly in place and does not wobble. Even a slight displacement will cause it to jump off the bolt head and damage the engine compartment. Under no circumstances should you start the engine, and if you do manage to do so, turn it off immediately.
To prevent the engine from starting, you can remove the fuel supply hose from the fuel pump to the carburetor if it is a carburetor engine, or the hose entering the fuel rail if the engine is injection.
Replacing crankshaft liners VAZ-2107
Remove the hood and battery
Drain the oil from the engine (see Changing the VAZ-2107 engine oil).
Drain the coolant (see Replacing the coolant in a VAZ-2107).
We remove the radiator together with the thermostat (see VAZ-2107 radiator replacement).
Remove the carburetor (see Replacing the VAZ-2107 carburetor).
Remove the fuel pump.
Remove the ignition distributor (see Ignition distributor VAZ-2107 repair).
Having sketched the connection order, disconnect the hoses and wires from the engine.
To make it easier to dismantle the engine, remove the cylinder head (see Replacing the VAZ-2107 head gasket).
Remove the coolant pump (see Replacing the VAZ-2107 coolant pump).
We unscrew the upper or lower nuts securing the engine mount (see Replacing the VAZ-2107 engine mount).
We unscrew the bolts securing the clutch housing to the engine.
1. Fasten the lifting device cables to the block and lift it.
By placing a jack under the gearbox and slightly rocking the block, we disconnect the engine and clutch housing.
We install the cylinder block on the stand.
We remove the clutch. Remove the pulley, camshaft drive cover, chain and oil pump drive gear. Remove the auxiliary drive shaft.
Remove the flywheel and the rear crankshaft cuff holder (see Replacing the rear crankshaft cuff).
2. Using a 10mm wrench, unscrew the fourteen bolts securing the oil pan to the cylinder block...
3...and remove it along with the sealing gasket. We remove the oil pump (see Oil pump removal and disassembly VAZ-2107)
Using a 14mm socket, unscrew the two nuts securing the connecting rod cover
Using the wooden handle of the hammer against the connecting rod, we push the piston out of the cylinder.
Similarly, remove the remaining three pistons.
Using a 17mm socket, unscrew the two bolts securing the crankshaft main bearing cover...
In the same way, remove the remaining four main bearing caps.
They are marked with marks corresponding to their serial number (count from the toe of the crankshaft).
On the last (fifth) cover there are two marks stamped, spaced along the edges.
Marks on the main bearing caps
We remove the crankshaft.
From the grooves in the bed of the fifth main bearing, we remove two half rings of the crankshaft thrust bearing.
The steel-aluminum liners installed in the beds of the 1st, 2nd, 4th and 5th main bearings have a groove.
The shell of the 3rd bearing does not have a groove (similar to the shells installed in the main bearing caps).
We disassemble the crankshaft (see Disassembling the crankshaft of a VAZ-2107).
What can a faulty pulley cause?
First, you need to understand the reasons for the breakdown of this element in order to protect the car owner from unplanned repairs. Breakage can occur even from a small blow; this is due to the fact that during production this part, as well as its inner ring, was not hardened. And this makes them quite fragile. It is entirely possible that it can be destroyed by the presence of even the most insignificant free movement. Therefore, it needs to be well strengthened during installation. During the production process of this element, micro scratches are formed on its surface. These scratches can grow over time, causing the part to malfunction and requiring replacement.
So, what can pulley malfunctions lead to?
- Malfunctions are fraught with consequences not only for the operation of the main unit, but also for the crankshaft. The fact is that while the car is moving, the crankshaft is also in constant motion. Thus, minor vibrations appear, but this is enough for the crankshaft to break. So, it serves as some of his protection and that is why it is so important. It also has a beneficial effect on the operation of the belt, which moves without strong vibrations. The belt also stretches less, which allows it to remain in good condition longer. And if it’s not changed in time, it might even burst.
It is very important to monitor the operation of the pulley, because its malfunction can negatively affect the operation of your machine.
Replacing the alternator pulley in a timely manner can extend the life of both certain small parts and large components of the car.
Signs of a mechanism malfunction
Numerous tests by a number of independent automotive companies have proven the high efficiency of the inertia pulley. The design will reduce the load on important engine components, reduce noise and vibration levels. But, you need to understand that this mechanism also has its own resource - a little more than 100 thousand kilometers. Structurally, an overrunning clutch has much in common with a rolling bearing; malfunctions and symptoms are also identical. It can fail by jamming.
Main symptoms of a malfunction:
- Noise appears when starting the engine;
- Observation of tensioner clicks;
- Malfunction of the belt drive.
Breakdown can be caused by various factors: mechanical damage, dirt, incorrect installation of the generator, natural destruction. Further operation of the vehicle will result in accelerated wear of the alternator belt and other related elements
It is important to respond in time to the first signals of failure in order to quickly and with minimal financial costs eliminate the consequences of failure of the inertial pulley