Every second car enthusiast who tries to repair his favorite four-wheeled friend with his own hands has encountered the problem of how to remove the crankshaft pulley. After reading the instructions in the maintenance and repair manual, at first glance, the procedure does not seem complicated, however, when you first try to unscrew the ill-fated bolt, it turns out that this is not so easy. It is completely unclear how to fix the crankshaft so that it does not rotate. Another problem is where is the best way to get to the treasured bolt. Removing the crankshaft pulley causes a lot of trouble because it is too tight. There is a high probability of damaging many parts of the engine compartment or the paintwork of the body.
The problem is that the crankshaft pulley bolt (or nut, depending on the model) is tightened with great force during installation. This is done so that it does not unwind spontaneously, since if unscrewed, serious damage and expensive repairs cannot be avoided. The degree of tightening gradually increases as the engine operates and is aggravated by sticking, coking, and corrosion.
In reality, the entire dismantling process can take 10-15 minutes, but there are some techniques you need to know and use. Different motor models use either a bolt or a nut to secure the pulley. Each option should be considered.
How to unscrew the crankshaft pulley nut?
Removing the crankshaft pulley
The nut at the end of the crankshaft holding the pulley is a sign of the engine of a classic rear-wheel drive car like VAZ from model 2101 to 2107, Niva and the like. Such a nut is also called a “ratchet”, since it can have ledges for a “crooked starter”.
It is better to do the work above the inspection hole. The crankshaft should be secured by placing the gearbox in 4th gear and applying the parking brake. You should stock up on the following tools in advance:
- socket or socket wrench 36 (or 38);
- lever extension in the form of a piece of pipe.
While under the car, try to unscrew the nut with a wrench with a sufficiently long lever. If the attempt is unsuccessful, put the gearbox in neutral and proceed as follows:
- the candlesticks are removed;
- while in the pit, install the key and extension so that the end rests on the floor or spar as the shaft rotates;
- turning the key in the ignition switch gives a short-term impulse.
As a rule, on the first or second attempt the nut comes off and is then unscrewed with a regular wrench. Don't forget to loosen and remove the alternator belt.
How to unscrew the crankshaft pulley bolt?
Unscrewing the crankshaft pulley
The bolt holding the pulley is prevalent in engines in front-wheel drive cars, when the block is located perpendicular to the axis of the car. In this case, you will have to tinker more, since it is more difficult to get to the bolt. To work you should prepare:
- jack;
- “tragus” (stump);
- a socket to the size of the bolt with an extension and lever;
- set of automotive tools.
In search of an answer to the question of how to remove the crankshaft pulley, many car enthusiasts begin to look for an opportunity to do this without prior preparation. By definition, such attempts cannot be successful.
In order to correctly remove the pulley, you must perform the following manipulations::
- the right front part of the car is lifted, the wheel is removed;
- the car is installed on a “tragus”;
- From the top side of the hood, all parts that impede access are removed: the air filter and the engine mudguard;
- the alternator belt is removed;
- to fix the crankshaft, the plug on the clutch block is opened and a pry bar is inserted into the resulting window to jam the flywheel teeth;
- under the wheel arch, a head with an extension and a lever is put on the pulley bolt;
- the bolt is unscrewed counterclockwise.
In the vast majority of cases, the bolt can be unscrewed. If it does not give in, then you can add the length of the lever. If this does not help, then you should use the help of the starter as described for the pulley nut in the “classic”.
We remove the pulley using folk automotive experience
Any threaded connection, even if tightly tightened. can be untwisted with less effort if you use some folk-automotive tricks. The problem of how to unscrew the crankshaft pulley ceases to be such if you moisten the bolt head or nut in advance with special WD oil, vinegar or brake fluid. Sometimes lightly tapping the edges of the nut helps.
Unscrewing a bolt or nut does not always solve the problem, since the pulley is held quite firmly on the shaft. You can remove the pulley using a regular pry bar, carefully prying it off from different sides. It is important that the force application point is as close to the shaft as possible. For hopeless cases, it is necessary to use a crankshaft pulley puller. This is a special device, which is a pin with a nut on which 2-3 grips are attached. The ends of the grippers are secured to the edges of the pulley, and the end of the pin rests against the center of the shaft. By twisting it clockwise, you can gradually pull the pulley off the shaft.
You should not be sure that in all cars, without exception, the crankshaft rotates clockwise.
For example, in some Honda cars the crankshaft rotates counterclockwise. It follows from this that the thread on the pulley nut (bolt) will be left-handed.
What is the thread on the VAZ 2107 crankshaft pulley: description of the part and step-by-step instructions
The manufacturer recommends replacing the front crankshaft oil seal of VAZ 2101-2107 engines every 150,000 km. However, in practice such replacement has to be performed more often. Accelerated wear of the sealing element and the appearance of engine oil leaks are caused by:
In addition, we cannot rule out hardening of the cuff due to natural aging and the possibility of a manufacturing defect - unfortunately, the quality of parts for rear-wheel drive VAZ models leaves much to be desired.
When and why to change the front oil seal
It is impossible not to notice damage to the sealing element - the rotating pulley scatters oil in the front of the engine and throughout the engine compartment. However, do not think that such a malfunction only leads to oiling of the units and a decrease in the lubricant level. If engine oil gets on the generator belt and other rubber parts, it can quickly render them unusable.
Keep in mind that the appearance of a leak through the engine seals is provoked by another factor - increased crankcase gas pressure. For this reason, be sure to check the cleanliness of the engine ventilation system.
Step-by-step instruction
Due to the limited space between the front of the engine and the radiator, it is difficult to press in a new oil seal without distortion. For this reason, experts recommend replacing the sealing element with the front engine cover removed.
Of course, doing this on a mechanic’s workbench is much more convenient, but there are also pitfalls here.
As practice shows, after such dismantling it is difficult to restore the tightness along the junction line of the oil pan, and in addition, there is a danger of breaking the internal threads in a rather delicate duralumin cover.
Car battery heater
For this reason, we recommend using the more common and less labor-intensive method, in which the damaged oil seal is replaced directly on the engine. This work will require your attention and accuracy. It is more convenient to perform all manipulations on a lift, overpass or inspection pit.
To replace the crankshaft oil seal, you do not need any special knowledge or expensive tools. The work can be done with your own hands, spending 1-2 hours on it. By being careful in your work, you will forget about oil leaks for a long time and will be able to easily keep the engine compartment clean.
Good night everybody! Share your experience on how to unscrew the crankshaft pulley nut on a classic. I hit the key with a hammer, and with a sledgehammer too, the ratchet key just bends. I even tried using the starter, the starter just wouldn’t turn. How to unscrew the crankshaft pulley of a VAZ 2107.
Signs of a malfunction of the VAZ 2107 crankshaft position sensor
- The first thing that may indicate the imminent death of the crankshaft sensor is an arbitrary decrease or increase in engine idle speed.
- Severe reduction in engine power
- Unable to start the engine
Removing the crankshaft position sensor
- Disconnect the contact chip from the sensor by first releasing the latch
- Using a Phillips screwdriver, unscrew the sensor mounting screw.
- After removing the crankshaft position sensor, check its operation using a multimeter
Checking the crankshaft position sensor VAZ 2107
If the crankshaft oil seal on a VAZ 2107 is damaged or worn, oil will leak from its seat. With severe wear, you will even have to often add more to the engine, since the level can drop quite quickly. In this case, it is necessary to replace the oil seal. You can do this yourself, having the necessary tools at hand, the list of which will be given below:
- Key for 41
- Chisel
- Flat blade screwdriver
- Puller
- Hammer
Removing the pulley and replacing the crankshaft oil seal
Since I still have one VAZ 2106 engine in my garage, which has not yet been sold, I decided to use it as an example to show how to replace the crankshaft oil seal.
In many classic repair manuals you can read that to replace the front oil seal, you need to remove the cover from the front, since the space between the engine and the radiator is quite small to do this work without problems.
I will show everything with the engine removed, so there were much fewer problems experienced. So, first, here is a list of the necessary tools that we will need:
How to remove a pulley from a crankshaft
So, first of all, having stopped the pulley, unscrew the nut securing it:
When the nut is completely unscrewed, you can try to remove the pulley itself. This can be done simply by prying it from the inside with the same chisel, or using a special puller, as shown in the photo:
After which we can easily remove it, which can be seen in the picture below:
Replacing the front crankshaft oil seal
In my case, everything was simple, since the engine was removed from the car and replacement was not difficult. I used the same puller to pry it from the inside of the oil seal and carefully pulled it out:
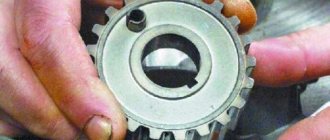
Now you can install the pulley in place, making sure it is correctly installed on the key. You can consider the procedure complete, and the VAZ 2106 ready for use!
But I once again draw your attention to the fact that if you do everything on a car, then doing it is very inconvenient and it is possible that some will even remove the front engine cover.
Replacing the front oil seal
Next, you can begin replacing the oil seal. To do this, you can pry it off with a screwdriver, or do it using one of the hooks of this same puller:
The price of a new oil seal is no more than one hundred rubles, so it’s not particularly hard on the wallet! You need to install a new one only after wiping the seat first, and do everything extremely carefully. First, we insert it exactly into its place, and then we put the old oil seal on it - and carefully punch it in a circle with a hammer until it sits tightly!
The front oil seal of the VAZ 2101-2107 engine is used to prevent engine oil leaks in the place where the accessory drive pulley is attached to the end of the crank. Although the sealing lip is made of high-quality fluorine rubber, over time its working edge wears out and lubricant leaks into the gap. Today we will share a method for replacing the front crankshaft oil seal of a VAZ “classic”. Even a novice driver can cope with the job, because to do this you don’t even have to remove the camshaft drive cover from the engine.
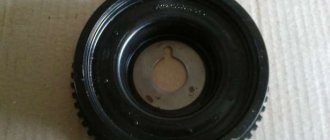
Crankshaft pulley
Every car enthusiast knows very well that most breakdowns and technical operations can be performed independently, saving good money. In this article we will talk about how to remove the crankshaft pulley without contacting a service center. We will consider all the nuances in detail, analyze the main problems and methods for solving them.
Where is the crankshaft pulley located?
The crankshaft pulley is hidden behind the generator. At the bottom of the engine compartment there is a disk that is tightly fixed to the clutch shaft; it is a pulley.
By design, this segment is divided into two types: conventional or with a damper. The latter have an additional massive external ring with a rubber gasket, which provides improved vibration absorption.
At first glance, the procedure may seem absolutely simple. However, there are several nuances.
It is necessary to fix the crankshaft so that it does not rotate. The high compression force of fasteners also causes a lot of trouble. When installing, the pulley bolt is tightened with a sufficiently large force.
To prevent it from unscrewing spontaneously, the degree of clamping gradually increases during operation of the power unit. This fastening system is determined by the need for increased reliability of fixation of the nuts.
After all, if you accidentally unscrew it, serious damage can occur, due to which costly repairs cannot be avoided.
How to unscrew the pulley nut in rear-wheel drive models
The pulley is held in place by a nut that is located at the end of the crankshaft. This design solution is presented in all rear-wheel drive VAZ cars in models from 2101 to 2107, Niva, etc. This fastening element is also called a ratchet due to the presence of a ledge for a crooked starter.
For maximum convenience in performing this work, it is recommended to place the machine above the inspection hole. To fix the crankshaft, you need to put the gearbox in the 4th gear position and turn on the handbrake. During the work we will need the following tools:
If you cannot unscrew the nut using the lever, do the following:
The nut should move, if not on the first, then on the second try. After this, it can be easily unscrewed using a regular key.
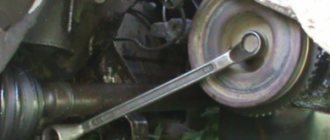
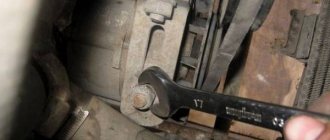
How to unscrew a pulley bolt in front-wheel drive models
The bolt is used as a fastening element for the crankshaft pulley in front-wheel drive vehicles. In such models, the block is placed perpendicular to the axis of the car. Unlike dismantling the nut in rear-wheel drive modifications, this method requires more time due to the need to remove additional parts. To perform the work you need to prepare the following tools:
How to remove the crankshaft pulley
The operations described above are the most complex; all subsequent steps can be completed without much effort. In this case, all stages must be carried out as carefully as possible so as not to damage important segments of the car. To remove the crankshaft pulley, you need to perform a number of additional operations. They include the dismantling of related components and parts.
Many people are interested in what thread is on the crankshaft pulley. The answer is simple, unscrew the bolt or nut counterclockwise.
Removing the crankshaft pulley using traditional methods
If the threaded connection does not give in, it can be unscrewed with minimal effort using special liquids. There are a number of active mixtures that corrode corrosion and smooth out rubbing surfaces. Special oils of the “WD” series are considered to be quite effective and the most widespread. You can also use vinegar or brake fluid.
In addition to unscrewing the fastening segments, problems may arise with removing the part itself. You can dismantle the pulley using a pry bar, carefully prying it up alternately from different sides. In the most hopeless cases, special pullers are used. They are a stud with a nut that has several grips.
Video “Replacing the crankshaft pulley on a VAZ classic”
This video talks about oil leakage due to wear on the crankshaft pulley.
The crankshaft on a VAZ 2105 is removed either to replace it with a new one or to replace its bearings. To carry out repair work, the car must be driven into an inspection hole, overpass, or use lifts. We also prepare a standard set of tools. The procedure for carrying out repair work is as follows:
- After driving the car into a pit, remove the oil pan protection, then drain the oil and remove the pan itself.
- Next we need to remove the crankshaft rear oil seal holder.
- Remove the camshaft drive belt cover and its sealing gasket.
- Remove the camshaft drive chain.
- Now we need to remove the connecting rod caps; first we need to mark them so that each cap corresponds to its own connecting rod.
- Unscrew the bolts securing the covers, remove the cover and liner. Push the connecting rod with the piston up the cylinder.
- We do the same with the main bearing caps. We first mark them relative to their seats, after which we use a seventeen socket wrench to unscrew two bolts of their fastening. The rear cover of the crankshaft main bearing has two half rings in its grooves - one steel-aluminum ring, and the second cermet. To remove them, pry up the ends of the half-rings with a flat-head screwdriver.
- When unscrewing and removing the covers, hold the crankshaft with your hand. Then remove the crankshaft from the car engine. When removing the covers, note that all of them, except the third one, have a groove. All covers have factory marks that correspond to their serial number (the report is taken from the toe of the crankshaft). The fifth cover has two marks, which are spaced along the edges.
- After the crankshaft is removed. We remove the liners from the seats of the main bearings.
This completes the process of disassembling and removing the crankshaft of the VAZ 2105. In general, repair work related to the piston group, boring the crankshaft and replacing liners and main bearing caps is recommended to be carried out with the appropriate experience and knowledge, or contact a specialized workshop.
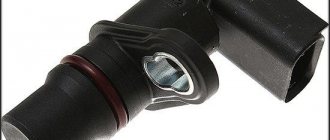
What is a crankshaft sensor ? In order to synchronize the ignition operation and fuel supply to the cylinder blocks on an injection engine, it is necessary to determine the crankshaft speed. This is precisely why you need a crankshaft position sensor , which is installed opposite a special synchronization disk mounted on the crankshaft.
How to remove a crankshaft pulley with your own hands
Many drivers prefer to carry out minor repairs to their car themselves; this not only reduces expenses from the family budget, but also a great way to spend time. Each such motorist will sooner or later have to face the problem of removing the crankshaft pulley of a car.
In most cases, a car enthusiast thinks about how to remove the crankshaft pulley when he first encounters the need to replace the seals.
Over the course of their service life, they dry out, crack and begin to leak oil, and this problem cannot be solved without removing the pulley.
At first glance, the task is not difficult, but as practice shows, in reality you may encounter some difficulties:
As we already wrote above, the crankshaft pulley can be secured with either a bolt or a nut.
Unscrew the pulley nut
The nut is used mainly in rear-wheel drive cars: classic VAZ 2101–2107 and Niva. To perform this procedure, we will need an overpass or inspection hole. First of all, put the gearbox in 4th gear and squeeze the handbrake. We will need the following tools:
If, using the lever, it was still not possible to unscrew the nut, then we try the following:
Unscrew the pulley bolt
The bolt is used primarily in the design of front-wheel drive vehicles. In this case, the block is located perpendicular to the axis. The process of unscrewing the bolt is a little more difficult because it is more difficult to get to. To perform this operation you need:
Now let's move on to the process of unscrewing the bolt, the order of our actions will be as follows:
Removing the crankshaft pulley
If you have already removed the bolt or nut from your crankshaft pulley, then further removal steps will be much easier. In the absence of special tools, this can be done with a regular pry bar, alternately prying it from one side or the other. When doing this, be careful not to use excessive force to avoid damaging the key and groove.
So we figured out how to remove the crankshaft pulley with your own hands. The process is not too complicated, but in any case, when you perform car repairs yourself, you need to be careful. Be careful and attentive, and everything will work out for you!
Source
How to remove a crankshaft pulley and not stop loving your car
Every second car enthusiast who tries to repair his favorite four-wheeled friend with his own hands has encountered the problem of how to remove the crankshaft pulley. After reading the instructions in the maintenance and repair manual, at first glance, the procedure does not seem complicated, however, when you first try to unscrew the ill-fated bolt, it turns out that this is not so easy. It is completely unclear how to fix the crankshaft so that it does not rotate. Another problem is where is the best way to get to the treasured bolt. Removing the crankshaft pulley causes a lot of trouble because it is too tight. There is a high probability of damaging many parts of the engine compartment or the paintwork of the body. The problem is that the crankshaft pulley bolt (or nut, depending on the model) is tightened with great force during installation. This is done so that it does not unwind spontaneously, since if unscrewed, serious damage and expensive repairs cannot be avoided. The degree of tightening gradually increases as the engine operates and is aggravated by sticking, coking, and corrosion.
In reality, the entire dismantling process can take 10-15 minutes, but there are some techniques you need to know and use. Different motor models use either a bolt or a nut to secure the pulley. Each option should be considered.
How to unscrew the crankshaft pulley nut?
The nut at the end of the crankshaft holding the pulley is a sign of the engine of a classic rear-wheel drive car like VAZ from model 2101 to 2107, Niva and the like. Such a nut is also called a “ratchet”, since it can have ledges for a “crooked starter”.
It is better to do the work above the inspection hole. The crankshaft should be secured by placing the gearbox in 4th gear and applying the parking brake. You should stock up on the following tools in advance:
While under the car, try to unscrew the nut with a wrench with a sufficiently long lever. If the attempt is unsuccessful, put the gearbox in neutral and proceed as follows:
As a rule, on the first or second attempt the nut comes off and is then unscrewed with a regular wrench. Don't forget to loosen and remove the alternator belt.
How to unscrew the crankshaft pulley bolt?
The bolt holding the pulley predominates in engines in front-wheel drive cars, when the block is located perpendicular to the axis of the car. In this case, you will have to tinker more, since it is more difficult to get to the bolt. To work you should prepare:
In search of an answer to the question of how to remove the crankshaft pulley, many car enthusiasts begin to look for an opportunity to do this without prior preparation. By definition, such attempts cannot be successful.
In order to correctly remove the pulley, you must perform the following manipulations::
In the vast majority of cases, the bolt can be unscrewed. If it does not give in, then you can add the length of the lever. If this does not help, then you should use the help of the starter as described for the pulley nut in the “classic”.
We remove the pulley using folk automotive experience
Any threaded connection, even if tightly tightened. can be untwisted with less effort if you use some folk-automotive tricks. The problem of how to unscrew the crankshaft pulley ceases to be such if you moisten the bolt head or nut in advance with special WD oil, vinegar or brake fluid. Sometimes lightly tapping the edges of the nut helps.
Unscrewing a bolt or nut does not always solve the problem, since the pulley is held quite firmly on the shaft. You can remove the pulley using a regular pry bar, carefully prying it off from different sides. It is important that the force application point is as close to the shaft as possible. For hopeless cases, it is necessary to use a crankshaft pulley puller. This is a special device, which is a pin with a nut on which 2-3 grips are attached. The ends of the grippers are secured to the edges of the pulley, and the end of the pin rests against the center of the shaft. By twisting it clockwise, you can gradually pull the pulley off the shaft.
You should not be sure that in all cars, without exception, the crankshaft rotates clockwise.
For example, in some Honda cars the crankshaft rotates counterclockwise. It follows from this that the thread on the pulley nut (bolt) will be left-handed.
Unscrew the pulley nut
The nut that holds the pulley at the end of the crankshaft indicates that we are working with a classic version of the engine, namely a VAZ-type car. So, before starting work, you need to prepare the necessary tool, namely a socket or socket wrench for “36” or “38”, you also need to prepare a piece of pipe about 30 cm (later you will find out why). It is better to do the work above the inspection hole. If this is not possible, then it is better to use a jack and definitely a tree stump (better to be safe).
We set the gearbox lever to the fourth gear position and turn on the parking brake mode (handbrake). We try to unscrew the nut using a wrench with a long lever while being under the car. If the attempt fails, you need to use another option.
Set the gearbox lever to the neutral position and remove the spark plugs. We install the key so that it rests (in the case when the length of the key is not enough, a pipe is used) against the floor or the rear spar in the direction of movement of the crankshaft. When the requirements are met, it is necessary to turn the ignition key to give short-term pulses. Sometimes the nut fits so tightly that you can’t get it off the first time. Mostly it is released on the third or fourth try. Once the nut is stripped, it can be tightened with a wrench.
Where is the crankshaft pulley located?
The crankshaft pulley is hidden behind the generator. At the bottom of the engine compartment there is a disk that is tightly fixed to the clutch shaft; it is a pulley. By design, this segment is divided into two types: conventional or with a damper. The latter have an additional massive external ring with a rubber gasket, which provides improved vibration absorption. At first glance, the procedure may seem absolutely simple. However, there are several nuances.
It is necessary to fix the crankshaft so that it does not rotate. The high compression force of fasteners also causes a lot of trouble. When installing, the pulley bolt is tightened with a sufficiently large force. To prevent it from unscrewing spontaneously, the degree of clamping gradually increases during operation of the power unit.
Preparation for replacing bearings and direct installation of the crankshaft
After the hood and battery are removed from the VAZ 2106, you need to carefully drain the oil and coolant. Then remove parts such as the radiator, thermostat, carburetor, fuel pump and ignition distributor. Be sure to note for yourself the order in which they are removed. Next, you need to remove all adjacent hoses and wires from the engine along with the cylinder head.
In addition, disconnect parts such as the generator, starter, coolant pump, upper nuts that secure the engine mount, and bolts that secure the clutch housing to the engine. The order in which disconnection is made must be strictly observed
During operation, the lifting device cables must be secured to the block and carefully lifted
Then, placing a jack under the gearbox, begin to carefully rock the unit in order to gradually disconnect it from the clutch housing. It will be necessary to remove the cylinder block, clutch, pulley, camshaft wire cover, oil pump parts, accessory drive shaft, flywheel and rear crankshaft seal holder. Using a 10mm wrench, you need to unscrew all the bolts that secure the oil pan to the cylinder block and remove it along with the seal gasket
Disconnect the oil pump. Using a 14mm socket, unscrew the nuts that secure the connecting rod cover, and then remove it. Then take a hammer, press the handle against the connecting rod, and push the pistons out of the cylinders. Next, take a 17mm socket and unscrew the bolts that attach the crankshaft to the cover. Counting from the crankshaft toe, according to the number marks, we disconnect all subsequent covers. Please note that on cover 5 there are two marks on both sides
Using a 10mm wrench, you need to unscrew all the bolts that secure the oil pan to the cylinder block and remove it along with the seal gasket. Disconnect the oil pump. Using a 14mm socket, unscrew the nuts that secure the connecting rod cover, and then remove it. Then take a hammer, press the handle against the connecting rod, and push the pistons out of the cylinders. Next, take a 17mm socket and unscrew the bolts that attach the crankshaft to the cover. Counting from the crankshaft toe, according to the number marks, we disconnect all subsequent covers. Keep in mind that on cover 5 there are two marks on both sides.
Only now can you remove the crankshaft itself and remove the two half rings of the crankshaft thrust bearing. When working, you need to remember that the metal liners installed on the beds of all bearings, with the exception of the 3rd, are equipped with a groove.
In what cases should the pulley be removed?
Most often, it is necessary to dismantle the crankshaft pulley when changing oil seals. The role of the O-rings is to prevent oil from the crankcase from reaching engine components. Over time, the seals wear out, crack, and as a result, oil leaks appear. To fix this, you need to change the seals. During this procedure, you have to remove the crankshaft pulley.
Also, the need to dismantle the crankshaft disk arises when replacing the timing belt on a VAZ 2107 injector. It is changed according to the regulations specified in the operating instructions for the VAZ 2107 injector, as it wears out after a visual inspection or if it breaks. During a technical inspection, the pulley must be inspected to identify any defects. If chips or scratches are found, the part should be replaced.
Damaged part with broken part
The procedure for removing the product itself is not difficult, but some problems arise.
Removing the crankshaft pulley using traditional methods
If the threaded connection does not give in, it can be unscrewed with minimal effort using special liquids. There are a number of active mixtures that corrode corrosion and smooth out rubbing surfaces. Special oils of the “WD” series are considered to be quite effective and the most widespread. You can also use vinegar or brake fluid.
In addition to unscrewing the fastening segments, problems may arise with removing the part itself. You can dismantle the pulley using a pry bar, carefully prying it up alternately from different sides. In the most hopeless cases, special pullers are used. They are a stud with a nut that has several grips.
Folk tricks
Let's look at a few folk car tricks that have helped more than one driver.
- Each threaded connection, by the way, not only on the part of the car, can be unscrewed by first lubricating it with a special oil, for example: HP, sunflower oil, vinegar, brake fluid.
- In rare cases, lightly tapping the edges of the bolt and nut with a hammer or wrench helps.
- Removing a bolt or nut does not mean removing the pulley. How to unscrew the crankshaft pulley without a special key? The pulley sits very firmly on the shaft; it can be removed using a pry bar or a screwdriver and carefully pry it off in several places.
Removal instructions
With the clutch disengaged, the crankshaft can be easily turned with a wrench.
To carry out the removal procedure, it is necessary to secure the shaft from turning.
Removal and Installation
On a VAZ 2107, the injector crankshaft pulley is held in place by a fastening nut. Another name for it is ratchet. To remove the crankshaft pulley, you will need to unscrew this nut. It is better to carry out work on an inspection ditch or overpass. The tools you need to prepare are:
Preparing tools for unscrewing
If the threaded connection is difficult to unscrew, there are special products, after application of which you can easily unscrew the fasteners. These products include WD oil. You can also use vinegar essence or brake fluid.
Work on dismantling and installing the crankshaft pulley on a VAZ 2107 injector consists of the following steps:
Unscrewing the nut using a starter After the nut is unscrewed, you can begin to dismantle the disk. The pulley can be removed using screwdrivers or a pry bar, prying it from different sides until it moves from the shaft. It is important to apply force closer to the shaft. Move the pulley away from the front cover
After completing work on the VAZ 2107 injector, you need to start the engine and check its performance.
What is the thread on the VAZ 2107 crankshaft pulley: description of the part and step-by-step instructions
The manufacturer recommends replacing the front crankshaft oil seal of VAZ 2101-2107 engines every 150,000 km. However, in practice such replacement has to be performed more often. Accelerated wear of the sealing element and the appearance of engine oil leaks are caused by:
In addition, we cannot rule out hardening of the cuff due to natural aging and the possibility of a manufacturing defect - unfortunately, the quality of parts for rear-wheel drive VAZ models leaves much to be desired.
When and why to change the front oil seal
It is impossible not to notice damage to the sealing element - the rotating pulley scatters oil in the front of the engine and throughout the engine compartment. However, do not think that such a malfunction only leads to oiling of the units and a decrease in the lubricant level. If engine oil gets on the generator belt and other rubber parts, it can quickly render them unusable.
Keep in mind that the appearance of a leak through the engine seals is provoked by another factor - increased crankcase gas pressure. For this reason, be sure to check the cleanliness of the engine ventilation system.
Step-by-step instruction
Due to the limited space between the front of the engine and the radiator, it is difficult to press in a new oil seal without distortion. For this reason, experts recommend replacing the sealing element with the front engine cover removed.
Of course, doing this on a mechanic’s workbench is much more convenient, but there are also pitfalls here.
As practice shows, after such dismantling it is difficult to restore the tightness along the junction line of the oil pan, and in addition, there is a danger of breaking the internal threads in a rather delicate duralumin cover.
Car battery heater
For this reason, we recommend using the more common and less labor-intensive method, in which the damaged oil seal is replaced directly on the engine. This work will require your attention and accuracy. It is more convenient to perform all manipulations on a lift, overpass or inspection pit.
To play it safe, make sure you have a puller in your arsenal. With its help, you can easily and safely dismantle even those parts that are installed with a noticeable interference.
To replace the crankshaft oil seal, you do not need any special knowledge or expensive tools. The work can be done with your own hands, spending 1-2 hours on it. By being careful in your work, you will forget about oil leaks for a long time and will be able to easily keep the engine compartment clean.
Good night everybody! Share your experience on how to unscrew the crankshaft pulley nut on a classic. I hit the key with a hammer, and with a sledgehammer too, the ratchet key just bends. I even tried using the starter, the starter just wouldn’t turn. How to unscrew the crankshaft pulley of a VAZ 2107.
Replacement and diagnostics
But is all this theory necessary for the average motorist? Hardly. Therefore, let's jump straight to the point - how to check this sensor and replace it?
It is worth mentioning that it is installed inside the ignition distributor (distributor) of the VAZ 2107. When diagnosing, there is no need to remove the sensor, just disconnect the connection plug. So, here are the two main diagnostic methods:
- Measuring the voltage at the signal pin. Connect the voltmeter, turn on the ignition. When rotating the crankshaft (using a ratchet wrench) of the VAZ 2107, a change in the voltage value will be observed in the range of 0.4..3 V.
- The most expensive way is to install a new Hall sensor that is known to be good. If the problems have disappeared, then we can safely say that the old device had obvious problems.
To replace the device, you will need to complete a simple chain of operations:
- Use a screwdriver to open the latches on the cover.
- Remove the top cover of the ignition distributor of the VAZ 2107.
- Unscrew the nut and remove the clamping device.
- Remove the distributor housing.
- Knock out the pin (fixing the oil slinger) with a hammer.
- Take out the coupling, washer, and remove the distributor shaft.
- Remove the brass screws, steel fasteners and regulator.
- Pull the lever of the vacuum ignition angle regulator to the side.
- After removing the curtains, you can remove the VAZ 2107 Hall sensor and install a new one in its place.
That's all, now all work can be considered completed. Assembly is carried out in reverse order. And don’t forget to install all the elements so that there is nothing left over.
Sources
- https://avtobaiki.ru/pokupka_avto/snyatie_datchika_polozheniya_kolenchatogo_vala.html
- https://vaz-remzona.ru/datchik-xolla-vaz-2107/
Removing the pulley and replacing the crankshaft oil seal
Since I still have one VAZ 2106 engine in my garage, which has not yet been sold, I decided to use it as an example to show how to replace the crankshaft oil seal.
In many classic repair manuals you can read that to replace the front oil seal, you need to remove the cover from the front, since the space between the engine and the radiator is quite small to do this work without problems.
I will show everything with the engine removed, so there were much fewer problems experienced. So, first, here is a list of the necessary tools that we will need:
How to remove a pulley from a crankshaft
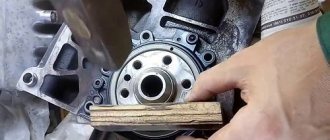
So, first of all, having stopped the pulley, unscrew the nut securing it:
When the nut is completely unscrewed, you can try to remove the pulley itself. This can be done simply by prying it from the inside with the same chisel, or using a special puller, as shown in the photo:
After which we can easily remove it, which can be seen in the picture below:
Replacing the front crankshaft oil seal
In my case, everything was simple, since the engine was removed from the car and replacement was not difficult. I used the same puller to pry it from the inside of the oil seal and carefully pulled it out:
Now you can install the pulley in place, making sure it is correctly installed on the key. You can consider the procedure complete, and the VAZ 2106 ready for use! But I once again draw your attention to the fact that if you do everything on a car, then doing it is very inconvenient and it is possible that some will even remove the front engine cover.
Pulley removal
Unscrewing a fastening bolt or nut is only half the battle. Next you need to pull the pulley out of the shaft. The pulley cannot be removed easily by hand unless its seat is broken. In addition, if the pulley fits tightly onto the shaft, it is also secured against turning by a key.
There are special pullers for removing the pulley from the shaft. There are mechanical and hydraulic pullers.
The design of a mechanical puller is simple. Usually it has three legs, with which you need to hook the pulley itself, and rest the central rod against the shaft. After which, you need to rotate the rod, the legs will straighten and pull the pulley towards you. There are even simpler pullers that you can make yourself. If there is no removable device for the pulley, then you can use pry bars. If one person is filming, then take turns, moving it a little on each side so that there is no distortion. If there are two, then at the same time, from different sides, the pulley is pressed out from the crankshaft with a sharp movement.
It also happens that when using a puller, the walls of the pulley grooves cannot withstand and break off. Therefore, when using pry bars, they must be engaged as close to the shaft as possible.
Crankshaft pulley
Every car enthusiast knows very well that most breakdowns and technical operations can be performed independently, saving good money. In this article we will talk about how to remove the crankshaft pulley without contacting a service center. We will consider all the nuances in detail, analyze the main problems and methods for solving them.
Where is the crankshaft pulley located?
The crankshaft pulley is hidden behind the generator. At the bottom of the engine compartment there is a disk that is tightly fixed to the clutch shaft; it is a pulley.
By design, this segment is divided into two types: conventional or with a damper. The latter have an additional massive external ring with a rubber gasket, which provides improved vibration absorption.
At first glance, the procedure may seem absolutely simple. However, there are several nuances.
It is necessary to fix the crankshaft so that it does not rotate. The high compression force of fasteners also causes a lot of trouble. When installing, the pulley bolt is tightened with a sufficiently large force.
To prevent it from unscrewing spontaneously, the degree of clamping gradually increases during operation of the power unit. This fastening system is determined by the need for increased reliability of fixation of the nuts.
After all, if you accidentally unscrew it, serious damage can occur, due to which costly repairs cannot be avoided.
How to unscrew the pulley nut in rear-wheel drive models
The pulley is held in place by a nut that is located at the end of the crankshaft. This design solution is presented in all rear-wheel drive VAZ cars in models from 2101 to 2107, Niva, etc. This fastening element is also called a ratchet due to the presence of a ledge for a crooked starter.
For maximum convenience in performing this work, it is recommended to place the machine above the inspection hole. To fix the crankshaft, you need to put the gearbox in the 4th gear position and turn on the handbrake. During the work we will need the following tools:
If you cannot unscrew the nut using the lever, do the following:
The nut should move, if not on the first, then on the second try. After this, it can be easily unscrewed using a regular key.
How to unscrew a pulley bolt in front-wheel drive models
The bolt is used as a fastening element for the crankshaft pulley in front-wheel drive vehicles. In such models, the block is placed perpendicular to the axis of the car. Unlike dismantling the nut in rear-wheel drive modifications, this method requires more time due to the need to remove additional parts. To perform the work you need to prepare the following tools:
How to remove the crankshaft pulley
The operations described above are the most complex; all subsequent steps can be completed without much effort. In this case, all stages must be carried out as carefully as possible so as not to damage important segments of the car. To remove the crankshaft pulley, you need to perform a number of additional operations. They include the dismantling of related components and parts.
Many people are interested in what thread is on the crankshaft pulley. The answer is simple, unscrew the bolt or nut counterclockwise.
Removing the crankshaft pulley using traditional methods
If the threaded connection does not give in, it can be unscrewed with minimal effort using special liquids. There are a number of active mixtures that corrode corrosion and smooth out rubbing surfaces. Special oils of the “WD” series are considered to be quite effective and the most widespread. You can also use vinegar or brake fluid.
In addition to unscrewing the fastening segments, problems may arise with removing the part itself. You can dismantle the pulley using a pry bar, carefully prying it up alternately from different sides. In the most hopeless cases, special pullers are used. They are a stud with a nut that has several grips.
I couldn’t get the crankshaft pulley off, what should I do?
If you succeed in breaking the fastening, unscrewing the nut completely is not difficult. But this doesn't always happen. In case of negative circumstances, use a different technique:
As noted above, on many front-wheel drive vehicles, the pulley is secured using a bolt.
In this case, the algorithm should be as follows:
1. Raise the vehicle from the right side, and then place some kind of stand under the body (for reliability). It could be a piece of log.
3. To fix the crankshaft, remove the plug in the clutch housing and install something metal, such as a mounting bracket, into the opening. With the other side, rest the tool against the teeth.
4. Place the head of the wrench on the bolt, and then use the extension to make several jerks to the left. This is necessary to at least rip the bolt from its original position. Most attempts are successful. If this does not help, use the method described a little above (with starting the starter).
To help you unscrew the nut (bolt), treat it with WD-40. In this case, it will be easier to tighten the bolt (nut). After completing the work, all that remains is to remove the pulley using a special puller or pry bar.
Watch the video on how to unscrew the crankshaft pulley bolt.
In the latter case, use support points that are as close as possible to the shaft. When performing this procedure, be careful to avoid deformation of the groove and key. Good luck on the roads and of course no breakdowns.
How to remove a crankshaft pulley with your own hands
Many drivers prefer to carry out minor repairs to their car themselves; this not only reduces expenses from the family budget, but also a great way to spend time. Each such motorist will sooner or later have to face the problem of removing the crankshaft pulley of a car.
In most cases, a car enthusiast thinks about how to remove the crankshaft pulley when he first encounters the need to replace the seals.
Over the course of their service life, they dry out, crack and begin to leak oil, and this problem cannot be solved without removing the pulley.
At first glance, the task is not difficult, but as practice shows, in reality you may encounter some difficulties:
As we already wrote above, the crankshaft pulley can be secured with either a bolt or a nut.
Unscrew the pulley nut
The nut is used mainly in rear-wheel drive cars: classic VAZ 2101–2107 and Niva. To perform this procedure, we will need an overpass or inspection hole. First of all, put the gearbox in 4th gear and squeeze the handbrake. We will need the following tools:
If, using the lever, it was still not possible to unscrew the nut, then we try the following:
Unscrew the pulley bolt
The bolt is used primarily in the design of front-wheel drive vehicles. In this case, the block is located perpendicular to the axis. The process of unscrewing the bolt is a little more difficult because it is more difficult to get to. To perform this operation you need:
Now let's move on to the process of unscrewing the bolt, the order of our actions will be as follows:
Removing the crankshaft pulley
If you have already removed the bolt or nut from your crankshaft pulley, then further removal steps will be much easier. In the absence of special tools, this can be done with a regular pry bar, alternately prying it from one side or the other. When doing this, be careful not to use excessive force to avoid damaging the key and groove.
So we figured out how to remove the crankshaft pulley with your own hands. The process is not too complicated, but in any case, when you perform car repairs yourself, you need to be careful. Be careful and attentive, and everything will work out for you!