VAZ engines have two, slightly different modifications of the torsional vibration damper and crankshaft hubs, in other words, the pulley. On a VAZ 2110, the crankshaft pulley can be made as a block, or also have a separate system with a hub - a damper.
Cast iron crankshaft pulley
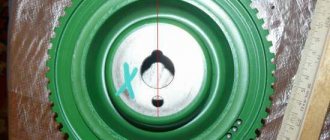
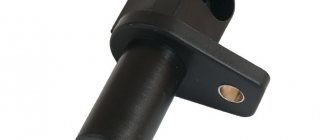
When the production of the “ten” had just begun, the crankshaft vibration damper was a single unit, and was secured with only one central bolt. Along with the injection VAZ 2110, a damper appeared. It is bolted to the hub.
Crankshaft damper pulley
Crankshaft damper pulley
Crankshaft damper pulley
Crankshaft damper pulley
Purpose, design and replacement of the VAZ 2110 crankshaft pulley
VAZ engines have two, slightly different modifications of the torsional vibration damper and crankshaft hubs, in other words, the pulley. On a VAZ 2110, the crankshaft pulley can be made as a block, or also have a separate system with a hub - a damper.
When the production of the “ten” had just begun, the crankshaft vibration damper was a single unit, and was secured with only one central bolt. Along with the injection VAZ 2110, a damper appeared. It is bolted to the hub.
Reverse actions
After removing the pulley, you can carefully examine it and put it aside for garage scrap metal. Take the new part in your hands and lubricate the key seat well with grease. Slightly tilting the key towards the hub, we slowly push the pulley onto the shaft. For this purpose, you should have a hammer in one hand, and in the other a piece of soft rubber, which is placed between the hammer and the body and prevents the hammer from damaging the crankshaft pulley.
Once the hub is in place, you need to tighten the fixing bolt. This must be done without any tricks: a wrench and a pipe will help tighten this bolt until it stops. To avoid turning the crankshaft when you begin to apply significant force to tighten the bolt, you need to lock it using a metal pin (large screwdriver), inserting the latter between the teeth of the flywheel ring. To do this, you need to open the clutch housing ventilation plug.
It is not recommended to tighten the bolt to the limit; you may miscalculate the effort and break it, and this is almost a disaster. To do this job correctly, you will need a torque wrench. As soon as the sensor shows a tightening torque of 400 N/meter, no further force is allowed.
After this, put the belt on the crankshaft pulley and tighten it using the tension bolt on the generator. Don't forget to tighten the generator mounting bolts and reconnect the connector on the ignition coil.
If you followed everything described above, then you now not only know how to remove the crankshaft pulley, but also know how to do it yourself.
Possible faults
Removal and, if necessary, replacement of the pulley may be required in the following cases:
- If the hub has turned. It must be said that most often this happens due to previous inept repairs. The fact is that the VAZ 2110 has a fixing sleeve in the seat for the damper, pressed into the gear. It tends to fall out of the gear, causing the hub to rotate;
- Oil leaked from under the front crankshaft oil seal;
- The lightweight crankshaft began to resonate strongly;
- The old-style pulley or damper is loose;
- The damper seat broke. In case of such a breakdown, a replacement is needed, preferably together with the crankshaft gear;
- If it is necessary to remove the crankshaft - for repairs, replacement of liners, half rings, converting it into a lightweight one, etc.
Removing the damper
On a VAZ 2110, the damper is removed in the following sequence:
- Disconnect the ground from the battery;
- Remove the radiator fan and fluid coupling;
- After loosening the bolts securing the fan pulley, remove the belt;
- It is advisable to remove the radiator, but if it does not interfere, you can leave it, protecting it from damage from the engine compartment with a sheet of plywood or cardboard;
- Remove the pulley from the radiator fan;
- We gain access to the damper, unscrew the bolts, dismantle it;
- When removing the hub, you need to secure it from turning (for which there is a special tool).
Next we proceed depending on the purpose of the analysis. If you only need to replace the damper, we do it and assemble everything in the reverse order.
You should know that replacing the liners on a VAZ 2110 can be done either with or without removing the crankshaft. But this requires a special device, and besides, it is better to entrust such work to an experienced mechanic - a mechanic.
If the crankshaft was dismantled to replace the liners or half rings, then we continue:
- Remove the lightweight or regular crankshaft;
- We remove the half rings;
- We evaluate the condition of the liners, and if they do not need replacement yet, then be sure to remove them and mark each of them;
- But, unfortunately, no matter how carefully the owner treats his VAZ 2110, sooner or later the time for physical wear comes for the liners - they need replacement.
- Four repair kits of inserts are produced for the VAZ 2110. You need to buy them only as a set, and only in a strict sequence of sizes. Sometimes, however, situations are possible when you have to purchase them “through size”;
- thus, the crankshaft only lasts for four (and sometimes even three) overhauls;
- replacement of liners cannot occur without grinding the crankshaft. The only exception is if it is replaced with a new one. At the same time, an experienced craftsman can turn the crankshaft into a lightweight one.
But if replacing the crankshaft pulley is not such a difficult task, and almost any home craftsman can do it, then grinding and tuning the crankshaft should be entrusted only to experienced motorists.
When reassembling, please note that the groove on the hub must be aligned with the segment key. In addition, the bolt holding the hub requires a torque wrench. Its tightening torque should be 400 N/m.
Dismantling the “single” pulley (old model)
Actually, removing and reassembling the old-style pulley does not have any special differences, except that it is easier to remove. It is enough to unscrew just one central bolt and pry off the pulley with two screwdrivers.
If you find an error, please select a piece of text and press Ctrl+Enter.
Source
Preparatory work
Before removing the crankshaft pulley, you need to prepare the necessary tool and perform preliminary procedures. In your work you will need the following tools:
- overlay key 19;
- pipe section;
- special pulley puller or pry bar.
Place a support under the front wheels, remove the connector from the ignition coil and set the gear shift lever to neutral. Unscrew the tension bolt of the generator by 3-3.5 cm, loosen the fastening bolts to allow it to move freely and remove the belt. After this, you can remove the crankshaft pulley 2110.
Crankshaft pulley damper signs of malfunction
A detail that does not catch the eye and seems insignificant, actually plays an important role in ensuring the functionality of all vehicle systems. Having a fairly simple and reliable device, the crankshaft pulley sometimes needs to be replaced. Most often it is removed when it is necessary to replace the crankshaft oil seal. In this regard, it is important to know what types of pulleys exist, what can cause breakdowns, and how replacement is made.
Types of pulleys for the crankshaft
The vast majority of car mechanisms use energy received from the rotating crankshaft to operate. If the rotation of the wheels is ensured by a whole system of shafts and gears, then a crankshaft pulley is used to drive the gas distribution mechanism (GRM), generator, pump, air conditioner.
In different periods of the automotive industry and for different brands of cars, pulley design solutions independent of each other were used. It makes no sense to say which type of pulleys is better; for different operating conditions of the car there is a different type of pulley.
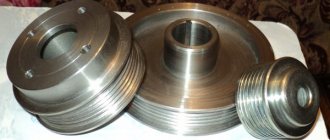
Crankshaft with pulley for V-belt
Almost all cars, trucks, and buses with engines developed by domestic designers in the Soviet era are equipped with a belt drive for the generator. The pulley for such a belt has an all-cast (all-welded) design, and the groove repeats the configuration of the V-belt.
The pulley is mounted on the end of the shaft through a key, which prevents it from turning, and is secured with a nut (less commonly, a bolt). The simplest design allowed the pulley to be used throughout the entire period of operation of the motor.
Crankshaft Timing Pulley
In order to facilitate the gas distribution system and wire, the designers proposed using a belt rather than a chain. A similar design is found on almost all modern cars. In order to achieve maximum coincidence of the angle of rotation of the crankshaft and camshaft, the inner surface of the belt has grooves, and teeth are applied to the outer rim of the pulley. That is why such a pulley is called toothed. Provided timely replacement of belts and proper operation, the pulley itself lasts quite a long time, and breakdown is rare.
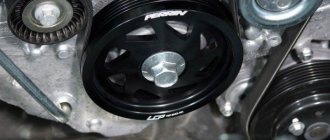
Crankshaft damper pulley
At the moment of startup and a sharp change in crankshaft rotation speed, the belt and gas distribution system are subjected to a strong impulse mechanical effect. The developers proposed equipping the pulley with a damper - a rubber layer between the inner race and the outer working disk. This design has found wide application in engines for minibuses and light-duty vehicles.
The designers achieved the desired result, but at the same time significantly reduced the life of the pulley. Rubber loses its elasticity and breaks down due to temperature changes, aggressive environments, and mechanical loads. Car owners are forced to continuously monitor the condition of the damper and urgently change the pulley if defects appear. Sometimes the pulley breaks, completely immobilizing the car.
How to replace a crankshaft pulley
Whatever design the pulley is used on the motor, the principle of dismantling and installation remains the same. If the motor is located along the engine compartment, then the pulley is located in the lower front part, behind the cooling radiator. If the block is located transversely, the pulley can be accessed by removing the right front wheel.
Unscrew the locking bolt
The only bolt that secures the pulley to the crankshaft is not so easy to unscrew. The threads of this bolt coincide with the direction of rotation of the crankshaft, so if you do not have a pneumatic impact wrench, you will have to cope with this task with some trickery.
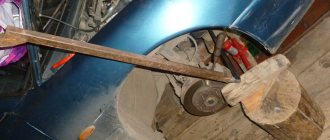
The crankshaft pulley bolt can be easily unscrewed using a spanner, a piece of pipe and your car's starter. We put a 19mm head on the bolt, and using a pipe we extend the handle of the key to the surface, and in such a way that it rests on the floor on the side opposite to the direction of rotation.
After that, we get behind the wheel, ask the nervous neighbors in the garage to leave and start the car with a quick movement of the key. The starter should not turn for more than a split second. After making five or six such attempts, you will be able to unscrew the “stuck” bolt without making titanic efforts. Be prepared to be accused of wasting the starter's resource, damaging your property, etc.
Yes, this method is not used in service centers, but there are witnesses to its effective implementation. Nothing was spoiled by this, except the mood of those who opposed this method of unscrewing bolts.
Functions of the crankshaft pulley
A crankshaft pulley is one of the parts of the crankshaft of a car engine, which is attached to the front output (protruding beyond the engine crankcase) part of the shaft (toe) and with the help of a special toothed belt (in some engines - a chain) synchronizes the operation of the crankshaft and camshaft of the engine. In addition, the crankshaft pulley, through the timing belt, also transmits torque (in fact, provides energy) to a number of devices of the so-called “attachments” of the car engine:
- generator
- engine coolant pump
- power steering pump
- air conditioner
The crankshaft pulley also performs (along with the flywheel and balancers) the functions of damping vibrations and shocks of the crankshaft. During the production process of pulleys, they all undergo special balancing. As you can see, a number of important vehicle mechanisms, including the engine itself, depend on the trouble-free operation of the crankshaft pulley. If there is no strictly synchronous operation of the crankshaft and camshaft, the engine will not operate normally.
That is why every car owner is faced with the requirement to regularly replace the crankshaft pulley complete with the timing belt (and, as a rule, the coolant pump roller). For each car model, there is a certain frequency for replacing the crankshaft pulley and timing belt. Wear and stretching of the timing belts, wear of the crankshaft pulley or pump roller can lead to engine malfunction, and in the worst case, to a break in the timing belt with subsequent damage to the entire crank group of the engine. Therefore, regular maintenance and replacement of the timing belt and crankshaft pulley should be taken seriously.
Dismantling process
If you know some technical details, then replacing a pulley takes no more than 20 - 30 minutes. First of all, you should find out what type of fastening is used to fix the part. Depending on the type of engine, the pulley may be attached to the crankshaft using a bolt or nut. Removal of the crankshaft pulley must take into account the type of fastening, because The most difficult part of the work is precisely dismantling the fastening element.
Removing the right mudguard
Removing the nut. The nut on the crankshaft pulley is found on classic models of cars from the domestic automotive industry. To remove it, it is recommended to install the vehicle above the inspection hole, secure it with wheel chocks, first put the car in 4th gear, thereby securing the crankshaft, and turn on the handbrake. During the work you will need:
- socket/socket wrench having a throat size from 36 to 38 mm;
- a piece of pipe that will act as a lever extension.
While in the inspection hole, you can begin to unscrew the nut with a socket/socket wrench, previously connected to the lever extension. It is necessary to take into account the high probability that during the operation of the vehicle the nut may become strongly stuck to its seat, as a result of which it will not be possible to unscrew it using the method described above. In this case, you will need to take the following actions:
- Set the gearbox to neutral position.
- Remove the spark plugs and the generator belt.
- Fix the key with the lever so that the end of the extension can be securely rested against the floor of the inspection hole as the crankshaft rotates.
- Apply a short-term pulse by quickly turning the ignition key.
Often the nut begins to give in after 2–3 such manipulations.
Hold the flywheel from turning and unscrew the pulley mount
Removing the bolt. The crankshaft bolt is found on front wheel drive vehicles. At the same time, its removal is a rather complicated procedure, because you can only get to the bolt by performing the following work in the sequence below:
- Using a jack, raise the front right part of the car body to the required height.
- Remove the front right wheel.
- Place the body on special supports that have a large contact patch with the surface of the bottom of the car.
- Remove the engine guard, generator set belt and air filter.
- To prevent rotation of the crankshaft, use a pry bar or any other suitable object to securely lock the flywheel.
- Unscrew the bolt with a wrench of a suitable size.