Reasons for replacement
The crankshaft pulley is located on the right side of the engine compartment and is best accessed from below
Before proceeding directly to the process, it is necessary to consider the main reasons why it may be necessary to dismantle this part. In fact, everything is much simpler than it seems. So, let's look at the main reasons for dismantling:
- Major repairs will require removal of the pulley.
- Wear of the product (wear or broken teeth).
- Some repair operations will require dismantling the pulley ( setting valve timing , etc.).
Should we unscrew the crankshaft pulley?
So, when the reasons are considered, let's proceed directly to the process itself. It is worth noting that this operation cannot be completed alone, so you need to ask for help, in other words, you will need an assistant . Let's consider the immediate sequence of actions for removing the crankshaft pulley:
- We place the car on a pit or overpass.
- We dismantle the front right wheel. The car must be well secured in this position, since when unscrewed it may fall off the jack. Therefore, you need to install a stump under the threshold, and anti-roll bars under the rear wheels; you can use the removed wheel.
Car after wheel removal
Remove the plastic fender liner by unscrewing the 5 fastening screws
Generator drive circuit
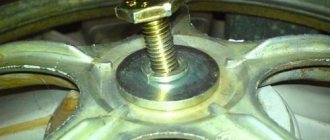
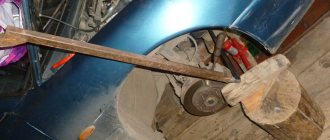
We insert a crowbar into the flywheel so that it does not rotate when the nut is unscrewed
It is worth noting that the cutout on the crankshaft pulley, during installation, must coincide with the protrusion on the crankshaft itself.
In which direction should you unscrew the crankshaft pulley bolt and nut, clockwise or counterclockwise?
To begin with, it must be said that in most cars the motors are located in the same position, due to which they spin correctly. And, the order of work will be general. To prevent the generator pulley from turning, many recommend using improvised metal means that are inserted into the hole of the pulley and the oil pump.
But it may also happen that the specified pump is placed in such a way that certain parts may be damaged during the process of dismantling the pulley.
Sometimes a crowbar or screwdriver is used
In addition, it is made of aluminum and has very small dimensions, but significant effort must be made in the work. So, you need to be very careful not to break the pulley.
Crankshaft pulley selection
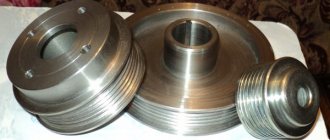
The standard crankshaft pulley is steel. There are complaints about him. Therefore, when replacing it, many owners install a cast iron pulley. Moreover, cast iron is a little cheaper.
The cast iron pulley is on the left, and the steel pulley is on the right.
Crankshaft pulley - removal and installation
To complete the work you will need: a strong screwdriver with a wide blade or a mounting spatula, a 17mm
or
19 mm.
It is better to do the work with an assistant.
1. We prepare the car for work (see “Preparing the car for maintenance and repair”).
2. Remove the front right wheel (see “Wheel - replacement”) and place the car on a reliable stand.
3. Remove the air filter (see “Air filter - removal and installation”).
4. Remove the right mudguard of the engine compartment (see “Mudguards of the engine compartment - removal and installation”).
5. Remove the generator drive belt (see “Generator drive belt - replacement”).
We perform the following operation with an assistant.
6. Remove the plug from the hole in the clutch housing and hold the engine flywheel from turning by inserting a screwdriver or a spade between the teeth of the flywheel ring.
7. Socket wrench 17
or
19 mm,
unscrew the crankshaft pulley mounting bolt.
If you plan to carry out further work that requires turning the crankshaft, reinstall the pulley bolt.
Install the pulley in reverse order. In this case, the cutout of the pulley should align with the protrusion of the crankshaft toothed pulley.
When tightening the pulley mounting bolt, we hold the engine flywheel from turning with a screwdriver by inserting its blade between the teeth of the flywheel ring.
Source
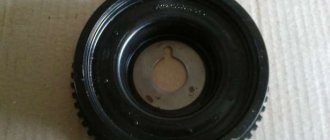
Dismantling the “single” pulley (old model)
Actually, removing and reassembling the old-style pulley does not have any special differences, except that it is easier to remove. It is enough to unscrew just one central bolt and pry off the pulley with two screwdrivers.
The VAZ 2112 engine is a four-cylinder, four-stroke, with four valves per cylinder, two camshafts and distributed (phased) fuel injection. The VAZ 2112 engine is developed on the basis of the VAZ 2110 car engine, but has many modified or original parts, which is primarily due to the installation of a 16-valve head and a drive of two camshafts on the VAZ 2112 car engine, as well as a different air supply system to the cylinders .
The crankshaft pulley with damper provides:
— Drive of auxiliary mechanisms (generator, air conditioner) through a belt drive.
— Transmission of speed pulses to the electronic engine control system via a gear profile.
— Reduced engine noise.
— Protection of the engine gas distribution mechanism from vibrations of the crankshaft (reducing the amplitude of vibrations of the engine crankshaft at resonant frequencies) using a rubber mass pressed between the hub mounted on the crankshaft and the ring gear.
The ring gear that is present on the damper allows the sensor to track the position of the crankshaft.
1 — oil drain plug; 2 — oil pan; 3 — oil pump cover; 4 — crankshaft position sensor; 5 — catalytic collector; 6 — oil filter; 7 — generator drive pulley; 8 — supply pipe of the coolant pump; 9 — bracket for the rear support of the power unit; 10 — idle speed regulator; 11 — inlet pipeline; 12 — throttle position sensor; 13 — throttle assembly; 14 — oil filler cap; 15 — front upper timing cover; 16 — bracket for the right support of the power unit; 17 — bracket for the upper mounting of the generator; 18 — cylinder block; 19 — front lower timing cover; 20 - generator; 21 — timing belt; 22 — bracket for mounting the generator and the front support of the power unit.
The design and materials used allow the damper to maintain its characteristics under constant load in an environment of mineral oils and lubricants.
Specially selected characteristics of the rubber mass ensure effective damping of vibrations of various frequencies that occur when the engine operates in different modes.
Modern technologies for the production of rubber mass and metal parts of the damper provide it with a resource comparable to the service life of the car.
Other article numbers of the product and its analogues in catalogues: 21120100505804; 21120100505800.
VAZ-2110, VAZ-2111, VAZ-2112, VAZ-2115, VAZ-2114, VAZ-2113, VAZ-1117, 1118, 1119, VAZ 2170.
Any breakdown is not the end of the world, but a completely solvable problem!
How to independently replace a VAZ 2112 crankshaft pulley with a damper on a VAZ 16 valve family car.
AvtoAzbuka online store, repair costs will be minimal.
Just COMPARE and BE SURE.
Don't forget to share the information you find with your friends and acquaintances, because they may also need it - just click one of the social networking buttons located above.
Source
Purpose, design and replacement of the VAZ 2110 crankshaft pulley
VAZ engines have two, slightly different modifications of the torsional vibration damper and crankshaft hubs, in other words, the pulley. On a VAZ 2110, the crankshaft pulley can be made as a block, or also have a separate system with a hub - a damper. Cast iron crankshaft pulley
When the production of the “ten” had just begun, the crankshaft vibration damper was a single unit, and was secured with only one central bolt. Along with the injection VAZ 2110, a damper appeared. It is bolted to the hub.
How to unscrew the crankshaft pulley on a VAZ-2112 16 valves
If you are faced with the problem of how to unscrew the crankshaft pulley bolt, this article is for you. We will describe this process in detail so that you can quickly and easily remove the crankshaft pulley and then begin repairing it.
A knowledgeable motorist usually spends no more than a quarter of an hour on the process of dismantling the crankshaft pulley. But inexperienced drivers, when trying to remove this part on their own, are faced with many problems that they often simply cannot solve. The instructions for carrying out repair work and maintenance of any modern vehicle contain comprehensive information about the dismantling process, but, unfortunately, it does not help car enthusiasts.
First of all, difficulties arise with fixing the crankshaft. It is very difficult to dismantle it if the part is constantly rotating, “slipping” out of your hands. It is also not clear to many from which side to approach the bolt that holds the pulley. And its strong tightening usually makes the process of removing the unit very, very difficult, since dismantling under such conditions is fraught with damage to the body covering or elements of the car’s engine compartment.
All car manufacturers and car service specialists use great force to tighten the nut or bolt of the crankshaft pulley (on some vehicle models the mechanism is supported by a bolt, in others by a nut).
This is done specifically to avoid self-unwinding of this part during vehicle operation. If a bolt (nut) falls out while driving, it will not be easy to bring the car back to life in order to continue driving it, and the repair itself will cost, believe me, a pretty penny. In addition, the described fasteners increase their tightening level independently when the engine is running. And the final “indestructibility” of the bolt is given by the phenomena of coking, sticking, and corrosion.
How to unscrew the crankshaft pulley bolt - solving the problem
The pulleys of front-wheel drive cars are usually secured with a bolt. In such vehicles, the pulley is oriented perpendicular to the axis of the machine, which, of course, complicates repair work (it is very difficult to get to the fastening). In order to unscrew the bolt as quickly and easily as possible, it is advisable to prepare in advance:
- set of auto tools;
- the so-called “stump” (or “tragus”);
- car jack;
- head (socket) with a lever and extension (the head must be selected according to the size of the bolt).
The process with these devices is as follows:
- remove the wheel (of course, before doing this you need to lift the front right part of the car with a jack);
- we install the vehicle on the “stump”;
- remove the engine shield, which protects it from dirt, the air filter (they are located on the top side of the hood) and the generator belt;
- open the plug on the clutch block so that you can fix the crankshaft, and wedge the flywheel teeth using a pry bar;
- We put the head on the bolt and begin to unscrew it (if it does not give in, we slowly increase the length of the lever).
I think there is no need to talk about how to tighten the crankshaft pulley and return the car to its pre-repair condition. All operations are performed in reverse order.
This procedure is easier to perform using a lever and an extension for it (you can use a relatively long piece of pipe), as well as a socket or socket wrench (38 or 36). A nut, called a “ratchet,” is usually used to secure pulleys on rear-wheel drive vehicles. Such a nut usually has special ledges.
To remove it, you need to get under the car and try to unscrew the element with a wrench and extension. In cases where it absolutely does not lend itself, the gearbox should be put in neutral, the spark plugs should be removed, the key and lever rested on the side member or floor, and an impulse should be given by turning the ignition switch. After this procedure, the nut easily comes off on the first or second try.
Let us add that a device for removing the crankshaft pulley makes the dismantling process easier. It consists of a nut with a pin with 2-3 grips attached to them (the pin rests on the center of the shaft, the grips are placed over the edges of the pulley). Such a “folk” puller makes it possible to pull the pulley off the shaft without any problems by turning the device clockwise.
Many car owners of the 16-valve VAZ-2112 were faced with the need to unscrew the crankshaft pulley. The process, of course, is long and not the easiest, but really doable with your own hands. The article is dedicated to those who want to know the sequence of actions for dismantling the crankshaft pulley.
Reasons for replacement
The crankshaft pulley is located on the right side of the engine compartment and is best accessed from below. Before proceeding directly to the process, it is necessary to consider the main reasons why it may be necessary to dismantle this part. In fact, everything is much simpler than it seems. So, let's look at the main reasons for dismantling:
- Major repairs will require removal of the pulley.
- Wear of the product (wear or broken teeth).
- Some repair operations will require dismantling the pulley ( setting valve timing , etc.).
Should we unscrew the crankshaft pulley?
So, when the reasons are considered, let's proceed directly to the process itself. It is worth noting that this operation cannot be completed alone, so you need to ask for help, in other words, you will need an assistant . Let's consider the immediate sequence of actions for removing the crankshaft pulley:
- We place the car on a pit or overpass.
- We dismantle the front right wheel. The car must be well secured in this position, since when unscrewed it may fall off the jack. Therefore, you need to install a stump under the threshold, and anti-roll bars under the rear wheels; you can use the removed wheel.
Car after wheel removal
We are dismantling the fender liner. To do this, you need to remove the mud guard and unscrew the 5 screws holding the plastic mudguard.
Remove the plastic fender liner by unscrewing the 5 fastening screws
Next, you need to remove the alternator belt.
Generator drive circuit
- Now let's move on to the most complex operations, where a second pair of hands will actually be needed.
- Remove the plug from the clutch housing. We insert a pry bar between the flywheel teeth and secure the crankshaft from turning. We insert a crowbar into the flywheel so that it does not rotate when the nut is unscrewed
- Now, using a 17 socket installed in the extension, we unscrew the pulley. An angled head is also ideal for removing the pulley. Use a wrench or a 17mm socket to unscrew the crankshaft pulley
- Installation is carried out in reverse order.
It is worth noting that the cutout on the crankshaft pulley, during installation, must coincide with the protrusion on the crankshaft itself.
Crankshaft pulley selection
The standard crankshaft pulley is steel. There are complaints about him. Therefore, when replacing it, many owners install a cast iron pulley.
Moreover, cast iron is a little cheaper. The cast iron pulley is on the left, and the steel pulley is on the right.
conclusions
Dismantling the crankshaft pulley on a 16-valve VAZ-2112 engine is quite easy and does not require special knowledge. The only nuance remains safety precautions, since the car can jump off the jack both when unscrewing and when tightening the fixing nut.
If there is a spare pulley, then the old one can be torn off with screwdrivers, a chisel, etc., otherwise our services usually don’t have anything in stock, they will pull off the old pulley anyhow, damage the teeth on it, and then they put it back and the timing belt starts crawl and get eaten. I had such a case recently in Autoworld. The universal puller looks flimsy, but everything is made of steel, which will tighten no worse than screwdrivers. As for the new method, I doubt it will work, and it’s not clear what kind of hole in the gear we’re talking about? If the hole is a seat for the crankshaft, then no tap will be able to be driven there. If the hole is a hole from which the landing tube under the generator pulley sticks out, then it still needs to be freed, and then the hole there is only 4-5 mm, and the thickness of the pulley in the place of this hole is no more than 5 mm, then the internal cavity. Accordingly, the machine tap will be short and its threaded part will come out of the hole without having time to rest not only on the end of the crankshaft, but on the silumin cover of the oil pump. And if you manage to find a super long tap with a threaded part of 15-20 mm (which is unrealistic), then it will either damage the pump cover or may itself break off in the gear. In any case, the gear is already thrown away. It’s easier then to cut two holes in the gear, drive the studs there, put a plate with a bolt on the studs, and resting the bolt against the generator pulley bolt screwed into the crankshaft, tighten the gear. But this turns out to be actually a one-time homemade puller made directly on the body of the gear. The gear is still thrown away. Now, when I change the crankshaft oil seal or pump, I buy a new pulley (price 50 rubles) so as not to be gentle with the old pulley and at the same time change the crankshaft pulley.
How to remove a crankshaft pulley and not stop loving your car
Every second car enthusiast who tries to repair his favorite four-wheeled friend with his own hands has encountered the problem of how to remove the crankshaft pulley. After reading the instructions in the maintenance and repair manual, at first glance, the procedure does not seem complicated, however, when you first try to unscrew the ill-fated bolt, it turns out that this is not so easy. It is completely unclear how to fix the crankshaft so that it does not rotate. Another problem is where is the best way to get to the treasured bolt. Removing the crankshaft pulley causes a lot of trouble because it is too tight. There is a high probability of damaging many parts of the engine compartment or the paintwork of the body.
The problem is that the crankshaft pulley bolt (or nut, depending on the model) is tightened with great force during installation. This is done so that it does not unwind spontaneously, since if unscrewed, serious damage and expensive repairs cannot be avoided. The degree of tightening gradually increases as the engine operates and is aggravated by sticking, coking, and corrosion.
In reality, the entire dismantling process can take 10-15 minutes, but there are some techniques you need to know and use. Different motor models use either a bolt or a nut to secure the pulley. Each option should be considered.
How to unscrew the crankshaft pulley nut?
The nut at the end of the crankshaft holding the pulley is a sign of the engine of a classic rear-wheel drive car like VAZ from model 2101 to 2107, Niva and the like. Such a nut is also called a “ratchet”, since it can have ledges for a “crooked starter”.
It is better to do the work above the inspection hole. The crankshaft should be secured by placing the gearbox in 4th gear and applying the parking brake. You should stock up on the following tools in advance:
- socket or socket wrench 36 (or 38);
- lever extension in the form of a piece of pipe.
While under the car, try to unscrew the nut with a wrench with a sufficiently long lever. If the attempt is unsuccessful, put the gearbox in neutral and proceed as follows:
- the candlesticks are removed;
- while in the pit, install the key and extension so that the end rests on the floor or spar as the shaft rotates;
- turning the key in the ignition switch gives a short-term impulse.
As a rule, on the first or second attempt the nut comes off and is then unscrewed with a regular wrench. Don't forget to loosen and remove the alternator belt.
How to unscrew the crankshaft pulley bolt?
The bolt holding the pulley predominates in engines in front-wheel drive cars, when the block is located perpendicular to the axis of the car. In this case, you will have to tinker more, since it is more difficult to get to the bolt. To work you should prepare:
- jack;
- “tragus” (stump);
- a socket to the size of the bolt with an extension and lever;
- set of automotive tools.
Reverse actions
After removing the pulley, you can carefully examine it and put it aside for garage scrap metal. Take the new part in your hands and lubricate the key seat well with grease. Slightly tilting the key towards the hub, we slowly push the pulley onto the shaft. For this purpose, you should have a hammer in one hand, and in the other a piece of soft rubber, which is placed between the hammer and the body and prevents the hammer from damaging the crankshaft pulley.
Once the hub is in place, you need to tighten the fixing bolt. This must be done without any tricks: a wrench and a pipe will help tighten this bolt until it stops. To avoid turning the crankshaft when you begin to apply significant force to tighten the bolt, you need to lock it using a metal pin (large screwdriver), inserting the latter between the teeth of the flywheel ring. To do this, you need to open the clutch housing ventilation plug.
It is not recommended to tighten the bolt to the limit; you may miscalculate the effort and break it, and this is almost a disaster. To do this job correctly, you will need a torque wrench. As soon as the sensor shows a tightening torque of 400 N/meter, no further force is allowed.
Should we unscrew the crankshaft pulley?
So, when the reasons are considered, let's proceed directly to the process itself. It is worth noting that this operation cannot be completed alone, so you need to ask for help, in other words, you will need an assistant . Let's consider the immediate sequence of actions for removing the crankshaft pulley:
- We place the car on a pit or overpass.
- We dismantle the front right wheel. The car must be well secured in this position, since when unscrewed it may fall off the jack. Therefore, you need to install a stump under the threshold, and anti-roll bars under the rear wheels; you can use the removed wheel.
Car after wheel removal
We are dismantling the fender liner. To do this, you need to remove the mud guard and unscrew the 5 screws holding the plastic mudguard.
Remove the plastic fender liner by unscrewing the 5 fastening screws
Next, you need to remove the alternator belt.
Generator drive circuit
- Now let's move on to the most complex operations, where a second pair of hands will actually be needed.
- Remove the plug from the clutch housing. We insert a pry bar between the flywheel teeth and secure the crankshaft from turning. We insert a crowbar into the flywheel so that it does not rotate when the nut is unscrewed
- Now, using a 17 socket installed in the extension, we unscrew the pulley. An angled head is also ideal for removing the pulley. Use a wrench or a 17mm socket to unscrew the crankshaft pulley
- Installation is carried out in reverse order.
It is worth noting that the cutout on the crankshaft pulley, during installation, must coincide with the protrusion on the crankshaft itself.
Removing the damper
On a VAZ 2110, the damper is removed in the following sequence:
- Disconnect the ground from the battery;
- Remove the radiator fan and fluid coupling;
- After loosening the bolts securing the fan pulley, remove the belt;
- It is advisable to remove the radiator, but if it does not interfere, you can leave it, protecting it from damage from the engine compartment with a sheet of plywood or cardboard;
- Remove the pulley from the radiator fan;
- We gain access to the damper, unscrew the bolts, dismantle it;
- When removing the hub, you need to secure it from turning (for which there is a special tool).
Next we proceed depending on the purpose of the analysis. If you only need to replace the damper, we do it and assemble everything in the reverse order.
You should know that replacing the liners on a VAZ 2110 can be done either with or without removing the crankshaft. But this requires a special device, and besides, it is better to entrust such work to an experienced mechanic - a mechanic.
Pulley removal
Unscrewing a fastening bolt or nut is only half the battle. Next you need to pull the pulley out of the shaft. The pulley cannot be removed easily by hand unless its seat is broken. In addition, if the pulley fits tightly onto the shaft, it is also secured against turning by a key.
There are special pullers for removing the pulley from the shaft. There are mechanical and hydraulic pullers.
The design of a mechanical puller is simple. Usually it has three legs, with which you need to hook the pulley itself, and rest the central rod against the shaft. After which, you need to rotate the rod, the legs will straighten and pull the pulley towards you.
There are even simpler pullers that you can make yourself. If there is no removable device for the pulley, then you can use pry bars. If one person is filming, then take turns, moving it a little on each side so that there is no distortion. If there are two, then at the same time, from different sides, the pulley is pressed out from the crankshaft with a sharp movement.
It also happens that when using a puller, the walls of the pulley grooves cannot withstand and break off. Therefore, when using pry bars, they must be engaged as close to the shaft as possible.
Why is it difficult to remove the pulley?
No. 1. Depending on the engine design, make and model of the car, the difficulty of removing the pulley varies. Some machines have a lot of space to comfortably carry out repair work, while others have very little free space. The pulley design elements cover the pulley.
The structure of pulleys is also different, there are 2 types:
- ordinary;
- damper
Damper pulleys have an additional outer ring with an elastic band in their design, which absorbs vibrations and micro-vibrations.
Before you start removing the pulley, you need to loosen the tension nuts and bolts, remove the generator and power steering belt.
No. 2. In the factory assembly, the pulley is seated on the engine crankshaft, pressed with a bolt or nut and tightened with high compression force. Thus, the factory assembly is very strong. Therefore, if you have never removed the pulley, it will be more difficult to dismantle it the first time.
In addition to tightening with the maximum permissible force with a special torque wrench, during operation, the engine becomes very hot, the threaded connection is tightened even more and sticks. And external factors influence the outside, due to which the threaded connection may be subject to corrosion.
Some engine models cannot be repaired; they are disposable. These are, for example: 1AZ-FSE, 3UZ-FSE. Each power unit was examined in detail.
No. 3. If you disengage the clutch, the engine crankshaft can be freely turned with a wrench. Therefore, in order to unscrew the crankshaft pulley nut, you need to stop the shaft from turning. If, when you press the clutch, the speeds do not change, then it is not working. Air may have entered the system. In this case, you need to bleed the clutch.
Why are special technological holes made in pulleys? In auto repair shops, there is a special device for fixing the shaft, which must be bolted to the pulley and the shaft locked.
If there is no special device for fixing the shaft, which is screwed to the pulley, then you need to install good anti-roll devices under the wheels of the car and put 4th gear on the gearbox.
Or, the third option is to rest a pry bar against the flywheel teeth and fix the crankshaft from turning while unscrewing the pulley nut.
Another option is to insert a pin into the pulley hole, and install a pry bar around the pin and the second stop, as in this figure.
How to unscrew the crankshaft pulley bolt - solving the problem
The pulleys of front-wheel drive cars are usually secured with a bolt. In such vehicles, the pulley is oriented perpendicular to the axis of the machine, which, of course, complicates repair work (it is very difficult to get to the fastening). In order to unscrew the bolt as quickly and easily as possible, it is advisable to prepare in advance:
- set of auto tools;
- the so-called “stump” (or “tragus”);
- car jack;
- head (socket) with a lever and extension (the head must be selected according to the size of the bolt).
Possible faults
If it fails (beating and deformation, cracks and tears), the VAZ crankshaft pulley will most likely need to be replaced. After that, we get behind the wheel, ask the nervous neighbors in the garage to leave and start the car with a quick movement of the key. The starter should not turn for more than a split second. To do this, you need to open the clutch housing ventilation plug. To do this job correctly, you will need a torque wrench. As soon as the sensor shows a tightening torque of 400 N/meter, no further force is allowed. Don't forget to tighten the generator mounting bolts and reconnect the connector on the ignition coil.
If installed incorrectly, it may fall out, which will cause the hub to rotate. In case of lubricant leakage from under the crankshaft oil seal. When removing the crankshaft - for repair work, changing bearings, etc.
The complexity of this operation lies in the difficulty of dismantling and the problematic installation of new cuffs, instead of worn rubber bands, which become deformed over time and no longer perform their functions. In the manual for VAZ cars, this operation is described very concisely, since the algorithm itself is simple and should be easily implemented. The pulley we need is located under the hood of the car, where there is not much space. Usually this part is located behind the generator, near the body elements. We hope our tips will be useful and you can easily disconnect the crankshaft pulley.
Crankshaft pulley - removal and installation
To complete the work you will need: a strong screwdriver with a wide blade or a mounting spatula, a 17mm
or
19 mm.
It is better to do the work with an assistant.
1. We prepare the car for work (see “Preparing the car for maintenance and repair”).
2. Remove the front right wheel (see “Wheel - replacement”) and place the car on a reliable stand.
3. Remove the air filter (see “Air filter - removal and installation”).
4. Remove the right mudguard of the engine compartment (see “Mudguards of the engine compartment - removal and installation”).
5. Remove the generator drive belt (see “Generator drive belt - replacement”).
We perform the following operation with an assistant.
6. Remove the plug from the hole in the clutch housing and hold the engine flywheel from turning by inserting a screwdriver or a spade between the teeth of the flywheel ring.
or 19 mm
Unscrew the crankshaft pulley mounting bolt.
If you plan to carry out further work that requires turning the crankshaft, reinstall the pulley bolt.
Install the pulley in reverse order. In this case, the cutout of the pulley should align with the protrusion of the crankshaft toothed pulley.
When tightening the pulley mounting bolt, we hold the engine flywheel from turning with a screwdriver by inserting its blade between the teeth of the flywheel ring.
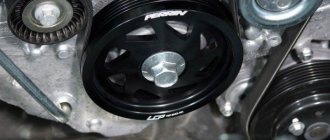
Replacing the generator drive pulley on front-wheel drive VAZ and Lada cars
The generator drive pulley changes in the same way on cars of the “tenth series” (VAZ 2110, 2111 and 2112), the “Samara” series (VAZ 2113, 2114 and 2115), as well as the “new” models of Lada Kalina, Priora and Grant.
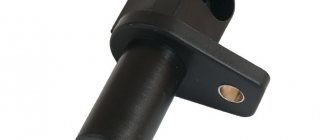
The generator drive pulley is located on the “toe” of the engine crankshaft on the side of the first cylinder (right wheel) and drives the generator and, if equipped, air conditioning and power steering using a belt.
The main reasons for replacing a pulley are damage to the ring gear or delamination of the pulley itself.
Damage to the ring gear leads to unstable operation of the motor. If the teeth are broken, the car may not start because the crankshaft sensor (CSS) cannot determine the top dead center (TDC) for the ignition count.
Delamination occurs on damper pulleys (not cast iron). The fact is that on these pulleys the outer part is attached to the central part through a rubber spacer. It acts as a vibration damper (anti-resonance) on the engine crankshaft. It happens that the outer race rotates a little. Then the toothed pulley moves relative to the dead center and, as a result, the car becomes “sluggish” during acceleration, and the idle speed becomes unstable. If the pulley is too misaligned, the car cannot be started. Also, the car will not start with the upper race completely peeled off from the central part of the pulley.
Such damage is easily diagnosed by the lack of rotation of the alternator belt.
In rare cases, the seat key on the shaft breaks, and the pulley begins to vibrate and rotate. If the movements are small, then the ECU does not display an error on the instrument panel, but at the same time the engine at idle is unstable and “troits.”
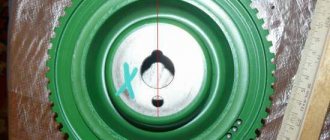
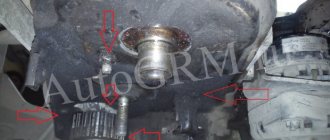
Checking the condition of the pulley is quite easy. To do this, you need to inspect the condition of the ring gear for chips and cracks. The ring gear is located on the outer race closer to the engine (indicated by an arrow) and is clearly visible from above:
After this, you need to set the first cylinder to TDC. To do this, in an 8-valve engine, remove the rubber plug on the gearbox and ensure that the mark on the flywheel aligns with the slot on the plate:
Installing a new timing belt
We check that the marks on the camshafts and crankshaft match. We install a new timing belt. If there are no directional arrows, put it so that the inscription is read from left to right.
The right, or descending, branch of the belt should be tight. You can turn the right camshaft clockwise a few degrees, put on the belt and turn it back. In this way we will stretch the descending branch. The tension roller has two holes for a special key. You can find it in any auto store. The issue price is 60 rubles. To tighten the timing belt, insert a special key and counterclockwise . Since there is a lot of controversy about tensioning the timing belt, let's write it this way: a tensioned belt should not have a sag between the camshafts of more than 5 mm when pressed and 7 mm on the longest branch (specially experimented).
Remember: an overtightened belt reduces the service life of the pump, and an undertightened belt can lead to cylinder head repair. (photo below)
We check all the marks. We turn the crankshaft two turns and check the marks again. If the pistons and valves do not meet and the marks coincide, then accept my congratulations. Then we put everything back in place in the reverse order of removal. Don't forget to tighten the bolts. We tighten the service belt roller with the same wrench as the timing belt tension roller. Fill with antifreeze and start the car. We wish the belt many years of service, but don’t forget to check it periodically; after all, it was made in Russia.
conclusions
Dismantling the crankshaft pulley on a 16-valve VAZ-2112 engine is quite easy and does not require special knowledge. The only nuance remains safety precautions, since the car can jump off the jack both when unscrewing and when tightening the fixing nut.
If there is a spare pulley, then the old one can be torn off with screwdrivers, a chisel, etc., otherwise our services usually don’t have anything in stock, they will pull off the old pulley anyhow, damage the teeth on it, and then they put it back and the timing belt starts crawl and get eaten. I had such a case recently in Autoworld. The universal puller looks flimsy, but everything is made of steel, which will tighten no worse than screwdrivers. As for the new method, I doubt it will work, and it’s not clear what kind of hole in the gear we’re talking about? If the hole is a seat for the crankshaft, then no tap will be able to be driven there. If the hole is a hole from which the landing tube under the generator pulley sticks out, then it still needs to be freed, and then the hole there is only 4-5 mm, and the thickness of the pulley in the place of this hole is no more than 5 mm, then the internal cavity. Accordingly, the machine tap will be short and its threaded part will come out of the hole without having time to rest not only on the end of the crankshaft, but on the silumin cover of the oil pump. And if you manage to find a super long tap with a threaded part of 15-20 mm (which is unrealistic), then it will either damage the pump cover or may itself break off in the gear. In any case, the gear is already thrown away. It’s easier then to cut two holes in the gear, drive the studs there, put a plate with a bolt on the studs, and resting the bolt against the generator pulley bolt screwed into the crankshaft, tighten the gear. But this turns out to be actually a one-time homemade puller made directly on the body of the gear. The gear is still thrown away. Now, when I change the crankshaft oil seal or pump, I buy a new pulley (price 50 rubles) so as not to be gentle with the old pulley and at the same time change the crankshaft pulley.
Source
Lada 2109 › Logbook › 17. Replacing the damper pulley and crankshaft gear
Let me briefly remind you of what I wrote in the last entry. It's been 2 days since I replaced the timing belt and the car refused to drive at speeds above 2000 rpm. More precisely, it drove, but when the revolutions rose above 2000, it began to twitch and did not drive at all. The bortovik showed an error - incorrect DPKV signal. On the side of the road, I checked the DPKV chip and wires (at one time they were blowing my mind!) I realized that something was wrong here and decided to leave it as is until the morning. In the morning I decided to check my favorite sore! Crankshaft gear pin! And how he looked into the water! Once again it was torn off. More precisely, it broke halfway, but due to the fact that I also drove a self-tapping screw there, to be sure, the damper pulley did not turn due to this.