Signs of pulley failure
Since without a part the entire washing process goes to waste, identifying a breakdown is as easy as shelling pears. You obviously won’t miss the fact that things remain dirty even after the washing machine, so start repairing them immediately. However, it is better to be one hundred percent sure, so we have collected signs for you that will help you accurately determine the condition of the pulley:
- The most obvious thing is that the drum does not rotate during washing. It's hard not to notice.
- When washing, you hear a lot of noise and knocking.
- The rotation occurs jerkily with a strong roar.
Now, if you are sure of a breakdown, it’s time to move on to the repair itself! Rest assured, it will not be difficult and even beginners will be able to do it.
Possible faults
How to remove a ball joint without a puller When you don’t have one at hand
Part designed to last for 10 years.
List of possible problems:
a burst rubber layer, which causes noise when the engine is running (a sign is the characteristic hum and timing noise); spontaneous unscrewing by cut parts; worn grooves, which affect premature belt wear; when beating during an accident, part of the part may break off, which leads to further breakdowns (therefore, after an accident, it is important to check the technical serviceability of the AvtoVAZ);
When purchasing a functional disk separately, you must choose the original part, no matter how much it costs. This contributes to reliable and long-lasting operation of the vehicle. Even if a simple part is turned, the size may not match.
The structure and principle of operation of the pulley. Typical problems
The wheel consists of two rings, which are connected by stiffening ribs. The part is attached to the drum shaft using a bolt and is located on the rear wall of the tank.
In automatic washing machines (AWMs) with a belt drive, a small pulley is also provided. It is fixed on the motor shaft. The operating principle of the system is simple:
- The engine starts.
- Via a drive belt, it transmits torque to the large rim of the tank.
- The wheel rotates, causing the tank and drum to rotate.
The motor tachometer is responsible for regulating the speed of rotation.
Most often the pulley is made of steel, but can be made of other metals. The surface is coated with anti-corrosion compounds to protect against rust. Therefore, the part rarely fails. In addition, without a visual inspection it is difficult to understand that the cause of the breakdown is in the reverse wheel.
What problems can happen:
- The fastening has become loose (the most common problem). At the same time, you may hear knocking and noise while the equipment is operating.
- Physical wear: cracks on the surface. The rotation of the drum is disrupted, the work stops completely.
- Deformation of the product shape. More often found with factory defects. Line production can be so clumsy that burrs remain on the surface, causing the belt to quickly fray and require replacement.
You can notice the problem by the slow rotation of the drum during the spin cycle. Or when the machine stops while the electronics are operating normally. In such cases, it is recommended to check the drive belt and impeller.
How to check and remove the pulley from the drum and motor of a washing machine?
For repairs, you will have to remove the back wall of the SM. Follow safety precautions.
Unplug the washer from the socket. Close the inlet valve.
Place the container and disconnect the inlet hose from the housing. Next follow the instructions:
- Remove the top cover by unscrewing the mounting screws from the back.
- Remove the back panel by unscrewing the bolts around the perimeter.
- If the belt does not come off, remove it from its place.
- Inspect the rim for bends and deformations. Rock it with your hand to check the strength of the fastening. Run your hand along the edge to see if there are any burrs?
In case of any problem, it is necessary to remove the pulley and install a working part. How to do it right:
- Lock the wheel in one position. Use available tools. You can install a block under the stiffener.
Sometimes it can be difficult to unscrew the central bolt. It sticks to the seat or is secured with sealant.
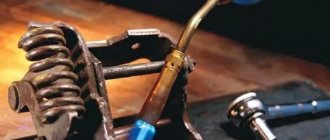
To solve the problem, heat the bolt with a blowtorch and spray with WD-40. Wait half an hour and unscrew the fastener.
Using a "pull" motion, remove the wheel from the shaft. Before fixing the new pulley on the shaft, inspect the seat and clean it from wear if necessary. Install the new element by lubricating the bolt with sealant.
Let's move on to the driving element of the motor. It is more difficult to dismantle it, because the part sits firmly on the bushing. You will need a special puller and a torch.
Repairing a pulley on a washing machine motor:
- Remove the engine. It is located under the washing machine tank.
- Disconnect its wiring and remove the bolts.
- Install the puller onto the part to be removed. It fits tightly, so it won’t be possible to remove it the first time.
- Using a torch, heat the element so that the metal expands and the fastening gives way.
How to put a pulley on a shaft with a key:
- Also heat the new part with a soldering iron or torch. Hold it with pliers.
- Place the ring in its original place.
How to attach a pulley to an electric motor shaft? To do this, press it in with hammer blows on the rod. The procedure is performed until the element has cooled down.
After cooling, the ring will be securely attached to the shaft. That's all the work. Now replace the engine and secure the belt. If the latter is damaged or worn out, install a new element.
- First, place the belt on the motor rim.
- Then, scrolling, onto the tank wheel.
- Turn the tank by hand. Everything should rotate easily, without difficulty or unnecessary noise.
It will not be possible to avoid manufacturing defects, but you can prevent breakdowns if you follow the operating rules. Do not overload the drum with laundry, monitor the operation of the bearings. If there is any extraneous noise, it is better to immediately remove the MCA panel and check what’s wrong. Delaying the problem will not solve it; on the contrary, it can lead to complete failure of the washing machine.
The video will help you cope with the repair yourself:
Tool making
But nothing is impossible, and you can make the appropriate tool yourself. You need to purchase a 54 heating lock nut so that the internal thread diameter is thirty-nine millimeters and the width does not exceed ten millimeters. Now it is important to grind off its edges by one and a half millimeters, and then weld a flat handle, the length of which is near the twenty-centimeter mark. That's all, the tool is completely ready for work.
This is how garage Kulibins do it to save money on buying original keys
Some pulleys have corners that have slightly rounded edges, so that the parts on the nut that are mating can be cut off a little.
Many drivers weld a pre-ground workpiece to a VAZ crankshaft nut wrench to obtain a universal tool suitable for most modern cars. In addition, such a handle is quite convenient to rest on the drive shaft of the front axle wheel.
Having unscrewed the bolt with a standard seventeenth head with an extension and a strong wrench, we continue to work. Don't forget about basic safety rules. So, to prevent the key from jumping off, you need to support the extension cord on a stand that will not jump out and break. Sometimes, even the wheel does not need to be dismantled for such work. Exceptions appear only when the car has tires with a large diameter (as indicated by the inscriptions on the tires) that exceed the standard dimensions. Then they take up more space in the arches. And, you will have to remove them, or use a wrench with a universal joint.
Reasons for pulley failure
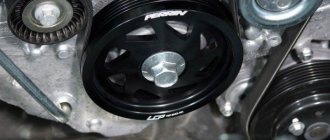
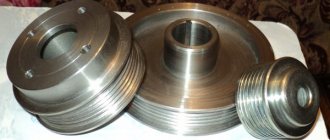
The pulley is a ring with a groove corresponding to the profile of the belt used. The outer part is connected to the hub using spokes reinforced with stiffeners. The part is cast from reinforced plastic or aluminum alloy, and then goes through a dynamic balancing stage (to reduce vibration of the equipment during operation). Old-style machines used a belt with a trapezoidal profile; Indesit, LG or Bosch front-loading equipment uses a poly V-belt with increased strength.
Common causes of failure of a part installed on the motor:
- destruction of the spokes or bead as a result of material fatigue;
- the appearance of material peeling on the treadmill due to manufacturing defects, which damage the belt during operation;
- Damage to the mounting hole due to installation of the pulley with a misalignment or insufficient fixation.
What functions does the node perform?
With the help of a small pulley on the motor axis and a large one on the drum axis, the high speeds generated by the electric motor are converted into high torque to rotate the drum, overcoming the inertial resistance of the water and laundry inside the tank.
Pulley for the Indesit washing machine
LG washing machines labeled Direct Drive do not have this unit. The transmission of torque from the motor to the drum is carried out directly by installing the latter on the rotor axis. All other brands have pulleys - Indesit, Siemens, Bosch, Electrolux and others.
Purpose of the crankshaft pulley
The design serves as a transmission from the drive to the attachment and consists of a massive disc-shaped cast iron part that is located on the axis. In addition, it contributes to cushioning during changes in rotation, balancing of the rotating device, and cooling of belts.
The design has a gap, with the help of which the disc is mounted on the camshaft in the front part, which comes from the carburetor or from the valve injector. The fasteners will be placed on it. And on top there are holes for attaching V-belts and poly-V-belts. The structure itself is quite heavy, so during manufacturing at the factory holes are made to reduce weight.
The part comes in two types - a crankshaft damper pulley and a regular one. Unlike the damperless part, the part has massive rings. There is a gasket on the outside, which is located separately from the base. The gasket reduces vibrations. In addition, the part is equipped with an outer disk and periphery connected by durable rubber. The rubber gasket protects against temperature changes and other influences. With prolonged use of the vehicle, the gasket wears out. Therefore, it needs to be changed from time to time in order to keep intact the more important part - the massive disk. External aluminum car part with irregularities. The toothed coating facilitates the operation of the part position sensor.
Reasons for dismantling the crankshaft
Dismantling the crankshaft on a VAZ-2114 may be required in the following cases:
- The reason that comes first is most often the replacement of the timing belt and other work
that is somehow related to the gas distribution mechanism. Work should be carried out in accordance with the regulations, or if the mechanism fails. - Another reason for dismantling is the crankshaft. They are changed when oil leaks occur in the places where they are installed.
Pulley fastening
On all VAZ-2114 vehicles without exception, the crankshaft pulley is fixed using a massive bolt, which can cause problems when removed.
A curved spanner wrench is good for fixing.
- First of all, this is due to its location, since it is difficult to securely and securely fasten the key or socket head.
- Secondly, even if you managed to position the key correctly, you will have to make every effort to dismantle it
. This is due to the fact that at the factory it is tightened as tightly as possible in order to avoid the facts of self-unwinding. Also, the right-hand thread may not be the best for unscrewing it, which during operation only screws the pulley in tighter and causes the part to stick.
When performing work to remove it, it is best to keep WD-40 on hand.
Tool for getting the job done
To make the work easier, you need to prepare the following tool:
- Jack.
- Wheel chocks.
- Pry bar and flat blade screwdrivers.
- A set of keys.
- Socket heads and extension.
It is best to carry out such work on a lift or inspection pit.
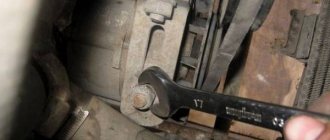
How to unscrew a bolt?
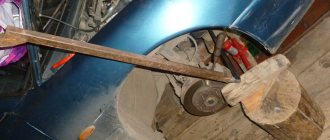
- As a rule, the pulley is attached to the crankshaft with a bolt only on front-wheel drive vehicles. To unscrew the bolt holding the pulley on the crankshaft, you will have to work hard, because getting to the bolt is not easy. Before you begin, you need to prepare the necessary tools: a jack, a head to match the size of the bolt and a lever with an extension, a tool kit for a motorist and a “tragus” (you can use a tree stump as a tragus). The removal phase looks something like this:
- We install a jack on the right side of the car in the area of the front wheel. Jack up the car and remove the wheel;
- Under the car, near the jack, we slip a trestle or stump (whatever is at hand). This will ensure the reliability and safety of bolt removal;
- During the work it will become clear that the bolt cannot be reached. We open the hood of the car and remove all parts that prevent full access. The air filter, the protective brushes of the car engine and the generator belt are usually removed;
- To unscrew the bolt you need to fix the crankshaft. To do this, you need to lock the flywheel teeth. Open the plug on the clutch block and insert a pry bar or screwdriver into the resulting hole. It is not very convenient to carry out actions to hold the flywheel lock and at the same time unscrew the bolt alone. You can ask someone for help;
- We take a head selected to the size of the bolt, with an extension and an additional lever, push it under the wheel arch and put it on the bolt;
- Turn the lever counterclockwise.
In most cases, the bolt gives in immediately, but if it is still in place, then you can use a slightly longer lever, and then it will definitely work.
Features of work
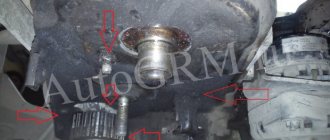
At first glance, there is nothing difficult in simply removing the bolt securing the pulley to the engine crankshaft flange. However, this is not quite true. The crankshaft pulley bolt very rarely unscrews and always sticks. Therefore, there is a risk of breaking it. First we need to get to this pulley. To do this, unscrew the bolt securing the generator to the tension bar. The latter is attached to the engine cylinder block.
View gallery
The generator is moved towards the engine, and the drive belt is removed from the pulleys. It can be rivulet type or serrated. Now, having reached the desired element, proceed to further actions.
For owners of cars with automatic transmission
How to unscrew the crankshaft pulley on an automatic machine? If an automatic gearbox is installed, then on a rear-wheel drive vehicle the “Parking” gear is set. The handbrake is turned on and then the element is unscrewed in the same way as on a manual gearbox. It is more difficult if the car is front-wheel drive. In this case, it will not be possible to remove the element as if it were a manual transmission (with the gear engaged and the brake pressed).
There is a high risk of damaging the gearbox. In this case, you need to lock the crankshaft so that it cannot rotate in any other way. Insert the assembly between the teeth of the engine flywheel ring gear through the hole in the gearbox bell. It is supported so that it cannot jump off and damage the teeth on the flywheel. In some cases, to get to the flywheel, you need to unscrew the engine starter. To do this, you will need an inspection hole, a lift or an overpass.
Removing the pulley and replacing the crankshaft oil seal
Since I still have one VAZ 2106 engine in my garage, which has not yet been sold, I decided to use it as an example to show how to replace the crankshaft oil seal. In many classic repair manuals you can read that to replace the front oil seal, you need to remove the cover from the front, since the space between the engine and the radiator is quite small to do this work without problems.
I will show everything with the engine removed, so there were much fewer problems experienced. So, first, here is a list of the necessary tools that we will need:
- 41 mm wrench or adjustable
- chisel (to lock the pulley while unscrewing the nut)
- flat screwdriver
- puller (not necessary, but convenient)
How to remove a pulley from a crankshaft
So, first of all, having stopped the pulley, unscrew the nut securing it:
When the nut is completely unscrewed, you can try to remove the pulley itself. This can be done simply by prying it from the inside with the same chisel, or using a special puller, as shown in the photo:
After which we can easily remove it, which can be seen in the picture below:
Replacing the front crankshaft oil seal
In my case, everything was simple, since the engine was removed from the car and replacement was not difficult. I used the same puller to pry it from the inside of the oil seal and carefully pulled it out:
- The seat must be cleared of deposits
- Then take a new oil seal and lubricate its working surface with engine oil.
- Press it into place. To avoid distortions, use the old oil seal, placing it on the new one, and carefully punch it in a circle with a hammer.
Now you can install the pulley in place, making sure it is correctly installed on the key. You can consider the procedure complete, and the VAZ 2106 ready for use!
But I once again draw your attention to the fact that if you do everything on a car, then doing it is very inconvenient and it is possible that some will even remove the front engine cover.
I forgot to mention the price of the seal. For VAZ “classics” it is about 100 rubles. Good luck with the renovation!
How to fix?
How this is done on cars with manual transmissions is briefly mentioned in this article, but our task is to perform the fixation on cars with an automatic transmission. For selected models, e.g. AUDI A6
, this won't be a big problem. You need to open the cap on the filler neck to fill the engine oil and turn the shaft until the “OT” symbol appears in the neck.
It shows that the piston is at top dead center, after which the shaft can be locked. This can be done as follows. Turn the TDC indicator out of the cylinder block, and in its place you need to screw a special fixing bolt. After this, you can begin to unscrew the pulley mount.
In some domestic and imported cars, there is a plug in the flywheel rotation zone
You need to carefully pull it out and ask an assistant to fix the shaft through the opened hole. To do this, you can use a pry bar or a powerful screwdriver.
The assistant will have to make some effort to keep it motionless.
The Ford Focus manufacturers also took care of the possibility of carrying out such an operation. There is also a plug on the cylinder block, which can be unscrewed to secure the shaft. To do this, insert a special rod into the opened hole, which you can make yourself. It is a cylindrical part about 65 mm long with a stepped shape. Its lower part has a length of 10 mm and a diameter of 4 mm. It is inserted into the groove of the crankshaft and locks it in a stationary state. The rest of the rod has a diameter of 8 mm, it acts as a guide into the opened hole.
What are the options for mounting the unit?
To remove the pulley from the electric motor that drives the tank using a belt, you must first determine the type of its fit.
Mounting methods differ in appearance and are defined as:
- spline connection (has a serrated edge of the shaft end);
- “hot” landing (the end of the engine axis is visually smooth and completely round);
- keyed fit (a groove is visible at the end);
- fit on a cone with a lock nut (the presence of fasteners is visually noticeable).
Drive pulley of an automatic washing machine
The vast majority of modern front-loading washing machines (Indesit, Bosch, Electrolux, Elgie and others) are equipped with a drive with a poly V-belt. Their pulley looks like a cylinder with transverse annular grooves. The fit of the part is usually splined or hot. The large wheel that turns the tank is usually secured with a locknut or screw.
Activator-type machines and older frontal models with a bottom-mounted motor are equipped with a conventional V-belt, and the pulley for them has deep flanges that prevent the belt from slipping off. These parts often have a keyway and a threaded connection.
Step-by-step instructions for replacing a washing machine pulley
Are you thinking about how to remove a pulley from a washing machine drum for further replacement? Take your time! Now we will tell you everything in detail and show you!
Disconnect your equipment from the power supply
The pulley, although not directly connected to electricity, is located next to the wires. It’s better to protect yourself from danger in advance, because this way you eliminate the risk of injury!
Remove the top cover
Unscrew all the fasteners that hold it in place.
Also remove the back panel and the belt on the pulley
The photo shows its appearance. In principle, there is nothing similar to it, so you will find it without difficulty.
Lock the wheel in one position
You can do this with a rope or a block inserted into the holes on the pulley.
Heat the mounting bolt with a soldering iron or use WD-40, then remove the mounting bolt
You can’t just pull it out, so these tips will help you with this.
Remove the wheel from the main shaft
Just pull it towards you. It should come off easily. If it’s difficult for you to do this, then you missed something in our instructions.
7. Carefully replace the part with a new one and reassemble the washing machine
To do this, you can read our instructions backwards. The actions will be the opposite.
Congratulations - you have coped with a complex repair, you are a real DIYer!
If you need spare parts for self-repair, purchase them from us: the widest range, fast delivery throughout Russia and a guarantee on everything.
TS3 (Universal-3): it is not possible to remove the spindle pulley... - Tabletop machine Universal
I ask for help, has anyone encountered this and/or am I doing something wrong?
The situation is this: I brought the machine home to my apartment, turned it on and was horrified - it became obvious that with such a level of noise the neighbors would come running even during the day, and there was no need to talk about the evening. I decided to shake up all the bearings, removed all the pulleys, the electric motor, disassembled everything and didn’t even (t-t-t) break anything, but the spindle pulley doesn’t give in at all! I did everything I could - I filled it with VD and waited a couple of days for it to dry out, and I used a mallet and a pry bar - no way!
I re-read all the topics related to removing the cartridge, spindle bearings, who writes what - some used a screwdriver and everything came off, some used a pry bar, etc., but for me it really resists - a rubber mallet with a pry bar doesn’t work help.
Moreover, the spindle shaft moves back and forth by 5-7 millimeters when the mallet hits it, but nothing further.
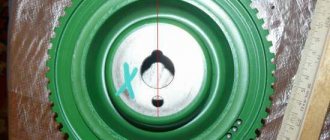
And I had a suspicion - maybe my pulley with the gear behind it sits on this shaft after all on a thread?? (although someone wrote that the pulley just sits on the shaft, but it doesn’t even flinch even an inch!) Suspicion is strengthened by the presence on the pulley of two holes for a slingshot key, however, maybe this was done to fix the pulley for replacement and reversing belt? In the photo I marked these holes with red circles.
What to do? Continuing to hammer does not give any result at all, I don’t have any pullers, and I have doubts that a puller will help if the pulley doesn’t even flinch from the sledgehammer. I wouldn’t want to break it, but I need to remove it, otherwise I won’t be able to get to the spindle bearings. The bearings growl, so I decided to try changing them.
www.chipmaker.ru
Withdrawal procedure
To remove the pulley from the washing machine drum yourself, you will need a screw puller for rolling bearings.
The central nut is first unscrewed (not available on all installations), which can be kept from unscrewing spontaneously by a metal washer. Then the legs of the device are inserted between the spokes and rest against the rear part of the hub, the screw is located in the centering hole on the axle. When the handle rotates, the part is smoothly pulled off the shaft without damaging the mating surfaces. What brand of equipment do you use at home?
- Bosch 16%, 1294 votes
1294 votes 16%1294 votes – 16% of all votes
- Samsung 15%, 1205 votes
1205 votes 15%
1205 votes – 15% of all votes
- LG 13%, 1097 votes
1097 votes 13%
1097 votes – 13% of all votes
- Indesit 6%, 514 votes
514 votes 6%
514 votes – 6% of all votes
- Atlant 6%, 505 votes
505 votes 6%
505 votes – 6% of all votes
- Electrolux 6%, 473 votes
473 votes 6%
473 votes – 6% of all votes
- Beko 3%, 286 votes
286 votes 3%
286 votes – 3% of all votes
- Philips 3%, 279 votes
279 votes 3%
279 votes – 3% of all votes
- Ariston 3%, 275 votes
275 votes 3%
275 votes – 3% of all votes
- Xiaomi 3%, 215 votes
215 votes 3%
215 votes – 3% of all votes
- Haier 3%, 212 votes
212 votes 3%
212 votes – 3% of all votes
- Redmond 2%, 173 votes
173 votes 2%
173 votes – 2% of all votes
- Siemens 2%, 135 votes
135 votes 2%
135 votes – 2% of all votes
- Gorenje 2%, 130 votes
130 votes 2%
130 votes – 2% of all votes
- Karcher 2%, 126 votes
126 votes 2%
126 votes – 2% of all votes
- Candy 1%, 123 votes
123 votes 1%
123 votes – 1% of all votes
- Liebherr 1%, 121 votes
121 votes 1%
121 votes – 1% of all votes
- Midea 1%, 120 votes
120 votes 1%
120 votes – 1% of all votes
- Hansa 1%, 118 votes
118 votes 1%
118 votes – 1% of all votes
- Whirlpool 1%, 115 votes
115 votes 1%
115 votes – 1% of all votes
- Zanussi 1%, 107 votes
107 votes 1%
107 votes – 1% of all votes
- Vitek 1%, 96 votes
96 votes 1%
96 votes – 1% of all votes
- AEG 1%, 72 votes
72 votes 1%
72 votes – 1% of all votes
- Dyson 1%, 55 votes
55 votes 1%
55 votes – 1% of all votes
- Scarlett 1%, 52 votes
52 votes 1%
52 votes – 1% of all votes
- Nord 1%, 50 votes
50 votes 1%
50 votes – 1% of all votes
- Thomas 1%, 50 votes
50 votes 1%
50 votes – 1% of all votes
- Miele 1%, 46 votes
46 votes 1%
46 votes – 1% of all votes
- iRobot 1%, 46 votes
46 votes 1%
46 votes – 1% of all votes
- Zelmer 0%, 40 votes
40 votes
40 votes – 0% of all votes
- BBK 0%, 39 votes
39 votes
39 votes – 0% of all votes
- DeLonghi 0%, 34 votes
34 votes
34 votes – 0% of all votes
- Kuppersberg 0%, 25 votes
25 votes
25 votes – 0% of all votes
- Smeg 0%, 15 votes
15 votes
15 votes – 0% of all votes
- iLife 0%, 10 votes
10 votes
10 votes – 0% of all votes
Total votes: 8253
Voted: 4828
22.01.2020
×
You or from your IP have already voted.
When removing the drum wheel, sometimes there is a problem with unscrewing the central bolt or nut. To reduce the effort, it is necessary to heat the element with the flame of a portable gas torch or blowtorch. Then you need to try to unscrew the threaded element with a wrench. An alternative technique is based on the use of fluids such as WD40, which is poured into the gap between the bolt and the impeller. The solution penetrates the threads and reduces the force required to unscrew.
Removing the pulley from the electric motor
The electric motor rotor has a small pulley that cannot be removed without a puller. The motor is removed from the washing machine and cleaned of dust and dirt, and then placed on a table or clamped in a vice through wooden spacers. The puller's paws rest against the rear end of the part, and the bolt is installed in the centering hole. To reduce the force, the surface of the pulley is heated to 125-150°C using a torch or blowtorch. The elevated temperature removes the adhesive that is used at the factory to hold the part in place.
When warming up, it is necessary to protect the windings and ball bearings from heat. A damp rag is placed on the shaft and housing; excessive wetting of the material is not recommended due to the risk of water entering the internal cavities of the engine. The heated pulley is carefully pulled off the axle with a puller; the work is done wearing protective gloves to prevent hand burns. After dismantling the drive, the electric motor is disassembled and worn elements are replaced.
To dismantle the drive, you can use a homemade puller made from a steel plate 10-15 mm thick. It is not recommended to use welded structures, since the force of tightening the pulley will destroy the seams. In a homemade device, symmetrical holes are drilled to install a threaded bushing for the lead screw. The configuration of the jaws matches the contour of the pulley. When removing, it is necessary to heat the pulley with a torch and use WD40 fluid.
Why is it so difficult to unscrew?
The main problem with dismantling is the mobility of the crankshaft. The device rotates in the same direction as the thread of the bolt/nut: moving one element, you move the other. Factory installation of parts is carried out with maximum torque.
The force of this clamp increases as the vehicle is used. Coking of the oil and corrosion lesions that form over time on the surface of the pulley and joint also complicate unscrewing.
How to remove a pulley bolt or nut
Front-wheel drive vehicles are often equipped with a pulley with a bolt, while rear-wheel drive vehicles are often equipped with a nut.
The disc-shaped part is hidden behind the generator, in the lower part of the engine compartment. To gain access to the bottom, use a pit, overpass, or lift. Depending on the car model, you will have to remove the cooling system reservoir, the air filter, in some cases the radiator and, most likely, the wheel. After this, remove the alternator and power steering belt.
Method 1 for threaded or bolted connections
To prevent the nut/bolt from turning, the load is removed from the clutch housing and the flywheel teeth are blocked. This can be done with a wrench, pry bar, screwdriver or other strong tool. The fixation must be strong and not break during dismantling. If there are no suitable items at hand, anti-roll devices are installed under the wheels, and fourth gear is placed in the gearbox.
- If the garage has a socket-type wrench (thirty-six / thirty-eight) and an extension cord, then you can use them to unscrew the nut/bolt.
- The handbrake handle is placed in the extreme position to block the wheels and keep the car stationary.
- The nut edges are tapped with a mallet.
- Then the key is turned counterclockwise in a smooth motion. Having given in, the part comes out without any problems.
Method 2 for threaded connections
- The gear lever is placed in neutral position.
- To prevent the engine from starting, the caps are removed from the spark plugs.
- The socket wrench is put on the nut and extended with a pipe, which is pressed against the floor/spar of the car on the right side.
- Turn on the engine starter quickly and briefly. It drives the flywheel, which acts on the crankshaft. The pulley is fixed - the nut comes off on its own.
The nut/bolt may be rusty. To remove it and make it easier to unscrew, you can treat the surface with acetic acid and WD-40 aerosol.
How to remove a pulley
The device is mounted on the crankshaft hubs and firmly fixed with a key, so manual dismantling is difficult. Most often, the pulley is removed using mechanical or hydraulic pullers. The devices consist of two legs that grip the part, and a rod in the middle that rests against the crankshaft. By rotating the rod, the legs pull, which drags the pulley behind them.
In the absence of a puller, sometimes a pry bar is used, gradually moving each side a little to avoid distortion. The tool is pressed as tightly as possible against the shaft to avoid chipping the walls of the grooves.
Pulley installation
Installing a keyed wheel consists of the following steps:
- Insert the segment or rectangular key into the groove provided on the motor shaft.
- Heat the new pulley to a temperature of 125-150°C, and then put the part on the axle.
- Install the drive element using a mandrel and a hammer until it stops.
- After the parts have cooled, the engine is installed in its original place, and then the belt is put on.
- Check the operation of the drive, replace the removed covers of the washing machine body.
When installing the drive on a spline shaft, it is necessary to apply thread locking agent to the surface of the axle. The pulley for the poly V-belt is placed on the shaft using a screw press or a vice; warping of the parts is not allowed. The element is installed on the shaft to its original state (the location of the end edge of the pulley must be marked on the shaft before removing the part). The applied sealant crystallizes within 12-24 hours (depending on the manufacturer); engine operation is allowed after the fixative has hardened.
The drum pulley is put on the shaft in a heated state; sealants are not used in the connection. The part is pressed onto the shaft until it stops by striking a wooden spacer with a hammer. Excessive force poses a risk of structural failure. Then the central bolt or nut is tightened, which is kept from spontaneous unscrewing by a thread lock or the bent edges of a steel washer (depending on the manufacturer of the washing machine).
How to remove the crankshaft gear of a VAZ 2110
Removing the gear is easy when the crankshaft is removed from the engine. To simplify the removal process, a special puller is needed.
It is important to know that you need to remove it after the engine has cooled down.
- You need to install the puller on the gear and rotate the rod. After a few scrolls it will start to come out.
- Carefully remove the gear, removing the key.
- Carefully examine the groove on the crankshaft.
To install the crankshaft gear, you need a metal pipe that can be placed on the shaft. Put on the key, push the gear a little and put the steel tube on the shaft so that it rests on the gear. Now, in order to return the gear to its original place, you need to knock on the pipe with a hammer. You can change some parts yourself, but you need to understand that even a minor mistake can lead to serious consequences.