In order for a car engine to operate stably with maximum performance, it needs a high-quality fuel mixture. One of the most important devices involved in its formation is the air filter - an essential element of any engine, be it gasoline or diesel. It is this that provides the carburetor or injector with air, cleaning it from moisture and dust.
In this article we will talk about what the VAZ-2110 air filter is, and also consider the process of installing it.
Why do you need a filter?
Both gasoline and diesel engines can work perfectly without an air filtration device, but how long will it last? The smallest particles of dust, dirt and moisture, when they enter the engine cylinders, will eventually begin to destroy the rubbing parts.
In addition, a fuel mixture that contains moisture and various debris will not only not provide sufficient power, but will also cause rapid failure of the carburetor, injector, injectors, etc.
Where is the air filter element located and what is it?
The VAZ-2110 air filter is located in the engine compartment of the car. Depending on the type of engine, its housing may have a different appearance. In carburetor engines it is made of metal and has a round shape. The VAZ-2110 air filter (injector) is placed in a rectangular plastic case.
The filter element itself also has a different shape: for a carburetor it is round, for an injector it is rectangular. It is made of a special porous material, compressed into an accordion.
The filter housing for injection models is connected to the engine via corrugation. This is a kind of air duct through which already purified air enters the device where the fuel mixture is formed. The VAZ-2110 air filter corrugation is a thick corrugated rubber hose. For carburetor models, the filter element housing is installed directly on the carburetor.
Device, principle of operation
The design of the filter is quite simple. It is a paper cartridge with a rubberized frame. The element can have a rectangular or round shape (depending on the type of engine power system).
The main cleaning element is porous paper. In order to reduce resistance and speed up the passage of air through the filter, porous paper is folded into an accordion. How does this element work? During the intake stroke, the engine valve opens and creates a vacuum (in other words, a vacuum). Due to the pressure difference, air is drawn into the collector from the atmosphere. It passes through the filter through small pores. Their diameter is small, which helps retain the smallest dirt particles. Next, the purified air enters the intake manifold, where it is then mixed with fuel and burned in the engine cylinder.
When to replace the filter
Naturally, the filter element someday becomes unusable and requires replacement. For VAZ-2110 cars, the manufacturer strongly recommends replacing it after every 20 thousand kilometers. If the car is operated in conditions of increased pollution, it is better to carry out this procedure after 10 thousand km, when the engine oil and oil filter are replaced.
It also happens that the VAZ-2110 air filter becomes unsuitable for further work much earlier. In carburetor engines, for example, it can be filled with oil if the oil scraper rings fail and no longer cope with their task. In addition, the filter may suffer from mechanical damage or contact with fuel or water. In these cases, it must be replaced immediately.
What functions does the air filter perform?
For stable operation of the power unit, two things are necessary:
- Fuel;
- Air.
If these components are missing, the motor will not work. If the air filter housing has minor, minor damage in the form of chips and cracks, malfunctions occur.
If the damage is large, then dirt and dust will flow into the engine in a continuous stream. This will ultimately lead to engine failure.
Conclusion: the air filter performs protective functions and provides the power unit with clean air.
Remember that the air filter housing should be replaced when damage is detected: cracks and dents.
Let's find out how to remove the filter element and what is needed for this.
Fastening the air filter housing of a VAZ 2110 car
Features of choice
Selecting a VAZ-2110 air filter today does not present any problem. To do this, you don’t even need to take it with you to the store or market. It is enough to tell the seller the car model and engine type (carburetor or injection), and he will offer you a choice of several products from different manufacturers.
Let us immediately note that the best option would be an original filter element produced by AvtoVAZ, but you can also purchase and install worthy analogues, such as Bosch, Mann or Filtron.
Zero resistance filter element
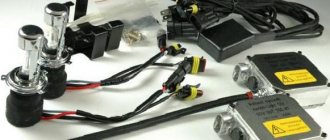
There is another type of filter element for injection engines - a filter with zero air resistance. This is a kind of tuning element designed to improve air intake. The filter element material here offers virtually no resistance to incoming air. This significantly increases engine power and throttle response. But such tuning has three disadvantages:
- the price of the “nulevik” is significantly higher than that of a conventional filter;
- high fuel consumption;
- need for replacement after every 5-7 thousand mileage.
Installation of VAZ-2110 filter (injection engine)
Now let's figure out how to install the air filter yourself, what you will need for this.
- screwdriver with Phillips bit;
- key to 10;
- damp cloth or sponge to remove dust;
- new filter.
We place the car on a flat surface, open the hood, disconnect the negative terminal from the battery, find the filter element housing and the corrugation going to the engine in the engine compartment.
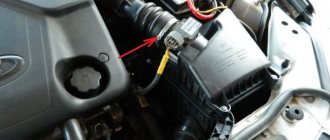
At the rear of the body there is a pipe for the VAZ-2110 air filter, onto which a corrugation is placed. It contains the connector for the mass air flow sensor (MAF). Disconnect this connector. Loosen the clamp on the pipe and disconnect the corrugation.
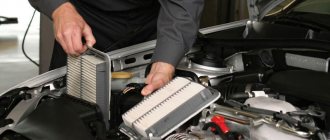
Using a Phillips screwdriver, unscrew the 4 screws securing the filter housing cover, remove it and set it aside. We remove the used filter element.
Use a damp cloth or sponge to wipe the inside surface of the case and lid, removing dirt and dust. We put the new filter in place. We install the housing cover, tighten the screws, connect the corrugation, and connect the sensor connector. We put the ground terminal on the battery, start the engine, check its operation.
Removing and installing the air filter VAZ 2170 Priora
- Repair manuals
- Repair manual for VAZ 2170 (Priora) 2004+.
- Removing and installing the air filter
The air filter is removed to gain access to other units in the engine compartment, as well as if it is damaged.
You will need: a 10mm wrench, a flat-blade and Phillips-blade screwdriver, and pliers.
1. Disconnect the wire from the negative terminal of the battery.
2. Disconnect the wiring harness connector from the mass air flow sensor (see “Replacing the air filter element” ).
| 3. Loosen the clamp securing the air supply hose... | 4. ...and disconnect the sleeve from the mass air flow sensor. |
| 5. If you are removing the air filter to replace it, and the new filter does not have a mass air flow sensor installed, remove the two sensor mounting bolts... | 6. ...and remove the sensor from the filter... |
7. ...and its O-ring.
| Note If you remove the air filter not for replacement, but to gain access to other units, the mass air flow sensor does not need to be removed. |
| 8. Squeeze the tapered shanks of the supports with pliers and remove the three rubber supports of the air filter from the holes. | 9. Remove the tip of the air intake hose from the bracket by pulling it towards the left headlight... |
| 10. ...and remove the air filter assembly with the air intake pipe. | 11. If necessary, remove the air intake hose from the adapter spacer. |
12. If you are replacing the air filter, remove the rubber air filter supports from the holes in its housing by squeezing the conical shanks of the supports with pliers (see paragraph 8). Install the supports on the new filter in the same way as when removing them, lubricating their shanks with engine oil to make installation easier.
| Note The manufacturer recommends cutting off the supports with a knife, in which case you will have to replace them with new ones. |
13. When installing rubber supports in the upper cross member of the front end, first insert the lower half of the support from the air filter side into the hole, and then, using a screwdriver, push the remaining lower part of the support into the hole.
14. Install the air filter and all removed parts in the reverse order of removal.
↓ Comments ↓
1. Car structure
1.0 Car structure 1.1 General information about the car 1.2 Passport data 1.3 Car keys 1.4. Controls 1.5. Heating and ventilation of the cabin 1.6 Ensuring a comfortable air temperature in the cabin 1.7. Doors 1.8. Passive safety equipment on the car 1.9. Seats
2. Recommendations for use
2.0 Recommendations for use 2.1. Safety rules and recommendations 2.2 Running in the car 2.3 Operating the car during the warranty period 2.4. Preparing the car for departure
3. Problems along the way
3.0 Malfunctions along the way 3.1. The engine does not start 3.2 Malfunctions of the fuel injection system 3.3 Idle speed has disappeared 3.4. Interruptions in the operation of the 3.5 engine. The car moves jerkily 3.6 The car accelerates poorly 3.7 The engine stalled while driving 3.8. Oil pressure dropped to 3.9. Engine overheating 3.10. The battery does not recharge 3.13. Knocks in the engine 3.16. Wheel puncture
4. Maintenance
4.0 Maintenance 4.1. General provisions 4.2. Inspection work 4.3. Lubrication and filling works 4.4. Diagnostic work 4.5. Repair and adjustment work
5. Engine
5.0 Engine 5.1 Design features 5.2 Possible engine malfunctions, their causes and solutions 5.3 Useful tips 5.4 Checking compression in the cylinders 5.5 Removing and installing the decorative engine casing 5.6 Removing and installing the engine splash guard 5.7 Installing the piston of the first cylinder to the TDC position of the compression stroke 5.8 Replacing the drive belt gas distribution mechanism and tension roller 5.9 Replacing the power unit supports 5.11. Replacing engine seals 5.13. Engine cylinder head 5.15. Engine repair 5.16. Lubrication system 5.17. Cooling system 5.18. Power supply system 5.19. Design Features
6. Transmission
6.0 Transmission 6.1. Clutch 6.2. Gearbox 6.3. Front wheel drives
7. Chassis
7.0 Chassis 7.1. Front suspension 7.2. Rear suspension
8. Steering
8.0 Steering 8.1 Design features 8.2 Possible steering malfunctions, their causes and solutions 8.3. Steering column 8.4. Steering linkage 8.5. Steering gear
9. Brake system
9.0 Brake system 9.1 Design features 9.2 Possible malfunctions of the brake system, their causes and solutions 9.3 Bleeding the brake system hydraulic drive 9.4 Removing and installing the vacuum brake booster 9.5 Replacing the brake pedal axle bushings 9.6. Main brake cylinder 9.7. Front wheel brakes 9.8. Braking mechanisms of the rear wheels 9.9. Pressure regulator 9.10. Brake hoses and tubes 9.11. Parking brake
10. Electrical equipment
10.0 Electrical equipment 10.1 Design features 10.2. Battery 10.3. Mounting block (relays and fuses) 10.4. Generator 10.5. Starter 10.6. Ignition switch (lock) 10.7. Electronic engine control system (ECM) 10.8. Ignition system 10.9. Lighting, light and sound signaling 10.10. Windshield cleaner 10.11. Washer reservoir 10.12. Electric fan of the engine cooling system 10.13. Electric motor of the heating and ventilation system fan 10.15. Cigarette lighter 10.16. Instrument cluster 10.18. Electronic anti-theft remote control system 10.19. Immobilizer 10.21. Replacing sensors and switches
11. Body
11.0 Body 11.1 Design features 11.2 Possible body malfunctions, their causes and solutions 11.3 Removing and installing windshield frame lining 11.4 Removing and installing soundproofing upholstery in the engine compartment 11.5. Removing and installing bumpers 11.6 Removing and installing the fender liner and protective wing cover 11.7 Removing and installing the front fender 11.8 Removing and installing decorative sill trims 11.9. Hood 11.10. Trunk lid 11.11. Doors 11.12. Seats 11.13. Seat belts 11.14. Rear view mirrors 11.15. Interior fittings 11.16. Instrument panel 11.17. Heater 11.20. Body care
12. Applications
12.0 Appendix 12.1 Appendix 1. Tightening torques of threaded connections, Nm 12.2 Appendix 2. Fuels, lubricants and operating fluids 12.3 Appendix 3. Nominal filling volumes 12.4 Appendix 4. Basic data for adjustments and monitoring 12.5 Appendix 5. Spark plugs used on vehicles 12.6 Appendix 6. Lamps used on a car 12.7 Appendix 7. What you need to have in a car 12.8 Appendix 8. Tools used when repairing a car
13. Electrical diagrams
13.0 Electrical Diagrams 13.1 Diagram 1. Instrument Panel Harness Connections 13.2 Diagram 2. Vehicle Front Wire Harness Connections 13.3 Diagram 3. Engine Electronic Control System (ECM) Harness Connections 13.4 Diagram 4. Vehicle Rear Wire Harness Connections 13.5 Diagram 5. Light Harness Connections license plate light 13.6 Diagram 6. Left front door wiring harness connections 13.7 Diagram 7. Right front door wiring harness connections 13.8 Diagram 8. Rear door wiring harness connections
Installation of air filter VAZ-2110 (carburetor)
In cars with a carburetor engine, the procedure for replacing the filter element is much simpler. The only tools and tools you will need here are a 10mm wrench and a rag.
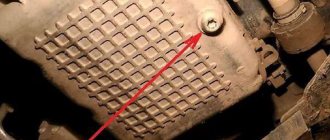
We place the car on a flat surface, lift the hood, and find the filter housing. It has several spring latches that secure the lid. We snap them off and unscrew the nut on the central stud of the cover with a size 10 wrench. Lift the lid, take out the old filter element, and throw it away. Remove dirt and dust from the inner surface of the case with a rag.
How to install an air filter on a VAZ-2110 carburetor?
There is a slightly different installation technology here. The filter is located in a metal housing, which is tightened with a small nut. The latter must be unscrewed with a 8 key. It is also necessary to remove all latches from the cover.
After this, access to the filter will open. Before installing a new one, you need to clean the insides of the case from dust. The filter itself is round in shape, and it makes no difference which side it will be installed on. After replacing the cleaning element, you should put the cover back on the latches and tighten the nut.
Do-it-yourself installation of a zero-resistance filter
The installation process of the “nulevik” is also quite simple and can be done independently. To do this you will need a set of keys and a Phillips screwdriver.
Under the hood we find the VAZ-2110 air filter housing. Disconnect the ground terminal on the battery. Disconnect the MAF connector. Using a screwdriver, loosen the clamp screw and remove the corrugation going to the engine.
Using a 10mm wrench (preferably a socket wrench), unscrew the nuts securing the mass air flow sensor to the filter housing. We dismantle the filter housing and remove it.
Using a Phillips screwdriver, remove the screw securing the ground wire to the cylinder head. Under this screw we install the bracket for fastening the air flow sensor that comes with the filter. We mount the sensor to the bracket using a 10mm bolt. The connection must be sufficiently rigid, otherwise the mass air flow sensor will fail due to vibration.
We attach the corrugation to the back of the sensor and fix it by clamping the clamp. We put the filter itself on the front of the mass flow sensor and press its pipe using a clamp. We connect the sensor connector, connect the terminal.
For normal and long-term operation of the power unit, timely replacement of the air filter is important. It cleans the air of dust and abrasive particles, which causes it to gradually clog.
During operation, the throughput decreases and the engine begins to “choke.” Because of this, the revs fluctuate, the car significantly loses dynamics, and gasoline consumption increases. This is why timely replacement of the filter element is so important for a vehicle.
ATTENTION! A completely simple way to reduce fuel consumption has been found! Don't believe me? An auto mechanic with 15 years of experience also didn’t believe it until he tried it. And now he saves 35,000 rubles a year on gasoline! Read more"
Zero resistance filter
Some car owners change the standard filter to the Federal Tax Service. This element has a different shape (resembling a mushroom) and is installed directly at the outlet of the air pipe. To install such an element in a car, you need to completely remove the plastic filter housing. After this, secure the FNS terminal with the rubber pipe using a clamp.
Why is it important to install such a filter? This is explained by the fact that the Federal Tax Service has a large throughput. This has a positive effect on engine power. But as practice shows, the expected increase is no more than two horsepower. Along with this, the filter requires periodic cleaning, and not with a simple cleaning agent, but with oil impregnation. To make the Federal Tax Service less contaminated, the owners place it in a round metal case. But this does not significantly increase the interval between cleanings.
Article number and cost of the original air filter VAZ 2110 and its analogues
On a VAZ 2110 car, one of two types of filter is used, depending on whether a carburetor or an injector is used in the power supply system of the power plant. On cars of the first years of production, an air filter is used, the article number of which is 21010110910002. The price for it is 120-235 rubles.
On a VAZ 2110 with an injector, the original air filter 2112-1109080 is used. Its cost ranges from 220 to 300 rubles. The consumable has a completely different shape compared to 21010110910002. Therefore, the filters are not interchangeable.
Third-party manufacturers produce analogues of native filters for both carburetor and injection versions of the car. Many alternative options have good quality at a very attractive price. The tables select the best analogues of the original consumables, which perform well on the VAZ 2110.
Table - Analogues of the original air filter 21010110910002
| Brands of analogues of the original air filter | Catalog number | Cost, ruble |
| Starline | SFVF2189 | 130-155 |
| Mann-Filter | C24431 | 210-300 |
| Mfilter | A101 | 60-90 |
| UFI | 2771900 | 150-200 |
| WIX | WA6395 | 140-160 |
| Nevsky filter | 21011109100 | 50-120 |
| Bosch | 1457432108 | 440-550 |
Replacement frequency
The frequency of replacing the air filter directly depends on the operating conditions of the vehicle. Typically, the interval before installing a new filter is 20-30 thousand km. In certain circumstances, unscheduled air filter replacement may be necessary. Such situations include:
- significant loss of dynamics;
- increased fuel consumption;
- there is through mechanical damage to the filter element;
- the car needed to cover a long stretch of dirt and dusty roads;
- there are significant deformations of the filter element;
- it is unknown when the previous consumable replacement was performed;
- The filter element is significantly filled with oil.
The process of replacing the air filter on a VAZ 2110 with a carburetor
Replacing the air filter on a carburetor VAZ 2110 is shown below.
- Open the hood.
- Unscrew the air filter cover.
In order for the car engine to work smoothly with maximum performance, it needs a high-quality fuel mixture. One of the important devices involved in its formation is the air filter - an essential element of any engine, be it gasoline or diesel. Only it provides the carburetor or injector with air, cleaning it from water and dust.
Next we will talk about what a VAZ-2110 air filter is, and we will additionally look at the process of installing it.
Both gasoline and diesel engines will be able to work perfectly without an air filtration device, but will it last forever? Small particles of dust, dirt and moisture, when they enter the engine cylinders, will begin to destroy the rubbing parts over time.
Already today, a fuel mixture containing moisture and various debris will not only not provide sufficient power, but will also at the same time become a prerequisite for the rapid failure of the carburetor, injector, injectors, etc.
The VAZ-2110 air filter is located under the hood of the car. Based on the type of motor, its housing contains a different type. In carburetor engines it is made of metal and has a round shape. The VAZ-2110 air filter (injector) is placed in a rectangular plastic housing.
The entire filter element also has a different shape: for the carburetor it is round, for the injector it is rectangular. It is made from a special porous material, compressed into an accordion.
The filter housing for injection models is connected to the engine using corrugations. In a certain sense, this is an air duct through which already purified air enters the device where the fuel mixture appears. The VAZ-2110 air filter corrugation is a thick corrugated rubber hose. For carburetor models, the filter element housing is installed directly on the carburetor.
How to install an air filter on a VAZ-2110 injector?
First you need to disassemble the case. We need to unscrew the four screws with a Phillips screwdriver. It is also necessary to remove the sensor plug that goes into the plastic case. Press the release button and set the element aside. Next, take out the old VAZ-2110 air filter. After that, we proceed to installing a new one.
It is mounted in such a way that its stripes coincide with the arrow that is located on the bottom of the case. By the way, if there are dirt, they should be cleaned with a dry soft cloth. This will make the new filter last a little longer. After that, close the lid and tighten the four screws back. Don’t forget to connect the sensor, otherwise “Check” may light up on the dashboard. That's it, the procedure for replacing the VAZ-2110 air filter is completed. The work will take no more than five minutes. If the VAZ-2110 air filter pipe is damaged, you need to unscrew its clamps with the same screwdriver on both sides (the one that goes to the intake manifold and to the plastic housing). Next, remove the old element and install the new one.