Very often, dozens of owners are not satisfied with the standard headlights. Firstly, it does not illuminate the road well enough, and secondly, visually it gives off a yellowish tint, which does not look very nice.
Therefore, in this article I will tell you how to install xenon in a VAZ 2110. Moreover, we will not consider here ordinary light bulbs that simply shine white (a kind of pseudo-xenon), but we will install real xenon with ignition units.
I’ll note right away that this type of modification is not complicated, so almost any car owner can do this kind of tuning of the VAZ 2110 optics.
Which xenon to choose?
In this section I will not advertise any companies. As they say, there is no comrade according to taste. Here I want to talk about the glow temperature: 4300 K, 5000 K, 6000 K and so on. How are they different? Xenon lamps with a glow temperature of 4300 K and 5000 K appear bright white. 6000 K - blue tint. 8000 K - pinkish tint. Initially, many are mistaken that the higher the temperature, the better the visibility - this is not true, especially in rain or fog. Xenon light with a high combustion temperature is very strongly reflected from wet asphalt and from fog. Therefore, my advice to you is to use xenon at 5000 K. This is the best option.
When is it possible?
And yet there is one possibility when LEDs and xenon can be installed in headlights. But, unfortunately, this opportunity will not make it any easier for us.
The fact is that the mandatory compliance of the light source with the headlight design is enshrined in the Basic Provisions of the Traffic Regulations. There is also a note that if the car is old and out of production, then you can install lighting devices from other models and even brands of cars on it.
Does this mean that VAZ can be equipped with other headlights, including those with xenon or LED? No, that doesn't mean it. According to the Technical Regulations, in any case, such a light source must be certified and tested as part of the vehicle on which it is installed. This means that if the old VAZ provided only halogen lamps, then the headlights will have to be installed only with a halogen light source.
In addition, with such an installation, you will have to go through the procedure of making changes to the design of the machine, which is quite labor-intensive and expensive.
Preparation. I'll remove the headlights.
- At the very beginning of this modification, you need to remove the headlight, for this:
- Remove the negative from the battery.
- Disconnect power from the headlight. (disconnecting the chip from the wires)
- We unscrew a couple of bolts on top of the headlight, which secure it to the body.
- Now you need to remove the plastic radiator grille, as it covers another bolt.
- Using a screwdriver, pry the decorative trim towards the center and pull it out.
- Here it is, the nut that secures the headlight to the bracket. Using a key set to “10”, unscrew it.
- Now turn off the hydraulic corrector. Using a screwdriver, pry up the retainer, turn the corrector and remove it from the headlight.
- At this stage you need to remove the turn signal; this is done simply by unscrewing a couple of bolts.
Preparations for installing xenon are completed, now we begin the process itself.
It is advisable to purchase 4 “mothers” (at the ends of the wires) for ease of connection, so as not to make twists.
A little about the improvement
The purpose of such an operation can be only one, improving the illumination of the roadway. Experts break it down into several stages, they can be as follows:
- Work to move the lens closer to the reflectors;
- Refinement of curtains;
- Changing the shape for the reflector.
Only carrying out all stages of refinement can lead to achieving the desired results in improving Kirzhach optics. We need to talk about these stages separately
Installation and connection
- We take out the standard halogen lamp by pressing the clamps.
- The next step is to cut off the wires (yellow and brown). These are pros and cons respectively.
- We crimp the 2 brown wires and place the female wire on them.
- We put a mother on the yellow (positive) wire.
- Since I have Kirzhach headlights, the xenon lamps came in handy. If you have headlights, then it will be a little more difficult for you; they will not immediately have lamps. Widen the diameter of the hole, but do not overdo it (you can use a round file).
- Now you need to make a hole in the protective cover for the wiring. I used a 23mm drill bit.
- We insert the lamp and secure it with clamps.
- We connect “plus” and “minus” with “mothers”, just do not confuse the polarity, this is very important. Because you can screw up either the lamps or the ignition units.
What is the imperfection of the VAZ 2110 headlights
The stream of light yellow beams emitted by ordinary low and high beams deserves many-sided criticism in many respects. Quite often you can meet a "tens" driver who claims that it is impossible to adjust the direction of the beam, usually even in bench conditions.
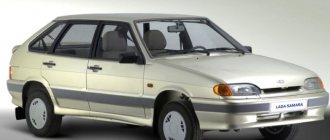
It is worth noting that the headlights for the VAZ 2110 were manufactured by two companies
:
Bosch and Kirzhach
. The former show slightly better lighting, although not perfect. The Russian block has a lens in its composition, the beam of which is too narrow. In this case, it is recommended to use PTF to improve the situation a little.
Read:
By installing good halogen lamps in Bosch lighting elements, you can try to achieve an acceptable level of illumination. Kirzhach defects cannot fix even the upper halogen
. This is explained:
- poor headlight seal, resulting in the inside of the lens being dirty (lost efficiency up to 40%),
- non-functional optical design (focal length is quite large)
- no headlight washers.
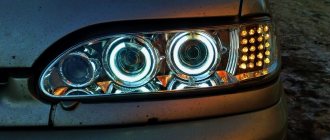
Pro Tip: A focusing lens will help you avoid blinding oncoming drivers.
To avoid dazzling oncoming drivers, it is necessary to install a focusing lens, which provides a stream of light of high brightness and high clarity, as well as excellent quality of the light beam as a result of the special lens glass that is included in the kit. In addition, focusing lenses are capable of uniformly dispersing headlight light, thereby creating a clear boundary between illuminated and darkened areas. Therefore, when using such lenses, it is impossible to blind pedestrians or oncoming motorists.
Diary of VAZ 2110 | Choice of fog lights. PTF Kirzhach
Enjoy watching everyone, I hope my video helped someone with their choice or technical questions) Spare parts
The discharge lamp has no filaments in its design. Here the luminescence process is based on the principle of a light arc. the inert gas glows. There is no field focusing feature for that matter. Thus, an additional element must be used. lens. But this minus is blocked by the light output, which increases several times compared to halogen lamps.
Read:
Thus
, it is not possible
to install an Xe bulb in a headlight using a simple reflector.
Due to improper scattering of the rays, the correct effect will not be obtained. However, this is not the most important thing. It is dangerous that ignoring an important requirement (the presence of a lens in the design) will lead to the appearance of other road users. Possibility of installing xenon in PTF. big question. The direct purpose of fog lights is to highlight the vehicle in low visibility conditions. This light is most fully encountered with light of a yellowish tint. Using these lamps at night serves as a minor addition to the headlight as it illuminates the area directly in front of the car.
In general, a significant increase in comfort and safety while driving will allow us to list the following manipulations with Kirzhakh headlights
:
- installation of gas discharge lamps;
- minor modification of optics design;
- cleaning the lens surface;
- installation of a headlight washing system.
Fine or deprivation of rights?
Until recently, the responsibility for installing xenon or LED lamps in halogen headlights was quite acute. The fact is that the courts imposed punishment in the form of deprivation of rights under Part 3 of Article 12.5 of the Code of Administrative Offenses for changing the operating mode and color of lighting devices.
But from time immemorial this was illegal, because in most cases the color does not change when changing the type of headlights. Only occasionally, when installing “cold” xenon light, does a blue effect appear. But for the courts this was unconvincing.
Why until recently? Because the Supreme Court of the Russian Federation recently put an end to this issue, indicating everything that we described above for lower courts. That is, for the illegal installation of xenon or LED in halogen headlights, only a fine of 500 rubles is imposed under Part 1 of Article 12.5 of the Administrative Code.
Just a few years ago, the press paid a lot of attention to the installation of xenon bulbs in car headlights. The traffic police also monitored the installation of xenon quite closely.
In 2022, much more attention is paid to LED bulbs, which are much easier to install.
This article will discuss whether it is worth installing xenon bulbs in a car whose design requires the installation of other (halogen) headlights. In addition, possible fines for the use of xenon in 2021 will be considered:
How to install xenon in the fogs of a VAZ 2110 with your own hands?
Xenon in PTF To carry out an inspection, you must purchase a set of international H3 gas discharge lamps
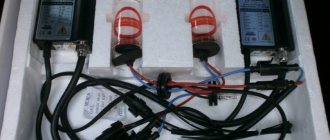
. This is due to the compatibility of the element bases. In addition, the improved glow kit must have an ignition unit (energy converter). In practice, everything looks simple:
- disconnect the usual wire block;
- remove the base;
- replace the lamp;
- insert the base back;
- connect the wiring to the on-board power supply system through the ignition unit ;
- adjust the headlights.
Thus , since the wiring has been slightly changed, it is necessary to slightly correct the control line of the xenon fog lights in the VAZ 2110 interior. The energy converter (ignition unit) is connected in accordance with the instructions. This is a very dangerous component of the system, as it generates a voltage of about 25 kV, depending on the modification.
By correcting defects in the factory design of headlights, you can significantly improve driving comfort in the dark. Properly installed fog lights will help harmoniously complement the night lighting picture.
Everyone strives for personal safety and comfort, the same can be said about lighting the road by car at night. That is why many are interested in how to make sure that the installation of xenon on a VAZ 2110 is successful, but at the same time still have legal light, to which the traffic police will not have complaints? The issue, in principle, is being resolved, both directly for the headlights and for the PTF.
VAZ 2110 with xenon headlights and PTF
Prerequisites
Including xenon in the fog lights of a VAZ-2110 vehicle is a fairly popular and practical tuning solution today. The operation can be attributed to the modernization of the optical elements of the car structure. When installing xenon in VAZ-2110 foglights, it is necessary to comply with all operating conditions established by the maintenance regulations. It will be necessary to keep the glass optics of the VAZ-2110 car clean; if this is not done, a “dazzler” effect may appear, which will become a noticeable obstacle to the safety of oncoming cars and will reduce the efficiency of the fog lights.
Legal connection
You should know that the PTF may already have bi-xenon lamps and corresponding lenses installed from the factory. This is a PTF of the so-called class D, such a light is absolutely legal, inspectors cannot “find fault” with it.
To install xenon on a VAZ 2110 in foglights, as well as conventional headlights, it is necessary that the entire kit, which uses bi-xenon lamps, be legal. That is, these are, for example, licensed headlights or PTF. There must be a letter D on the glass itself, it is this that indicates that bi-xenon lamps need to be connected to this headlight. In this case, xenon is legal and will not cause any complaints.
What about LEDs?
The LED light source is also not installed on domestic cars. We have already explained the issue of installing LEDs, when it is possible and when it is not.
In general, this is a more modern type of head light, and has come into fashion quite recently. A number of manufacturers for their models have even begun to provide documentation for the possibility of installing LED lamps in such headlights when obtaining vehicle type approval. These include, for example, Hyundai and Kia. This, of course, does not mean that you can simply replace the halogen lamps in such cars with LED ones. But changes are made in a somewhat simplified mode. In addition, even the most budget models - Kia Rio and Hyundai Solaris - are equipped with xenon.
But we are talking about VAZ cars. And for them, LED lamps in headlights, unfortunately, are prohibited, since the design of their light source module does not provide for the installation of anything other than incandescent (halogen) lamps.
Advantages and possible disadvantages
Actually, bi-xenon lenses illuminate the road perfectly - this applies to both conventional headlights and PTF. They produce bright white and blue light.
Another thing is that the PTF light should be low-directional, “piercing” the fog, but not blinding oncoming drivers. For example, in Boshevsky PTF there is no lens, there is only a reflector, which is why a low beam of light is not created.
This is why you need to install a focusing lens, then the bi-xenon lamps will behave in the best way - the driver can clearly see the road, and oncoming drivers do not feel the desire to take a brick and break your bi-xenon PTFs.
Problems that xenon bulbs create
Let's look at the main problems that incorrectly installed xenon bulbs create:
Firstly, the light of xenon lamps blinds drivers of oncoming and passing cars. This happens because when used with “halogen” reflectors, the light from xenon lamps can be directed incorrectly, that is, not towards the road. In particular, non-standard light bulbs can shine on neighboring and oncoming cars, creating discomfort for drivers.
Of course, we can say that this is a problem for other road users, but to think so is at least stupid. First of all, this is a problem for the driver himself, whose car has non-standard incandescent lamps installed. It is obvious that an oncoming car with a blinded driver will most likely crash into its “offender”, i.e. into a car with incorrectly installed xenon bulbs. So don't tempt fate.
Secondly, there is a common misconception that xenon lamps improve road visibility, i.e. the more light, the better you can see. Moreover, many drivers of cars with “collective farm” xenon firmly believe in this.
With xenon bulbs, the car glows like a Christmas tree. There really is more light. But because of the “non-xenon” reflectors, the headlights don’t shine as well as they should. The light falls too close to the car, i.e. The actual illumination of the road with xenon headlights is much worse. This is confirmed by comparative tests of the same headlights with different types of bulbs. However, many drivers want their car to sparkle in the dark and trust that their bulbs are the best.
Dismantling
Before installing xenon on a VAZ 2110, you need to dismantle the old headlight unit. It happens like this:
- We de-energize the car by removing the negative from the battery;
- Disconnect all connectors from the headlights;
- Unscrew the mounting bolts from the upper mount;
- Remove the grille from the radiator;
- Unscrew one bolt securing the headlight unit from below;
- Use a screwdriver to pry up the cover and remove it;
- Using a 10mm wrench, unscrew the nut securing it to the bracket;
- We take out the headlight unit;
- We pry it with a screwdriver, turn the hydraulic corrector cylinder lock, and remove it;
- Remove the turn signal by unscrewing a couple of bolts.
Removal
Kit
Of course, without dismantling the old headlights it will be impossible to install xenon devices. Dismantling is performed as follows.
- The vehicle is deprived of power by removing the negative terminal from the battery.
- The connectors going to the headlights are disconnected. All without exception.
- The fasteners are removed from the top mount. The bolts are located there.
- The radiator grille is dismantled.
- The bolt that holds the headlight unit in its lower part is removed. He's there alone.
- Next, pry up the cover using a flat-head screwdriver and remove it.
- Now take a 10 mm wrench and use it to remove the fixing nut to the bracket.
- All that remains is to remove the headlight unit.
- Do not forget to pry the hydraulic correction cylinder retainer using the same flat-head screwdriver to remove the unit.
- The direction indicators are removed. To do this, simply unscrew a couple of bolts.
Installing a new module
To carry out legal installation, it is better to purchase a good legal module and install it. For example, headlights from Hella promise to work well, but they must be of the second generation, they have wide lenses. Their designation is Lens G2, they are installed standard on the BMW E60, that is, the quality is excellent.
However, there are slight differences with those installed on the VAZ 2110, so they will need to be slightly modified.
You will need 2 pieces:
- Hella lenses;
- Ignitor;
- Ignition unit;
- Bi-xenon lamps.
The price of this kit, provided that used lenses are used, will be about 3,500 rubles.
Finalization and installation process:
- We change the seat intended for the standard Kirzhach module under Hella;
- We connect the wiring of the bi-xenon lamps to the standard one - everything here fits and matches;
- Install a new module;
- We fix the ignition unit in a way that is convenient for you (there is enough space).
Compliance with safety regulations
You need to understand that the unit runs on electricity; it has a voltage multiplier, which can be hidden inside the housing.
For this reason, there are risks of electric shocks. Even to check with a tester the serviceability of a part that is not connected to the vehicle's power source, precautions are required.
Before turning on the ballast, please consider the following safety tips:
- The unit is turned on and started only when it is connected to the lamp. Otherwise, the controller will constantly operate, protecting a person from electric shocks if the lamp is “unscrewed”. And in this position, when the controller is triggered, the unit will not work.
- The unit must be placed on a dry and non-conductive surface. You can place it on a rubberized glove or rubber mat.
- The device must not be placed near objects or substances that are easily ignited by a spark. This is especially true for aerosols, gas cans and other things.
- Do not touch the switched-on device with bare hands. To exclude the possibility of a shock from high-voltage current (30-35 kV), you must wear rubber (or rubberized fabric) gloves. Gloves and hands should not be wet or oily.
- After the unit has started, it should cool down a bit. Therefore, it is turned off for 2-3 minutes immediately after starting.
- Paraffin, and not its analogues, is suitable for liquid waterproofing of a microcircuit. Because the silicone is difficult to remove if you need to open the block box again. In addition, the composition of chemical substances in silicone or similar waterproofing negatively affects their contacts when the elements of the microcircuit are heated.
- After “washing” the parts and the microcircuit with an alcohol solution, you need to let everything dry before checking its serviceability by connecting it to an electric current.
Repairing a xenon ignition unit does not seem difficult if you understand everything well from the very beginning.
Before you decide to repair the unit, you must first carry out a complete diagnosis of it and determine all the causes of failure using special instrumentation.
You can use the standard connection instructions to guide you. It will help both when checking faults and when installing a repaired (or new) xenon lamp ignition unit.
How to put xenon in reverse is shown in the article: xenon in reverse.
How to check the xenon ignition unit at home, see the page.
Find out about xenon in Moscow from this information.
Xenon in a regular headlight unit
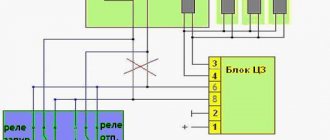
If you decide to install bi-xenon lamps in the standard Kirzhach headlight unit, then proceed as follows:
- Getting the wires ready. Traditionally, plus is yellow, and minus is brown. We crimp two minuses, as well as two pluses, in turn, carefully insulating them;
- The holes for the lamps should be slightly processed with a file when trying on the lamps, so as not to overdo it;
- Install bi-xenon lamps;
- The wiring from the lamp should be routed into the protective cover. But for this you will need to drill a corresponding hole;
- Install and secure the headlight in the base without reversing the polarity;
- The ignition unit is connected according to the circuit that should come with the lamp;
- Reinstall the lights.
Now you can reconnect the battery and check how the new lighting works. Don't forget about adjustments!
Required Tools
When carrying out tuning, you need to use a special set of power tools, which includes pliers with a protective case that meet all safety requirements when working with electrical equipment. Also, the tool kit must include a screwdriver with attachments for various bolt connections, with which you can easily unscrew the element with a slight movement. It is first important to check that there is no power supply to the element, which will avoid electric shock.