High-quality operation of the lighting system plays a vital role for comfortable driving at night and in bad weather conditions. However, even with fully operational equipment, the amount of light can be significantly reduced due to contamination of the head optics. A headlight washer was developed specifically to solve this problem, which allows you to remotely clean the lights without leaving the car and without interrupting the movement. The presence of a washer becomes especially important when using xenon headlights.
What is a headlight washer in a car?
Modern cars are constantly being improved and strive to be as comfortable and safe as possible for drivers. One of these developments to increase driving convenience and safety is a washer, which is necessary to clean the headlight lens from dirt, dust and insects.
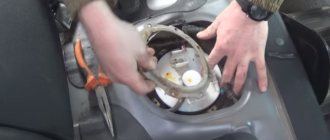
BMW standard headlight washer
The driver can activate the function while driving and improve the quality of light by cleaning the headlight lens.
The washer looks like a smaller windshield cleaner (in the case of a brush type). More modern models (jet) are made in the form of small pads under the headlights, which extend after receiving a command from the driver. Install the washer in close proximity to the optics. Depending on the type of design, the device may be hidden in the inside of the car's bumper and activated only after pressing the headlight washer button. There is also a stationary installation option, when the system nozzles are located on the outer surface of the front bumper.
What types of headlights is it used on?
The washer is required to be installed on cars with xenon headlights. For halogen it is available as an option. The fact is that halogen and gas-discharge lamps have the same principle of directing light. But xenon has a stronger luminous flux. The presence of dirt or frozen ice on the headlight leads to scattering of the light beam.
Halogen bulbs simply lose their brightness and deprive the driver of high-quality illumination of the road surface, while xenon can blind oncoming cars, creating emergency situations. Therefore, for cars with standard xenon, a washer system must be installed.
Selection rules
When purchasing a washer, you need to take into account the location of the optics, bumper, and their shape. There are kits for sale for universal use and for certain car models. Nozzle types:
- on the bumper;
- with a flat half-top;
- with a semicircular top.
In off-road models, the car bumper is installed high; elongated nozzles are the ideal choice. There is no washer reservoir in standard kits - it must be ordered separately, having previously determined the installation location. If there is no free space, the mechanism is connected to the standard windshield cleaning system.
Choose products from trusted brands - Hella, Sho-me, etc. In this case, you will receive reliable and efficient washers that are easy to install and unpretentious in maintenance.
Types of washers
Depending on the design of the washer, there are:
- brush;
- and inkjet devices.
The difference between them lies in the principle of glass cleaning and the elements that make up the system.
A brush washer is like a smaller size glass cleaner. Water is supplied to the glass under slight pressure, and a special brush washes away dirt using mechanical cleaning. The device is installed for glass diffusers, since plastic is too sensitive to this procedure.
Brush headlight washer
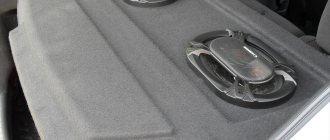
Jet washer is installed on most modern cars. The principle of operation of the device is to supply washing liquid to the headlight lens under high pressure. The quality of cleaning depends on the distance between the nozzle and the optics, the volume of detergent and the degree of spray.
Jet headlight washer for Tiguan
The jet washer is also called a retractable washer because it is located entirely in the body of the car's bumper. The elements of the feed system are visible only after it is put into operation.
Why is the washer not working?
The main reasons for the inoperability of the cleaning system:
- When the low beam is off, the washer does not function.
- There is no liquid in the tank - without it, cleaning is impossible.
- A pinched hose from the tank to the headlights due to a broken nozzle or tubes.
- Incomplete closing of the nozzle - occurs when clogged with dirt and dust. Rinse the hole with water and return the nozzle to its place. Proceed with caution, since the plastic is thin and does not withstand significant loads.
Cleaning elements come as standard, but you can install it yourself. Thanks to the injector covers, there is no need to drill into the bumper.
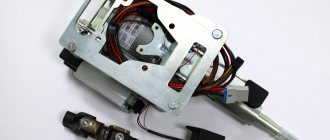
Design and principle of operation
The design of the headlight cleaning system resembles a windshield washer in the number and type of elements used. The main devices included in it:
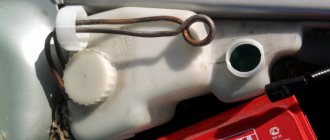
- Tank with cleaning fluid. Provides up to 25 operating cycles. During one activation, the system uses up to 200 ml of detergent. The total tank capacity is 2.5 liters for one and 4 liters for two nozzles.
- Motor. Used in a telescopic system to move the nozzle.
- High pressure pump. Designed to supply detergent to the nozzles.
- Nozzle block. Provides liquid spray onto headlight lenses.
- Connecting hoses.
- Control block. Controls the optics cleaning process.
Components of a high-pressure jet headlight washer
The operating principle of a headlight washer is quite simple. It can be divided into three main stages:
- opening of linings with nozzles;
- watering the headlights with cleaning fluid;
- return to standard position.
The driver activates the cleaning function, putting the system into operation. After this, the process of rinsing the glass with washing liquid under high pressure begins. The control unit commands the motor to extend the nozzles. The liquid is supplied from the tank using a high pressure pump. Connecting hoses transfer the detergent to the nozzles, after which it is sprayed onto the diffuser. When the process is completed, the motors return the device to its original position.
Types of nozzles
Depending on the installation method, the nozzles are:
- stationary;
- telescopic.
Stationary ones are installed directly on the car bumper. This is a simple device in design and design, which is characterized by reliable operation. The only drawback is that the injectors are always visible.
Static nozzles
Telescopic nozzles are installed inside the bumper, leaving a special hole for outward movement. When the cleaning system is activated, a special motor pushes out the elements, adjusting the spray range and angle. Although the basic principle of how both types of injectors work is very similar, telescopic units are more popular due to their ability to be integrated into the bumper.
Telescopic nozzles
What does it represent?
An optics washer is not much different from a windshield washer. The principle is the same, the liquid is supplied by an electric motor under pressure through a nozzle, which sprays the washer over the surface. Nozzles, which can be jet or fan, are located directly in front of the lighting devices. Activation occurs at the driver’s command, this is either a separate button or the position of a multifunction switch. In some cars, the option is turned on in semi-automatic mode, after every fifth activation of the windshield washer.
How does the washer turn on?
Depending on the vehicle, there are two ways to control the system:
- automatic;
- manual.
The device operates without driver intervention after activating the glass wiper and turning on the low beam. This option is considered economically unprofitable because it consumes a large amount of liquid.
Premium segment cars are equipped with an intelligent control system. The electronic unit analyzes the frequency of activation of the glass cleaner and, based on the information received, washes the headlights.
The most convenient and economical option is to use a button on the instrument panel. During manual operation there are no problems with how to turn the headlight washers on or off, and the cleaning fluid is used only when necessary.
How to turn on a separate button
Let's look at how to turn on the headlight washer using a button:
- A pair of wires coming from the pump are connected through a power line to the relay.
- The positive wire through the headlight washer fuse is connected to the battery positive.
- The negative wire is screwed to the car body. Make sure that the relay is in the fuse mounting block.
- Connect a separate power button to the remaining contacts.
Choose a convenient location for the button. Check to see if the headlight washers are working properly when turned on. If you are temporarily not using your device, turn it off.
Main disadvantages
Despite the simplicity and obvious need to use headlight washers, car owners also note a number of disadvantages:
- Poor cleaning properties at high speeds.
- Increased consumption of detergent.
- Constant problems with how to turn on and activate the headlight washers in winter. The device does not operate correctly and may not fully return to its original position.
If the washer fluid is frozen, it is recommended not to use the cleaning system. Otherwise, the driver risks breaking the device due to the increased load on its elements.
The use of a headlight washer made it possible to simplify the process of cleaning the optics and improve visibility on the road without driver intervention. Although the solution does not directly affect traffic safety, it increases the operating comfort of the vehicle. We can only hope that in the future the shortcomings with the operation of the system in winter and the high consumption of washing liquid will be eliminated.
DIY installation instructions
You can install the headlight washer yourself. The work will not take much time and will not require special tools.
Required tools and materials
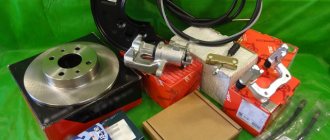
The working set includes:
- pump;
- hoses;
- nozzles;
- wiring;
- relay;
- fasteners;
- buttons.
Additionally, prepare masking tape, a cutter or drill, fine sandpaper, and a fluid reservoir.
Sequencing
Work order:
- The installation of the washer begins with the installation of nozzles. To do this, mark the holes for the holes with masking tape. The nozzle should be located in the center of the head optics - this guarantees maximum coverage of the glass area with the water jet.
- The hole is created using a cutter or drill. Drilling should be done from the outside of the bumper, otherwise the coating may swell.
- The sharp edges of the plastic are treated with sandpaper.
- Nozzles are inserted into the holes, then tubes are connected to them. Both tubes are laid towards the tank, where they will be connected to the pump through an adapter.
How to install the kit
Now I’ll tell you how such devices are installed. If you have already purchased a universal headlight washer with all the components listed above, then you can read the installation instructions.
In general, each washer comes with a diagram from the manufacturer with detailed instructions and recommendations. Plus, each car has its own characteristics. This does not allow installing a universal kit on all cars according to an identical scheme. There will be some differences.
But the general principle is based on the following:
Since the connection diagram is included in the kit and it is not universal for all washers and cars, I will not give any specific advice here.
In practice, there is nothing complicated about installing headlight washers. You need to initially take a good kit, think about the installation location, and complete the installation without rushing and without trying to violate the manufacturer’s recommendations. Especially regarding the electrical circuit and power supply
Remember the importance of good insulation. Good luck to you!
Thank you for reading us! Subscribe, leave comments and ask questions if you have any!
Watch this video on YouTube
Choosing a headlight washer kit
To begin, carefully inspect your car, especially observe the design of the glass (but glass is a relative concept, since there may also be plastic, let’s call it a lens) of the headlights, as well as the upper surface of the bumper - this is especially important, since you need to understand what kind of washer design will have to deal with. In terms of design, the washers differ in the nozzles.
Injectors can be made:
- under a flat bumper;
- under the spherical bumper;
- for SUVs, which are distinguished by large and tall headlights.
Fortunately, nowadays there are a huge number of online stores; you can buy everything from the comfort of your own home. It’s best to take a digital camera and take a few photos of the car. On the first, the headlight should be in full frontal frame, and on the second, in profile, so that the bumper is visible.
Such photographs can help the consultant choose a washer model. In addition to the injectors, you need to pay attention to the washer reservoir. The fact is that the kit that includes the headlight washer has a pump, but the reservoir itself is not there.
How to properly turn on and check the design
The optimal location for mounting the control module is considered to be the ignition unit and the alarm column, but there may be other options. In this case, the white wire is connected to the positive contact of the side light. The red wire is then connected to the voltage source through a fuse. The red and black wires, which come from the same bundle with the white ones, are connected to the “+” and “-” of the washer. The remaining blue wire is connected to the positive contact of the cigarette lighter illumination or to the contact responsible for turning off the dimensions. After the structure is assembled, it needs to be tested. To do this, pour washer fluid or clean water into the tank and evaluate whether the nozzles work and how the spraying occurs.
Self-installation
- Remove the bumper from the car.
- Drill a hole in the washer reservoir, install the rubber seal and pump.
- Pull the hoses in the direction of the sprayers, install a tee.
- Mark the approximate installation location. The jet nozzles are attached to the bumper only. Telescopic products can be attached either to the bumper with self-tapping screws or to a metal bumper reinforcement. If the injector body in the retracted position does not rest against the amplifier, then you can choose the option with self-tapping screws or with the manufacture of a special bracket for attaching the injectors to the bumper stiffeners. On some cars it is not possible to use this option, since the bumper is located too close to the amplifier. In this case, the retractable nozzles are attached to the amplifier in such a way that, when lowered, the decorative covers are completely adjacent to the bumper, and in operating condition, the adjustment range of the nozzles allows the jet of liquid to be directed directly to the lamp area.
- Make markings. To do this, it is most convenient to stick masking tape on the bumper, mark the location of the nozzle, and then measure the distance from it to several points on the headlight. Then, after removing the bumper, repeat the measurements as accurately as possible to understand how the injectors should be positioned in the retracted position.
- Install the nozzles on the minimum number of fittings for fitting (if possible, secure them with glue). Drill a hole large enough to go through the spray body. If nothing interferes with the extension, securely fasten the nozzle and decorative cover.
- Install the hoses;
- Connect the power, check the operation of the system, the reliability of the wires and hoses.
- Adjust the nozzles.
Power connection
In a simpler, but no less functional, version, a conventional 4-pin relay is used to connect power. Take the power “plus” directly from the battery, placing a fuse of the required rating as close as possible to the battery (how to calculate the fuse rating). Connect the control plus from it. Screw the power minus to ground, and stretch the control minus wire to the button in the cabin. The button must be normally open, without locking. Connect one pin of the button to the control minus of the relay, and the second to ground inside the cabin. When the button is pressed, the contacts will close, causing the pump to turn on.
How to test the headlight washer operation
It is best to install the OF control unit in the steering column or ignition switch unit, but you may well prefer other options that are more convenient for your car. We direct the white wire from the control unit to the positive terminal of the side light, connect the red wire to the supply wire, but always through a fuse (you should choose the one with the least load on consumers). We connect the black and red wires in series to the positive and negative contacts of the washer, the last blue wire is in the positive terminal of the cigarette lighter socket illumination (as an option - to the contact that turns off the side lights).
When the electrical part of the work is completed, you can begin testing the operation of the washer. Fill the tank with working fluid and press the power button. We make sure that the pump and nozzles are working, carefully check how well the jet flows and whether it completely covers the diffuser. If there are still unaffected areas, you can try to correct the situation using gaskets or bending the injector barrel.
As you can see, using a headlight washer is very simple, since in general the principle of operation is the same, and with a combined installation option, both devices function as a single mechanism. But caring for a headlight washer will require more effort from you than servicing a standard device. The main enemy of PF is dirt. Since the nozzles are located in an unprotected place, they, as well as the valve in the tank, are susceptible to contamination, which can lead to loss of performance of the device or a significant deterioration in cleaning the headlights - heavily soiled nozzles will spray liquid rather than spray it.
At the stage of installing the washer, you need to ensure that during installation no foreign objects or dirt get into the basque; the liquid being poured must also be perfectly clean. Tap water is by no means the most optimal solution, but if there is no other option, be sure to boil it before use. But it’s better to run to the nearest pharmacy and buy the right amount of distilled water that does not contain any impurities
Just as a housewife uses cleaning products when washing dishes, car owners can pour a small amount of regular car shampoo into the tank, which will allow them to easily deal with outdated, dried and difficult to remove stains that ordinary water cannot handle. Please note that this operation should only be carried out in the summer. In winter, the same antifreeze liquid is poured into the reservoir as into the windshield washer. It does not require any additives - ethylene successfully copes with the task of dissolving old contaminants. In addition, additives of unknown origin may freeze if they enter the pump, which will completely disable it.
Do not forget to change the fluid in time when the season changes, especially when switching from warm to cold seasons.
Another concern associated with caring for the headlight washer is regular cleaning of the injectors. Don’t forget to wipe the headlights as well, since the washer does not clean them perfectly evenly. Remember that running the pump idle for a long time can cause it to fail. If the system is combined, you will notice this by the absence of a stream from the head washer nozzles, but if you use a separate device, you will not see whether there is liquid in the system. So check its level regularly and top up if necessary.
Periodically check the reliability of all fasteners and inspect the wiring for damage. If circumstances do not require the use of headlight washers, turn them on during long periods of inactivity, even if this is not necessary, since this is necessary to clean the injector nozzles.
Summarizing the above, we note that headlight washers are a really necessary device, but you should not count on the ideal condition of the headlight lenses - after all, the wipers do not cope with their task perfectly. And if your car is equipped with xenon optics, then you simply need a headlight washer.
What voltage should be on a car battery in different modes
- hoses;
- pump;
- tee with valve;
- power unit;
- connectors;
- wires;
- fuse;
- adjusting key;
- clamps;
- self-tapping screws;
- relay;
- control button;
- seals;
- installation and power connection diagram.
Can be connected to the windshield washer reservoir system. But then you will have to make a hole in it. Or take a new tank separately and install it in the engine compartment.