Thanks to the arrangement of the hub, wheel bearing, brake drum and wheel disc, forward movement, braking, and steering of the vehicle wheels occur, ensuring the safety of the driver and passengers. Replacing the VAZ 2109 hub is quite possible with your own hands if you have all the necessary materials and tools at your disposal.
The time standards for replacing the hub, according to the technical data for the VAZ 2109, are 27 minutes with the wheel removed. These instructions with photos will help you change the rear hub.
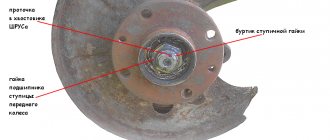
Removing the front hub of a VAZ 2109
Remove the protective cap of the hub nut by picking it up with a screwdriver.
Unlock the hub nut and unscrew it.
Using a screwdriver, remove the thrust washer.
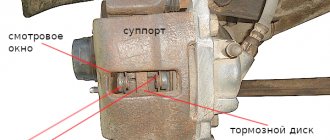
We remove the brake caliper and hang it on a wire to the spring, making sure that the brake hose does not twist and does not bend. Before removing the brake caliper, first remove the brake pads. This will make it easier to put the bracket in place.
Remove the brake disc from the guide pins.
Unscrew the three mounting bolts and remove the brake shield.
We unscrew the two bolts and disconnect the ball joint of the suspension arm from the steering knuckle.
Mark the position of the eccentric (top bolt) relative to the strut bracket.
Unscrew the two nuts and remove both mounting bolts.
We disconnect the steering knuckle from the strut bracket and remove it from the drive shaft.
Completing the operation
After this, the washer and nut are returned to their place, and the hub is driven in completely until it stops. After this is done, the brake disc is returned to its place, the wheel is put on, all the bolts are screwed in, and the car is removed from the jack. After completing all work, it is necessary to tighten the hub nut. It is worth noting that the tightening torque should be 19-23 kgf/m. In other words, you need to tighten it with the same force with which it was removed before.
After this, a cap is put on the hub. The bearing replacement is completed, and the VAZ-2109 is ready for further use.
Source: ladaautos.ru
Installation of the front hub of the VAZ 2109
Before installing the hub, thoroughly clean all parts from dirt.
The hub nut is disposable. If the collar becomes jammed, we change it.
We install the front hub of the VAZ 2109 in the reverse order of removal, taking into account the following.
When we lowered the car to the ground, tighten the hub nut to a torque of 225–250 N m (22.5–25 kgf m).
Pull the collar of the nut into the grooves of the threaded part of the drive shaft. We put on a protective cap.
After strongly rocking the car several times, tighten the threaded connections. After driving 100 km, we tighten these threaded connections again.
VAZ 2109: replacing the front hub on your own
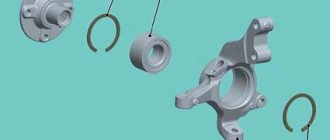
Front hub and its parts
In a VAZ 2109 car, replacing the front hub is necessary if it is worn out. The hubs, in turn, play a very important role. Without them, the wheels will not rotate at the required speed, which will first lead to damage to the brake system, and then to failure of the entire car. Therefore, if there are any problems with the front hubs, they need to be diagnosed in advance so that later it is not too late. Replacing the front hub of a VAZ 2109 is a difficult and responsible task, but you can handle it in your garage yourself.
Why is inaction dangerous?
It is better not to ignore a malfunction of the rear wheel bearing for several reasons:
- firstly, in the presence of noise and hum, driving a car is not nearly as pleasant as it might seem at first glance. To get rid of unnecessary sounds, car enthusiasts are ready to endure any costs;
- secondly, ignoring a bearing failure may lead to the need to replace the entire strut (which, naturally, entails more serious costs);
- thirdly, malfunctions of the chassis system are dangerous due to the unpredictability of the car on the road and an increase in the likelihood of an accident. Therefore, it is highly undesirable to joke with this.
Front hub wear
Replacing the front hub on a VAZ 2109
Typically hub wear manifests itself in the following ways:
- There is play in the hub bearings, that is, they wobble slightly.
Note: the play should not be allowed to be too strong, as this will require replacing not only the hub, but also the bearing.
- The bearings are “humming”. While driving, strange sounds are heard coming from the wheels. As a rule, with increasing speed they become even more pronounced. After this, when the speed decreases, the noise does not become less quiet.
Note: If the hum is heard on only one side, then only one hub needs to be replaced. If it occurs in both wheels, both hubs need to be replaced immediately.
- Bearings This can cause the caliper to overheat as well, causing it to fly off as well. In addition, the brake fluid also boils too quickly. This leads to rapid failure of the braking system.
Causes of hub wear
Replacing the front hub on a VAZ 2109
Usually there are the following reasons due to which the hub wears out:
- The wheel bearing has completely fallen apart. Perhaps it is only in the early stages of destruction. In any case, it will have to be changed, but after appropriate diagnostics.
Replacing the front wheel hub of a VAZ 2109
- The wheel bearing nut is not tightened properly. Such an oversight can cause backlash. In this case, you can get by by simply screwing in this nut all the way. That is, you should not change the hub or its bearing.
- The steering tip does not work well.
- There are shortcomings in the operation of the upper or lower ball joint.
Causes of problems
The hub is a very durable part of a car disk, so breakdowns rarely occur. But still sometimes deformation of the spare part occurs. In addition, the rear hub is more wear-resistant than the front hub, since it is less subject to heavy loads.
"Road factors"
Ingress of moisture and dust eventually displaces the lubricant, and the disc begins to overheat as a result of excess friction.
Insufficient lubrication
It ranks first among the causes of failure of this spare part.
Important!
Sometimes it is caused by poor-quality lubricant material.
Excessive loads
In the average area this is unlikely. Usually found in mountainous areas.
Strong “tightening” of fasteners
It often happens that the bolts are screwed in more than necessary - this is how the threads wear out.
Important! If the hub and bearing are an inseparable connection, then there is almost no risk of wear of such a structure.
How to diagnose bearing play
VAZ 2109 front wheel hub
In fact, this process is very simple, and even a beginner can do it. For this:
- Raise the car using a jack to the optimal distance.
Note: It is much easier to diagnose using an inspection hole, but if you don’t have one, a jack will also work.
- Bleed the wheel. This should be done according to a certain pattern: hold the wheel on both sides, squeezing it as much as possible. You should swing your arms in the same direction (preferably away from you). By the way, this procedure is also carried out in car services, so it is advisable to attend it in order to be prepared for its implementation later.
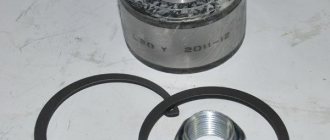
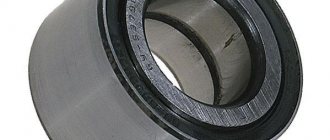
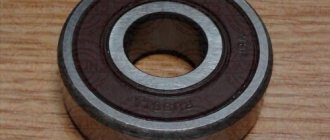
Bearing selection
To replace a wheel bearing, you will need to know about its parameters, dimensions, and characteristics specific to the VAZ 2109.
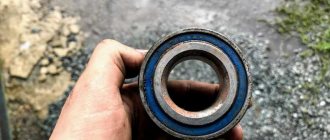
For the “nine”, a double-row angular contact roller bearing with tapered rollers is used. Axial clearances are pre-adjusted and filled with lubricant. Closed bearing type.
Based on the table, you can find the optimal bearing for the front hub of your car.
| Parameter | Required indicator |
| Inner diameter | 34 millimeters |
| Outside diameter | 64 millimeters |
| Bearing width | 37 millimeters |
| Bearing weight | 0.556 kilograms |
| Limit speed | 3700 rpm |
Replacing the front hub
- Unscrew the wheel nut with a 30 mm socket.
- Raise the car on a jack.
- Remove the wheel.
- Remove the brake caliper.
- By removing the brake disc, you will have access to the front hub.
- Unscrew the hub nut. It is secured with three bolts. The bolts are too close to each other, so the head becomes very tight here and is difficult to rotate.
Note: You can loosen these bolts slightly and then remove them. If the bolt is very tight, you can warm it up.
- Using a screwdriver, pull the hub out of its seat.
Mounting the front hub on a VAZ 2109
- Thoroughly clean the seat.
- An oil seal must be inserted into the hub housing. It needs to be pryed off, as it will get in the way (it can be inserted into a new hub). To make it fit better, its seat should be lubricated with oil.
- Traces of dirt will remain under the oil seal, so that in the future dirt does not get under the new oil seal, it is necessary to lubricate it with a special liquid.
- Put the hub in place. Lightly tighten the hub nut so that the hub does not fall out.
- Press it in.
- Tighten all the necessary screws on the reverse side.
Replacing the front wheel bearing
This repair is best done with an assistant:
- Raise the wheel on a jack.
- Turn on the ignition, engage 3rd or 4th gear.
Note: The hum is immediately audible.
- To avoid the sound of the engine disturbing you, you need to press the clutch, turn off the ignition and listen.
- It is better to unscrew the hub nut together (one presses on the brake, and the other turns).
- Release the steering knuckle from the ball joint by unscrewing the two bolts.
- Remove the brake caliper by unscrewing two bolts 17.
- Remove the brake disc along with the hub. It's easier that way.
Note: usually over many years of operation of the machine, the hub becomes stuck to the disk. Therefore, in order to save yourself from unnecessary manipulations, you should remove them together.
- If you can hear a sound when you turn the disk, then the problem was in the bearing.
- Remove the bearing.
- Change it.
- Reassemble everything in reverse order.
You can replace the hub with your own hands. However, you need to be very careful in the process of such work. After all, wheels are no joke - all the nuts must be tightened as tightly as possible. The price for repairs at a car service is much higher than what you would have to pay if you did the repairs yourself. Before you start replacing the hub, it is worth reviewing the photos and videos on this topic. The instructions will also not be superfluous.
Source: masteravaza.ru
Preparatory activities before replacement
Regardless of the chosen replacement option, you will need a minimum set of tools:
- Large screwdriver.
- Keys: 17, 13, 10.
- Hexagon 10.
- Hammer and chisel.
- A long 30mm wrench or a 30mm socket with a knob.
- Wheel puller for VAZ (photo).
- Mandrels (or heads) for knocking out the old part from the hub.
- Torque wrench.
We prepare the car, place it on a flat surface, you will also need bright lighting. You will complete all the work faster with an assistant, and also if you use an inspection hole (overpass). Put the car in first gear, and be sure to put chocks under the rear wheels.
Advice: The first, more efficient and high-quality replacement option is recommended for work, since pressing in and out is done using a removable device, in a shock-free manner.
Tools and materials for work
- Wheel chocks;
- Socket head for nine, thirteen, fifteen, nineteen, thirty;
- Power wrench;
- Jack;
- Wheel bolt wrench;
- Car stand;
- Nineteen spanner;
- Penetrating lubricant;
- Ratchet driver;
- Kardanchik;
- Extension;
- Pliers;
- Vise;
- Torque wrench;
- Extensions for dismantling and installing bearings;
- Hammer;
- Deep head for seven;
- Slotted screwdriver;
- Rubber hammer;
- Bulgarian;
- Chisel;
- Circlip pliers;
- Lithium grease.
This is interesting: Diagnostics of Passat b3 (Passat b3): how to find faults for a beginner?
Sequencing
- First of all, the car should be in first gear, after which the car is put on the handbrake. Wheel chocks must be placed under the rear wheels.
- The car is jacked up, the wheel, in the hub of which the bearing is damaged, is removed.
The car is on a jack, the wheel is removed, the hub is visible
- Use a 30 mm socket wrench to unscrew the wheel bearing nut.
The nut is unscrewed with a 30mm head
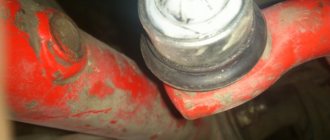
- Using a flat screwdriver, pry up the caliper, then it should be unscrewed from the steering knuckle (for this, use a 17 mm spanner).
- The unscrewed caliper should be tied with something (otherwise it will hang on the brake hose and this hose may come off under its weight). You should also unscrew the brake disc from the hub.
- Now you need to remove the wheel bearing itself. To get to it, you must first remove the steering knuckle, which will require unscrewing a couple of bolts that secure the knuckle to the car's ball joint.
Use a spanner to unscrew the ball joint bolts
- Using an attachment of a suitable diameter (you can use a piece of steel pipe of the required diameter as this attachment), you should knock the hub out of the bearing, after which you need to remove the retaining ring (pliers are excellent for removing the retaining ring).
It is better to knock out the hub with a pipe of suitable diameter
The best way to remove the ring is with pliers.
- Now you need to press out the bearing. This is done using a puller pre-clamped in a vice.
Pressing out the bearing with a puller
The bearing was successfully pressed out by the puller
- After pressing out the bearing, the place where it was located must be thoroughly cleaned of rust and dirt, and then lubricated.
- The new wheel bearing is pressed into the steering knuckle using a vice and a puller, and the retaining ring is installed in place.
- The knuckle with the new bearing is screwed back to the ball joint, the unit is reassembled, and the wheel is installed in place.
Replacing the front wheel hub bearing of VAZ 2108, 2109, 21099 cars
The service life of front wheel hub bearings on VAZ 2108, 2109, 21099 vehicles and their modifications is within 40-60 thousand km. Depending on the operating conditions and the quality of the part, it may vary up or down.
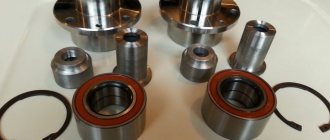
Necessary tools, fixtures and parts
— New front wheel hub bearing and new hub nut
It is recommended to replace the bearings on both front wheels at once, but based on practice, you can replace only one, the one that is humming.
— Wheel bearing puller (cup or other design)
Before carrying out work, it is imperative to acquire this puller, which will allow for a high-quality replacement of the bearing.
— Retaining ring remover
— Key or head on “17”
— Chisel and hammer
— Two bolts 10-15 cm long in diameter equal to the wheel bolts
Preparatory work
— Loosen the hub nut
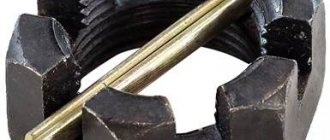
Using a center punch or a screwdriver, unscrew the edge of the nut jammed into the groove of the outer CV joint shank. Use a 30mm socket with a wrench or a socket wrench to loosen the hub nut.
— Jack up both front wheels of the car
Main characteristics and varieties
The rear wheel bearing on the VAZ-2108 is produced under catalog number 256706. It has the following technical characteristics:
- weight, g – 400;
- number of balls, pcs. – 28;
- ball diameter, mm – 9.525;
- static load capacity, KN – 25.9;
- dynamic load capacity, KN – 30.1;
- rated rotation speed, rpm – 6500.
The VAZ-2108 rear wheel bearing number may be different. If a store offers you a product marked 537906, don’t be surprised. This is a high-load bearing. Some of its characteristics differ from the characteristics of the standard spare part:
- weight, g – 511;
- static load capacity, KN – 90.1;
- dynamic load capacity, KN – 64.8;
- rated rotation speed, rpm – 5000.
As you can see, the reinforced rear hub bearing on the VAZ-2108 has increased resistance to loads. But at the same time, its rotation frequency should not exceed 5 thousand rpm. Such products, when properly used, can “walk” freely up to two hundred thousand kilometers.
Removing the front hub of a VAZ 2109
Remove the protective cap of the hub nut by picking it up with a screwdriver.
Unlock the hub nut and unscrew it.
Using a screwdriver, remove the thrust washer.
We remove the brake caliper and hang it on a wire to the spring, making sure that the brake hose does not twist and does not bend. Before removing the brake caliper, first remove the brake pads. This will make it easier to put the bracket in place.
Remove the brake disc from the guide pins.
Unscrew the three mounting bolts and remove the brake shield.
We unscrew the two bolts and disconnect the ball joint of the suspension arm from the steering knuckle.
Mark the position of the eccentric (top bolt) relative to the strut bracket.
Unscrew the two nuts and remove both mounting bolts.
We disconnect the steering knuckle from the strut bracket and remove it from the drive shaft.
Installation of the front hub of the VAZ 2109
Before installing the hub, thoroughly clean all parts from dirt.
The hub nut is disposable. If the collar becomes jammed, we change it.
We install the front hub of the VAZ 2109 in the reverse order of removal, taking into account the following.
When we lowered the car to the ground, tighten the hub nut to a torque of 225–250 N m (22.5–25 kgf m).
Pull the collar of the nut into the grooves of the threaded part of the drive shaft. We put on a protective cap.
After strongly rocking the car several times, tighten the threaded connections. After driving 100 km, we tighten these threaded connections again.
Replacing the front wheel bearing of a VAZ-2109
The wheel bearing specifically for the front wheel remains one of the weakest points of almost all VAZ models. In this regard, the plant designers note that the replacement of the above-mentioned part should be done regularly and quite often (maximum every 80,000 kilometers). Moreover, the above recommendation applies not only to those vehicles that are operated in extreme conditions, but equally to others. As practice shows, in reality the need to install a new part in many cases arises much sooner.
How is a damaged front wheel bearing replaced, both on a VAZ-2109 and on a Kalina or Priora? You will get the answer to this question from this article.
Symptoms of a problem
In particular, the breakdown is indicated by:
- the appearance of noise in the front (where the racks are located) when driving;
- a fairly strong vibration is felt in the cabin (it usually occurs if the lubricant dries out or if the bearing is excessively dirty);
- a crunching or metallic grinding sound is heard (element breaking).
To confirm your suspicions, test the node in the following simple way:
- the problematic side is lifted on a jack;
- remove the wheel;
- the disc is scrolled manually.
Its smooth movement indicates serviceability; the presence of the characteristic sound of rolling balls indicates that the bearing has become unusable.
When starting to replace the above-mentioned part, choose one of the methods described in this article that is most suitable for you.
Necessary tools and preparatory work
Whichever method you choose, you will need in any case:
- hammer;
- chisel;
- a set of ring wrenches, as well as socket wrenches for 10 and 30;
- flat screwdriver;
- puller (if available);
- mandrel for knocking out the bearing;
- torque wrench.
The machine is installed on a level area. Take care of lighting - use a portable spotlight. The car is put in first gear; for additional safety, blocks are placed under the rear wheels.
- lifting the front end with a jack, unscrew the wheel;
- unlock the locknuts held by the collar;
- We tighten the caliper bolts, then remove it or simply hang it.
These procedures must be followed no matter which bearing removal method you choose.
Replacement with the rack not removed
This method will allow you to avoid subsequent collapse. Here you need to remove:
- wheel together with disk;
- caliper and the hub itself.
Replacement is carried out directly on the car, without removing the rack. Here you will have to work with a puller. The procedure is performed like this:
- unscrew the bolts from the brake drum and remove it;
- remove the ball joints;
- pull out the CV joint from the front hub, and then remove it itself using a chisel;
- the retaining ring is pulled out from the steering knuckle (it contains the outer part of the damaged bearing);
- the puller is installed directly on the fist;
- by tightening the bolt of the device, the part is pressed out;
When it completely leaves the axle, the protection is dismantled, then the hub is removed, from which the inner race is removed.
You can also remove the latter without a puller, but you will need a chisel for this. It’s also quite easy to score with a grinder and then split with a heavy hammer.
Required
To complete the work, nothing unusual is required - most are already in the car enthusiast’s garage:
- pliers (with their help it will be necessary to dismantle the retaining rings);
- socket wrench. If you have the whole set, great, but for this work, number “30” is especially necessary;
- spanner wrench Again, you can use a set, but one “12” key is enough for the job. Without it, it will not be possible to remove the guide pins from the brake drum;
- special puller (necessary for pressing out bearings);
- Additional tools that may be useful are a hammer, a small wooden block, a pry bar and a chisel.
Installation
The inner surface of the fist is cleaned of dirt and lubricant (solid oil) is applied to it. The puller with the new bearing is installed in place and pressed into place. To make the process easier, it is recommended to first cool it thoroughly in the freezer.
A working unit is inserted into the fist as evenly as possible, trying to avoid distortion. After installing the bearing, put the hub back on and press it in if necessary. All other stages of work are carried out in reverse order.
The hub nut must be tightened using a torque wrench (the required force is 20 N*M).
Which hub to buy
Hubs are presented in two categories on the market:
- branded;
- specialized brands SNR (France, satisfactory reviews*), SKF (Sweden, ranked second after SNR), FAG (Germany) and others.
Important!
In addition to direct manufacturers, there are also packaging companies on the market - CX (China), QH (has low ratings), Optimal (you can find many negative reviews about this packer), Ruville (average quality).
Replacement without a puller with dismantling the rack
In this case, the entire structure must be completely removed from the car, including the steering knuckle. Replacement of a part that has become unusable is carried out directly at the rack. The advantage of this method is that there is no need to subsequently deal with wheel alignment.
All work is carried out in the following order:
- the steering tip is removed;
- the upper bolts holding the rack are unscrewed (they are located in the engine compartment);
- then it is removed from the CV joint and pulled out of the car.
The bearing is replaced and the strut is mounted in place.
Replacement without dismantling the stand and puller
In this case, it is necessary to remove the entire rotating mechanism with the hub installed. Then she is knocked out. Upon completion of the work, you will have to check the wheel alignment.
The sequence of actions here looks like this:
- the caliper is removed;
- the bolts securing the rack are screwed together;
- the rotating mechanism is removed;
- the CV joint is then removed;
- the drum is twisted from the hub;
- dismantle the protection;
- the fist, freed from other elements, is secured in a vice;
- the hub is knocked out, and then the bearing is removed.
Useful tips
By following these guidelines you will ensure that your new bearings last longer:
- when replacing a damaged part, place a new one on both front wheels, so the entire system will work more stable (after the procedure, the wheel alignment is checked);
- the bearing is cooled before use, and the rotating mechanism, on the contrary, is heated, this will allow pressing to be carried out with minimal labor costs;
- try to buy new spare parts in stores with a good reputation that have the necessary certificates of conformity and other documents confirming the quality of the products sold.
Source: ladaautos.ru
Kinds
The following types of hubs exist:
- driving unsteered wheels;
This type is suitable for rear-wheel drive cars and is installed on the rear wheels.
- driven uncontrolled;
You might be interested in this About rims on Hyundai cars
Designed for the rear wheels of front-wheel drive vehicles.
- leading managed;
Used in the front wheels of front-wheel drive cars.
- slave managed;
This type is needed for the front wheels of rear-wheel drive cars.