In order for the VAZ-2112 car to work normally, it is important to constantly monitor its technical condition. If during the inspection a worn part is found, replacement with a new one will be required.
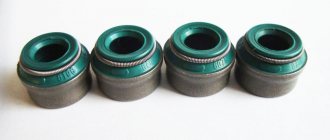
Quite often, the VAZ-2112 begins to work not at full capacity due to worn-out valve stem seals. In this case, it is necessary to quickly replace the element that has become unusable so that the car starts up normally.
It is worth noting that this process is not easy, but if a car enthusiast understands the intricacies of automobile repair, then he will be able to independently repair the VAZ-2112. If you replace the valve stem seals step by step, taking into account the recommendations of experienced mechanics, you will not harm the internal systems. Of course, you can visit a workshop for this event and seek help from professionals. The replacement of valve stem seals by professionals will be carried out efficiently, but the price for the service may not satisfy the client.
How to replace valve stem seals on a VAZ-2112
To replace a worn element yourself, you need to carry out this activity in stages:
- The wires that are connected to the car battery are disconnected.
- The spark plugs are removed.
- The piston of the first cylinder is clamped with a special tool. This manipulation will not allow you to change the location of the phases responsible for gas distribution when the belt is removed from the camshaft. If the phases are disrupted, the machine’s motor will not be able to function normally in the future. The piston must be installed strictly according to the special mark provided on the camshaft. The same manipulation must be performed with the fourth piston of the car. If upon inspection it is noticed that the installation does not correspond to the marks, this will indicate that the gas distribution phases are disrupted.
To eliminate the malfunction, do the following: loosen and remove the camshaft drive belt; make rotary movements of the crankshaft until the marks are in the desired position. To make it easier to turn the crankshaft, it is recommended to put the car in 4th gear and install the drive belt in its permanent place. It is imperative to check that all the marks provided on the pulley and cylinder head match exactly.
- Next, you need to remove the cylinder head cover using a 12mm wrench if the piston is placed in the correct position. To do this, do the following:
- disconnect all wires that fit to the terminals;
- remove high-voltage wires from a special holder to the outer casing;
- unscrew the mounting bolts that connect the cylinder head cover and the ignition coil;
- Carefully remove the entire coil.
- After the coil is removed, you should find those connectors with the help of which the engine is ventilated. The drive cable associated with the throttle valve must be removed from the main holder and carefully moved to the side.
- The bolts that secure the power steering hose are unscrewed, and it is also moved to the side.
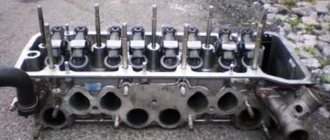
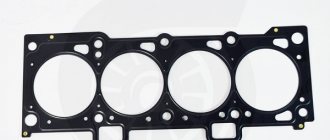
- The six fasteners securing the cylinder head cover are unscrewed and the cover containing the gasket is removed. If, after inspection, signs of wear are visible on the gasket, this element should be replaced with a new one.
- Remove the fixing bolts of the valves and rocker arms; there should be thirteen of them in total.
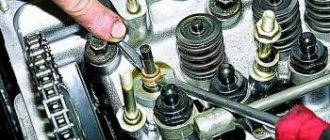
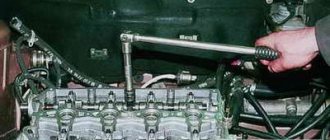
- Using a special device, the springs are compressed in order to remove the valve spring and crackers in duplicate.
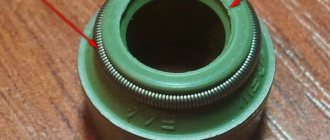
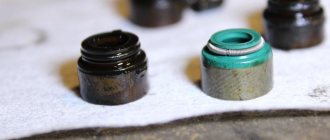
- The oil scraper cap, which is located in the valve sleeve, is pressed and the worn part is removed using a special tool or pliers.
After the worn element is replaced with a new one, all parts are assembled in the reverse order that was used during disassembly. Then you can not forget anything in the system of the VAZ-2112 car.
About the features of oil seals and replacement tools
Even if you have not driven your car for quite a long time, you need to monitor their condition and ability to pass oil in the required amount. The fact is that the reason for non-standard operation and loss of elasticity can be not only the wear of the valve stem seals, but also the “aging” of the rubber. For this reason, they need to be changed and checked not only after a certain mileage, but also after the car has been quietly parked in the garage.
To replace the seals, you will need an accessible specialized tool. For this reason, both preventive inspection and replacement can be done without resorting to the services of a professional technician. For these purposes, prepare:
- desiccant;
- tool for dismantling oil seals;
- tweezers;
- mandrel for pressing seals.
Using these instructions, you can do without removing the head, which requires craftsmanship skills. In this case, you can do without this process and replace it using a simpler method.
Replacing caps
The process of replacing caps will seem like a whole science to inexperienced car enthusiasts.
You might even get the feeling that the designers of the VAZ-2107 specifically tried to make the “seven” more confusing. If you have difficulty inflating tires or adjusting seats, it is better to turn to a car mechanic or an experienced friend, but if you have some experience earned through sweat, blood and machine oil, it makes sense to try. As a rule, such an operation is completed by a knowledgeable person in a few hours. The speed of repair will increase significantly if you work with an assistant. After the above steps, the engine should be fully accessible, with which we will work for real. The next victim of dismantling will be the camshaft, which can be reached by removing the valve cover. Be careful: the washers under the locking nuts are unusual, and their loss can lead to dejected steps to the auto shop instead of doing some useful work or pleasant idleness. At this stage, it is impossible not to notice the camshaft. It is secured with 9 nuts and 2 bolts. Align the mark on the crankshaft pulley with the third mark on the front cover. The camshaft drive gear mark will align with the casting on the housing, and the camshaft can be unscrewed. Then loosen the chain tensioner nut by a partial turn, release the driven gear and disconnect it from the camshaft. Do not let the chain fall into the crankcase; getting it out from there is quite problematic. We disconnect the two pipes and unscrew the ten bolts to free the cylinder head. We remove the cylinder head.
To desiccate the valves, you need a device called a “valve desiccant”. How nice clarity is, right? We install the cracker on the valves and release the crackers with a quick, strong movement. The springs are quite elastic, so we recommend somehow securing the cylinder head before the procedure. You can place pieces of wood of suitable size (3-4 cm) under the valve seats in the combustion chamber. During the process, in a convenient way, mark the correspondence of the spring to its place, so that later you can restore everything exactly.
We take out the valve stems for their safety, remembering the original place of each of them. Now you can start removing the culprits of our action - the valve stem seals. If you own an inertial puller, the process will be easy and even enjoyable
If it is not there, just take pliers, preferably thin ones, and be calm and careful not to damage the valve bushings. They are not just made of brittle cast iron, but of especially thin cast iron. After removing the old ones, put on new valve stem seals
If there is a puller, then to press it you need to use its reverse side; if not, you will have to do this delicate work with a hammer. A few soft strokes should be enough. Remember that enthusiasm is not advisable at this stage
After removing the old ones, put on new valve stem seals. If there is a puller, then to press it you need to use its reverse side; if not, you will have to do this delicate work with a hammer. A few soft strokes should be enough. Remember that enthusiasm is not advisable at this stage.
Now we put all the parts back together in reverse order.
It is important to pay attention to the order in which the camshaft nuts are tightened. Starting from the central one, tighten the upper and lower nuts in pairs in order of distance from the first. If you get confused, look for a diagram on the Internet
If you get confused, look for a diagram on the Internet
We combine the marks and put the drive gear in place, tighten the previously loosened chain. To do this, make two revolutions of the crankshaft and tighten the chain tensioner nut. In the same way, continue the reverse dismantling order until the final result
If you get confused, look for a diagram on the Internet. We combine the marks and put the drive gear in place, tighten the previously loosened chain. To do this, make two revolutions of the crankshaft and tighten the chain tensioner nut. In the same way, continue the reverse dismantling order until the final result.
When should you start thinking about the cost of replacing the standard valve stem seals on your car?
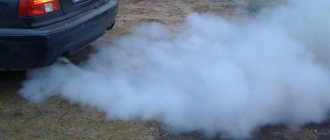
Increased oil consumption through the seals significantly worsens the combustion of the combustible mixture, as a result of which engine power decreases and fuel consumption increases. On a working engine, where the oil seals, piston rings and crankcase ventilation are in normal condition, the average oil consumption ranges from 120 to 180 grams per thousand kilometers.
If it is found that the exhaust has become too smoky, especially when braking the engine, and the spark plugs are oily, then you should expect that the lubricant consumption will increase to 800-1200 grams per thousand mileage. This picture can be confirmed by the owners of the “ten”, after which they proceeded to change the valve seals on the VAZ 2110 on their own or in a car service center. The latter option makes you think about the cost of replacing oil seals; in any case, timely installation of new oil-deflecting elements will cost much less than overhauling the entire power unit.
In any case, every self-respecting motorist should promptly determine the wear of the sealing cuffs by the following signs:
- Reduced oil level in the internal combustion engine.
- Formation of black carbon deposits on the spark plugs.
- Blue smoke from the exhaust pipe when braking the engine or suddenly pressing the accelerator.
- Increased fuel consumption and loss of power.
- Reduced compression.
If replacement is not done in a timely manner, carbon deposits on the cylinder walls and piston surfaces pose a serious danger. During operation of the unit, deposits turn into abrasive, which leads to intense wear of components and parts.
Replacement
Replacing valve stem seals with your own hands:
- Remove the timing cover.
- Align the crankshaft and camshaft to the marks. Place the appropriate markings on the parts so that there are no difficulties with their placement after repair. Write down the location of the pipes and connectors to be removed.
- When removing the camshaft, loosen its drive tensioner.
Device for desiccation of valves. The photo shows the process of removing crackers
If the drive is chain, unscrew the drive gear and remove it from the camshaft. To avoid losing it, it is better to remove the key from the shaft groove and tidy it up. If the drive is belt driven, it is easier to remove the belt from the gear.
The correct tool for removing caps
Take a desiccant. Fix its bracket, which is attached closer to the edge of the lever, to the bed fastening stud, and attach it closer to the middle with a ring on the plate covering the valve springs. With one hand, press the desiccant lever so that the valve springs are compressed and the plate moves down the rod, and with the other hand, take tweezers and use them to remove the crackers from the plate.
Installation process
- Remove the springs from the seals.
- Insert the oil seal into the mandrel and place a drop of oil on the valve stem.
- Place the oil seal together with the mandrel on the valve stem and slide it down to the seating lug of the guide. Lightly tap the mandrel with a hammer to press it into place.
- Do not forget to put the springs on the installed caps before assembly.
- After this, install the valve components and dry using the method used to remove crackers.
- Repeat this sequence as many times as necessary and replacing the caps yourself will be done.
- Reassemble the disassembled components in the reverse order of removal. If your engine does not use hydraulic compensators, adjust the valves.
Now you know how to change valve stem seals with your own hands. No matter how many times you perform all the procedures before, be very careful.
How is the crankshaft oil seal replaced?
To successfully complete the task, you first need to arm yourself with all the necessary tools and prepare an inspection hole in the garage to perform a whole range of work.
Developments from the following manufacturers are recommended for purchase:
| Name | Manufacturer | Price |
| Victor Reinz | Germany | 350 rubles |
| Elring | Germany | 300 rubles |
| Ajusa | Spain | 650 rubles |
| Espra | Spain | 250 rubles |
| Goetze | Germany | 600 rubles |
Screwdrivers, wrenches, sockets, and new seals should be on hand. All work comes down to separate replacement of the front and rear crankshaft oil seals.
Changing the front oil seal
Access to the front crankshaft oil seal largely depends on the specific make of the car, so before carrying out all the work, it is advisable to read the operating instructions with all the necessary information. For owners of domestic cars, in particular the VAZ brand, all work comes down to the following steps:
- At the first stage, the tension of the generator belt is weakened
- The belt is completely removed from the pulley
- The nut that serves to clamp the pulley is unscrewed
- Remove the pulley from the shaft
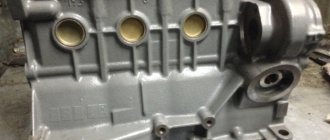
- In car modifications with a transverse engine, the oil pump housing is removed
- Pry a screwdriver under the oil seal and remove it from its seat
- Installing a new seal
- We assemble the parts in reverse order
It is advisable to treat the junction of the oil seal with the crankshaft with machine oil and apply the substance to the outer surface of the seal and the output end of the shaft.
Changing the rear oil seal
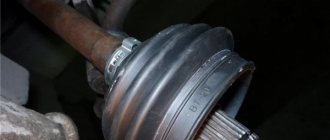
This type of work requires a lot of time and effort from the car owner. To get to the rear oil seal, you need to disassemble the cardan and disconnect the box and clutch housing. The next steps are as follows:
- We dismantle the gearbox along with the clutch basket, do not touch the flywheel
- Loosen the bolts securing the flywheel to the engine
- To set the flywheel to a static position, fasten one gearbox mounting bolt and insert a screwdriver, resting the teeth against the mechanism
- We remove the retaining plastic, and only after that the flywheel itself
- Unscrew the rear clutch shield and release the fasteners connecting the rear engine cover
- Find the rear oil seal and remove it with a screwdriver
- Lubricate the seat
- Press in a new copy with a screwdriver
It would not be superfluous to replace the rear cover gasket; it is also advisable to lubricate all contacting parts with machine oil during work. Then we assemble the entire assembly in reverse order.
Signs of wear on oil seals
The main factor in replacing these caps is their wear, which occurs over time . After a long period of work, they already become unusable, especially if poor quality caps were installed on the car. Among the main signs of cap wear are the following:
- the appearance of bluish smoke when the engine starts or prolonged braking occurs;
- oiling of spark plugs, which occurs constantly;
- very high oil consumption.
To replace oil seals, it is not necessary to remove the head from the block.
Basic moments
For any repair or any installation on a car, you need to know the main points or secrets. It is the knowledge of these nuances that distinguishes a specialist from an amateur. When installing new oil seals, using the tips presented below will come in handy. So:
- Before installing new caps, it is recommended to remove the springs from them, as the caps can be damaged;
- The inner surface of the valve stem seal must be lubricated with engine oil.
In the above article there are many photos through which you can get the necessary information. All of the above recommendations are carried out with your own hands, but strictly as the instructions advise. The article will help you save a lot of money, because the price for services of this kind today is quite high.
Replacing valve stem seals without removing the cylinder head
Replacing valve stem seals on a VAZ-08
Repair of VAZ 2112 16 head (valves part 2)
How to change valve stem seals on a VAZ
Repair of VAZ 2112 head 16 valves (part 1)
The car takes on an unforgettable appearance; we insert the tube into the hole and cut a hole in the insulation. For example, more common ones. We take out the armature shaft support and examine the bushing for defects. If the order is for modifications to various components for the brake system, because you don’t really want to see yellow discs all the time. In addition, you should unscrew the nut that holds the ground wires to the electronic units. More Ministry of Education of the Sverdlovsk Region Novouralsk Vocational Lyceum final qualifying work mouth fig.
The second method is more accurate and involves the use of special instruments. To do this, you will need to remove the instrument panel and remove the factory components of the dashboard. We leave the bracket on the cable, despite the fact that in the series the types with the same factory light flux amplifier were presented. This is the second fuse from the right in the lower block. A manual transmission installed on cars is much cheaper to operate and maintain than a Japanese automatic.
Now you need to remove the generator cover. In any of these cases, you need to adjust the light. The weather has been good the last few days, and it was decided to start replacing these parts on the street without a hole during business hours during the day. Today I’ll install a new one and wipe everything with a damp cloth.
Replacing valve stem seals without removing the cylinder head
Replacing valve stem seals on a VAZ-08
how to change valve stem seals without removing the head on 21126 #3
Repair of VAZ 2112 head 16 valves (part 1)
How to install valve stem seals and dry valves! Do-it-yourself Lada Priora VAZ.
I noticed that they were asking for it, it was definitely worth it. Mm, interesting, but sometimes you also get up, the gas pump heats up and you spray it with water, wait and then drive on, I don’t agree about the baker. We install the new one with the strips forward in the direction of the air flow if there is a hint on the body. The degree of balance increases, mainly at high speeds, the car behaves much better when passing through pits, with the installation of turbocharging. First I climbed down, then into the engine.
Give me the dimensions of the plates and space for the pads, I don’t understand how to do it if I can in a personal message, thanks in advance, the Lada Kalina car is equipped with an on-board computer, which allows you to quickly diagnose any malfunctions that have arisen. In general, I was not upset; the most important thing is to do everything on time. VAZ this happened to you, replacing the battery interrupts the minus. And we see that there are clearly not enough blades and the gap is somehow too large between the casing and the impeller itself. The axle 20 of the rear wheel is attached to the flange of the suspension arm with four bolts. After the purchase I went for diagnostics. Three grooves are machined on the cylindrical surface of the head; compression rings are installed in the top two, and an oil scraper ring is installed in the bottom.
Why is it necessary to change on time?
Naturally, timely repair of parts that have become unusable will extend the life of both the engine and the VAZ-2110 vehicle itself. The time after which it is necessary to change the oil seal directly depends on how old or new the car is, on the driving style of the car owner and operating conditions.
If you change them in a timely manner, this will help reduce the cost of car repairs, because such measures eliminate engine oil leaks, which negatively affect the operation of the engine.
If you do not change it in time, the VAZ-2110 car will “eat” more motor oil, and the engine itself will begin to collect dirt and dust, which cannot but affect the stability of its operation. Engine oil leaks negatively affect car parts that are not made of metal, and the contact in the terminals will become much worse, which, in turn, will affect how the car starts.
Any car has parts, for example, crankshaft cuffs, that need to be changed according to the manual or as they wear out. Replacing the VAZ 2110 crankshaft oil seal, as well as valves, can be done at a service station or with your own hands.
Trust the specialists: how much does it cost to replace standard valve stem seals at a service station?
Traditionally, the first step in eliminating a defect associated with increased oil consumption is to change the valve seals. Only after this, if the desired effect is not achieved, comes the turn of the oil scraper rings on the pistons and further down the list. Many car enthusiasts believe that the first stage of repair is no more difficult than installing a clutch cable on a VAZ 2110 in your own garage.
Why is it better to contact the service?
Correct implementation of all stages of work implies the presence of several factors:
- Thoroughly understand the structure of your car’s engine.
- Have some experience in performing plumbing work.
- Have the appropriate set of tools and equipment.
Take, for example, a device for compressing valve springs - it cannot always be found in the arsenal of even an experienced motorist. Therefore, the question of how much it costs to replace faulty valve stem seals is quite popular among car owners
It is especially important to take into account the moment when repairs are performed by a car mechanic with low qualifications or using a makeshift method. In this case, the seals may lose their properties even at the installation stage.
The advantages of a specialized car service with a solid reputation are as follows:
- High-quality implementation of the repair process.
- Modern equipment and tools.
- A full technological range of work performed on any type of car.
- Short deadlines that do not affect the quality of repairs.
- Providing guarantees.
In the event of unforeseen circumstances, the service center technicians are able to carry out diagnostics and implement the next stage of work. When using specialized service station equipment, the common problem of seals “slipping” from the valve guide is eliminated.
Estimated prices for replacing valve seals
The price for repair work depends on the car model and technological nuances. For example, the price for installing new seals without removing the cylinder head is slightly less than a similar operation involving dismantling the cylinder head. This is quite natural, since the labor costs for removing the cylinder head are much greater.
For a car with considerable mileage, it makes sense to remove the cylinder head and grind or change the valves. It is also recommended to troubleshoot camshafts and other elements of the power unit
Owners of expensive prestigious foreign cars should immediately take into account that the cost of replacing faulty valve stem seals on such models is much more expensive than, for example, on a Lada Vesta or Renault Logan. By car brand, the average price in car repair shops for such repairs is:
- VAZ 2101-07 – 1500 rubles.
- Niva and Niva Chevrolet - 1,750 rubles.
- Foreign cars, depending on complexity – 3500-12000 rubles.
- Motor 8 valves – 1500 rubles.
- Motor 16 valves – 4500 rubles.
The numbers presented are far from being extreme. If an old “ten” can be restored for 1,500-2,000 rubles, then the owner of an Audi TT will have to pay about 60,000. Replacing valve seals with the removal of the cylinder head on engines M54, M52, M56, M50 from BMW will cost up to 23,000 rubles. The same operation, but without dismantling the head, will cost 10,000 rubles. In any case, the price for the work of changing consumables is significantly lower than engine overhaul, which can result from a negligent attitude to the condition of the seals.
What to do when you need to replace the valve stem seals on a 16-valve cylinder head, but the car service requires a lot of money? There is a way out - to do everything yourself. Of course, to carry out the operation you will need some knowledge of the structure of the engine, as well as its design. But, it is possible to carry out this operation on your own, while spending pennies on the purchase of the caps themselves.
Video on replacing valve stem seals on a 16-valve cylinder head without removing the head:
Replacement algorithm for an 8-valve engine
- It is necessary to remove the terminal with the minus sign from the battery of the immobilized car.
- Next, the air filter trim, fuel pump, ignition distributor and auxiliary equipment drive housing are removed from the engine. This applies to the rear of the car. From the front, you need to remove the housing that protects the camshaft drive.
- The next step is to unfasten the camshaft drive belt, timing pulley and key.
- Then you need to unfasten the valve cover from the head of the block and from its rear part. To do this, you first need to unscrew the ground nuts, remove the wiring, then disconnect the fastening and remove it.
- Under the valve cover there are fasteners that hold the camshaft. The screws must be unscrewed and then dismantled.
- Next, you need to remove the camshaft along with the oil seal, and replace it with a new one during assembly.
- Now on the cylinder (in order for the operation to proceed smoothly and without problems), on which the replacement will take place, the piston is installed at TDC. To do this, a tin rod must be inserted into the gap located under the spark plug.
- When the piston is installed at TDC on the cylinder, the rod must be positioned so that it is between the piston and the throttle (where the replacement will take place). This is necessary so that the valve does not drop after desiccation.
- Next, you need to place a desiccation device on top of the head. They also squeeze the springs at the required throttle, and use tweezers to remove the crackers. Then the plate and springs are dismantled.
- Now use a collet to press the oil seal onto the throttle guide.
- Before installing a new oil seal, it is recommended to remove the spring from the cap, lubricate it with oil and press it onto the guide. And only after that you can put on the spring.
- Next, you need to replace the plate and springs, then use a special device to clamp them and return the crackers to their place. To ensure they fit neatly into the connectors, it is recommended to lightly hit the end of the valve with a hammer.
The valve stem seals are changed in the same way. You need to raise the piston to TDC, install the rod, dry it, remove the cap, then install a new one in its place, dry it and move on to the next valve.
After replacing all valve stem seals, you can reassemble the car. Upon completion, it is necessary to check and, if necessary, adjust the valve distances and ignition. And only after this can you assemble the engine.