The estimated service life of valve seals (aka oil seals, MSK) is 100 thousand km, but with intensive use of the car or the use of low-quality fuels and lubricants, they wear out earlier. Signs of MSC wear are blue smoke during startup and revving on a warm engine, oil and carbon deposits on spark plugs, and increased lubricant consumption. The problem can only be solved by replacing the seals with new ones. However, if you choose low-quality ones, this will happen again faster than you would expect.
If you want to know how to choose good valve stem seals with the longest service life, read the article. Here we will determine which company's valve stem seals are better by comparing products from different brands.
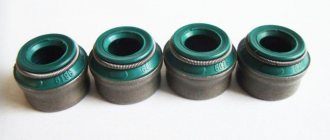
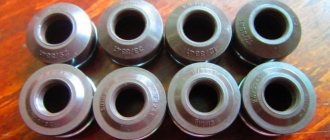
Valve seals for VAZ 2107 engine
Foreign substances must not enter the combustion chamber of a running engine, so protection of the cylinders is necessary. The valve stem seals (stuffing box) play the role of a protective element. They prevent oil from entering when the valve stems move. If the caps do not perform their functions, they will need to be replaced. Otherwise, carbon deposits may form on individual engine elements, which will lead to increased lubricant consumption.
Purpose and design of caps
When the engine is running, the elements of the gas distribution mechanism (GRM) are in constant motion. To reduce their friction and wear, timing oil is supplied from the sump under pressure, which should not enter the working area of the valves. Otherwise, the stable operation of the power unit will be disrupted. Valve seals prevent oil from entering the combustion chamber.
Valve stem seals are quite simple and consist of the following parts:
- Base. This is a steel sleeve that forms the frame of the lid and gives it strength.
- Spring. Provides a tight rubber seal to the valve stem.
- Cap. Removes excess fat from the stem. It is made of rubber and is the main structural element.
Previously, fluoroplastic was used instead of rubber. Nowadays, manufacturers use materials that have increased wear resistance, a long service life and are resistant to aggressive environments. If the caps fail, serious problems can arise. This determines high requirements for the quality of the materials from which they are made.
Signs of wear
Timely detection of wear and replacement of VAZ 2107 caps will prevent serious engine malfunctions. The first signs of wear on the valve seals are as follows:
- The exhaust gases turn blue or white.
- Oil consumption increases.
- Soot forms on the candles.
If signs of wear on the valve stem seals appear, it will be necessary to check not only the seals themselves, but also the entire gas distribution mechanism, including the valves. Worn caps must be replaced. If this is not done in time, the following problems may occur:
- the engine will begin to lose power;
- the engine will run unstably or stop idling;
- the pressure in the cylinders will decrease;
- Soot will appear on the cylinders, pistons, valves, which will lead to loss of tightness.
The appearance of oil deposits on engine components will reduce its service life and speed up the need for major repairs. Timely replacement of caps will avoid these problems.
When to change valve stem seals
As the sealing material of the seals hardens, that is, it becomes less elastic, oil will begin to seep into the cylinder. However, it can leak there even when the piston rings are worn out. It is confusing to urgently replace caps when the oil level drops and there are no visible signs of oil leakage. While driving, you need to watch the exhaust. First you need to brake the engine, then sharply press the accelerator pedal. If thick gray smoke comes out of the muffler, the valve stem seals are worn. A similar effect will be observed after long-term parking.
This is explained quite simply. If the seal between the valve stem and valve guide is broken, oil will begin to flow into the engine cylinder from the cylinder head. If the piston rings are worn or coked, the engine will behave slightly differently. In this case, a characteristic smoke trail will remain behind the car only when the engine is running under load (during dynamic movement, descent, etc.). Indirectly, worn rings can be judged by increased fuel consumption, decreased engine power and starting problems.
Selecting new caps
When purchasing new valve seals, VAZ 2107 owners face the problem of choice. There are a huge number of similar products on the market, from high-quality to outright fakes. Therefore, the purchase of new baseball caps should be considered extremely responsible, first of all paying attention to the manufacturer. When purchasing, you should give preference to products from Elring, Victor Reinz, Corteco and SM.
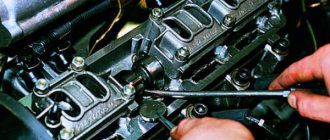
Replacing valve stem seals for VAZ 2107
The following tools are required to replace valve stem seals:
- dryer (remove valves);
- wrench;
- tin bar;
- screwdriver;
- new valve stem seals.
The replacement itself is carried out in the following order:
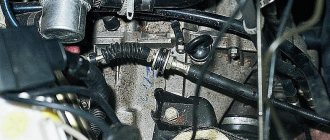
- Drain some of the coolant (about two liters).
- Remove the air filter along with the carburetor housing and throttle valve.
After replacing the covers, the crankshaft is returned to its original position, the bearing housing and camshaft sprocket are installed and then the chain is tensioned. The remaining units are assembled in reverse order.
Video: replacing valve stem seals on a VAZ 2107
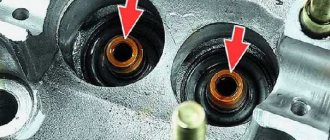
Removing and installing caps
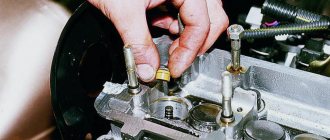
Next you need to remove the caps:
- Unscrew the spark plug from the cylinder on which work is being done. You need to insert a tin rod into the hole to prevent the valves from falling through.
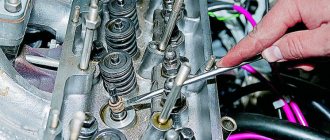
- Compress the valve spring.
- Remove the crackers using tweezers.
- Remove the puller.
- Install the collet, then hit the device bushing with a hammer. Thanks to this, you will compress the seal from the bushing.
- Remove the valve seal from the collet.
It is worth noting that in the absence of a collet, you can use pliers. But the seal must not be rotated, as the guide sleeve can be severely damaged. Procedure for installing a new cap:
- Lubricate it with oil and install it on the mandrel.
- Carefully press it all the way into the bottom plate.
- Install the spring on the seal.
- The crackers need to be installed in place, and then struck sharply with a hammer using a metal rod.
Be sure to lubricate all places where friction occurs with engine oil. Reassemble in reverse order. There is nothing complicated about replacing valve seals on a VAZ-2110; all the work can be done by any motorist with his own hands.
Replacing valve seals on a VAZ-2110 with your own hands on News4Auto.ru.
Our life consists of everyday little things that in one way or another affect our well-being, mood and productivity. I didn’t get enough sleep - my head hurts; I drank coffee to improve the situation and cheer myself up - I became irritable. I really want to foresee everything, but I just can’t. Moreover, everyone around, as usual, gives advice: gluten in bread - don’t go near it, it will kill you; A chocolate bar in your pocket is a direct path to tooth loss. We collect the most popular questions about health, nutrition, diseases and give answers to them that will allow you to better understand what is good for your health.
Replacement of VAZ 2107 engine valves
The need to replace VAZ 2107 valves arises in the following cases:
- valves bend due to a broken timing chain or severe wear of the rod;
- the plate broke;
- the valve itself burned out.
For repairs, you will need to purchase new valves and prepare the tools used to replace the valve stem seals. The cylinder head must also be removed from the engine. This is done as follows:
- We unscrew the cylinder head fasteners with a 10mm socket.
Replacing valve guides
Valve bushings (valve guides) are designed to guide the movement of the valve stem. Thanks to the precise fit of the head on the seat, the combustion chamber is sealed. The correct operation of the valves largely depends on the practicality of the seats and guides, which wear out over time and begin to negatively affect the operation of the engine. In this case, it is necessary to replace the bushings and seats.
If the bushings are heavily worn, oil consumption increases, valve stem seals fail, and lubricant gets into the cylinders. As a result, the temperature regime of the engine is disrupted and carbon deposits form on its individual parts. The main signs of guide wear:
- increased oil consumption;
- the appearance of noise in the head area.
To make sure that the silent blocks are faulty, you need to open the hood and listen to how the engine operates. If unusual sounds and noises are heard, it is necessary to diagnose the valves and their guides.
For repair you will need:
- hammer;
- expand to 8022 and 8028;
- mandrel for pressing and pressing bushings.
Replacement of valve bushings on the removed cylinder head is carried out in the following sequence:
- Hit the spindle with a hammer and push out the valve guide.
Replacing the valve seat
The operation of seat valves, like the entire engine, is associated with high temperatures. This can lead to the formation of various defects on parts, such as holes, cracks, and burns. If the cylinder head overheats, misalignment may occur between the valve sleeve and the valve seat. As a result, the tightness of the connection will be broken. In addition, the seat wears faster along the cam axis than anywhere else.
The seat will need to be removed from the seat to replace it. The set of necessary tools and equipment may vary depending on the abilities of the car owner:
- automobile;
- electric drill;
- hammer;
- metal guide;
- old valve.
The seat can be disassembled in the following ways:
- By car. The saddle becomes boring, becomes thinner and less durable. In this case, the rest of the saddle is rotated and removed with forceps.
- Using an electric drill. A small abrasive wheel is secured into the drill chuck, the tool is turned on, and the saddle is cut. At some point, the part may be removed due to the weakening of the seal.
- For welding. The old valve is welded to the seat in several places. The valve together with the seat is ejected with hammer blows.
The new seat is installed in the following order:
- To ensure the required tightness of 0.1-0.15 mm, the cylinder head is heated on a gas stove to 100 ˚C and cooled in the freezer compartment of the refrigerator for two days.
- The saddle is pressed into the motor head with light blows of a hammer through the adapter.
- After the heads have cooled, they begin to flare the saddles.
It is best to chamfer on a lathe. Rigid clamping of the workpiece and centering of the cutter will provide high precision, unattainable with hand tools. If this is not possible, you can use cutters and a drill.
Three edges are cut on the seat using cutters at different angles:
The last edge is the narrowest. It is with this that the valve will come into contact. After this, all that remains is to sharpen the valve.
Video: replacing the valve seat
Grinding in VAZ 2107 valves
Grinding in the valves is necessary to ensure the tightness of the combustion chamber. This is carried out not only after replacing the seat, but also when reducing compression in the cylinders. Grinding can be done in the following ways:
- on a special machine;
- hand cutter;
- mechanically.
Since special equipment can only be found in car services or mechanical workshops, the latter option is most common in garage conditions. For manual grinding you will need:
The valves are ground in in the following sequence:
- We put a spring on the valve and insert its rod into the bushing.
Video: grinding in VAZ 2101–07 valves
Valve cover VAZ 2107
Sometimes the VAZ 2107 engine is filled with oil from the outside. This usually occurs due to a worn valve cover gasket that is leaking lubricant. In this case, the gasket is replaced with a new one.
Replacing the gasket
The valve cover gasket can be made of rubber, cork or silicone. Each option has its own advantages and disadvantages. Therefore, the final choice of gasket material depends only on the personal preferences of the car owner.
To replace the gasket you will need:
- plug 10;
- small extension;
- crank or ratchet;
- dry rag;
- new gasket.
The gasket is replaced in the following order:
- We disassemble the air filter along with the housing.
- Disconnect the throttle control rod from the carburetor.
The cover is installed in the reverse order and the nuts must be tightened in a strictly defined order.
Therefore, replace the valve seals and the valves of the VAZ 2107. By preparing the appropriate set of tools and carefully studying the recommendations of professionals, even a novice car enthusiast can do this.
Replacing caps (seals)
First you need to prepare to replace the valve seals. You will need the following set of tools:
- Open-end and socket wrenches.
- A device for compressing springs.
- Puller and mandrel for valve stem seals.
- Tin rod 7-10 mm thick.
- You will also need a hammer, pliers, tweezers and screwdrivers.
It is recommended to clean the entire head with kerosene. Only after this can you begin to dismantle the air filter, fuel pump and ignition distributor (on carburetor engines). Dismantling is carried out according to the following algorithm:
- Unscrew the nuts securing the cover and remove it.
- Unscrew the nuts that secure the ground wires.
- Unscrew the cylinder head cover fasteners from the rear.
- Loosen one by one the four nuts that secure the front camshaft bearing housing. The rear housing is secured with six nuts.
- Remove the key from the groove.
- Remove the camshaft and its seals.